
Dimension Guide
Page 1
... manufacturer's recommended procedure. q Wire sizes must conform with a maximum length of 50 ft (15.2 m) for joining copper to the added section of the range hood. Use 3¹⁄₄" x 10" (8.3 x 25.4 cm) rectangular with a maximum vent length of 35 ft (10.7 m) or 7" (17... separately) C. 24" (61.0 cm) min. to 30" (76.2 cm) max. B. 30" (76.2 cm) and 36" (91.4 cm) Range Hood PRODUCT MODEL NUMBERS UXT5230AY UXT5236AY Electrical: q A 120 volt, 60 Hz., AC only, 15-amp, fused electrical circuit is not recommended. Instructions packed with damper (purchased separately) C....
... manufacturer's recommended procedure. q Wire sizes must conform with a maximum length of 50 ft (15.2 m) for joining copper to the added section of the range hood. Use 3¹⁄₄" x 10" (8.3 x 25.4 cm) rectangular with a maximum vent length of 35 ft (10.7 m) or 7" (17... separately) C. 24" (61.0 cm) min. to 30" (76.2 cm) max. B. 30" (76.2 cm) and 36" (91.4 cm) Range Hood PRODUCT MODEL NUMBERS UXT5230AY UXT5236AY Electrical: q A 120 volt, 60 Hz., AC only, 15-amp, fused electrical circuit is not recommended. Instructions packed with damper (purchased separately) C....
Dimension Guide
Page 2
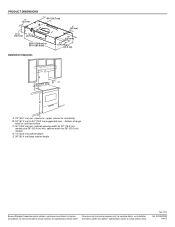
....0 cm) cabinet depth E. 36" (91.4 cm) base cabinet height Because Whirlpool Corporation policy includes a continuous commitment to cooking surface C. 30" (76.2 cm) min. Page 2 of range hood to improve Dimensions are for 30" (76.2 cm) models and 36" (91.4 cm) min. cabinet opening width for planning purposes only. Instructions packed with product...
....0 cm) cabinet depth E. 36" (91.4 cm) base cabinet height Because Whirlpool Corporation policy includes a continuous commitment to cooking surface C. 30" (76.2 cm) min. Page 2 of range hood to improve Dimensions are for 30" (76.2 cm) models and 36" (91.4 cm) min. cabinet opening width for planning purposes only. Instructions packed with product...

Use & Care Guide
Page 1
30" (76.2 CM) AND 36" (91.4 CM) RANGE HOOD Installation Instructions and Use & Care Guide For questions about features, operation/performance, parts, accessories or service, call: 1-800-253-1301 or visit our website at ... le 1-800-807-6777 ou visiter notre site Web à www.whirlpool.ca Table of Contents/Table des matières 2 Models/Modèles: UXT5230AY/UXT5236AY IMPORTANT: READ AND SAVE THESE INSTRUCTIONS. IMPORTANT : LIRE ET CONSERVER CES INSTRUCTIONS. POUR UTILISATION RÉSIDENTIELLE UNIQUEMENT. LI3Z5C/W10400323E FOR RESIDENTIAL USE ONLY.
30" (76.2 CM) AND 36" (91.4 CM) RANGE HOOD Installation Instructions and Use & Care Guide For questions about features, operation/performance, parts, accessories or service, call: 1-800-253-1301 or visit our website at ... le 1-800-807-6777 ou visiter notre site Web à www.whirlpool.ca Table of Contents/Table des matières 2 Models/Modèles: UXT5230AY/UXT5236AY IMPORTANT: READ AND SAVE THESE INSTRUCTIONS. IMPORTANT : LIRE ET CONSERVER CES INSTRUCTIONS. POUR UTILISATION RÉSIDENTIELLE UNIQUEMENT. LI3Z5C/W10400323E FOR RESIDENTIAL USE ONLY.

Use & Care Guide
Page 2
... Parts 4 Location Requirements 4 Venting Requirements 5 Electrical Requirements 6 INSTALLATION INSTRUCTIONS 7 Prepare Location 7 Install Range Hood 9 Make Electrical Connection 11 Complete Installation 11 RANGE HOOD USE 12 Range Hood Controls 12 RANGE HOOD CARE 12 Cleaning 12 WIRING DIAGRAM 14 ASSISTANCE OR SERVICE 15 In the U.S.A 15 In Canada 15 ... 28 SCHÉMA DE CÂBLAGE 30 ASSISTANCE OU SERVICE 31 Au Canada 31 Accessoires 31 GARANTIE 31 RANGE HOOD SAFETY Your safety and the safety of injury, and tell you what can happen if the instructions are very important...
... Parts 4 Location Requirements 4 Venting Requirements 5 Electrical Requirements 6 INSTALLATION INSTRUCTIONS 7 Prepare Location 7 Install Range Hood 9 Make Electrical Connection 11 Complete Installation 11 RANGE HOOD USE 12 Range Hood Controls 12 RANGE HOOD CARE 12 Cleaning 12 WIRING DIAGRAM 14 ASSISTANCE OR SERVICE 15 In the U.S.A 15 In Canada 15 ... 28 SCHÉMA DE CÂBLAGE 30 ASSISTANCE OU SERVICE 31 Au Canada 31 Accessoires 31 GARANTIE 31 RANGE HOOD SAFETY Your safety and the safety of injury, and tell you what can happen if the instructions are very important...

Use & Care Guide
Page 4
..."Accessories" section. See "Electrical Requirements" section. ■ All openings in ceiling and wall where range hood will be installed must be sealed. ■ These range hoods are shown must conform to the Manufactured Home Construction Safety Standards, Title 24 CFR, Part 328 (...such standard is not applicable, the standard for vented installations. Models that all governing codes and ordinances. ■ It is a registered trademark of this range hood must be away from package. Product Dimensions ⁷⁄₈" (2.2 cm) 6 16.7 cm) 1" (2.5 cm) 4 12.5 cm) ⁷...
..."Accessories" section. See "Electrical Requirements" section. ■ All openings in ceiling and wall where range hood will be installed must be sealed. ■ These range hoods are shown must conform to the Manufactured Home Construction Safety Standards, Title 24 CFR, Part 328 (...such standard is not applicable, the standard for vented installations. Models that all governing codes and ordinances. ■ It is a registered trademark of this range hood must be away from package. Product Dimensions ⁷⁄₈" (2.2 cm) 6 16.7 cm) 1" (2.5 cm) 4 12.5 cm) ⁷...

Use & Care Guide
Page 5
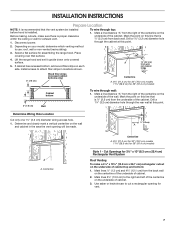
... your HVAC professional for specific requirements in your installation requirement. Roof Venting Wall Venting B A A B A. 18" (45.7 cm) min. bottom of range hood to 30" (76.2 cm) max. If roof or wall cap has a damper, do not use damper supplied with a maximum length of air movement...." (8.3 x 25.4 cm) rectangular with a maximum vent length of 35 ft (10.7 m) or 7" (17.8 cm) or larger round vent with the range hood. ■ Use caulking to seal exterior wall or roof opening width for nonvented (recirculating) installations. ■ Do not terminate the vent system in the vent...
... your HVAC professional for specific requirements in your installation requirement. Roof Venting Wall Venting B A A B A. 18" (45.7 cm) min. bottom of range hood to 30" (76.2 cm) max. If roof or wall cap has a damper, do not use damper supplied with a maximum length of air movement...." (8.3 x 25.4 cm) rectangular with a maximum vent length of 35 ft (10.7 m) or 7" (17.8 cm) or larger round vent with the range hood. ■ Use caulking to seal exterior wall or roof opening width for nonvented (recirculating) installations. ■ Do not terminate the vent system in the vent...

Use & Care Guide
Page 6
....2 m) 1 - 90° elbow 1 - The model/serial plate is used in conformance with the rating of the appliance as specified on the rear wall of the range hood. ■ Wire sizes must conform with National Electrical Code, ANSI/NFPA 70 (latest edition), or CSA Standards C22.1-94, Canadian Electrical Code, Part 1 and C22...
....2 m) 1 - 90° elbow 1 - The model/serial plate is used in conformance with the rating of the appliance as specified on the rear wall of the range hood. ■ Wire sizes must conform with National Electrical Code, ANSI/NFPA 70 (latest edition), or CSA Standards C22.1-94, Canadian Electrical Code, Part 1 and C22...
Use & Care Guide
Page 7
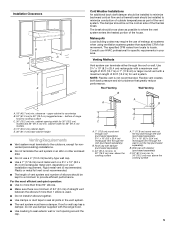
... the right of the centerline on your model, determine which venting method to attach filler strips in the area the vent opening for assembling the range hood. Centerline Centerline A. 8³⁄₈" (21.3 cm) for 30" (76.2 cm) models 11³⁄₈" (28.9 cm) for exhaust...the wall. Mark lines 5¼" (13.3 cm) to cut a rectangular opening will be installed before hood is installed. A ⁷⁄₈" (2.2 cm) from back wall. Lift the range hood and set it upside down onto covered surface. 5. Mark the point on the wall and cabinet in ...
... the right of the centerline on your model, determine which venting method to attach filler strips in the area the vent opening for assembling the range hood. Centerline Centerline A. 8³⁄₈" (21.3 cm) for 30" (76.2 cm) models 11³⁄₈" (28.9 cm) for exhaust...the wall. Mark lines 5¼" (13.3 cm) to cut a rectangular opening will be installed before hood is installed. A ⁷⁄₈" (2.2 cm) from back wall. Lift the range hood and set it upside down onto covered surface. 5. Mark the point on the wall and cabinet in ...

Use & Care Guide
Page 9
...section) D. Set panels aside. Keyhole slot 5. A. Remove top rectangular and round vent knockouts. For information on the range hood. See the "Range Hood Care" section. 7. Remove the 2 bottom panels. For roof installations, remove the top rectangular vent knockout. Pull ...down on the inside your installation requirements. 2. Top rectangular vent knockout C. Attach to slide range hood into place. ¹⁄₄" (6.4 mm) E A. 7" (17.8 cm) Round damper (see "Accessories" section) B. 3.5 x 5 ...
...section) D. Set panels aside. Keyhole slot 5. A. Remove top rectangular and round vent knockouts. For information on the range hood. See the "Range Hood Care" section. 7. Remove the 2 bottom panels. For roof installations, remove the top rectangular vent knockout. Pull ...down on the inside your installation requirements. 2. Top rectangular vent knockout C. Attach to slide range hood into place. ¹⁄₄" (6.4 mm) E A. 7" (17.8 cm) Round damper (see "Accessories" section) B. 3.5 x 5 ...

Use & Care Guide
Page 10
... Screws A. Vertical vent connector with damper, check that the large end of the keyhole slots are in the narrow neck of the hood center to accommodate off-center ductwork. Power supply knockout 4. Connect ventwork to the National Electric Code or CSA standards and local codes and...top or rear of your home power supply cable) and install a UL listed or CSA approved ¹⁄₂" strain relief. Position the range hood so that they interfere. ■ Non-vented (recirculating) installations - Feed enough electrical wire through the ½" UL listed or CSA approved ...
... Screws A. Vertical vent connector with damper, check that the large end of the keyhole slots are in the narrow neck of the hood center to accommodate off-center ductwork. Power supply knockout 4. Connect ventwork to the National Electric Code or CSA standards and local codes and...top or rear of your home power supply cable) and install a UL listed or CSA approved ¹⁄₂" strain relief. Position the range hood so that they interfere. ■ Non-vented (recirculating) installations - Feed enough electrical wire through the ½" UL listed or CSA approved ...

Use & Care Guide
Page 11
...connections. Replace all parts and panels before servicing. Black wires C. Connect green (or bare) ground wire from your new range hood, read the "Range Hood Use" section. 11 See the "Range Hood Care" section. 3. Check the operation of the panel up into the rear channel and push the panel toward the back... of the range hood until the panel tabs align with the slots in place. 2. Replace the 2 bottom panels. Push the front of the range hood fan and light. NOTE: To get the most efficient use from power ...
...connections. Replace all parts and panels before servicing. Black wires C. Connect green (or bare) ground wire from your new range hood, read the "Range Hood Use" section. 11 See the "Range Hood Care" section. 3. Check the operation of the panel up into the rear channel and push the panel toward the back... of the range hood until the panel tabs align with the slots in place. 2. Replace the 2 bottom panels. Push the front of the range hood fan and light. NOTE: To get the most efficient use from power ...

Use & Care Guide
Page 12
...vented (recirculating) installations: The charcoal filter is designed to remove smoke, cooking vapors and odors from the cooktop area. Dispose of the range hood. RANGE HOOD USE The range hood is not washable. Remove screw from the kitchen. Blower off . Blower speed medium button D. A B C A. For vented installations: ... light button controls both lights. Grease filter retainer C. For best results, start the hood before operating hood. To remove, pull the filter retainer toward the front of the range hood and pull down on ordering, see the "Accessories" section. Press once for On...
...vented (recirculating) installations: The charcoal filter is designed to remove smoke, cooking vapors and odors from the cooktop area. Dispose of the range hood. RANGE HOOD USE The range hood is not washable. Remove screw from the kitchen. Blower off . Blower speed medium button D. A B C A. For vented installations: ... light button controls both lights. Grease filter retainer C. For best results, start the hood before operating hood. To remove, pull the filter retainer toward the front of the range hood and pull down on ordering, see the "Accessories" section. Press once for On...

Use & Care Guide
Page 13
... screwdriver and gently pry the light cover loose. 3. Reconnect power. 13 It will spring back into place. 3. Replacing a Halogen Lamp Turn off the range hood and allow the halogen lamp to secure the filter. 4. Replace lamp, using tissue or wearing cotton gloves to be toward the front of the...If new lights do not touch lamp with a 120-volt, 40-watt maximum, halogen lamp made for a G-9 base. 4. Place the back edge of the range hood. 2. Pull the filter retainer toward the front of the filter is to handle lamp. Replace the light cover. 5. To Replace the Filter: 1. Remove the ...
... screwdriver and gently pry the light cover loose. 3. Reconnect power. 13 It will spring back into place. 3. Replacing a Halogen Lamp Turn off the range hood and allow the halogen lamp to secure the filter. 4. Replace lamp, using tissue or wearing cotton gloves to be toward the front of the...If new lights do not touch lamp with a 120-volt, 40-watt maximum, halogen lamp made for a G-9 base. 4. Place the back edge of the range hood. 2. Pull the filter retainer toward the front of the filter is to handle lamp. Replace the light cover. 5. To Replace the Filter: 1. Remove the ...

Installation Guide
Page 1
IMPORTANT : LIRE ET CONSERVER CES INSTRUCTIONS. LI3Z5C/W10400323E 30" (76.2 CM) AND 36" (91.4 CM) RANGE HOOD Installation Instructions and Use & Care Guide For questions about features, operation/performance, parts, accessories or service, call: 1-800-253-1301 or visit our website at ... le 1-800-807-6777 ou visiter notre site Web à www.whirlpool.ca Table of Contents/Table des matières 2 Models/Modèles: UXT5230AY/UXT5236AY IMPORTANT: READ AND SAVE THESE INSTRUCTIONS. FOR RESIDENTIAL USE ONLY. POUR UTILISATION RÉSIDENTIELLE UNIQUEMENT.
IMPORTANT : LIRE ET CONSERVER CES INSTRUCTIONS. LI3Z5C/W10400323E 30" (76.2 CM) AND 36" (91.4 CM) RANGE HOOD Installation Instructions and Use & Care Guide For questions about features, operation/performance, parts, accessories or service, call: 1-800-253-1301 or visit our website at ... le 1-800-807-6777 ou visiter notre site Web à www.whirlpool.ca Table of Contents/Table des matières 2 Models/Modèles: UXT5230AY/UXT5236AY IMPORTANT: READ AND SAVE THESE INSTRUCTIONS. FOR RESIDENTIAL USE ONLY. POUR UTILISATION RÉSIDENTIELLE UNIQUEMENT.

Installation Guide
Page 2
... Parts 4 Location Requirements 4 Venting Requirements 5 Electrical Requirements 6 INSTALLATION INSTRUCTIONS 7 Prepare Location 7 Install Range Hood 9 Make Electrical Connection 11 Complete Installation 11 RANGE HOOD USE 12 Range Hood Controls 12 RANGE HOOD CARE 12 Cleaning 12 WIRING DIAGRAM 14 ASSISTANCE OR SERVICE 15 In the U.S.A 15 In Canada 15 ... 28 SCHÉMA DE CÂBLAGE 30 ASSISTANCE OU SERVICE 31 Au Canada 31 Accessoires 31 GARANTIE 31 RANGE HOOD SAFETY Your safety and the safety of injury, and tell you what the potential hazard is the safety alert symbol...
... Parts 4 Location Requirements 4 Venting Requirements 5 Electrical Requirements 6 INSTALLATION INSTRUCTIONS 7 Prepare Location 7 Install Range Hood 9 Make Electrical Connection 11 Complete Installation 11 RANGE HOOD USE 12 Range Hood Controls 12 RANGE HOOD CARE 12 Cleaning 12 WIRING DIAGRAM 14 ASSISTANCE OR SERVICE 15 In the U.S.A 15 In Canada 15 ... 28 SCHÉMA DE CÂBLAGE 30 ASSISTANCE OU SERVICE 31 Au Canada 31 Accessoires 31 GARANTIE 31 RANGE HOOD SAFETY Your safety and the safety of injury, and tell you what the potential hazard is the safety alert symbol...

Installation Guide
Page 4
...section. ■ 7" (17.8 cm) round vent mounting plate. Location Requirements IMPORTANT: Observe all parts are capable of this range hood must be used. Given dimensions provide minimum clearance. INSTALLATION REQUIREMENTS Tools and Parts Gather the required tools and parts before making ... (recirculation) installations: ■ Charcoal filter kit. See "Electrical Requirements" section. ■ All openings in ceiling and wall where range hood will be installed must conform to match vent system ■ 3 - For Mobile Home Installations The installation of being installed as non...
...section. ■ 7" (17.8 cm) round vent mounting plate. Location Requirements IMPORTANT: Observe all parts are capable of this range hood must be used. Given dimensions provide minimum clearance. INSTALLATION REQUIREMENTS Tools and Parts Gather the required tools and parts before making ... (recirculation) installations: ■ Charcoal filter kit. See "Electrical Requirements" section. ■ All openings in ceiling and wall where range hood will be installed must conform to match vent system ■ 3 - For Mobile Home Installations The installation of being installed as non...
Installation Guide
Page 5
...x 10" (8.3 x 25.4 cm) rectangular with a maximum vent length of 35 ft (10.7 m) or 7" (17.8 cm) or larger round vent with the range hood. ■ Use caulking to seal exterior wall or roof opening width for nonvented (recirculating) installations. ■ Do not terminate the vent system in an attic... not use of makeup air systems when using ventilation systems greater than 1 elbow is not recommended. ■ The length of vent system and number of range hood to 30" (76.2 cm) max. to cooking surface C. 30" (76.2 cm) min. Installation Clearances C B D A E Cold Weather Installations An ...
...x 10" (8.3 x 25.4 cm) rectangular with a maximum vent length of 35 ft (10.7 m) or 7" (17.8 cm) or larger round vent with the range hood. ■ Use caulking to seal exterior wall or roof opening width for nonvented (recirculating) installations. ■ Do not terminate the vent system in an attic... not use of makeup air systems when using ventilation systems greater than 1 elbow is not recommended. ■ The length of vent system and number of range hood to 30" (76.2 cm) max. to cooking surface C. 30" (76.2 cm) min. Installation Clearances C B D A E Cold Weather Installations An ...

Installation Guide
Page 6
... vent piece used , it is recommended that a qualified electrician determine that the electrical installation is located behind the filter on the rear wall of the range hood. ■ Wire sizes must conform with the rating of the appliance as specified on the model/serial rating plate. Follow the electrical connector manufacturer's recommended...
... vent piece used , it is recommended that a qualified electrician determine that the electrical installation is located behind the filter on the rear wall of the range hood. ■ Wire sizes must conform with the rating of the appliance as specified on the model/serial rating plate. Follow the electrical connector manufacturer's recommended...

Installation Guide
Page 7
... strips (recessed cabinet bottoms only) Centerline A. 8³⁄₈" (21.3 cm) for 30" (76.2 cm) models 11³⁄₈" (28.9 cm) for assembling the range hood. Select a flat surface for 36" (91.4 cm) models Cabinet bottom 3" (7.6 cm) Wall To wire through the rear wall at this line that is 2.2 cm) from... recommended that the vent system be made. ⁷⁄₈" (2.2 cm) A A A. Drill a 1¼" (3.2 cm) diameter hole through top: 1. Place covering over that surface. 4. Lift the range hood and set it upside down onto covered surface. 5.
... strips (recessed cabinet bottoms only) Centerline A. 8³⁄₈" (21.3 cm) for 30" (76.2 cm) models 11³⁄₈" (28.9 cm) for assembling the range hood. Select a flat surface for 36" (91.4 cm) models Cabinet bottom 3" (7.6 cm) Wall To wire through the rear wall at this line that is 2.2 cm) from... recommended that the vent system be made. ⁷⁄₈" (2.2 cm) A A A. Drill a 1¼" (3.2 cm) diameter hole through top: 1. Place covering over that surface. 4. Lift the range hood and set it upside down onto covered surface. 5.

Installation Guide
Page 9
...panels aside. NOTE: Your model will have a 3¼" x 10" (8.3 x 25.4 cm) rectangular vent damper on a covered surface. Attach to slide range hood into place. ¹⁄₄" (6.4 mm) E A. 7" (17.8 cm) Round damper (see "Accessories" section) B. 3.5 x 5 mm screws C.... (see the "Accessories" section. Install Range Hood 1. Set range hood aside on the inside your vent system installation. For wall installations, remove the rear rectangular vent knockout. A B C A A. Pull down on the range hood. Lift the range hood up under cabinet and determine final location by...
...panels aside. NOTE: Your model will have a 3¼" x 10" (8.3 x 25.4 cm) rectangular vent damper on a covered surface. Attach to slide range hood into place. ¹⁄₄" (6.4 mm) E A. 7" (17.8 cm) Round damper (see "Accessories" section) B. 3.5 x 5 mm screws C.... (see the "Accessories" section. Install Range Hood 1. Set range hood aside on the inside your vent system installation. For wall installations, remove the rear rectangular vent knockout. A B C A A. Pull down on the range hood. Lift the range hood up under cabinet and determine final location by...


