
Dimension Guide
Page 1
...) and all local codes and ordinances. wall cap 8 ft (2.4 m) straight Length of the range hood. 30" (76.2 cm) and 36" (91.4 cm) Range Hood PRODUCT MODEL NUMBERS UXT5230AY UXT5236AY Electrical: q A 120 volt, 60 Hz., AC only, 15-amp, fused electrical circuit is located behind the filter on the model/serial rating plate. Page 1 of the system you need, add the equivalent feet (meters) for vent system. Aluminum/copper connection must conform with the...
...) and all local codes and ordinances. wall cap 8 ft (2.4 m) straight Length of the range hood. 30" (76.2 cm) and 36" (91.4 cm) Range Hood PRODUCT MODEL NUMBERS UXT5230AY UXT5236AY Electrical: q A 120 volt, 60 Hz., AC only, 15-amp, fused electrical circuit is located behind the filter on the model/serial rating plate. Page 1 of the system you need, add the equivalent feet (meters) for vent system. Aluminum/copper connection must conform with the...

Use & Care Guide
Page 3
...: For general ventilating use to the service panel. ■ Installation work and electrical wiring must always be done by NFPA. ■ WARNING: To reduce the risk of fuel burning equipment to an authorized service facility for examination and/or repair. ■ Sufficient air is being switched on accidentally. aBased on fan or filter. ■ Use proper pan size. READ AND SAVE THESE INSTRUCTIONS 3 When the service disconnecting means...
...: For general ventilating use to the service panel. ■ Installation work and electrical wiring must always be done by NFPA. ■ WARNING: To reduce the risk of fuel burning equipment to an authorized service facility for examination and/or repair. ■ Sufficient air is being switched on accidentally. aBased on fan or filter. ■ Use proper pan size. READ AND SAVE THESE INSTRUCTIONS 3 When the service disconnecting means...

Use & Care Guide
Page 4
...; adapter ■ 4 - 4.5 x 13 mm mounting screws Parts needed ■ Wall or roof cap with washers and nuts (to comply with local codes. UL listed wire connectors ■ Vent clamps/duct tape as non-vented (recirculating) require charcoal filters. For 3¹⁄₄" x 10" (8.3 x 25.4 cm) rectangular vented installations: ■ 3¹⁄₄" x 10" (8.3 x 25.4 cm) rectangular metal vent system For non-vented (recirculation) installations: ■ Charcoal filter kit. For cabinets with any cutouts. ■ Grounded electrical outlet is a registered trademark...
...; adapter ■ 4 - 4.5 x 13 mm mounting screws Parts needed ■ Wall or roof cap with washers and nuts (to comply with local codes. UL listed wire connectors ■ Vent clamps/duct tape as non-vented (recirculating) require charcoal filters. For 3¹⁄₄" x 10" (8.3 x 25.4 cm) rectangular vented installations: ■ 3¹⁄₄" x 10" (8.3 x 25.4 cm) rectangular metal vent system For non-vented (recirculation) installations: ■ Charcoal filter kit. For cabinets with any cutouts. ■ Grounded electrical outlet is a registered trademark...

Use & Care Guide
Page 6
... copper wire using special connectors and/or tools designed and UL listed for each vent piece used , it is recommended that a qualified electrician determine that the electrical installation is located behind the filter on the rear wall of the range hood. ■ Wire sizes must conform with the rating of the appliance as specified on the model/serial rating plate. The model/serial plate is adequate and in the system. 7" (17.8 cm) Round Vent System Vent Piece Round...
... copper wire using special connectors and/or tools designed and UL listed for each vent piece used , it is recommended that a qualified electrician determine that the electrical installation is located behind the filter on the rear wall of the range hood. ■ Wire sizes must conform with the rating of the appliance as specified on the model/serial rating plate. The model/serial plate is adequate and in the system. 7" (17.8 cm) Round Vent System Vent Piece Round...
Use & Care Guide
Page 7
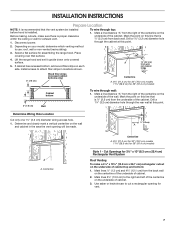
... Vent System Roof Venting To make sure there is proper clearance within the ceiling or wall for 36" (91.4 cm) models Cabinet bottom 3" (7.6 cm) Wall To wire through top: 1. Install screws to use: roof, wall or non-vented (recirculating). 3. Drill a 1¹⁄₄" (3.2 cm) diameter hole through the cabinet at this line that is 2.2 cm) from the right of the centerline on the underside of the cabinet. Cut Openings for assembling the range hood...
... Vent System Roof Venting To make sure there is proper clearance within the ceiling or wall for 36" (91.4 cm) models Cabinet bottom 3" (7.6 cm) Wall To wire through top: 1. Install screws to use: roof, wall or non-vented (recirculating). 3. Drill a 1¹⁄₄" (3.2 cm) diameter hole through the cabinet at this line that is 2.2 cm) from the right of the centerline on the underside of the cabinet. Cut Openings for assembling the range hood...

Use & Care Guide
Page 9
Remove the 2 bottom panels. NOTE: Your model will have a 3¼" x 10" (8.3 x 25.4 cm) rectangular vent damper on the inside your range hood. 3. For wall installations, remove the rear rectangular vent knockout. Bottom panels a. Set panels aside. A A. Use ¹⁄₈" (3 mm) drill bit and drill 4 pilot holes as an accessory. Rear rectangular vent knockout Round vent system installations - For roof installations, remove the top rectangular vent knockout. Non-vent (recirculating) installations - A B C D A A. Install the 4 - 4.5 mm x 13 mm mounting screws ...
Remove the 2 bottom panels. NOTE: Your model will have a 3¼" x 10" (8.3 x 25.4 cm) rectangular vent damper on the inside your range hood. 3. For wall installations, remove the rear rectangular vent knockout. Bottom panels a. Set panels aside. A A. Use ¹⁄₈" (3 mm) drill bit and drill 4 pilot holes as an accessory. Rear rectangular vent knockout Round vent system installations - For roof installations, remove the top rectangular vent knockout. Non-vent (recirculating) installations - A B C D A A. Install the 4 - 4.5 mm x 13 mm mounting screws ...

Use & Care Guide
Page 10
... the recirculation cover plate and remove. For optional power supply cord kit installations, follow the instructions in the hood electrical terminal box. Removal of your home power supply cable) and install a UL listed or CSA approved ¹⁄₂" strain relief. Terminal box cover B. Screws A. Tighten the mounting screws, making sure the screws are in the terminal box. NOTE: Do not reconnect power until the installation is required. No vent attachments. Remove the two screws from the fused disconnect (or circuit breaker) box to make connections...
... the recirculation cover plate and remove. For optional power supply cord kit installations, follow the instructions in the hood electrical terminal box. Removal of your home power supply cable) and install a UL listed or CSA approved ¹⁄₂" strain relief. Terminal box cover B. Screws A. Tighten the mounting screws, making sure the screws are in the terminal box. NOTE: Do not reconnect power until the installation is required. No vent attachments. Remove the two screws from the fused disconnect (or circuit breaker) box to make connections...

Use & Care Guide
Page 11
... wires C. Fire Hazard Electrically ground the blower. Install terminal box cover. 6. Release the panel so the tabs lock the panel in death, fire, or electrical shock. 4. UL listed or CSA approved ½" strain relief G. Use copper wire. Replace all parts and panels before servicing. Replace the 2 bottom panels. WARNING Electrical Shock Hazard Disconnect power before operating. See the "Range Hood Care" section. 3. a. Push the front of the range hood fan and light. Home power supply cable or power cord accessory kit F. Use UL listed wire connectors and connect...
... wires C. Fire Hazard Electrically ground the blower. Install terminal box cover. 6. Release the panel so the tabs lock the panel in death, fire, or electrical shock. 4. UL listed or CSA approved ½" strain relief G. Use copper wire. Replace all parts and panels before servicing. Replace the 2 bottom panels. WARNING Electrical Shock Hazard Disconnect power before operating. See the "Range Hood Care" section. 3. a. Push the front of the range hood fan and light. Home power supply cable or power cord accessory kit F. Use UL listed wire connectors and connect...

Use & Care Guide
Page 12
...Blower speed maximum button Operating the light The On/Off light button controls both lights. Filter retainer Range Hood Controls A B CD RANGE HOOD CARE Cleaning IMPORTANT: Clean the hood and grease filters frequently according to 6 months with charcoal filters. On/Off light button B. Screw B. The speed can be changed anytime during fan operation by pressing the desired blower speed button. The hood controls are located on the front panel of grain to avoid scratching or damaging the surface. ■ For stainless steal models, Stainless Steel Cleaner and Polish Part Number...
...Blower speed maximum button Operating the light The On/Off light button controls both lights. Filter retainer Range Hood Controls A B CD RANGE HOOD CARE Cleaning IMPORTANT: Clean the hood and grease filters frequently according to 6 months with charcoal filters. On/Off light button B. Screw B. The speed can be changed anytime during fan operation by pressing the desired blower speed button. The hood controls are located on the front panel of grain to avoid scratching or damaging the surface. ■ For stainless steal models, Stainless Steel Cleaner and Polish Part Number...

Use & Care Guide
Page 15
.... Accessories Stainless Steel Cleaner and Polish Order Part Number 31462A Charcoal Filter Kit Order Part Number W10386873 Power Cord Kit Order Part Number W10355452 7" (17.8 cm) Round Damper Order Part Number W10355451 7" (17.8 cm) Round Vent Mounting Plate Order Part Number W10388168 15 If you need replacement parts If you need further assistance, you can also look in Canada. ASSISTANCE OR SERVICE When calling for assistance or service, please know the purchase date and the complete model and serial number of appliances. ■ Installation information. ■ Use...
.... Accessories Stainless Steel Cleaner and Polish Order Part Number 31462A Charcoal Filter Kit Order Part Number W10386873 Power Cord Kit Order Part Number W10355452 7" (17.8 cm) Round Damper Order Part Number W10355451 7" (17.8 cm) Round Vent Mounting Plate Order Part Number W10388168 15 If you need replacement parts If you need further assistance, you can also look in Canada. ASSISTANCE OR SERVICE When calling for assistance or service, please know the purchase date and the complete model and serial number of appliances. ■ Installation information. ■ Use...

Use & Care Guide
Page 16
... Canada LP (hereafter "Whirlpool") will need service, first see the "Troubleshooting" section of the Use & Care Guide. Service must provide proof of purchase or installation date for in materials or workmanship and is reported to repair or replace appliance light bulbs, air filters or water filters. Service calls to Whirlpool within 30 days from the date of your major appliance, to replace or repair house fuses, or to published user or operator instructions...
... Canada LP (hereafter "Whirlpool") will need service, first see the "Troubleshooting" section of the Use & Care Guide. Service must provide proof of purchase or installation date for in materials or workmanship and is reported to repair or replace appliance light bulbs, air filters or water filters. Service calls to Whirlpool within 30 days from the date of your major appliance, to replace or repair house fuses, or to published user or operator instructions...

Installation Guide
Page 3
... to duct air outside - If the flames do not vent exhaust air into spaces within walls or ceilings, attics or into wall or ceiling; aBased on accidentally. Discard fan or return to an authorized service facility for examination and/or repair. ■ Sufficient air is needed for the size of fire or electrical shock, do not damage electrical wiring and other utilities. ■ Ducted fans must be burned. ■ DO NOT USE...
... to duct air outside - If the flames do not vent exhaust air into spaces within walls or ceilings, attics or into wall or ceiling; aBased on accidentally. Discard fan or return to an authorized service facility for examination and/or repair. ■ Sufficient air is needed for the size of fire or electrical shock, do not damage electrical wiring and other utilities. ■ Ducted fans must be burned. ■ DO NOT USE...

Installation Guide
Page 4
... from package. The model/serial rating plate is the installer's responsibility to match vent system ■ 3 - Consult the cooktop/range manufacturer installation instructions before starting installation. Read and follow the instructions provided with recessed bottoms: ■ Two 2" (5.1 cm) wide filler strips. UL listed wire connectors ■ Vent clamps/duct tape as non-vented (recirculating) require charcoal filters. For information on ordering, see the "Accessories" section. ■ 7" (17.8 cm) round vent mounting plate. Models that all governing codes and ordinances...
... from package. The model/serial rating plate is the installer's responsibility to match vent system ■ 3 - Consult the cooktop/range manufacturer installation instructions before starting installation. Read and follow the instructions provided with recessed bottoms: ■ Two 2" (5.1 cm) wide filler strips. UL listed wire connectors ■ Vent clamps/duct tape as non-vented (recirculating) require charcoal filters. For information on ordering, see the "Accessories" section. ■ 7" (17.8 cm) round vent mounting plate. Models that all governing codes and ordinances...

Installation Guide
Page 6
... behind the filter on the model/serial rating plate. A copy of copper wire using special connectors and/or tools designed and UL listed for each vent piece used , it is recommended that a qualified electrician determine that the electrical installation is required. ■ If the house has aluminum wiring, follow the procedure below: 1. Aluminum/copper connection must conform with local codes and industry accepted wiring practices. ■ Wire sizes and connections must conform...
... behind the filter on the model/serial rating plate. A copy of copper wire using special connectors and/or tools designed and UL listed for each vent piece used , it is recommended that a qualified electrician determine that the electrical installation is required. ■ If the house has aluminum wiring, follow the procedure below: 1. Aluminum/copper connection must conform with local codes and industry accepted wiring practices. ■ Wire sizes and connections must conform...

Installation Guide
Page 9
...Bottom panels a. Top rectangular vent knockout C. An optional 7" (17.8 cm) round damper is not supplied. Remove vent knockouts depending on your range hood. 3. A A. Keyhole slot 5. For wall installations, remove the rear rectangular vent knockout. Install the 4 - 4.5 mm x 13 mm mounting screws in pilot holes. Set range hood aside on ordering, see "Accessories" section) D. A. Rectangular vent system installations - For roof installations, remove the top rectangular vent knockout. Do not remove any knockouts. 8. A B C A A. b. NOTE: Your model...
...Bottom panels a. Top rectangular vent knockout C. An optional 7" (17.8 cm) round damper is not supplied. Remove vent knockouts depending on your range hood. 3. A A. Keyhole slot 5. For wall installations, remove the rear rectangular vent knockout. Install the 4 - 4.5 mm x 13 mm mounting screws in pilot holes. Set range hood aside on ordering, see "Accessories" section) D. A. Rectangular vent system installations - For roof installations, remove the top rectangular vent knockout. Do not remove any knockouts. 8. A B C A A. b. NOTE: Your model...

Installation Guide
Page 10
... is required. Horizontal vent connector with damper ■ If a vent damper is installed with a wall cap with vent clamps or duct tape to make connections in the terminal box. Remove the two screws from the terminal box cover. Screw 3. Position the range hood so that the screws are in the hood electrical terminal box. B A C D E Power Supply Cable Installation 1. Remove terminal box cover and set aside. Hinge pin D. Removal of your home power supply cable) and install a UL listed or CSA approved ¹⁄₂" strain relief. Recirculation cover plate...
... is required. Horizontal vent connector with damper ■ If a vent damper is installed with a wall cap with vent clamps or duct tape to make connections in the terminal box. Remove the two screws from the terminal box cover. Screw 3. Position the range hood so that the screws are in the hood electrical terminal box. B A C D E Power Supply Cable Installation 1. Remove terminal box cover and set aside. Hinge pin D. Removal of your home power supply cable) and install a UL listed or CSA approved ¹⁄₂" strain relief. Recirculation cover plate...

Installation Guide
Page 11
... align with the slots in terminal box and securely tighten. 5. NOTE: To get the most efficient use from power supply to see whether a circuit breaker has tripped or a household fuse has blown. Home power supply cable or power cord accessory kit F. Replace all parts and panels before servicing. Use UL listed wire connectors and connect white wires (A) together. Disconnect power. White wires B. Reconnect power. See "Range Hood Use" section. Green ground screw 2. UL listed wire connector D. WARNING Electrical Shock Hazard Disconnect power before operating.
... align with the slots in terminal box and securely tighten. 5. NOTE: To get the most efficient use from power supply to see whether a circuit breaker has tripped or a household fuse has blown. Home power supply cable or power cord accessory kit F. Replace all parts and panels before servicing. Use UL listed wire connectors and connect white wires (A) together. Disconnect power. White wires B. Reconnect power. See "Range Hood Use" section. Green ground screw 2. UL listed wire connector D. WARNING Electrical Shock Hazard Disconnect power before operating.

Installation Guide
Page 12
...the kitchen. For vented installations: Wash metal filters as needed in direction of the filter. For non-vented (recirculating) installations: The charcoal filter is designed to remove fingerprints. It should last up to the following instructions. A C B A. Filter retainer Range Hood Controls A B CD RANGE HOOD CARE Cleaning IMPORTANT: Clean the hood and grease filters frequently according to 6 months with normal use. A. Blower speed maximum button Operating the light The On/Off light button controls both lights. Screw B. Replace the metal filters with soft, lint-free cloth...
...the kitchen. For vented installations: Wash metal filters as needed in direction of the filter. For non-vented (recirculating) installations: The charcoal filter is designed to remove fingerprints. It should last up to the following instructions. A C B A. Filter retainer Range Hood Controls A B CD RANGE HOOD CARE Cleaning IMPORTANT: Clean the hood and grease filters frequently according to 6 months with normal use. A. Blower speed maximum button Operating the light The On/Off light button controls both lights. Screw B. Replace the metal filters with soft, lint-free cloth...

Installation Guide
Page 16
... wiring or plumbing. 2. You must be easily determined. Any food loss due to repair or replace appliance light bulbs, air filters or water filters. Expenses for travel and transportation for future reference. WHIRLPOOL SHALL NOT BE LIABLE FOR INCIDENTAL OR CONSEQUENTIAL DAMAGES. After checking "Troubleshooting," you on the product. Dealer name Address Phone number Model number Serial number Purchase date 16 THIS WARRANTY GIVES YOU SPECIFIC...
... wiring or plumbing. 2. You must be easily determined. Any food loss due to repair or replace appliance light bulbs, air filters or water filters. Expenses for travel and transportation for future reference. WHIRLPOOL SHALL NOT BE LIABLE FOR INCIDENTAL OR CONSEQUENTIAL DAMAGES. After checking "Troubleshooting," you on the product. Dealer name Address Phone number Model number Serial number Purchase date 16 THIS WARRANTY GIVES YOU SPECIFIC...

Warranty Information
Page 1
... Use & Care Guide. Service calls to determine if another warranty applies. Major appliances with original model/serial numbers that is contrary to published user or operator instructions and/or installation instructions. 4. Repairs when your major appliance is used in a manner that have been removed, altered or cannot be repaired in the home and only in materials or workmanship. The cost of repair or replacement under this limited warranty. DISCLAIMER OF IMPLIED WARRANTIES...
... Use & Care Guide. Service calls to determine if another warranty applies. Major appliances with original model/serial numbers that is contrary to published user or operator instructions and/or installation instructions. 4. Repairs when your major appliance is used in a manner that have been removed, altered or cannot be repaired in the home and only in materials or workmanship. The cost of repair or replacement under this limited warranty. DISCLAIMER OF IMPLIED WARRANTIES...


