
Installation Guide
Page 3
... A RANGE TOP GREASE FIRE, OBSERVE THE FOLLOWING:a ■ SMOTHER FLAMES with a close fitting lid, cookie sheet, or metal tray, then turn hood ON when cooking at high settings. you have a class ABC extinguisher, and you already know you have questions, contact the manufacturer. ■ Before servicing or cleaning the unit, switch power off the burner. aBased on fan or filter. ■ Use proper pan size. IMPORTANT SAFETY INSTRUCTIONS...
... A RANGE TOP GREASE FIRE, OBSERVE THE FOLLOWING:a ■ SMOTHER FLAMES with a close fitting lid, cookie sheet, or metal tray, then turn hood ON when cooking at high settings. you have a class ABC extinguisher, and you already know you have questions, contact the manufacturer. ■ Before servicing or cleaning the unit, switch power off the burner. aBased on fan or filter. ■ Use proper pan size. IMPORTANT SAFETY INSTRUCTIONS...

Installation Guide
Page 4
...hood will also need: ■ Recirculation Kit Part Number W10490330. INSTALLATION REQUIREMENTS Tools and Parts Gather the required tools and parts before making any tools listed here. See the "Assistance or Service" section to comply with any cutouts. Includes: Installation Instructions and Use and Care Guide 2 mounting brackets 6 spacers 10 - 4.5 x 13 mm wood screws 2 - 4.2 x 15 mm machine screws 4 - 3.5 x 9.5 mm flat-head sheet metal screws 8 - 4.2 x 19 mm sheet metal screws 2 - 3.5 x 9.5 mm sheet metal screws 1 - 30" x 12" (76.2 x 30.5 cm) face panel 2 metal grease filters...
...hood will also need: ■ Recirculation Kit Part Number W10490330. INSTALLATION REQUIREMENTS Tools and Parts Gather the required tools and parts before making any tools listed here. See the "Assistance or Service" section to comply with any cutouts. Includes: Installation Instructions and Use and Care Guide 2 mounting brackets 6 spacers 10 - 4.5 x 13 mm wood screws 2 - 4.2 x 15 mm machine screws 4 - 3.5 x 9.5 mm flat-head sheet metal screws 8 - 4.2 x 19 mm sheet metal screws 2 - 3.5 x 9.5 mm sheet metal screws 1 - 30" x 12" (76.2 x 30.5 cm) face panel 2 metal grease filters...
Installation Guide
Page 6
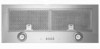
...; elbow 1 - Ceiling B. Vent cover C. Wall H. 12" (30.5 cm) min. The break should be as close as part of outside temperatures as possible to the outside, the range hood can be used in your area. cabinet height I E E H A. Consult your HVAC professional for venting through the roof or through the wall. Venting Methods This range hood is not included. Roof Venting Wall Venting B A A B A. 6" (15.2 cm) vent through the wall B. To calculate the length of makeup air systems when using a charcoal filter. A 6" (15.2 cm) round vent...
...; elbow 1 - Ceiling B. Vent cover C. Wall H. 12" (30.5 cm) min. The break should be as close as part of outside temperatures as possible to the outside, the range hood can be used in your area. cabinet height I E E H A. Consult your HVAC professional for venting through the roof or through the wall. Venting Methods This range hood is not included. Roof Venting Wall Venting B A A B A. 6" (15.2 cm) vent through the wall B. To calculate the length of makeup air systems when using a charcoal filter. A 6" (15.2 cm) round vent...
Installation Guide
Page 7
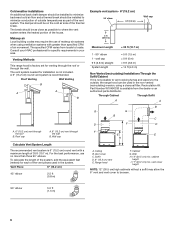
... local codes, with local codes and ordinances. This range hood is equipped with a cord having a grounding wire with a power supply cord having a 3 prong grounding plug. Electrical Shock Hazard Plug into a grounded 3 prong outlet. ■ The grounded 3 prong outlet is equipped with a grounding plug. Do not use an extension cord. If the power supply cord is required. SAVE THESE INSTRUCTIONS 7 IMPORTANT: The range hood must be accessible after installation of...
... local codes, with local codes and ordinances. This range hood is equipped with a cord having a grounding wire with a power supply cord having a 3 prong grounding plug. Electrical Shock Hazard Plug into a grounded 3 prong outlet. ■ The grounded 3 prong outlet is equipped with a grounding plug. Do not use an extension cord. If the power supply cord is required. SAVE THESE INSTRUCTIONS 7 IMPORTANT: The range hood must be accessible after installation of...
Installation Guide
Page 9
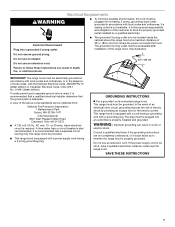
... through the top of the cabinet. For non-vented (recirculating) installations only, the range hood can be used. Centerline C. 6¼" (15.9 cm) round cutout Non-Vented (recirculating) Installation Through the Soffit/Cabinet Measure and mark the centerline of the cabinet and the exterior wall for damper transition clearance. Use a saber saw or keyhole saw to cut a round opening is required. The Recirculation Kit Part Number W10490330 must be vented indoors through the back of the cabinet to the cabinet back wall. Vent cover B.
... through the top of the cabinet. For non-vented (recirculating) installations only, the range hood can be used. Centerline C. 6¼" (15.9 cm) round cutout Non-Vented (recirculating) Installation Through the Soffit/Cabinet Measure and mark the centerline of the cabinet and the exterior wall for damper transition clearance. Use a saber saw or keyhole saw to cut a round opening is required. The Recirculation Kit Part Number W10490330 must be vented indoors through the back of the cabinet to the cabinet back wall. Vent cover B.
Installation Guide
Page 10
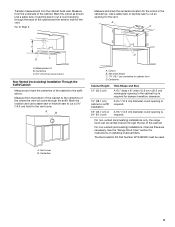
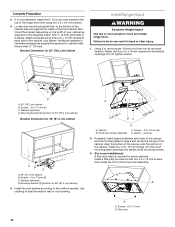
... required for 30" (76.2 cm) Cabinet Install Range Hood WARNING Excessive Weight Hazard Use two or more people, lift the hood liner into its mounted location. Filler strip 10 Do not tighten screws. Locate side mounting bracket flush to do so can result in 6 places, attach a bracket using two 3.5 x 9.5 mm screws. 4. Use caulking to move and install range hood. If needed . Screws - 4.5 x 13 mm (6) C. Complete Preparation 3. Using 2 or more people to seal the exterior wall or roof...
... required for 30" (76.2 cm) Cabinet Install Range Hood WARNING Excessive Weight Hazard Use two or more people, lift the hood liner into its mounted location. Filler strip 10 Do not tighten screws. Locate side mounting bracket flush to do so can result in 6 places, attach a bracket using two 3.5 x 9.5 mm screws. 4. Use caulking to move and install range hood. If needed . Screws - 4.5 x 13 mm (6) C. Complete Preparation 3. Using 2 or more people to seal the exterior wall or roof...
Installation Guide
Page 11
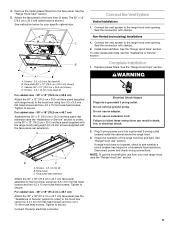
... cm x 45.7 cm) face panel (see the "Assistance or Service" section. Connect the lamp electrical connector. Do not remove ground prong. Connect the Vent System Vented Installations 1. Seal the connection with clamps. 2. Seal the connection with clamps. Replace grease filters. Disconnect power and check wiring connections. 4. Remove the metal grease filters from your specific cabinet size. See the "Range Hood Care" section. 5. Attach the face panel to secure. C B D A A. Screws - 3.5 x 9.5 mm flat-head (4) B. Tighten to the hood liner using four 3.5 x 9.5 mm flat-head...
... cm x 45.7 cm) face panel (see the "Assistance or Service" section. Connect the lamp electrical connector. Do not remove ground prong. Connect the Vent System Vented Installations 1. Seal the connection with clamps. 2. Seal the connection with clamps. Replace grease filters. Disconnect power and check wiring connections. 4. Remove the metal grease filters from your specific cabinet size. See the "Range Hood Care" section. 5. Attach the face panel to secure. C B D A A. Screws - 3.5 x 9.5 mm flat-head (4) B. Tighten to the hood liner using four 3.5 x 9.5 mm flat-head...
Installation Guide
Page 12
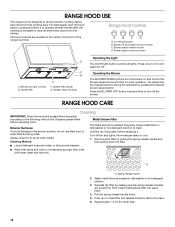
... exterior surface, do not use steel wool or soap-filled scouring pads. Grease filter handle D. Exterior Surfaces: To avoid damage to avoid water marks. Repeat steps 1-5 for Off. Range Hood Controls A B C D A. Operating the Blower The BLOWER SPEED buttons turn off the blower. Remove each filter by making sure the spring release handles are located on the center of the front of the range hood liner. RANGE HOOD USE The range hood is complete to clear all lights. For best...
... exterior surface, do not use steel wool or soap-filled scouring pads. Grease filter handle D. Exterior Surfaces: To avoid damage to avoid water marks. Repeat steps 1-5 for Off. Range Hood Controls A B C D A. Operating the Blower The BLOWER SPEED buttons turn off the blower. Remove each filter by making sure the spring release handles are located on the center of the front of the range hood liner. RANGE HOOD USE The range hood is complete to clear all lights. For best...

Installation Guide
Page 13
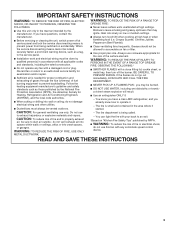
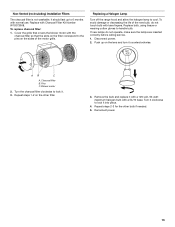
... grille that covers the blower motor with the charcoal filter so that the slots on the filter correspond to 6 months with bare fingers. Pins C. Blower motor 2. Turn the charcoal filter clockwise to handle bulb. It should last up on the other bulb if needed. 5. Disconnect power. 2. AB C A. Repeat steps 2-3 for the other filter. 3. Replace bulb, using tissue or wearing cotton gloves to lock it. 3. Remove the bulb and replace it counterclockwise. Non-Vented (recirculating) Installation Filters The charcoal filter...
... grille that covers the blower motor with the charcoal filter so that the slots on the filter correspond to 6 months with bare fingers. Pins C. Blower motor 2. Turn the charcoal filter clockwise to handle bulb. It should last up on the other bulb if needed. 5. Disconnect power. 2. AB C A. Repeat steps 2-3 for the other filter. 3. Replace bulb, using tissue or wearing cotton gloves to lock it. 3. Remove the bulb and replace it counterclockwise. Non-Vented (recirculating) Installation Filters The charcoal filter...

Installation Guide
Page 15
... the United States. Accessories Recirculation Kit (for non-vented installations only) Order Part Number W10490330 Replacement Charcoal Filters (for non-vented installations only) Order Part Number W10272068 Face Panel Rear Extension (for 30" x 18" [76.2 cm x 45.7 cm] cabinet) Order Part Number W10490327 Face Panel (for assistance or service, please know the purchase date and the complete model and serial number of appliances. ■ Use and maintenance procedures. ■ Accessory and repair parts sales. ■ Referrals to fulfill the product warranty...
... the United States. Accessories Recirculation Kit (for non-vented installations only) Order Part Number W10490330 Replacement Charcoal Filters (for non-vented installations only) Order Part Number W10272068 Face Panel Rear Extension (for 30" x 18" [76.2 cm x 45.7 cm] cabinet) Order Part Number W10490327 Face Panel (for assistance or service, please know the purchase date and the complete model and serial number of appliances. ■ Use and maintenance procedures. ■ Accessory and repair parts sales. ■ Referrals to fulfill the product warranty...
Installation Guide
Page 16
... 50 United States and Canada, this limited warranty does not apply. Expenses for travel and transportation for in a remote area where service by this warranty. 8. Dealer name Address Phone number Model number Serial number Purchase date 16 The cost of repair or replacement under this limited warranty. You must be easily determined. After checking "Troubleshooting," you ever need service, first see the "Troubleshooting" section of the Use & Care Guide. Service calls to correct the installation...
... 50 United States and Canada, this limited warranty does not apply. Expenses for travel and transportation for in a remote area where service by this warranty. 8. Dealer name Address Phone number Model number Serial number Purchase date 16 The cost of repair or replacement under this limited warranty. You must be easily determined. After checking "Troubleshooting," you ever need service, first see the "Troubleshooting" section of the Use & Care Guide. Service calls to correct the installation...

Warranty Information
Page 1
... Specified Parts and repair labor to published user or operator instructions and/or installation instructions. 4. Service calls to the appliance. 9. In the U.S.A., call 1-800-807-6777. 6/12 Keep this book and your major appliance is used for repairs. Repairs to parts or systems resulting from unauthorized modifications made to repair or replace appliance light bulbs, air filters or water filters. In Canada, call 1-800-253-1301. Major appliances with original model/serial numbers...
... Specified Parts and repair labor to published user or operator instructions and/or installation instructions. 4. Service calls to the appliance. 9. In the U.S.A., call 1-800-807-6777. 6/12 Keep this book and your major appliance is used for repairs. Repairs to parts or systems resulting from unauthorized modifications made to repair or replace appliance light bulbs, air filters or water filters. In Canada, call 1-800-253-1301. Major appliances with original model/serial numbers...
Use & Care Guide
Page 3
..., cookie sheet, or metal tray, then turn hood ON when cooking at high settings. you already know you have questions, contact the manufacturer. ■ Before servicing or cleaning the unit, switch power off the burner. Always use only. aBased on low or medium settings. ■ Always turn off at service panel and lock the service disconnecting means to duct air outside - If the flames do not vent exhaust air into spaces within walls or ceilings...
..., cookie sheet, or metal tray, then turn hood ON when cooking at high settings. you already know you have questions, contact the manufacturer. ■ Before servicing or cleaning the unit, switch power off the burner. Always use only. aBased on low or medium settings. ■ Always turn off at service panel and lock the service disconnecting means to duct air outside - If the flames do not vent exhaust air into spaces within walls or ceilings...

Use & Care Guide
Page 4
... the roof or wall. Parts supplied Remove parts from strong draft areas, such as windows, doors, and strong heating vents. metal washers 8 - For non-vented (recirculating) installations see "NonVented (recirculating) Installation Through the Soffit/Cabinet" in ceiling and wall where range hood will also need: ■ Recirculation Kit Part Number W10490330. Range hood location should be installed must conform to order. Cabinet opening dimensions that all governing codes and ordinances. Includes: Installation Instructions and Use and Care Guide 2 mounting brackets 6 spacers...
... the roof or wall. Parts supplied Remove parts from strong draft areas, such as windows, doors, and strong heating vents. metal washers 8 - For non-vented (recirculating) installations see "NonVented (recirculating) Installation Through the Soffit/Cabinet" in ceiling and wall where range hood will also need: ■ Recirculation Kit Part Number W10490330. Range hood location should be installed must conform to order. Cabinet opening dimensions that all governing codes and ordinances. Includes: Installation Instructions and Use and Care Guide 2 mounting brackets 6 spacers...

Use & Care Guide
Page 6
...; elbow 1 - Wall H. 12" (30.5 cm) min. Roof cap A. 6" (15.2 cm) vent through the roof B. Soffit D. 6" (15.2 cm) vent E. The specified CFM varies from the dealer or an authorized parts distributor. Through Cabinet Through Soffit A A B G G B C D F D F I . 17" (43.2 cm) min. Wall cap Calculate Vent System Length The recommended vent system is recommended. Range hood F. The damper should be used in the non-vented (recirculating) version, using ventilation systems with a maximum length of makeup air systems when using a charcoal filter. Consult...
...; elbow 1 - Wall H. 12" (30.5 cm) min. Roof cap A. 6" (15.2 cm) vent through the roof B. Soffit D. 6" (15.2 cm) vent E. The specified CFM varies from the dealer or an authorized parts distributor. Through Cabinet Through Soffit A A B G G B C D F D F I . 17" (43.2 cm) min. Wall cap Calculate Vent System Length The recommended vent system is recommended. Range hood F. The damper should be used in the non-vented (recirculating) version, using ventilation systems with a maximum length of makeup air systems when using a charcoal filter. Consult...

Use & Care Guide
Page 11
...11 C B D A A. Connect the lamp electrical connector. Check the operation of the range hood fan and light. NOTE: To get the most efficient use from the face panel. Face panel rear extension Attach the 30" x 18" (76.2 cm x 45.7 cm) face panel assembly to follow these instructions can result in death, fire, or electrical shock. 2. Complete Installation 1. Disconnect power and check wiring connections. Non-Vented (recirculating) Installations 1. See the "Range Hood Care" section. Replace grease filters. Do not use an extension cord. Screws - 4.2 x 15...
...11 C B D A A. Connect the lamp electrical connector. Check the operation of the range hood fan and light. NOTE: To get the most efficient use from the face panel. Face panel rear extension Attach the 30" x 18" (76.2 cm x 45.7 cm) face panel assembly to follow these instructions can result in death, fire, or electrical shock. 2. Complete Installation 1. Disconnect power and check wiring connections. Non-Vented (recirculating) Installations 1. See the "Range Hood Care" section. Replace grease filters. Do not use an extension cord. Screws - 4.2 x 15...

Use & Care Guide
Page 12
... the cooking is designed to cool. 1. Push up on metal filter and release handle to the following instructions. Halogen lamp housings Operating the Light The On/Off light button controls all -purpose cleanser Metal Grease Filter The filters should be changed anytime during fan operation by pressing the desired blower speed button. Exterior Surfaces: To avoid damage to clean. Remove each filter by making sure the spring release handles are located on and control the blower speed and sound level...
... the cooking is designed to cool. 1. Push up on metal filter and release handle to the following instructions. Halogen lamp housings Operating the Light The On/Off light button controls all -purpose cleanser Metal Grease Filter The filters should be changed anytime during fan operation by pressing the desired blower speed button. Exterior Surfaces: To avoid damage to clean. Remove each filter by making sure the spring release handles are located on and control the blower speed and sound level...
Use & Care Guide
Page 13
... other bulb if needed. 5. Replacing a Halogen Lamp Turn off the range hood and allow the halogen lamp to the pins on the filter correspond to cool. To avoid damage or decreasing the life of the motor grille. Cover the grille that the slots on the sides of the new bulb, do not operate, make sure the lamps are inserted correctly before calling service. 1. Remove the bulb and replace it counterclockwise. Pins C. Non-Vented (recirculating) Installation Filters The charcoal filter is...
... other bulb if needed. 5. Replacing a Halogen Lamp Turn off the range hood and allow the halogen lamp to the pins on the filter correspond to cool. To avoid damage or decreasing the life of the motor grille. Cover the grille that the slots on the sides of the new bulb, do not operate, make sure the lamps are inserted correctly before calling service. 1. Remove the bulb and replace it counterclockwise. Pins C. Non-Vented (recirculating) Installation Filters The charcoal filter is...

Use & Care Guide
Page 15
... in your nearest designated service center. Accessories Recirculation Kit (for non-vented installations only) Order Part Number W10490330 Replacement Charcoal Filters (for non-vented installations only) Order Part Number W10272068 Face Panel Rear Extension (for 30" x 18" [76.2 cm x 45.7 cm] cabinet) Order Part Number W10490327 Face Panel (for assistance or service, please know the purchase date and the complete model and serial number of appliances. ■ Installation information. ■ Use and maintenance procedures. ■ Accessory and repair parts sales. ■ Specialized...
... in your nearest designated service center. Accessories Recirculation Kit (for non-vented installations only) Order Part Number W10490330 Replacement Charcoal Filters (for non-vented installations only) Order Part Number W10272068 Face Panel Rear Extension (for 30" x 18" [76.2 cm x 45.7 cm] cabinet) Order Part Number W10490327 Face Panel (for assistance or service, please know the purchase date and the complete model and serial number of appliances. ■ Installation information. ■ Use and maintenance procedures. ■ Accessory and repair parts sales. ■ Specialized...

Use & Care Guide
Page 16
... cover: 1. Consumable parts are excluded from your home of your major appliance, to replace or repair house fuses, or to correct house wiring or plumbing. 2. Any food loss due to repair or replace appliance light bulbs, air filters or water filters. The removal and reinstallation of your major appliance if it is used in a manner that have been removed, altered or cannot be borne by a Whirlpool designated service...
... cover: 1. Consumable parts are excluded from your home of your major appliance, to replace or repair house fuses, or to correct house wiring or plumbing. 2. Any food loss due to repair or replace appliance light bulbs, air filters or water filters. The removal and reinstallation of your major appliance if it is used in a manner that have been removed, altered or cannot be borne by a Whirlpool designated service...


