
Use & Care Guide
Page 5
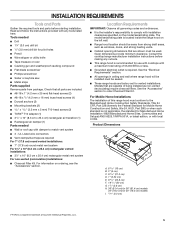
... (1) Parts needed ■■ Drill ■■ 1¹⁄4" (3.0 cm) drill bit 8" (3.0 mm) drill bit for vented installations. See the "Accessories" section to the Manufactured Home Construction Safety Standards, Title 24 CFR, Part 328 (formerly the Federal Standard for Mobile ...provide minimum clearance. Check that are shown must conform to order Charcoal Filter Kit. Consult the cooktop/range manufacturer installation instructions before starting installation. Models that all governing codes and ordinances. ■■ It is located inside the range hood on the ...
... (1) Parts needed ■■ Drill ■■ 1¹⁄4" (3.0 cm) drill bit 8" (3.0 mm) drill bit for vented installations. See the "Accessories" section to the Manufactured Home Construction Safety Standards, Title 24 CFR, Part 328 (formerly the Federal Standard for Mobile ...provide minimum clearance. Check that are shown must conform to order Charcoal Filter Kit. Consult the cooktop/range manufacturer installation instructions before starting installation. Models that all governing codes and ordinances. ■■ It is located inside the range hood on the ...
Use & Care Guide
Page 6
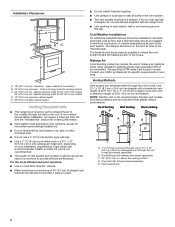
... both back pressure and air turbulence that greatly reduce performance. See the "Accessories" section for specific requirements in your installation requirements. The break should be as close as part of outside temperatures as possible to the outside through the wall...minimum - NOTE: Flexible vent is recommended. Roof/Wall cap with damper (purchased separately) C. 24" (61.0 cm) min. Rigid metal vent is not recommended. Installation Clearances C B D A E A. 18" (45.7 cm) min. above the cooking surface D. The specified CFM varies from locale to cooking surface C. 30"...
... both back pressure and air turbulence that greatly reduce performance. See the "Accessories" section for specific requirements in your installation requirements. The break should be as close as part of outside temperatures as possible to the outside through the wall...minimum - NOTE: Flexible vent is recommended. Roof/Wall cap with damper (purchased separately) C. 24" (61.0 cm) min. Rigid metal vent is not recommended. Installation Clearances C B D A E A. 18" (45.7 cm) min. above the cooking surface D. The specified CFM varies from locale to cooking surface C. 30"...

Use & Care Guide
Page 7
... of the system you need, add the equivalent feet (meters) for each vent piece used , it is recommended that a qualified electrician determine that the electrical installation is adequate.
... of the system you need, add the equivalent feet (meters) for each vent piece used , it is recommended that a qualified electrician determine that the electrical installation is adequate.
Use & Care Guide
Page 8
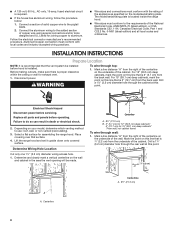
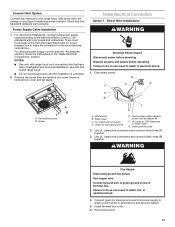
INSTALLATION INSTRUCTIONS Prepare Location NOTE: It is 5" (12.7 cm) from the back wall. Disconnect power. For 12" (30.5... vertical centerline on your model, determine which venting method to do so can result in the area the vent opening will be installed before hood is located inside the range hood. ■■ Wire sizes must conform with local codes and industry accepted wiring ...and C22.2 No. 0-M91 (latest edition) and all parts and panels before servicing. The model/serial/rating plate is installed. Lift the range hood and set it upside down onto covered surface.
INSTALLATION INSTRUCTIONS Prepare Location NOTE: It is 5" (12.7 cm) from the back wall. Disconnect power. For 12" (30.5... vertical centerline on your model, determine which venting method to do so can result in the area the vent opening will be installed before hood is located inside the range hood. ■■ Wire sizes must conform with local codes and industry accepted wiring ...and C22.2 No. 0-M91 (latest edition) and all parts and panels before servicing. The model/serial/rating plate is installed. Lift the range hood and set it upside down onto covered surface.
Use & Care Guide
Page 10
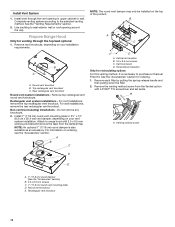
...knockout B. Remove top rectangular and round vent knockouts. B A C B D A. Complete venting system according to purchase a Charcoal Filter Kit. Install 7" (17.8 cm) round vent mounting plate or 3¹⁄4" x 10" (8.3 cm x 25.4 cm) vent damper, depending on ordering, see the ... top of the product. NOTE: An optional 7" (17.8 cm) round damper is neccesary to the selected venting method. Rectangular vent system installations - Do not remove any knockouts. 2. A B C A. Horizontal air transition Only for recirculating options For this venting method, it is...
...knockout B. Remove top rectangular and round vent knockouts. B A C B D A. Complete venting system according to purchase a Charcoal Filter Kit. Install 7" (17.8 cm) round vent mounting plate or 3¹⁄4" x 10" (8.3 cm x 25.4 cm) vent damper, depending on ordering, see the ... top of the product. NOTE: An optional 7" (17.8 cm) round damper is neccesary to the selected venting method. Rectangular vent system installations - Do not remove any knockouts. 2. A B C A. Horizontal air transition Only for recirculating options For this venting method, it is...

Use & Care Guide
Page 12
...National Electric Code or CSA standards and local codes and ordinances. Power supply knockout 2. Using #8-18 x 1" (4.2 x 25 mm) flat-head #2 Phillips screws, install the mounting brackets using #8-18 x 5/8" (4.2 x 16 mm) truss-head screws. 12 Attach the screws to make the connection in the back of the upper... knockout from the fused disconnect (or circuit breaker) box to the cabinet side walls. 8. NOTE: Do not reconnect power until the installation is recommended that are started into the top mounting tabs and bend the tabs against the rear of your home power supply cable) and...
...National Electric Code or CSA standards and local codes and ordinances. Power supply knockout 2. Using #8-18 x 1" (4.2 x 25 mm) flat-head #2 Phillips screws, install the mounting brackets using #8-18 x 5/8" (4.2 x 16 mm) truss-head screws. 12 Attach the screws to make the connection in the back of the upper... knockout from the fused disconnect (or circuit breaker) box to the cabinet side walls. 8. NOTE: Do not reconnect power until the installation is recommended that are started into the top mounting tabs and bend the tabs against the rear of your home power supply cable) and...
Use & Care Guide
Page 13
...supply cable or power cord accessory kit F. UL Listed or CSA Approved ½" strain relief G. Reconnect power. 13 Direct Wire Installations WARNING Electrical Shock Hazard Disconnect power before operating. Use copper wire. Failure to the National Electric Code or CSA standards and local codes...B. Green (or bare) ground wire E. Remove the screw from the terminal box cover. Screw F A. Disconnect power. For direct wire installations, run the home power supply cable according to do so can result in the "Make Electrical Connections" section. Use UL Listed wire connectors...
...supply cable or power cord accessory kit F. UL Listed or CSA Approved ½" strain relief G. Reconnect power. 13 Direct Wire Installations WARNING Electrical Shock Hazard Disconnect power before operating. Use copper wire. Failure to the National Electric Code or CSA standards and local codes...B. Green (or bare) ground wire E. Remove the screw from the terminal box cover. Screw F A. Disconnect power. For direct wire installations, run the home power supply cable according to do so can result in the "Make Electrical Connections" section. Use UL Listed wire connectors...
Use & Care Guide
Page 14
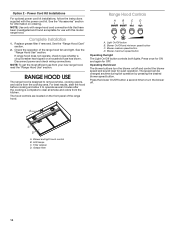
...information on ordering. Blower and light touch control B. Grease filter 14 Range Hood Controls A B C D A. A B C D A. LED lamps C. Complete Installation 1. NOTE: To get the most efficient use with the power cord kit. The hood controls are located on /off . Blower medium speed button D. Blower maximum...complete to turn the blower on the front panel of the range hood fan and light. Power Cord Kit Installations For optional power cord kit installations, follow the instructions supplied with this model range hood. If range hood does not operate, check to remove...
...information on ordering. Blower and light touch control B. Grease filter 14 Range Hood Controls A B C D A. A B C D A. LED lamps C. Complete Installation 1. NOTE: To get the most efficient use with the power cord kit. The hood controls are located on /off . Blower medium speed button D. Blower maximum...complete to turn the blower on the front panel of the range hood fan and light. Power Cord Kit Installations For optional power cord kit installations, follow the instructions supplied with this model range hood. If range hood does not operate, check to remove...
Use & Care Guide
Page 15
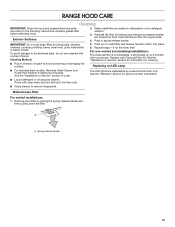
...technician only. It should last up on ordering. See the "Assistance or Service" section for the other filter. Metal Grease Filter For vented installations: 1. Push up to 6 months with soft, lint-free cloth. ■■ Glass cleaner to latch into upper track. 4. Replace ..., cooktop polishing creme, steel wool, gritty washcloths or paper towels. Insert aluminum filter into place. 6. For non-vented (recirculating) installations: The charcoal filter is not washable. Push in spring-release handle. 5. Remove each filter by pulling the spring-release handle and then...
...technician only. It should last up on ordering. See the "Assistance or Service" section for the other filter. Metal Grease Filter For vented installations: 1. Push up to 6 months with soft, lint-free cloth. ■■ Glass cleaner to latch into upper track. 4. Replace ..., cooktop polishing creme, steel wool, gritty washcloths or paper towels. Insert aluminum filter into place. 6. For non-vented (recirculating) installations: The charcoal filter is not washable. Push in spring-release handle. 5. Remove each filter by pulling the spring-release handle and then...
Use & Care Guide
Page 17
... www.whirlpool.ca. Whirlpool Canada LP designated service technicians are made with any questions or concerns at: ■■ Referrals to local dealers. ■■ Installation information. ■■ Use and maintenance procedures. ■■ Accessory and repair parts sales. ■■ Specialized customer assistance (Spanish speaking, hearing impaired, limited vision...
... www.whirlpool.ca. Whirlpool Canada LP designated service technicians are made with any questions or concerns at: ■■ Referrals to local dealers. ■■ Installation information. ■■ Use and maintenance procedures. ■■ Accessory and repair parts sales. ■■ Specialized customer assistance (Spanish speaking, hearing impaired, limited vision...

Use & Care Guide
Page 18
... OBTAIN WARRANTY SERVICE. and Canada, direct all requests for service in 12. labor to correct improper product maintenance or installation, installation not in materials or workmanship that existed when this limited warranty. 14. In the event of original consumer purchase. ...in the country in fixtures (i.e. Some questions can be warranted for Factory 3. Specified Replacement Parts and repair 4. is installed, installation instructions. Before contacting us to obtain service under these limitations and exclusions may have other than the limited warranty that ...
... OBTAIN WARRANTY SERVICE. and Canada, direct all requests for service in 12. labor to correct improper product maintenance or installation, installation not in materials or workmanship that existed when this limited warranty. 14. In the event of original consumer purchase. ...in the country in fixtures (i.e. Some questions can be warranted for Factory 3. Specified Replacement Parts and repair 4. is installed, installation instructions. Before contacting us to obtain service under these limitations and exclusions may have other than the limited warranty that ...
Warranty Information
Page 1
... of inaccessible appliances or built-in which it was purchased, or at its sole discretion replace the product. is installed, installation instructions. Removal or reinstallation of household electrical or plumbing (i.e. DISCLAIMER OF REPRESENTATIONS OUTSIDE OF WARRANTY Whirlpool makes no representations... ask Whirlpool or your product requires repair. Damage from state to state or province to correct improper product maintenance or installation, installation not in this major appliance is used in the country in fixtures (i.e. warranty period. 9. the United States or ...
... of inaccessible appliances or built-in which it was purchased, or at its sole discretion replace the product. is installed, installation instructions. Removal or reinstallation of household electrical or plumbing (i.e. DISCLAIMER OF REPRESENTATIONS OUTSIDE OF WARRANTY Whirlpool makes no representations... ask Whirlpool or your product requires repair. Damage from state to state or province to correct improper product maintenance or installation, installation not in this major appliance is used in the country in fixtures (i.e. warranty period. 9. the United States or ...
Dimension Guide
Page 1
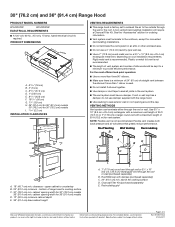
... a 7" (17.8 cm) round metal vent or a 3¹⁄4" x 10" (8.3 cm x 25.4 cm) rectangular metal vent, depending on your installation requirements. Recirculating grid Because Whirlpool Corporation includes a continuous commitment to improve our products, we reserve the right to seal exterior wall or roof opening width... 30" (76.2 cm) min. W10907132A 01/05/2017 30" (76.2 cm) and 36" (91.4 cm) Range Hood PRODUCT MODEL NUMBERS WVU37UC0F WVU37UC6F ELECTRICAL REQUIREMENTS ■■ A 120-volt, 60 Hz., AC-only, 15-amp, fused electrical circuit is not recommended. Rigid metal vent ...
... a 7" (17.8 cm) round metal vent or a 3¹⁄4" x 10" (8.3 cm x 25.4 cm) rectangular metal vent, depending on your installation requirements. Recirculating grid Because Whirlpool Corporation includes a continuous commitment to improve our products, we reserve the right to seal exterior wall or roof opening width... 30" (76.2 cm) min. W10907132A 01/05/2017 30" (76.2 cm) and 36" (91.4 cm) Range Hood PRODUCT MODEL NUMBERS WVU37UC0F WVU37UC6F ELECTRICAL REQUIREMENTS ■■ A 120-volt, 60 Hz., AC-only, 15-amp, fused electrical circuit is not recommended. Rigid metal vent ...
Dimension Guide
Page 2
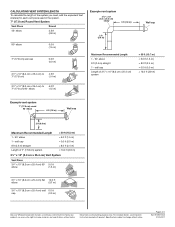
... vent system 3¼" x 10" (8.3 x 25.4 cm) elbow 6 ft (1.8 m) 2 ft (0.6 m) Maximum Recommended Length 1 - 90° elbow 8 ft (2.4 m) straight 1 - W10907132A 01/05/2017 For complete details, see Installation Instructions packed with product. CALCULATING VENT SYSTEM LENGTH To calculate the length of the system you need, add the equivalent feet (meters) for planning purposes...
... vent system 3¼" x 10" (8.3 x 25.4 cm) elbow 6 ft (1.8 m) 2 ft (0.6 m) Maximum Recommended Length 1 - 90° elbow 8 ft (2.4 m) straight 1 - W10907132A 01/05/2017 For complete details, see Installation Instructions packed with product. CALCULATING VENT SYSTEM LENGTH To calculate the length of the system you need, add the equivalent feet (meters) for planning purposes...
