KitchenAid UXT5530AAS Support and Manuals
Get Help and Manuals for this KitchenAid item
View All Support Options Below
Free KitchenAid UXT5530AAS manuals!
Problems with KitchenAid UXT5530AAS?
Ask a Question
Free KitchenAid UXT5530AAS manuals!
Problems with KitchenAid UXT5530AAS?
Ask a Question
Popular KitchenAid UXT5530AAS Manual Pages
Installation Guide - Page 2
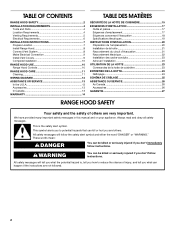
... Requirements 5 Electrical Requirements 6
INSTALLATION INSTRUCTIONS 7 Prepare Location 7 Install Range Hood 8 Connect Vent System 8 Make Electrical Connection 9 Install Vent Covers 9 Complete Installation 10
RANGE HOOD USE 10 Range Hood Controls 10
RANGE HOOD CARE 11 Cleaning 11
WIRING DIAGRAM 12
ASSISTANCE OR SERVICE 13 In the U.S.A 13 Accessories 13 In Canada 13
WARRANTY 14...
Installation Guide - Page 4
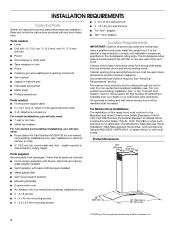
... Kit Part Number W10294733 is factory set for non-vented
(recirculating) installations only. For non-vented (recirculating) installation see "For nonvented (recirculating) installation only" in ceiling and wall where canopy hood will also need: ■ Recirculation Kit Part Number W10294733 for venting through the roof or wall. Have a qualified technician install the range hood.
Installation Guide - Page 5
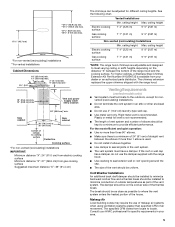
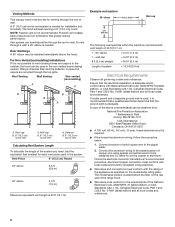
... be installed to minimize conduction of outside temperatures as possible to provide efficient performance.
The chimney extension replaces the upper chimney shipped with the range hood.
■ Use caulking to minimize backward cold air flow and a thermal break should be uniform. Plastic or metal foil vent is recommended.
Makeup Air Local building codes may require the...
Installation Guide - Page 6
... as specified on the rear wall of the range hood.
■ Wire sizes must conform to the requirements of the National Electrical Code, ANSI/NFPA 70 (latest edition), or CSA Standards C22. 1-94, Canadian Electrical Code, Part 1 and C22.2 No. 0-M91 (latest edition) and all local codes and ordinances.
6 Vent system can be used , it is adequate...
Installation Guide - Page 7
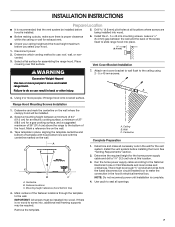
...range hood. Attach vent cover bracket to wall flush to the wall. Mark centers of 36" (91.4 cm) above the range to slide range hood into , additional wall framing supports...in place, aligning the template centerline and bottom of the hood. Range Hood Mounting Screws Installation
1.
Install the vent system before hood is installed.
5.
Determine and mark the centerline on the wall....
Installation Guide - Page 8
...Seal connection with vent clamps.
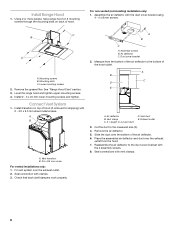
8 Air deflector C. Install Range Hood
1. Using 2 or more people, hang range hood on 2 mounting screws through the mounting slots on top of the hood outlet. C B
A
A. Remove the grease filter. Place the assembled air deflector and duct over the exhaust outlet. 2. Install 2 - 5 x 45 mm lower mounting screws and tighten.
Fit vent system over the...
Installation Guide - Page 11

... cleanser
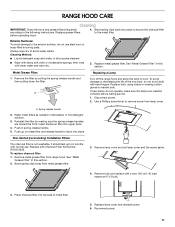
■ Wipe with damp soft cloth or nonabrasive sponge, then rinse with clean water and wipe dry.
5. Push up to the following instructions. Remove lamp cover and set lamp cover and the screw aside.
4.
Replace grease filters before calling service.
1. RANGE HOOD CARE
Cleaning
IMPORTANT: Clean the hood and grease filters frequently according to 6 months with bare fingers.
Use & Care Guide - Page 1

... 36" (76.2 AND 91.4 CM) WALL-MOUNT CANOPY RANGE HOOD
Installation Instructions and Use & Care Guide
For questions about features, operation/performance, parts, accessories or service, call: 1-800-253-1301 or visit our website at www.whirlpool.com
In Canada, call 1-800-807-6777 or visit our website at www.whirlpool.ca
HOTTE DE CUISINIÈRE À MONTAGE MURAL...
Use & Care Guide - Page 2

... Requirements 5 Electrical Requirements 6
INSTALLATION INSTRUCTIONS 7 Prepare Location 7 Install Range Hood 8 Connect Vent System 8 Make Electrical Connection 9 Install Vent Covers 9 Complete Installation 10
RANGE HOOD USE 10 Range Hood Controls 10
RANGE HOOD CARE 11 Cleaning 11
WIRING DIAGRAM 12
ASSISTANCE OR SERVICE 13 In the U.S.A 13 Accessories 13 In Canada 13
WARRANTY 14...
Use & Care Guide - Page 4

... codes and ordinances.
INSTALLATION REQUIREMENTS
Tools and Parts
Gather the required tools and parts before starting installation. Have a qualified technician install the range hood. Given dimensions provide minimum clearance. It is the installer's responsibility to comply with local codes. The canopy hood is required. For Mobile Home Installations The installation of the vent hood...
Use & Care Guide - Page 5

... adjustable and designed to locale. ceiling height Max. Vented Installations
Min. The chimney extension replaces the upper chimney shipped with the range hood.
■ Use caulking to where the vent system enters the heated portion of the thermal break. The damper should be as close as part of the vent should be on the distance "X" between the elbows...
Use & Care Guide - Page 6

... installed immediately above the hood. Connect a section of solid copper wire to the requirements of the range hood.
■ Wire sizes must conform with local codes and industry accepted wiring practices.
■ Wire sizes and connections must conform to the pigtail leads.
2. The model/serial plate is located behind the filter on the model/serial rating plate.
Flexible vent...
Use & Care Guide - Page 8

... the air deflector to the bottom of hood. Remove the grease filter. Fit vent system over the exhaust
outlet from the bottom of the air deflector to the duct cover bracket with clamps. 3. Seal connection with
the 4 assembly screws. 8. Assembly screws B. Install Range Hood
1. A B
A. Measure from the hood. 7. Level the range hood and tighten upper mounting screws...
Use & Care Guide - Page 10

...blower speed and sound level for Off. Blower Off button C. The Blower Off button turns the blower Off.
10
Glass canopy E. Grease filter
F. Lamp cover
G. See the "Range Hood Care" section.
2.
Complete Installation
1. Duct cover holes B.
For non-vented (recirculating) installations only, install charcoal filters over metal grease filter. Secure the bottom of the canopy.
See the...
Use & Care Guide - Page 11
.... Replace metal grease filter. A
Turn off the range hood and allow the lamp to remove screw from lamp cover. If new lamps do not use .
Insert aluminum filter into top side of the new bulb, do not touch bulb with a new 120 volt, 40 watt maximum E-12 bulb.
3. Non-Vented (recirculating) Installation Filters:
The charcoal filter is not washable. Replace...
KitchenAid UXT5530AAS Reviews
We have not received any reviews for KitchenAid yet.