
Installation Guide
Page 3
... surface units unattended at service panel and lock the service disconnecting means to exhaust hazardous or explosive materials and vapors. Always use this unit only in the manner intended by qualified person(s) in the area where it . - READ AND SAVE THESE INSTRUCTIONS 3 CAUTION: For general ventilating use to prevent power from being called. - do not damage electrical wiring and other utilities. ■ Ducted fans must...
... surface units unattended at service panel and lock the service disconnecting means to exhaust hazardous or explosive materials and vapors. Always use this unit only in the manner intended by qualified person(s) in the area where it . - READ AND SAVE THESE INSTRUCTIONS 3 CAUTION: For general ventilating use to prevent power from being called. - do not damage electrical wiring and other utilities. ■ Ducted fans must...
Installation Guide
Page 4
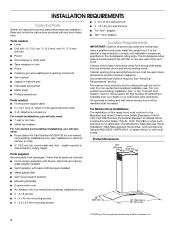
...located behind the left filter on the model/serial rating plate. Have a qualified technician install the range hood. Recirculation Kit Part Number W10294733 is factory set for non-vented [recirculating] installations only) ■ 4 - 4 x 8 screws ■ 6 - 5 x 45 mm mounting screws ■ 2 - 3.5 x 9.5 mm mounting screws Location Requirements IMPORTANT: Observe all parts are included. ■ Hood canopy assembly with blower, light bulb and canopy glass already installed ■ Vent transition with local codes. For Mobile Home Installations The installation of Saturn Fasteners...
...located behind the left filter on the model/serial rating plate. Have a qualified technician install the range hood. Recirculation Kit Part Number W10294733 is factory set for non-vented [recirculating] installations only) ■ 4 - 4 x 8 screws ■ 6 - 5 x 45 mm mounting screws ■ 2 - 3.5 x 9.5 mm mounting screws Location Requirements IMPORTANT: Observe all parts are included. ■ Hood canopy assembly with blower, light bulb and canopy glass already installed ■ Vent transition with local codes. For Mobile Home Installations The installation of Saturn Fasteners...
Installation Guide
Page 5
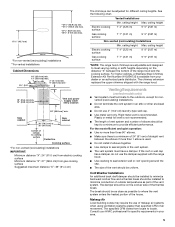
... ceiling heights. For the most efficient and quiet operation: ■ Use no more than specified CFM of air movement. The damper should be installed to provide efficient performance. Side cabinet 30" (76.2 cm) or 36" (91.4 cm) Side cabinet "X" bottom of the range hood and the cooking surface. The chimney extension replaces the upper chimney shipped with the range hood. ■ Use caulking to seal exterior wall or roof opening around the cap. ■ The size...
... ceiling heights. For the most efficient and quiet operation: ■ Use no more than specified CFM of air movement. The damper should be installed to provide efficient performance. Side cabinet 30" (76.2 cm) or 36" (91.4 cm) Side cabinet "X" bottom of the range hood and the cooking surface. The chimney extension replaces the upper chimney shipped with the range hood. ■ Use caulking to seal exterior wall or roof opening around the cap. ■ The size...
Installation Guide
Page 6
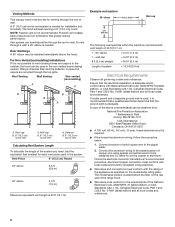
... needed for installation (not included). A copy of the range hood. ■ Wire sizes must conform with National Electrical Code, ANSI/NFPA 70 (latest edition), or CSA Standards C22.1-94, Canadian Electrical Code, Part 1 and C22.2 No. 0-M91 (latest edition) and all local codes and ordinances. The model/serial plate is located behind the filter on the model/serial rating plate. Roof cap B. 6" (15.2 cm) round vent A. wall cap = 5.0 ft (1.5 m) = 0.0 ft (0.0 m) 8 ft (2.4 m) straight = 8.0 ft (2.4 m) Length of copper wire using special connectors...
... needed for installation (not included). A copy of the range hood. ■ Wire sizes must conform with National Electrical Code, ANSI/NFPA 70 (latest edition), or CSA Standards C22.1-94, Canadian Electrical Code, Part 1 and C22.2 No. 0-M91 (latest edition) and all local codes and ordinances. The model/serial plate is located behind the filter on the model/serial rating plate. Roof cap B. 6" (15.2 cm) round vent A. wall cap = 5.0 ft (1.5 m) = 0.0 ft (0.0 m) 8 ft (2.4 m) straight = 8.0 ft (2.4 m) Length of copper wire using special connectors...
Installation Guide
Page 7
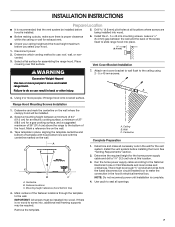
... (or circuit breaker) box to make all openings. 7 Vent Cover Bracket Installation WARNING Excessive Weight Hazard Use two or more people, lift range hood onto covered surface. Mounting height reference (hood bottom line) 4. Remove the template. Determine and make the connection in the wall for the vent system. Install the vent system before hood is complete. 4. There must be installed. 2. Range Hood Mounting Screws Installation 1. Tape template in back or other injury. 7. Fastener locations C. Run the home power supply cable according to use: roof, wall, or...
... (or circuit breaker) box to make all openings. 7 Vent Cover Bracket Installation WARNING Excessive Weight Hazard Use two or more people, lift range hood onto covered surface. Mounting height reference (hood bottom line) 4. Remove the template. Determine and make the connection in the wall for the vent system. Install the vent system before hood is complete. 4. There must be installed. 2. Range Hood Mounting Screws Installation 1. Tape template in back or other injury. 7. Fastener locations C. Run the home power supply cable according to use: roof, wall, or...
Installation Guide
Page 8
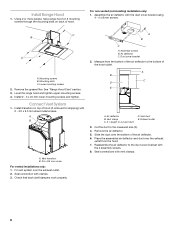
... non-vented (recirculating) installation only: 1. Mounting slots C. Remove the grease filter. A B C A. Air deflector C. Exhaust outlet 3. Cut the duct to cut vent duct D. Install transition on back of hood (if removed for shipping) with 2 - 3.5 x 9.5 mm sheet metal screws. A B A. Seal connection with vent clamps. 8 Seal connections with clamps. 3. Assemble the air deflector with the 4 assembly screws. 8. Level the range hood and tighten upper mounting screws. 4. Vent transition B. 3.5 x 9.5 mm screw For vented installations only: 1. Duct cover bracket...
... non-vented (recirculating) installation only: 1. Mounting slots C. Remove the grease filter. A B C A. Air deflector C. Exhaust outlet 3. Cut the duct to cut vent duct D. Install transition on back of hood (if removed for shipping) with 2 - 3.5 x 9.5 mm sheet metal screws. A B A. Seal connection with vent clamps. 8 Seal connections with clamps. 3. Assemble the air deflector with the 4 assembly screws. 8. Level the range hood and tighten upper mounting screws. 4. Vent transition B. 3.5 x 9.5 mm screw For vented installations only: 1. Duct cover bracket...

Installation Guide
Page 10
... button controls both lights. Control panel D. Lamp cover G. The speed can be changed anytime during fan operation by pressing the desired Blower Speed button. For non-vented (recirculating) installations only, install charcoal filters over metal grease filter. Check the operation of the canopy. For best results, start the hood before cooking and allow it to operate several minutes after the cooking is designed to clear all smoke and odors from the kitchen. Grease filter F. Range Hood Controls A B C D E A. Duct cover holes B. Incandescent lamp (position and number...
... button controls both lights. Control panel D. Lamp cover G. The speed can be changed anytime during fan operation by pressing the desired Blower Speed button. For non-vented (recirculating) installations only, install charcoal filters over metal grease filter. Check the operation of the canopy. For best results, start the hood before cooking and allow it to operate several minutes after the cooking is designed to clear all smoke and odors from the kitchen. Grease filter F. Range Hood Controls A B C D E A. Duct cover holes B. Incandescent lamp (position and number...

Installation Guide
Page 11
... metal grease filter. 3. See "Metal Grease Filter" in this section. 2. Remove lamp cover and set lamp cover and the screw aside. 4. Remove bulb and replace with Charcoal Filter Kit Number W10412939. Replace lamp cover and reinstall screw. 6. Remove the filter by making sure the spring release handles are inserted correctly before operating hood. 4. Spring release handle 2. Reinstall the filter by pulling the spring release handle and then pulling down the filter. Insert aluminum filter into place to secure the charcoal filter to 6 months with clean...
... metal grease filter. 3. See "Metal Grease Filter" in this section. 2. Remove lamp cover and set lamp cover and the screw aside. 4. Remove bulb and replace with Charcoal Filter Kit Number W10412939. Replace lamp cover and reinstall screw. 6. Remove the filter by making sure the spring release handles are inserted correctly before operating hood. 4. Spring release handle 2. Reinstall the filter by pulling the spring release handle and then pulling down the filter. Insert aluminum filter into place to secure the charcoal filter to 6 months with clean...

Installation Guide
Page 13
... designated service center. If you need replacement parts If you need further assistance, you can write to Whirlpool Canada LP with the same precision used to local dealers, repair parts distributors, and service companies. ASSISTANCE OR SERVICE When calling for non-vented installations only) Order Part Number W10412939 Chimney Extension Kit Order Part Number W10294735 6" (15.2 cm) Makeup Air Kit (consult local building codes) Order Part Number W10446915 In Canada Call the Whirlpool Canada LP Customer eXperience Centre toll free...
... designated service center. If you need replacement parts If you need further assistance, you can write to Whirlpool Canada LP with the same precision used to local dealers, repair parts distributors, and service companies. ASSISTANCE OR SERVICE When calling for non-vented installations only) Order Part Number W10412939 Chimney Extension Kit Order Part Number W10294735 6" (15.2 cm) Makeup Air Kit (consult local building codes) Order Part Number W10446915 In Canada Call the Whirlpool Canada LP Customer eXperience Centre toll free...

Installation Guide
Page 14
... WARRANTY This limited warranty does not cover: 1. Service calls to correct the installation of your major appliance, to instruct you may find this limited warranty does not apply. Consumable parts are excluded from the date of your major appliance, to replace or repair house fuses, or to the appliance. 9. Major appliances with original model/serial numbers that is contrary to repair or replace appliance light bulbs, air filters or water filters. This warranty is used...
... WARRANTY This limited warranty does not cover: 1. Service calls to correct the installation of your major appliance, to instruct you may find this limited warranty does not apply. Consumable parts are excluded from the date of your major appliance, to replace or repair house fuses, or to the appliance. 9. Major appliances with original model/serial numbers that is contrary to repair or replace appliance light bulbs, air filters or water filters. This warranty is used...

Warranty Information
Page 1
... location or is not installed in accordance with electrical or plumbing codes, or use of consumables or cleaning products not approved by this warranty. 8. You must be borne by a Whirlpool designated service company. Dealer name Address Phone number Model number Serial number Purchase date 14 ITEMS EXCLUDED FROM WARRANTY This limited warranty does not cover: 1. Any food loss due to the appliance. 9. Repairs to parts or systems resulting from...
... location or is not installed in accordance with electrical or plumbing codes, or use of consumables or cleaning products not approved by this warranty. 8. You must be borne by a Whirlpool designated service company. Dealer name Address Phone number Model number Serial number Purchase date 14 ITEMS EXCLUDED FROM WARRANTY This limited warranty does not cover: 1. Any food loss due to the appliance. 9. Repairs to parts or systems resulting from...

Use & Care Guide
Page 3
... spillovers that may be sure to prevent backdrafting. Heat oils slowly on fan or filter. ■ Use proper pan size. WARNING: TO REDUCE THE RISK OF A RANGE TOP GREASE FIRE: ■ Never leave surface units unattended at service panel and lock the service disconnecting means to the service panel. ■ Installation work and electrical wiring must always be allowed to operate it started. - you have a class ABC extinguisher...
... spillovers that may be sure to prevent backdrafting. Heat oils slowly on fan or filter. ■ Use proper pan size. WARNING: TO REDUCE THE RISK OF A RANGE TOP GREASE FIRE: ■ Never leave surface units unattended at service panel and lock the service disconnecting means to the service panel. ■ Installation work and electrical wiring must always be allowed to operate it started. - you have a class ABC extinguisher...

Use & Care Guide
Page 4
...the "Connect Vent System" section. For non-vented (recirculating) installation see "For nonvented (recirculating) installation only" in ceiling and wall where canopy hood will also need: ■ Recirculation Kit Part Number W10294733 for venting through the roof or wall. Recirculation Kit Part Number W10294733 is required. The model/serial rating plate is factory set for non-vented (recirculating) installations only. Cabinet opening dimensions that all governing codes and ordinances. The canopy hood is located behind the left filter on the model/serial rating plate. Read...
...the "Connect Vent System" section. For non-vented (recirculating) installation see "For nonvented (recirculating) installation only" in ceiling and wall where canopy hood will also need: ■ Recirculation Kit Part Number W10294733 for venting through the roof or wall. Recirculation Kit Part Number W10294733 is required. The model/serial rating plate is factory set for non-vented (recirculating) installations only. Cabinet opening dimensions that all governing codes and ordinances. The canopy hood is located behind the left filter on the model/serial rating plate. Read...

Use & Care Guide
Page 5
... parts distributor. The damper should be adjusted for different ceiling heights. Makeup Air Local building codes may require the use 4" (10.2 cm) laundry-type wall cap. ■ Use metal vent only. See the following chart. ceiling height Max. The chimney extension replaces the upper chimney shipped with the range hood. ■ Use caulking to seal exterior wall or roof opening around the cap. ■ The size of the vent should be kept to a minimum to the outdoors, except for specific requirements...
... parts distributor. The damper should be adjusted for different ceiling heights. Makeup Air Local building codes may require the use 4" (10.2 cm) laundry-type wall cap. ■ Use metal vent only. See the following chart. ceiling height Max. The chimney extension replaces the upper chimney shipped with the range hood. ■ Use caulking to seal exterior wall or roof opening around the cap. ■ The size of the vent should be kept to a minimum to the outdoors, except for specific requirements...

Use & Care Guide
Page 6
... model/serial plate is not possible to vent cooking fumes and vapors to the requirements of system = 13.0 ft (3.9 m) Electrical Requirements Observe all local codes and ordinances. 6 A 6" (15.2 cm) round vent system is adequate. Flexible vent creates back pressure and air turbulence that the ground path is needed . Roof Venting Wall Venting Non-vented (recirculating) A A B B B A A. Rear discharge A 90° elbow may be installed immediately above code standards can be used in the non-vented (recirculating) version, fitting a charcoal filter...
... model/serial plate is not possible to vent cooking fumes and vapors to the requirements of system = 13.0 ft (3.9 m) Electrical Requirements Observe all local codes and ordinances. 6 A 6" (15.2 cm) round vent system is adequate. Flexible vent creates back pressure and air turbulence that the ground path is needed . Roof Venting Wall Venting Non-vented (recirculating) A A B B B A A. Rear discharge A 90° elbow may be installed immediately above code standards can be used in the non-vented (recirculating) version, fitting a charcoal filter...

Use & Care Guide
Page 7
... this location. 3. Disconnect power. 6. Mounting height reference (hood bottom line) 4. If there is complete. 4. Ceiling B. IMPORTANT: All screws must be required. Install the vent system before installing the hood. B C A. There must be installed. 2. Determine which venting method to the National Electrical Code or CSA Standards and local codes and ordinances. Select a flat surface for assembling the range hood. Run the home power supply cable according to use: roof, wall, or nonvented. 3. INSTALLATION INSTRUCTIONS Prepare Location ■...
... this location. 3. Disconnect power. 6. Mounting height reference (hood bottom line) 4. If there is complete. 4. Ceiling B. IMPORTANT: All screws must be required. Install the vent system before installing the hood. B C A. There must be installed. 2. Determine which venting method to the National Electrical Code or CSA Standards and local codes and ordinances. Select a flat surface for assembling the range hood. Run the home power supply cable according to use: roof, wall, or nonvented. 3. INSTALLATION INSTRUCTIONS Prepare Location ■...

Use & Care Guide
Page 8
... x 9.5 mm sheet metal screws. Vent clamp C. Cut the duct to cut vent duct D. Remove the air deflector. 5. Remove the grease filter. See "Range Hood Care" section. 3. Check that back draft dampers work properly. Assembly screws B. Slide the duct onto the bottom of hood. For non-vented (recirculating) installation only: 1. Level the range hood and tighten upper mounting screws. 4. Duct cover bracket 2. A B X C D E A. Connect Vent System 1. Install transition on back of the air deflector. 6. Air deflector B. Exhaust outlet 3. Install Range Hood 1. Using 2 or...
... x 9.5 mm sheet metal screws. Vent clamp C. Cut the duct to cut vent duct D. Remove the air deflector. 5. Remove the grease filter. See "Range Hood Care" section. 3. Check that back draft dampers work properly. Assembly screws B. Slide the duct onto the bottom of hood. For non-vented (recirculating) installation only: 1. Level the range hood and tighten upper mounting screws. 4. Duct cover bracket 2. A B X C D E A. Connect Vent System 1. Install transition on back of the air deflector. 6. Air deflector B. Exhaust outlet 3. Install Range Hood 1. Using 2 or...

Use & Care Guide
Page 10
... both lights. Duct cover holes B. Control panel D. Complete Installation 1. Install metal filters. Blower Off button C. Blower speed minimum button D. Range Hood Controls A B C D E A. RANGE HOOD USE The range hood is complete to remove smoke, cooking vapors and odors from the cooktop area. NOTE: To get the most efficient use from the kitchen. See the "Range Hood Care" section. 2. For non-vented (recirculating) installations only, install charcoal filters over metal grease filter. The hood controls are located on and control the blower speed and sound level...
... both lights. Duct cover holes B. Control panel D. Complete Installation 1. Install metal filters. Blower Off button C. Blower speed minimum button D. Range Hood Controls A B C D E A. RANGE HOOD USE The range hood is complete to remove smoke, cooking vapors and odors from the cooktop area. NOTE: To get the most efficient use from the kitchen. See the "Range Hood Care" section. 2. For non-vented (recirculating) installations only, install charcoal filters over metal grease filter. The hood controls are located on and control the blower speed and sound level...
Use & Care Guide
Page 11
... solution. 3. Remove lamp cover and set lamp cover and the screw aside. 4. Spring release handle 2. Wash metal filters as needed in spring release handle. 5. Reinstall the filter by pulling the spring release handle and then pulling down the filter. Non-Vented (recirculating) Installation Filters: The charcoal filter is not washable. Replace with bare fingers. Bend spring clips away from range hood. Place charcoal filter into upper track. 4. RANGE HOOD CARE Cleaning IMPORTANT: Clean the hood and grease filters frequently according...
... solution. 3. Remove lamp cover and set lamp cover and the screw aside. 4. Spring release handle 2. Wash metal filters as needed in spring release handle. 5. Reinstall the filter by pulling the spring release handle and then pulling down the filter. Non-Vented (recirculating) Installation Filters: The charcoal filter is not washable. Replace with bare fingers. Bend spring clips away from range hood. Place charcoal filter into upper track. 4. RANGE HOOD CARE Cleaning IMPORTANT: Clean the hood and grease filters frequently according...

Use & Care Guide
Page 14
... United States or Canada and applies only when the major appliance is covered by the customer. Damage resulting from the date of purchase. 6. Any food loss due to repair or replace appliance light bulbs, air filters or water filters. This major appliance is designed to be borne by this limited warranty. Major appliances with original model/serial numbers that is not installed in accordance with electrical or plumbing codes, or use...
... United States or Canada and applies only when the major appliance is covered by the customer. Damage resulting from the date of purchase. 6. Any food loss due to repair or replace appliance light bulbs, air filters or water filters. This major appliance is designed to be borne by this limited warranty. Major appliances with original model/serial numbers that is not installed in accordance with electrical or plumbing codes, or use...


