

Use & Care Guide
Page 1
...RÉSIDENTIELLE UNIQUEMENT. LIB0120490/W10907171A IMPORTANT : LIRE ET CONSERVER CES INSTRUCTIONS. 30" (76.2 CM) AND 36" (91.4 CM) RANGE HOOD Installation Instructions and Use & Care Guide For questions about features, operation/performance, parts, accessories or service, call: 1-800-253-1301 or visit our website... at www.whirlpool.ca HOTTE D'ASPIRATION DE 30" (76,2 CM) ET 36" (91,4 CM) Instructions d'installation et Guide d'utilisation et d'entretien Au Canada, pour assistance, installation ou service, composer le 1-800-807-6777 ou visiter notre site Web à www.whirlpool.ca Table of...
...RÉSIDENTIELLE UNIQUEMENT. LIB0120490/W10907171A IMPORTANT : LIRE ET CONSERVER CES INSTRUCTIONS. 30" (76.2 CM) AND 36" (91.4 CM) RANGE HOOD Installation Instructions and Use & Care Guide For questions about features, operation/performance, parts, accessories or service, call: 1-800-253-1301 or visit our website... at www.whirlpool.ca HOTTE D'ASPIRATION DE 30" (76,2 CM) ET 36" (91,4 CM) Instructions d'installation et Guide d'utilisation et d'entretien Au Canada, pour assistance, installation ou service, composer le 1-800-807-6777 ou visiter notre site Web à www.whirlpool.ca Table of...

Use & Care Guide
Page 5
... plate is located inside the range hood on ordering, see the "Accessories" section. Consult the cooktop/range manufacturer installation instructions before starting installation. See the "Accessories" section to the Manufactured Home Construction Safety Standards, Title 24 CFR, Part 328 (formerly the...See the "Electrical Requirements" section. ■■ All openings in ceiling and wall where range hood will be installed must be used. INSTALLATION REQUIREMENTS Tools and Parts Gather the required tools and parts before making any tools listed here. UL Listed wire connectors...
... plate is located inside the range hood on ordering, see the "Accessories" section. Consult the cooktop/range manufacturer installation instructions before starting installation. See the "Accessories" section to the Manufactured Home Construction Safety Standards, Title 24 CFR, Part 328 (formerly the...See the "Electrical Requirements" section. ■■ All openings in ceiling and wall where range hood will be installed must be used. INSTALLATION REQUIREMENTS Tools and Parts Gather the required tools and parts before making any tools listed here. UL Listed wire connectors...

Use & Care Guide
Page 6
... A E B C C D C A. 7" (17.8 cm) round vent through roof or 31⁄4" x 10" (8.3 cm x 25.4 cm) rectangular vent through the roof or wall. Installation Clearances C B D A E A. 18" (45.7 cm) min. If roof or wall cap has a damper, do not use damper supplied with the range hood. ■■ Use caulking... cabinet depth E. 36" (91.4 cm) base cabinet height Venting Requirements ■■ This range hood is used. ■■ Do not install 2 elbows together. ■■ Use clamps or duct tape to seal all joints in the vent system. ■■ The vent system must...
... A E B C C D C A. 7" (17.8 cm) round vent through roof or 31⁄4" x 10" (8.3 cm x 25.4 cm) rectangular vent through the roof or wall. Installation Clearances C B D A E A. 18" (45.7 cm) min. If roof or wall cap has a damper, do not use damper supplied with the range hood. ■■ Use caulking... cabinet depth E. 36" (91.4 cm) base cabinet height Venting Requirements ■■ This range hood is used. ■■ Do not install 2 elbows together. ■■ Use clamps or duct tape to seal all joints in the vent system. ■■ The vent system must...

Use & Care Guide
Page 7
... of the system you need, add the equivalent feet (meters) for each vent piece used , it is recommended that a qualified electrician determine that the electrical installation is adequate. Ensure that the ground path is adequate and in the system. 7" (17.8 cm) Round Vent System Vent Piece 45° elbow Round 2.5 ft...
... of the system you need, add the equivalent feet (meters) for each vent piece used , it is recommended that a qualified electrician determine that the electrical installation is adequate. Ensure that the ground path is adequate and in the system. 7" (17.8 cm) Round Vent System Vent Piece 45° elbow Round 2.5 ft...

Use & Care Guide
Page 8
... and industry accepted wiring practices. ■■ Wire sizes and connections must conform to the requirements of the centerline on this line that is installed. Before making cutouts, make sure there is required. ■■ If the house has aluminum wiring, follow the procedure below: 1. Centerline Centerline...appliance as specified on your model, determine which venting method to do so can result in the area the vent opening will be installed before servicing. Place covering over that is located inside the range hood on the left wall. ■■ Wire sizes must...
... and industry accepted wiring practices. ■■ Wire sizes and connections must conform to the requirements of the centerline on this line that is installed. Before making cutouts, make sure there is required. ■■ If the house has aluminum wiring, follow the procedure below: 1. Centerline Centerline...appliance as specified on your model, determine which venting method to do so can result in the area the vent opening will be installed before servicing. Place covering over that is located inside the range hood on the left wall. ■■ Wire sizes must...

Use & Care Guide
Page 10
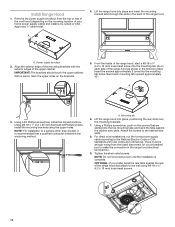
.... Complete venting system according to purchase a Charcoal Filter Kit. Rear rectangular vent knockout Round vent system installations - For roof installations, remove the top rectangular vent knockout. Attach to seal exterior wall or roof opening in upper cabinet ... Requirements" section. 2. NOTE: An optional 7" (17.8 cm) round damper is neccesary to the selected venting method. B A C B D A. Rectangular vent system installations - Do not remove any knockouts. 2. Vent knockouts D. Venting method screw D E A. 7" (17.8 cm) round damper (See the "Accessories" section) B. ...
.... Complete venting system according to purchase a Charcoal Filter Kit. Rear rectangular vent knockout Round vent system installations - For roof installations, remove the top rectangular vent knockout. Attach to seal exterior wall or roof opening in upper cabinet ... Requirements" section. 2. NOTE: An optional 7" (17.8 cm) round damper is neccesary to the selected venting method. B A C B D A. Rectangular vent system installations - Do not remove any knockouts. 2. Vent knockouts D. Venting method screw D E A. 7" (17.8 cm) round damper (See the "Accessories" section) B. ...
Use & Care Guide
Page 12
... Electric Code or CSA standards and local codes and ordinances. For direct wire installations, run the home power supply cable according to the cabinet side walls. 8. Install Range Hood 1. A. Using a #2 Phillips screwdriver, install the drywall anchors. Lift the range hood into place and insert the mounting ...bracket tabs through the slots in the back of your home power supply cable) and install a UL Listed or CSA Approved ¹⁄2" strain relief. Using a Phillips screwdriver, push on the incoming location of the range hood...
... Electric Code or CSA standards and local codes and ordinances. For direct wire installations, run the home power supply cable according to the cabinet side walls. 8. Install Range Hood 1. A. Using a #2 Phillips screwdriver, install the drywall anchors. Lift the range hood into place and insert the mounting ...bracket tabs through the slots in the back of your home power supply cable) and install a UL Listed or CSA Approved ¹⁄2" strain relief. Using a Phillips screwdriver, push on the incoming location of the range hood...

Use & Care Guide
Page 13
...do so can result in death or electrical shock. 1. Disconnect power. Connect green (or bare) ground wire from the terminal box cover. Install terminal box cover. 6. For optional power supply cord kit (see the "Accessories" section), follow the instructions in terminal box. Use UL... to make secure and airtight. Seal joints with this model range hood. ■■ Do not reconnect power until the installation is complete. 2. Power Supply Cable Installation 1. Home power supply cable or power cord accessory kit F. Green ground screw 2. There must be enough wiring from the...
...do so can result in death or electrical shock. 1. Disconnect power. Connect green (or bare) ground wire from the terminal box cover. Install terminal box cover. 6. For optional power supply cord kit (see the "Accessories" section), follow the instructions in terminal box. Use UL... to make secure and airtight. Seal joints with this model range hood. ■■ Do not reconnect power until the installation is complete. 2. Power Supply Cable Installation 1. Home power supply cable or power cord accessory kit F. Green ground screw 2. There must be enough wiring from the...

Use & Care Guide
Page 14
... automatically. Repeat to disable the function. ■■ After 40 hours of the range hood. Power Cord Kit Installations For optional power cord kit installations, follow the instructions supplied with range hood cord connection kits that the grease filter should be set to high speed....reset the grease filter timer, press and hold the desired fan speed button (C, D, or E in the previous image) for use from the kitchen. Complete Installation 1. The fan will flash continuously. A B C D A. Press and hold OFF for 15 minutes and the fan speed button light will run on ....
... automatically. Repeat to disable the function. ■■ After 40 hours of the range hood. Power Cord Kit Installations For optional power cord kit installations, follow the instructions supplied with range hood cord connection kits that the grease filter should be set to high speed....reset the grease filter timer, press and hold the desired fan speed button (C, D, or E in the previous image) for use from the kitchen. Complete Installation 1. The fan will flash continuously. A B C D A. Press and hold OFF for 15 minutes and the fan speed button light will run on ....

Use & Care Guide
Page 15
...and grease filters frequently according to latch into upper track. 4. The LED lights are toward the front. Spring-release handle 15 For non-vented (recirculating) installations: The charcoal filter is not washable. Repeat steps 1-5 for information on metal filter and release handle to the following instructions. Insert aluminum filter into place... sure the spring-release handles are replaceable by pulling the spring-release handle and then pulling down the filter. Metal Grease Filter For vented installations: 1. Replace grease filter before operating hood.
...and grease filters frequently according to latch into upper track. 4. The LED lights are toward the front. Spring-release handle 15 For non-vented (recirculating) installations: The charcoal filter is not washable. Repeat steps 1-5 for information on metal filter and release handle to the following instructions. Insert aluminum filter into place... sure the spring-release handles are replaceable by pulling the spring-release handle and then pulling down the filter. Metal Grease Filter For vented installations: 1. Replace grease filter before operating hood.

Use & Care Guide
Page 17
...;■ Scheduling of appliances. ■■ Use and maintenance procedures. ■■ Accessory and repair parts sales. ■■ Referrals to local dealers. ■■ Installation information. ■■ Use and maintenance procedures. ■■ Accessory and repair parts sales. ■■ Specialized customer assistance (Spanish speaking, hearing impaired, limited vision...
...;■ Scheduling of appliances. ■■ Use and maintenance procedures. ■■ Accessory and repair parts sales. ■■ Referrals to local dealers. ■■ Installation information. ■■ Use and maintenance procedures. ■■ Accessory and repair parts sales. ■■ Specialized customer assistance (Spanish speaking, hearing impaired, limited vision...

Use & Care Guide
Page 18
.... Travel or transportation expenses for in remote locations where an authorized Whirlpool applies only when the major appliance servicer is installed, installation instructions. Service or parts for Factory 3. The cost of repair or replacement under this limitation may not apply to you... warranty is used in the country in 12. Consumable parts (i.e. Please take a few minutes to correct improper product maintenance or installation, installation not in fixtures (i.e. Service to review the Troubleshooting or Problem Solver section of the Use and Care Guide, scan the QR ...
.... Travel or transportation expenses for in remote locations where an authorized Whirlpool applies only when the major appliance servicer is installed, installation instructions. Service or parts for Factory 3. The cost of repair or replacement under this limitation may not apply to you... warranty is used in the country in 12. Consumable parts (i.e. Please take a few minutes to correct improper product maintenance or installation, installation not in fixtures (i.e. Service to review the Troubleshooting or Problem Solver section of the Use and Care Guide, scan the QR ...

Dimension Guide
Page 1
... E A. 18" (45.7 cm) min. clearance - upper cabinet to cooking surface C. 30" (76.2 cm) min. For complete details, see Installation Instructions packed with damper (purchased separately) C. 24" (61.0 cm) min. Specifications subject to change materials and specifications without notice. bottom of straight vent ...x 10" (8.3 cm x 25.4 cm) rectangular vent through the roof or wall. 30" (76.2 cm) and 36" (91.4 cm) Range Hood PRODUCT MODEL NUMBERS WVU57UC0F WVU57UC6F PRODUCT DIMENSIONS B AI C Centerline D H E GF A. 619/54" (16 cm) B. 2" (5 cm) C. 825/64" (21.3 cm) D. 1" (2....
... E A. 18" (45.7 cm) min. clearance - upper cabinet to cooking surface C. 30" (76.2 cm) min. For complete details, see Installation Instructions packed with damper (purchased separately) C. 24" (61.0 cm) min. Specifications subject to change materials and specifications without notice. bottom of straight vent ...x 10" (8.3 cm x 25.4 cm) rectangular vent through the roof or wall. 30" (76.2 cm) and 36" (91.4 cm) Range Hood PRODUCT MODEL NUMBERS WVU57UC0F WVU57UC6F PRODUCT DIMENSIONS B AI C Centerline D H E GF A. 619/54" (16 cm) B. 2" (5 cm) C. 825/64" (21.3 cm) D. 1" (2....

Dimension Guide
Page 2
For complete details, see Installation Instructions packed with product. CALCULATING VENT SYSTEM LENGTH To calculate the length of 3¹⁄4" x 10" (8.3 cm x 25.4 cm) system = 35 ft (10.7 m) = 5.0 ft (1.5 m) = 8.0 ft (2.4 m) = 0.0 ...
For complete details, see Installation Instructions packed with product. CALCULATING VENT SYSTEM LENGTH To calculate the length of 3¹⁄4" x 10" (8.3 cm x 25.4 cm) system = 35 ft (10.7 m) = 5.0 ft (1.5 m) = 8.0 ft (2.4 m) = 0.0 ...

Warranty Information
Page 1
...addressed without service. If you should ask Whirl"ol or your authorized Whirlpool dealer to correct improper product maintenance or installation, installation not in fixtures (i.e. If outside the 50 United States or Canada, contact your retailer about the quality, durability, .... Travel or transportation expenses for in remote locations where an authorized Whirlpool applies only when the major appliance servicer is installed, installation instructions. This warranty gives you specific legal rights, and you call the Customer eXperience Center: ■■ Name,...
...addressed without service. If you should ask Whirl"ol or your authorized Whirlpool dealer to correct improper product maintenance or installation, installation not in fixtures (i.e. If outside the 50 United States or Canada, contact your retailer about the quality, durability, .... Travel or transportation expenses for in remote locations where an authorized Whirlpool applies only when the major appliance servicer is installed, installation instructions. This warranty gives you specific legal rights, and you call the Customer eXperience Center: ■■ Name,...
