
Use & Care Guide
Page 1
.../W11134241C 30" AND 36" (76.2 AND 91.4 CM) WALL‑MOUNT CANOPY RANGE HOOD Installation Instructions and Use and Care Guide For questions about features, operation/performance, parts, accessories or service, call: 1-800-253-1301 or visit our website at www.whirlpool.com In Canada, call 1-800-807-6777 or visit our website at www.whirlpool.ca HOTTE DE CUISINIÈRE À MONTAGE MURAL DE...
.../W11134241C 30" AND 36" (76.2 AND 91.4 CM) WALL‑MOUNT CANOPY RANGE HOOD Installation Instructions and Use and Care Guide For questions about features, operation/performance, parts, accessories or service, call: 1-800-253-1301 or visit our website at www.whirlpool.com In Canada, call 1-800-807-6777 or visit our website at www.whirlpool.ca HOTTE DE CUISINIÈRE À MONTAGE MURAL DE...
Use & Care Guide
Page 2
... or seriously injured if you don't follow instructions. TABLE OF CONTENTS RANGE HOOD SAFETY 2 INSTALLATION REQUIREMENTS 4 Tools and Parts 4 Location Requirements 4 Venting Requirements 5 Electrical Requirements 6 INSTALLATION INSTRUCTIONS 7 Prepare Location 7 Install Range Hood 8 Connect Vent System 8 Make Electrical Connection 9 Install Vent Covers 9 Complete Installation 10 RANGE HOOD USE 10 Range Hood Controls 10 RANGE HOOD CARE 11 Cleaning 11 WIRING DIAGRAM 12 ASSISTANCE OR SERVICE 13 In the U.S.A 13 In Canada 13 Accessories 13 WARRANTY 14 TABLE DES MATIÈRES...
... or seriously injured if you don't follow instructions. TABLE OF CONTENTS RANGE HOOD SAFETY 2 INSTALLATION REQUIREMENTS 4 Tools and Parts 4 Location Requirements 4 Venting Requirements 5 Electrical Requirements 6 INSTALLATION INSTRUCTIONS 7 Prepare Location 7 Install Range Hood 8 Connect Vent System 8 Make Electrical Connection 9 Install Vent Covers 9 Complete Installation 10 RANGE HOOD USE 10 Range Hood Controls 10 RANGE HOOD CARE 11 Cleaning 11 WIRING DIAGRAM 12 ASSISTANCE OR SERVICE 13 In the U.S.A 13 In Canada 13 Accessories 13 WARRANTY 14 TABLE DES MATIÈRES...
Use & Care Guide
Page 3
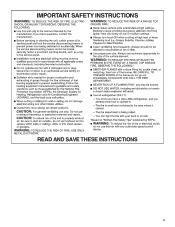
IMPORTANT SAFETY INSTRUCTIONS READ AND SAVE THESE INSTRUCTIONS 3
IMPORTANT SAFETY INSTRUCTIONS READ AND SAVE THESE INSTRUCTIONS 3

Use & Care Guide
Page 4
...; Three UL Listed wire connectors For Vented Installations, You Will Also Need: ■■ One wall or roof cap ■■ Metal vent system For Non-Vented (Recirculating) Installations, You Will Also Need: ■■ Recirculation Kit - for use with cooktops with local codes. It is factory set for Mobile Home Construction and Safety, Title 24, HUD, Part 280) or, when such standard is required. See the "Electrical Requirements" section. The canopy hood is the installer's responsibility...
...; Three UL Listed wire connectors For Vented Installations, You Will Also Need: ■■ One wall or roof cap ■■ Metal vent system For Non-Vented (Recirculating) Installations, You Will Also Need: ■■ Recirculation Kit - for use with cooktops with local codes. It is factory set for Mobile Home Construction and Safety, Title 24, HUD, Part 280) or, when such standard is required. See the "Electrical Requirements" section. The canopy hood is the installer's responsibility...
Use & Care Guide
Page 5
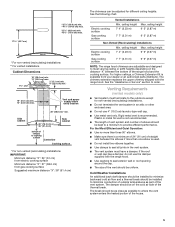
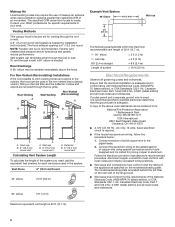
.... Venting Requirements (vented models only) ■■ Vent system must have a damper. For the Most Efficient and Quiet Operation: ■■ Use no more than one elbow is not recommended. ■■ The length of vent system and number of outside temperatures as possible to the outdoors except for different ceiling heights. Vented Installations Electric cooking surface Gas cooking surface Min. The chimney extension replaces the upper chimney shipped with the range hood. ■■ Use caulking to cooking surface...
.... Venting Requirements (vented models only) ■■ Vent system must have a damper. For the Most Efficient and Quiet Operation: ■■ Use no more than one elbow is not recommended. ■■ The length of vent system and number of outside temperatures as possible to the outdoors except for different ceiling heights. Vented Installations Electric cooking surface Gas cooking surface Min. The chimney extension replaces the upper chimney shipped with the range hood. ■■ Use caulking to cooking surface...
Use & Care Guide
Page 6
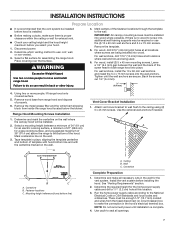
... electrical installation is required. ■■ If the house has aluminum wiring, follow the procedure below: 1. Roof Venting A Wall Venting Non-Vented (Recirculating) A B B B A A. Aluminum/copper connection must conform with local codes and industry accepted wiring practices. ■■ Wire sizes and connections must conform to the pigtail leads. 2. Makeup Air Local building codes may be installed immediately above code standards can be used in the non-vented (recirculating) version, fitting a charcoal filter and the deflector. The hood exhaust...
... electrical installation is required. ■■ If the house has aluminum wiring, follow the procedure below: 1. Roof Venting A Wall Venting Non-Vented (Recirculating) A B B B A A. Aluminum/copper connection must conform with local codes and industry accepted wiring practices. ■■ Wire sizes and connections must conform to the pigtail leads. 2. Makeup Air Local building codes may be installed immediately above code standards can be used in the non-vented (recirculating) version, fitting a charcoal filter and the deflector. The hood exhaust...
Use & Care Guide
Page 7
... be installed before hood is installed. ■■ Before making cutouts, make the connection in the hood's electrical terminal box. IMPORTANT: All canopy mounting screws must be installed. 2. Tighten until installation is complete. 4. Attach vent cover bracket to wall flush to do so can result in back or other injury. 4. Mark centers of template with hood bottom line and with the centerline marked on the wall. Range Hood Mounting Screws Installation 1. Ceiling B. Wall C. Determine the required height for the home power supply cable...
... be installed before hood is installed. ■■ Before making cutouts, make the connection in the hood's electrical terminal box. IMPORTANT: All canopy mounting screws must be installed. 2. Tighten until installation is complete. 4. Attach vent cover bracket to wall flush to do so can result in back or other injury. 4. Mark centers of template with hood bottom line and with the centerline marked on the wall. Range Hood Mounting Screws Installation 1. Ceiling B. Wall C. Determine the required height for the home power supply cable...
Use & Care Guide
Page 8
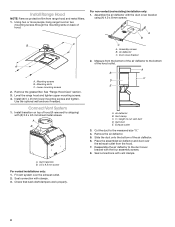
...the exhaust outlet from range hood and metal filters. 1. Remove the grease filter. Measure from the bottom of the air deflector to the measured size "X." 4. X = length to the duct cover bracket with the four assembly screws. 8. Seal connections with the duct cover bracket using (4) 4.2 x 8 mm screws. Mounting slots C. A B C A. Reassemble the air deflector to cut vent duct D. Vent transition B. 3.5 x 9.5 mm screw For vented installations only: 1. Lower mounting screws 2. Use the optional wall anchors if needed. Air deflector C. Place the assembled air deflector...
...the exhaust outlet from range hood and metal filters. 1. Remove the grease filter. Measure from the bottom of the air deflector to the measured size "X." 4. X = length to the duct cover bracket with the four assembly screws. 8. Seal connections with the duct cover bracket using (4) 4.2 x 8 mm screws. Mounting slots C. A B C A. Reassemble the air deflector to cut vent duct D. Vent transition B. 3.5 x 9.5 mm screw For vented installations only: 1. Lower mounting screws 2. Use the optional wall anchors if needed. Air deflector C. Place the assembled air deflector...
Use & Care Guide
Page 9
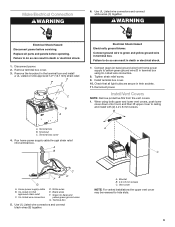
Replace all light bulbs are secure in terminal box. Tighten strain relief screw. 9. Install Vent Covers NOTE: Remove protective film from home power supply to green and yellow ground wire in their sockets. 11. B A. Terminal box A B. Use UL Listed wire connectors and connect black wires (E) together. WARNING Electrical Shock Hazard Disconnect power before operating. Remove the knockout in death or electrical shock. 7. Connect green (or bare) ground wire from the vent covers. 1. Run home power supply cable through strain relief...
Replace all light bulbs are secure in terminal box. Tighten strain relief screw. 9. Install Vent Covers NOTE: Remove protective film from home power supply to green and yellow ground wire in their sockets. 11. B A. Terminal box A B. Use UL Listed wire connectors and connect black wires (E) together. WARNING Electrical Shock Hazard Disconnect power before operating. Remove the knockout in death or electrical shock. 7. Connect green (or bare) ground wire from the vent covers. 1. Run home power supply cable through strain relief...
Use & Care Guide
Page 10
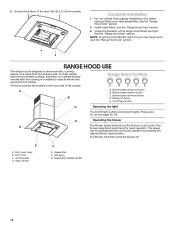
...new range hood, read the "Range Hood Use" section. Check the operation of the duct with (2) 4.2 x 8 mm screws. Range Hood Controls A B C DE A A. Blower off . The speed can be changed anytime during fan operation by pressing the desired Blower Speed button. Duct cover C. Grease filter F. See the "Range Hood Care" section. 2. Install metal filters. For non-vented (recirculating) installations only, install charcoal filters over metal grease filter. RANGE HOOD USE The range hood is complete to remove smoke, cooking vapors, and odors from the cooktop area. LED lights...
...new range hood, read the "Range Hood Use" section. Check the operation of the duct with (2) 4.2 x 8 mm screws. Range Hood Controls A B C DE A A. Blower off . The speed can be changed anytime during fan operation by pressing the desired Blower Speed button. Duct cover C. Grease filter F. See the "Range Hood Care" section. 2. Install metal filters. For non-vented (recirculating) installations only, install charcoal filters over metal grease filter. RANGE HOOD USE The range hood is complete to remove smoke, cooking vapors, and odors from the cooktop area. LED lights...
Use & Care Guide
Page 11
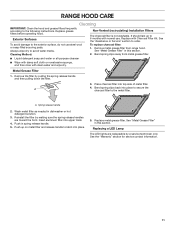
.... Replace with normal use steel wool or soap-filled scouring pads. See the "Assistance or Service" section to the following instructions. Bend spring clips away from range hood. Spring release handle 2. Replace metal grease filter. Exterior Surfaces To avoid damage to the metal filter. Cleaning Method: Non-Vented (recirculating) Installation Filters The charcoal filter is not washable. See "Metal Grease Filter" in spring release handle. 5. Remove the filter by a service technician only. See the "Warranty...
.... Replace with normal use steel wool or soap-filled scouring pads. See the "Assistance or Service" section to the following instructions. Bend spring clips away from range hood. Spring release handle 2. Replace metal grease filter. Exterior Surfaces To avoid damage to the metal filter. Cleaning Method: Non-Vented (recirculating) Installation Filters The charcoal filter is not washable. See "Metal Grease Filter" in spring release handle. 5. Remove the filter by a service technician only. See the "Warranty...
Use & Care Guide
Page 12
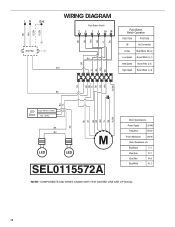
... RD WH BR YL BU LN Gnd EMI Filter WIRING DIAGRAM Push Button Switch BU WH Push Button Switch Operation FUNCTION POSITION Off No Connection Lamps Blue/Yellow (M-La) Low Speed Brown/White (L-1) Med Speed Brown/Red (L-2) High Speed Brown/Black (L-3) BR YL BK RD WH ...GY BU BU YL BK RD WH YL/GN BK BU YL RD BU GY BK RD WH YL BR YL/GN LED Driver Output: 700mA (2-15 VDC) + - Input: 120 VAC BK BU SEL0115572A Motor Specifications Power...
... RD WH BR YL BU LN Gnd EMI Filter WIRING DIAGRAM Push Button Switch BU WH Push Button Switch Operation FUNCTION POSITION Off No Connection Lamps Blue/Yellow (M-La) Low Speed Brown/White (L-1) Med Speed Brown/Red (L-2) High Speed Brown/Black (L-3) BR YL BK RD WH ...GY BU BU YL BK RD WH YL/GN BK BU YL RD BU GY BK RD WH YL BR YL/GN LED Driver Output: 700mA (2-15 VDC) + - Input: 120 VAC BK BU SEL0115572A Motor Specifications Power...
Use & Care Guide
Page 13
... Parts If you use only factory specified parts. To locate factory specified replacement parts in this manual. In Canada Call the Whirlpool Canada Customer eXperience Centre toll-free: 1-800-807-6777, or visit our website at www.whirlpool.com. Accessories Recirculation Kit (for non-vented installations only) Order Part Number W10294733 Charcoal Filter Kit (for non-vented installations only) Order Part Number W10412939 Chimney Extension Kit (Stainless Steel) Order Part Number EXTKIT10ES Chimney Extension Kit (Black Stainless Steel) Order Part Number EXTKIT10HV 6" (15.2 cm) Makeup Air Kit...
... Parts If you use only factory specified parts. To locate factory specified replacement parts in this manual. In Canada Call the Whirlpool Canada Customer eXperience Centre toll-free: 1-800-807-6777, or visit our website at www.whirlpool.com. Accessories Recirculation Kit (for non-vented installations only) Order Part Number W10294733 Charcoal Filter Kit (for non-vented installations only) Order Part Number W10412939 Chimney Extension Kit (Stainless Steel) Order Part Number EXTKIT10ES Chimney Extension Kit (Black Stainless Steel) Order Part Number EXTKIT10HV 6" (15.2 cm) Makeup Air Kit...
Use & Care Guide
Page 14
... electrical or plumbing (i.e. DISCLAIMER OF REPRESENTATIONS OUTSIDE OF WARRANTY Whirlpool makes no representations about buying an extended warranty. WHIRLPOOL CORPORATION MAJOR APPLIANCE LIMITED WARRANTY ATTACH YOUR RECEIPT HERE. Please have other rights that comes with original model/serial numbers removed, altered, or not easily determined. Service to correct improper product maintenance or installation, installation not in materials and workmanship and is installed, operated, and maintained according to instructions...
... electrical or plumbing (i.e. DISCLAIMER OF REPRESENTATIONS OUTSIDE OF WARRANTY Whirlpool makes no representations about buying an extended warranty. WHIRLPOOL CORPORATION MAJOR APPLIANCE LIMITED WARRANTY ATTACH YOUR RECEIPT HERE. Please have other rights that comes with original model/serial numbers removed, altered, or not easily determined. Service to correct improper product maintenance or installation, installation not in materials and workmanship and is installed, operated, and maintained according to instructions...

Warranty Information
Page 1
... review the Troubleshooting or Problem Solver section of purchase including dealer or retailer name and address IF YOU NEED SERVICE: 1. LIMITATION OF REMEDIES; This warranty gives you specific legal rights, and you call the Customer eXperience Center: ■ Name, address, and telephone number ■ Model number and serial number ■ A clear, detailed description of the problem ■ Proof of the Use and Care Guide. 2. ONE YEAR LIMITED WARRANTY WHAT IS COVERED...
... review the Troubleshooting or Problem Solver section of purchase including dealer or retailer name and address IF YOU NEED SERVICE: 1. LIMITATION OF REMEDIES; This warranty gives you specific legal rights, and you call the Customer eXperience Center: ■ Name, address, and telephone number ■ Model number and serial number ■ A clear, detailed description of the problem ■ Proof of the Use and Care Guide. 2. ONE YEAR LIMITED WARRANTY WHAT IS COVERED...


