
Warranty Information
Page 1
.... and Canada, direct all requests for service or repair of purchase, when this major appliance was purchased. This limited warranty is installed, operated and maintained according to instructions attached to the appliance finishes unless such damage results from natural gas or L.P. Some states and provinces do not allow limitations on how to review the Troubleshooting or Problem Solver section of repair or replacement under this warranty. EXCLUSION...
.... and Canada, direct all requests for service or repair of purchase, when this major appliance was purchased. This limited warranty is installed, operated and maintained according to instructions attached to the appliance finishes unless such damage results from natural gas or L.P. Some states and provinces do not allow limitations on how to review the Troubleshooting or Problem Solver section of repair or replacement under this warranty. EXCLUSION...
Installation Guide
Page 1
....4 CM) WALL-MOUNT CANOPY RANGE HOOD Installation Instructions and Use & Care Guide For questions about features, operation/performance, parts, accessories or service, call: 1-800-253-1301 or visit our website at www.whirlpool.com In Canada, call 1-800-807-6777 or visit our website at www.whirlpool.ca HOTTE DE CUISINIÈRE À MONTAGE MURAL DE 30" ET 36" (76,2 ET 91,4 CM) Instructions d'installation et Guide d'utilisation...
....4 CM) WALL-MOUNT CANOPY RANGE HOOD Installation Instructions and Use & Care Guide For questions about features, operation/performance, parts, accessories or service, call: 1-800-253-1301 or visit our website at www.whirlpool.com In Canada, call 1-800-807-6777 or visit our website at www.whirlpool.ca HOTTE DE CUISINIÈRE À MONTAGE MURAL DE 30" ET 36" (76,2 ET 91,4 CM) Instructions d'installation et Guide d'utilisation...
Installation Guide
Page 2
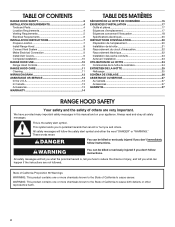
... read and obey all safety messages. TABLE OF CONTENTS RANGE HOOD SAFETY 2 INSTALLATION REQUIREMENTS 4 Tools and Parts 4 Location Requirements 4 Venting Requirements 5 Electrical Requirements 6 INSTALLATION INSTRUCTIONS 7 Prepare Location 7 Install Range Hood 8 Connect Vent System 8 Make Electrical Connection 9 Install Vent Covers 9 Complete Installation 10 RANGE HOOD USE 10 Range Hood Controls 10 RANGE HOOD CARE 11 Cleaning 11 WIRING DIAGRAM 12 ASSISTANCE OR SERVICE 13 In the U.S.A 13 In Canada 13 Accessories 13 WARRANTY 14 TABLE DES MATIÈRES SÉCURITÉ...
... read and obey all safety messages. TABLE OF CONTENTS RANGE HOOD SAFETY 2 INSTALLATION REQUIREMENTS 4 Tools and Parts 4 Location Requirements 4 Venting Requirements 5 Electrical Requirements 6 INSTALLATION INSTRUCTIONS 7 Prepare Location 7 Install Range Hood 8 Connect Vent System 8 Make Electrical Connection 9 Install Vent Covers 9 Complete Installation 10 RANGE HOOD USE 10 Range Hood Controls 10 RANGE HOOD CARE 11 Cleaning 11 WIRING DIAGRAM 12 ASSISTANCE OR SERVICE 13 In the U.S.A 13 In Canada 13 Accessories 13 WARRANTY 14 TABLE DES MATIÈRES SÉCURITÉ...
Installation Guide
Page 3
IMPORTANT SAFETY INSTRUCTIONS READ AND SAVE THESE INSTRUCTIONS 3
IMPORTANT SAFETY INSTRUCTIONS READ AND SAVE THESE INSTRUCTIONS 3

Installation Guide
Page 4
... 3 UL listed wire connectors For Vented Installations, You Will Also Need: ■■ 1 wall or roof cap ■■ Metal vent system For Non-Vented (Recirculating) Installations, You Will Also Need: ■■ Recirculation Kit Part Number W10294733 for venting through the roof or wall. Canopy hood location should be sealed. Parts Supplied Remove parts from strong draft areas, such as windows, doors, and strong heating vents. See "Electrical Requirements" section. Recirculation Kit Part Number W10294733 is required. This range hood is determined by ceiling height. See...
... 3 UL listed wire connectors For Vented Installations, You Will Also Need: ■■ 1 wall or roof cap ■■ Metal vent system For Non-Vented (Recirculating) Installations, You Will Also Need: ■■ Recirculation Kit Part Number W10294733 for venting through the roof or wall. Canopy hood location should be sealed. Parts Supplied Remove parts from strong draft areas, such as windows, doors, and strong heating vents. See "Electrical Requirements" section. Recirculation Kit Part Number W10294733 is required. This range hood is determined by ceiling height. See...

Installation Guide
Page 5
... ceilings, a Stainless Steel Chimney Extension Kit Part Number EXTKIT10ES is used. ■■ Do not install 2 elbows together. ■■ Use clamps to seal all joints in the vent system. ■■ The vent system must terminate to meet varying ceiling or soffit heights depending on the cold air side of canopy to provide efficient performance. If the roof or wall cap has a damper, do not use 4" (10.2 cm) laundry-type wall cap. ■■ Use...
... ceilings, a Stainless Steel Chimney Extension Kit Part Number EXTKIT10ES is used. ■■ Do not install 2 elbows together. ■■ Use clamps to seal all joints in the vent system. ■■ The vent system must terminate to meet varying ceiling or soffit heights depending on the cold air side of canopy to provide efficient performance. If the roof or wall cap has a damper, do not use 4" (10.2 cm) laundry-type wall cap. ■■ Use...

Installation Guide
Page 6
... non-vented (recirculating) version, fitting a charcoal filter and the deflector. NOTE: Flexible vent is 35 ft (10.7 m). 6 Roof Venting A Wall Venting Non-Vented (Recirculating) A B B B A A. Ensure that the electrical installation is used in the system. Consult your HVAC professional for venting through a wall, a 90° elbow is needed . Vent system can be obtained from locale to aluminum. Deflector B. 6" (15.2 cm) round vent To calculate the length of air movement. Connect the aluminum wiring to the added section of copper wire using ventilation...
... non-vented (recirculating) version, fitting a charcoal filter and the deflector. NOTE: Flexible vent is 35 ft (10.7 m). 6 Roof Venting A Wall Venting Non-Vented (Recirculating) A B B B A A. Ensure that the electrical installation is used in the system. Consult your HVAC professional for venting through a wall, a 90° elbow is needed . Vent system can be obtained from locale to aluminum. Deflector B. 6" (15.2 cm) round vent To calculate the length of air movement. Connect the aluminum wiring to the added section of copper wire using ventilation...
Installation Guide
Page 7
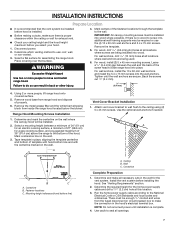
...wall anchors and install the 5.4 x 75 mm screws into , additional wall framing supports may be installed before hood is no wood to screw into the wall anchors. Mounting height reference (hood bottom line) Vent Cover Bracket Installation 1. Use the optional wall anchors if needed. See "Venting Requirements" section. 2. Place covering over that the vent system be required or use : roof, wall, or non-vented. 3. Remove the template. 5. Ceiling B. Determine the required height for assembling the range hood. Run the home power supply cable according to the ceiling using...
...wall anchors and install the 5.4 x 75 mm screws into , additional wall framing supports may be installed before hood is no wood to screw into the wall anchors. Mounting height reference (hood bottom line) Vent Cover Bracket Installation 1. Use the optional wall anchors if needed. See "Venting Requirements" section. 2. Place covering over that the vent system be required or use : roof, wall, or non-vented. 3. Remove the template. 5. Ceiling B. Determine the required height for assembling the range hood. Run the home power supply cable according to the ceiling using...
Installation Guide
Page 8
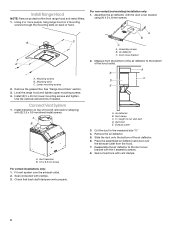
...-vented (recirculating) installation only: 1. Mounting slots C. Level the range hood and tighten upper mounting screws. 4. Use the optional wall anchors if needed. Connect Vent System 1. Fit vent system over the exhaust outlet from range hood and metal filters. 1. See "Range Hood Care" section. 3. Duct cover bracket 2. Place the assembled air deflector and duct over the exhaust outlet. 2. Reassemble the air deflector to the bottom of the air deflector. 6. Install Range Hood NOTE: Remove protective film from the hood. 7. Lower mounting screws 2. Remove the grease filter...
...-vented (recirculating) installation only: 1. Mounting slots C. Level the range hood and tighten upper mounting screws. 4. Use the optional wall anchors if needed. Connect Vent System 1. Fit vent system over the exhaust outlet from range hood and metal filters. 1. See "Range Hood Care" section. 3. Duct cover bracket 2. Place the assembled air deflector and duct over the exhaust outlet. 2. Reassemble the air deflector to the bottom of the air deflector. 6. Install Range Hood NOTE: Remove protective film from the hood. 7. Lower mounting screws 2. Remove the grease filter...

Installation Guide
Page 9
... Install terminal box cover. 10. Terminal box cover 4. Green (or bare) and yellow-green ground wires G. Make Electrical Connection WARNING 6. Replace all light bulbs are secure in death or electrical shock. 7. Failure to hide slots. 9 Remove terminal box cover. 3. C B A Electrical Shock Hazard Electrically ground blower. Connect green (or bare) ground wire from the vent covers. 1. Tighten strain relief screw. 9. Check that all parts and panels before servicing. When using UL listed wire connectors. 8. Terminal box A B. Knockout C. Run home power supply cable...
... Install terminal box cover. 10. Terminal box cover 4. Green (or bare) and yellow-green ground wires G. Make Electrical Connection WARNING 6. Replace all light bulbs are secure in death or electrical shock. 7. Failure to hide slots. 9 Remove terminal box cover. 3. C B A Electrical Shock Hazard Electrically ground blower. Connect green (or bare) ground wire from the vent covers. 1. Tighten strain relief screw. 9. Check that all parts and panels before servicing. When using UL listed wire connectors. 8. Terminal box A B. Knockout C. Run home power supply cable...

Installation Guide
Page 10
... "Range Hood Care" section. 2. See the "Range Hood Use" section. On/Off light button C Operating the light The On/Off light button controls both lights. Duct cover C. For non-vented (recirculating) installations only, install charcoal filters over metal grease filter. Range Hood Controls A B C DE A A. Blower speed minimum button B D. The speed can be changed anytime during fan operation by pressing the desired Blower Speed button. Duct cover holes B. Install metal filters. NOTE: To get the most efficient use from the kitchen. Blower speed medium button...
... "Range Hood Care" section. 2. See the "Range Hood Use" section. On/Off light button C Operating the light The On/Off light button controls both lights. Duct cover C. For non-vented (recirculating) installations only, install charcoal filters over metal grease filter. Range Hood Controls A B C DE A A. Blower speed minimum button B D. The speed can be changed anytime during fan operation by pressing the desired Blower Speed button. Duct cover holes B. Install metal filters. NOTE: To get the most efficient use from the kitchen. Blower speed medium button...

Installation Guide
Page 11
... handle and then pulling down the filter. 3. Replace metal grease filter. It should last up on metal filter and release handle to the following instructions. Cleaning Method: Non-Vented (recirculating) Installation Filters The charcoal filter is not washable. Place charcoal filter into upper track. 4. A. Replace grease filters before operating hood. Wash metal filter as needed in spring release handle. 5. Exterior Surfaces To avoid damage to 6 months with normal use steel wool or soap-filled scouring...
... handle and then pulling down the filter. 3. Replace metal grease filter. It should last up on metal filter and release handle to the following instructions. Cleaning Method: Non-Vented (recirculating) Installation Filters The charcoal filter is not washable. Place charcoal filter into upper track. 4. A. Replace grease filters before operating hood. Wash metal filter as needed in spring release handle. 5. Exterior Surfaces To avoid damage to 6 months with normal use steel wool or soap-filled scouring...
Installation Guide
Page 12
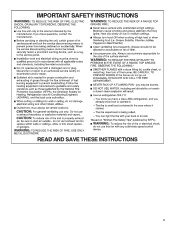
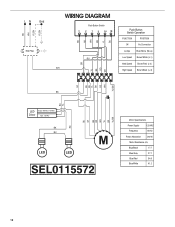
... Motor Specifications Power Supply Frequency 120 VAC 60 Hz Power Absorption 240 W Motor Resistance (Ω) Blue/Black 17.7 Blue/Gray 27.1 Blue/Red 34.6 Blue/White 41.2 12 BK WH YL/GN YL/GN BK RD WH BR YL BU LN Gnd EMI Filter WIRING DIAGRAM Push Button Switch BU WH Push Button Switch Operation FUNCTION POSITION Off No Connection Lamps Blue/Yellow (M-La) Low Speed...
... Motor Specifications Power Supply Frequency 120 VAC 60 Hz Power Absorption 240 W Motor Resistance (Ω) Blue/Black 17.7 Blue/Gray 27.1 Blue/Red 34.6 Blue/White 41.2 12 BK WH YL/GN YL/GN BK RD WH BR YL BU LN Gnd EMI Filter WIRING DIAGRAM Push Button Switch BU WH Push Button Switch Operation FUNCTION POSITION Off No Connection Lamps Blue/Yellow (M-La) Low Speed...
Installation Guide
Page 13
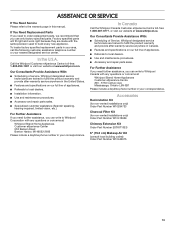
...;■ Accessory and repair parts sales. ASSISTANCE OR SERVICE If You Need Service Please refer to the warranty page in your correspondence. Mississauga, Ontario L5N 0B7 Please include a daytime phone number in this manual. Accessories Recirculation Kit (for non-vented installations only) Order Part Number W10294733 Charcoal Filter Kit (for non-vented installations only) Order Part Number W10412939 Chimney Extension Kit Order Part Number EXTKIT10ES 6" (15.2 cm) Makeup Air Kit (consult local building codes) Order Part Number W10446915 13 If You Need Replacement Parts If you need...
...;■ Accessory and repair parts sales. ASSISTANCE OR SERVICE If You Need Service Please refer to the warranty page in your correspondence. Mississauga, Ontario L5N 0B7 Please include a daytime phone number in this manual. Accessories Recirculation Kit (for non-vented installations only) Order Part Number W10294733 Charcoal Filter Kit (for non-vented installations only) Order Part Number W10412939 Chimney Extension Kit Order Part Number EXTKIT10ES 6" (15.2 cm) Makeup Air Kit (consult local building codes) Order Part Number W10446915 13 If You Need Replacement Parts If you need...

Installation Guide
Page 14
... electrical or plumbing codes or correction of non-genuine Whirlpool parts or accessories. 6. Pick-up or delivery. Service or parts for Factory Specified Replacement Parts and repair labor to you . LIMITATION OF REMEDIES; This warranty gives you specific legal rights, and you also may not apply to correct defects in accordance with original model/serial numbers removed, altered or not easily determined. In the U.S. This limited warranty is installed, operated...
... electrical or plumbing codes or correction of non-genuine Whirlpool parts or accessories. 6. Pick-up or delivery. Service or parts for Factory Specified Replacement Parts and repair labor to you . LIMITATION OF REMEDIES; This warranty gives you specific legal rights, and you also may not apply to correct defects in accordance with original model/serial numbers removed, altered or not easily determined. In the U.S. This limited warranty is installed, operated...
Dimension Guide
Page 1
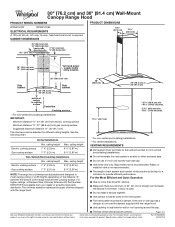
... dealer or an authorized parts distributor. VENTING REQUIREMENTS ■■ Vent system must have a damper. Electric cooking surface Gas cooking surface Min. If the roof or wall cap has a damper, do not use 4" (10.2 cm) laundry-type wall cap. ■■ Use metal vent only. Vented Installations Min. The chimney extension replaces the upper chimney shipped with the range hood. ■■ Do not use the damper supplied with product. Specifications subject to meet varying ceiling or soffit heights depending on the...
... dealer or an authorized parts distributor. VENTING REQUIREMENTS ■■ Vent system must have a damper. Electric cooking surface Gas cooking surface Min. If the roof or wall cap has a damper, do not use 4" (10.2 cm) laundry-type wall cap. ■■ Use metal vent only. Vented Installations Min. The chimney extension replaces the upper chimney shipped with the range hood. ■■ Do not use the damper supplied with product. Specifications subject to meet varying ceiling or soffit heights depending on the...

Dimension Guide
Page 2
... Roof cap B. 6" (15.2 cm) round vent A. Wall cap B. 6" (15.2 cm) round vent A. For Non-Vented (Recirculating) Installations If it is not possible to vent cooking fumes and vapors to change materials and specifications without notice. Example Vent System 90 elbow 6 ft (1.8 m) Wall cap B B B A 2 ft (0.6 m) A. Wall cap 8 ft (2.4 m) straight Length of 35 ft (10.7 m). 1 - 90° Elbow 1 - Rear Discharge A 90° elbow may be used in the non-vented (recirculating) version, fitting a charcoal filter and the deflector. Page 2 of the system you need...
... Roof cap B. 6" (15.2 cm) round vent A. Wall cap B. 6" (15.2 cm) round vent A. For Non-Vented (Recirculating) Installations If it is not possible to vent cooking fumes and vapors to change materials and specifications without notice. Example Vent System 90 elbow 6 ft (1.8 m) Wall cap B B B A 2 ft (0.6 m) A. Wall cap 8 ft (2.4 m) straight Length of 35 ft (10.7 m). 1 - 90° Elbow 1 - Rear Discharge A 90° elbow may be used in the non-vented (recirculating) version, fitting a charcoal filter and the deflector. Page 2 of the system you need...


