
Getting Started Guide
Page 1
ENGLISH ᕡ Installing the software IMPORTANT: Before connecting any cables, install the software that was included with your camera. www.kodak.com/go/c433support 1 After installing the software, return to this Getting Started Guide. Follow the on-screen instructions.
ENGLISH ᕡ Installing the software IMPORTANT: Before connecting any cables, install the software that was included with your camera. www.kodak.com/go/c433support 1 After installing the software, return to this Getting Started Guide. Follow the on-screen instructions.

Getting Started Guide
Page 3
ENGLISH ᕣ Turning on the camera ᕤ Setting the language, date/time OK www.kodak.com/go/c433support 1 2 OK to change for previous/next field to accept 3
ENGLISH ᕣ Turning on the camera ᕤ Setting the language, date/time OK www.kodak.com/go/c433support 1 2 OK to change for previous/next field to accept 3

Getting Started Guide
Page 6
To purchase accessories, visit www.kodak.com/go /easysharecenter To use an EasyShare dock, see its Getting Started Guide. 2 6 www.kodak.com/go /c433accessories. ENGLISH ᕧ Transferring pictures/videos USB cable 1 Kodak EasyShare printer dock or camera dock (May be sold separately.) For dock compatibility, visit www.kodak.com/go/dockcompatibility.
To purchase accessories, visit www.kodak.com/go /easysharecenter To use an EasyShare dock, see its Getting Started Guide. 2 6 www.kodak.com/go /c433accessories. ENGLISH ᕧ Transferring pictures/videos USB cable 1 Kodak EasyShare printer dock or camera dock (May be sold separately.) For dock compatibility, visit www.kodak.com/go/dockcompatibility.

Getting Started Guide
Page 7
... • interactive troubleshooting and repairs • interactive tutorials • FAQs • downloads • accessories • printing information • product registration www.kodak.com/go/c433support 7 Finish reading this book, so you can take and share your camera! ENGLISH ᕨ Keep learning about your best pictures! Congratulations! You have: • set up your...
... • interactive troubleshooting and repairs • interactive tutorials • FAQs • downloads • accessories • printing information • product registration www.kodak.com/go/c433support 7 Finish reading this book, so you can take and share your camera! ENGLISH ᕨ Keep learning about your best pictures! Congratulations! You have: • set up your...
Getting Started Guide
Page 10
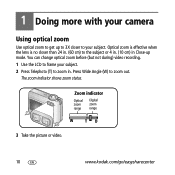
The zoom indicator shows zoom status. Zoom indicator Optical zoom range Digital zoom range W TD 3 Take the picture or video. 10 www.kodak.com/go/easysharecenter Optical zoom is effective when the lens is no closer than 24 in. (60 cm) to zoom in Close-up to 3X closer to zoom out. You can change optical zoom before (but not during) video recording. 1 Use the LCD to frame your subject. 2 Press Telephoto (T) to the subject or 4 in. (10 cm) in . Press Wide Angle (W) to your subject. 1 Doing more with your camera Using optical zoom Use optical zoom to get up mode.
The zoom indicator shows zoom status. Zoom indicator Optical zoom range Digital zoom range W TD 3 Take the picture or video. 10 www.kodak.com/go/easysharecenter Optical zoom is effective when the lens is no closer than 24 in. (60 cm) to zoom in Close-up to 3X closer to zoom out. You can change optical zoom before (but not during) video recording. 1 Use the LCD to frame your subject. 2 Press Telephoto (T) to the subject or 4 in. (10 cm) in . Press Wide Angle (W) to your subject. 1 Doing more with your camera Using optical zoom Use optical zoom to get up mode.
Getting Started Guide
Page 11
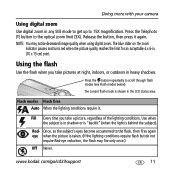
...camera Using digital zoom Use digital zoom in any Still mode to get up to scroll through flash modes (see Flash modes below). The current flash mode is taken. (If the lighting conditions require flash but do not require Red-eye reduction, the flash may notice decreased image quality when using digital zoom...Never. Press the button repeatedly to 15X magnification. Red- Fill Every time you take a picture, regardless of the lighting conditions. www.kodak.com/go/c433support 11 Press the Telephoto (T) button to the flash, then fires again eye when the picture is shown in heavy shadows...
...camera Using digital zoom Use digital zoom in any Still mode to get up to scroll through flash modes (see Flash modes below). The current flash mode is taken. (If the lighting conditions require flash but do not require Red-eye reduction, the flash may notice decreased image quality when using digital zoom...Never. Press the button repeatedly to 15X magnification. Red- Fill Every time you take a picture, regardless of the lighting conditions. www.kodak.com/go/c433support 11 Press the Telephoto (T) button to the flash, then fires again eye when the picture is shown in heavy shadows...

Getting Started Guide
Page 12
...-focus. Auto-focus framing marks are not available in Landscape. Doing more with sound. 12 www.kodak.com/go/easysharecenter Use this mode Auto For General picture taking modes Choose the mode that best suits your camera Zoom position Wide angle Telephoto Flash distance 2-11.5 ft (0.6-3.5 m) @ ISO 200 2- 6.6 ft (0.6-2.0 m) @...-and-shoot simplicity when taking pictures under special conditions. (See page 13.) Video Capturing video with your subjects and surroundings. The camera automatically sets the focus distance depending on the zoom position. Close-up Close range.
...-focus. Auto-focus framing marks are not available in Landscape. Doing more with sound. 12 www.kodak.com/go/easysharecenter Use this mode Auto For General picture taking modes Choose the mode that best suits your camera Zoom position Wide angle Telephoto Flash distance 2-11.5 ft (0.6-3.5 m) @ ISO 200 2- 6.6 ft (0.6-2.0 m) @...-and-shoot simplicity when taking pictures under special conditions. (See page 13.) Video Capturing video with your subjects and surroundings. The camera automatically sets the focus distance depending on the zoom position. Close-up Close range.

Getting Started Guide
Page 13
Sport Subjects that are in bright light. Minimizes red eye. Place the camera on a flat, steady surface or use a tripod. www.kodak.com/go/c433support 13 Beach Bright beach scenes. Flash does not fire. Party People indoors. Snow Bright snow scenes. Fireworks Fireworks displays. Children Action pictures ...
Sport Subjects that are in bright light. Minimizes red eye. Place the camera on a flat, steady surface or use a tripod. www.kodak.com/go/c433support 13 Beach Bright beach scenes. Flash does not fire. Party People indoors. Snow Bright snow scenes. Fireworks Fireworks displays. Children Action pictures ...

Getting Started Guide
Page 14
... on a tripod • 2-shot (one picture taken after 10 seconds and another picture taken 8 seconds later) 4 Place camera on a flat, steady surface or use a tripod. Doing more with your camera Use this SCN mode For Self- Night Night scenes or low-light conditions. Place the Portrait... camera on a flat surface or tripod. 5 Compose the scene. 6 Press the Shutter button halfway, then completely down. 14 www.kodak.com/go/easysharecenter Using the self-timer The Self-timer creates a 10-, ...
... on a tripod • 2-shot (one picture taken after 10 seconds and another picture taken 8 seconds later) 4 Place camera on a flat, steady surface or use a tripod. Doing more with your camera Use this SCN mode For Self- Night Night scenes or low-light conditions. Place the Portrait... camera on a flat surface or tripod. 5 Compose the scene. 6 Press the Shutter button halfway, then completely down. 14 www.kodak.com/go/easysharecenter Using the self-timer The Self-timer creates a 10-, ...

Getting Started Guide
Page 15
... stops when no storage space remains. Only the 2- The exposure compensation level is shown on the LCD or brighter. , and the LCD gets dimmer www.kodak.com/go/c433support 15 Doing more with your pictures darker or lighter. Use the same procedure to take a video, but: ■ Turn the Mode dial... available in video mode. Using exposure compensation to adjust brightness In Auto, Landscape, or Close-up mode, you can adjust exposure compensation to make your camera To cancel the self-timer, follow steps 1 and 2, select Off, then press OK.
... stops when no storage space remains. Only the 2- The exposure compensation level is shown on the LCD or brighter. , and the LCD gets dimmer www.kodak.com/go/c433support 15 Doing more with your pictures darker or lighter. Use the same procedure to take a video, but: ■ Turn the Mode dial... available in video mode. Using exposure compensation to adjust brightness In Auto, Landscape, or Close-up mode, you can adjust exposure compensation to make your camera To cancel the self-timer, follow steps 1 and 2, select Off, then press OK.

Getting Started Guide
Page 16
... framing marks are not centered in Landscape or Video mode. NOTE: Framing marks do not appear in the scene. 1 Press the Shutter button halfway. The camera attempts to take the picture. When the framing marks turn green, focus is not focusing on the desired subject (or if the framing marks disappear..., and repeat step 1. 3 Press the Shutter button completely down to focus on foreground subjects, even if the subjects are fixed at Center Wide. 16 www.kodak.com/go/easysharecenter
... framing marks are not centered in Landscape or Video mode. NOTE: Framing marks do not appear in the scene. 1 Press the Shutter button halfway. The camera attempts to take the picture. When the framing marks turn green, focus is not focusing on the desired subject (or if the framing marks disappear..., and repeat step 1. 3 Press the Shutter button completely down to focus on foreground subjects, even if the subjects are fixed at Center Wide. 16 www.kodak.com/go/easysharecenter

Getting Started Guide
Page 17
Next picture/video (during playback). www.kodak.com/go /c433accessories.) NOTE: Pictures taken at the 3.5 MP (3:2) quality setting are displayed at a 3:2 aspect ratio with your pictures/videos. 1 Press Review. (Press again to ... at the top of the LCD. Videos: OK Play/pause. To save battery power, use an optional Kodak EasyShare dock. (See www.kodak.com/go /c433support 17 2 Working with pictures/videos Reviewing pictures/videos on your camera Press the Review button to view and work with black bars at the top of the screen.
Next picture/video (during playback). www.kodak.com/go /c433accessories.) NOTE: Pictures taken at the 3.5 MP (3:2) quality setting are displayed at a 3:2 aspect ratio with your pictures/videos. 1 Press Review. (Press again to ... at the top of the LCD. Videos: OK Play/pause. To save battery power, use an optional Kodak EasyShare dock. (See www.kodak.com/go /c433support 17 2 Working with pictures/videos Reviewing pictures/videos on your camera Press the Review button to view and work with black bars at the top of the screen.

Getting Started Guide
Page 20
The original picture is copied, then cropped. The picture is saved. Press the Menu button to move the crop box. 5 Follow the screen prompts. Working with pictures/videos Cropping pictures 1 Press Review. 2 for previous/next. 3 Press Menu, choose Crop , then press OK. 4 Press Telephoto (T) to zoom in, or to exit the menu. 20 www.kodak.com/go/easysharecenter A cropped picture cannot be cropped again on the camera.
The original picture is copied, then cropped. The picture is saved. Press the Menu button to move the crop box. 5 Follow the screen prompts. Working with pictures/videos Cropping pictures 1 Press Review. 2 for previous/next. 3 Press Menu, choose Crop , then press OK. 4 Press Telephoto (T) to zoom in, or to exit the menu. 20 www.kodak.com/go/easysharecenter A cropped picture cannot be cropped again on the camera.

Getting Started Guide
Page 21
... not copied. www.kodak.com/go/c433support 21 Copy pictures or videos: 1 Press the Review button, then press the Menu button. 2 Press to highlight Copy , then press the OK button. 3 Press to highlight an option. 4 Press the OK button. Tags that : ■ A card is inserted in the camera. ■ The camera's picture storage...
... not copied. www.kodak.com/go/c433support 21 Copy pictures or videos: 1 Press the Review button, then press the Menu button. 2 Press to highlight Copy , then press the OK button. 3 Press to highlight an option. 4 Press the OK button. Tags that : ■ A card is inserted in the camera. ■ The camera's picture storage...
Getting Started Guide
Page 22
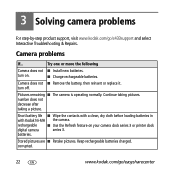
... charged. corrupted. 22 www.kodak.com/go /c433support and select Interactive Troubleshooting & Repairs. turn off. Pictures remaining ■ The camera is operating normally. Camera problems If... Continue taking a picture. rechargeable ■ Use the Refresh feature on . ■ Charge rechargeable batteries. turn on your camera dock series 3 or printer dock digital camera series 3. Camera does not ■ Remove...
... charged. corrupted. 22 www.kodak.com/go /c433support and select Interactive Troubleshooting & Repairs. turn off. Pictures remaining ■ The camera is operating normally. Camera problems If... Continue taking a picture. rechargeable ■ Use the Refresh feature on . ■ Charge rechargeable batteries. turn on your camera dock series 3 or printer dock digital camera series 3. Camera does not ■ Remove...
Getting Started Guide
Page 24
..., it is the sole remedy under this warranty. Wipe gently with any conditions and/or limitations stated herein. Warranty Kodak warrants Kodak EasyShare digital cameras and accessories (excluding batteries) to remove dust and dirt. See www.kodak.com/go /c433support. Retain the original dated sales receipt. Proof of the date of purchase. If replacement parts are...
..., it is the sole remedy under this warranty. Wipe gently with any conditions and/or limitations stated herein. Warranty Kodak warrants Kodak EasyShare digital cameras and accessories (excluding batteries) to remove dust and dirt. See www.kodak.com/go /c433support. Retain the original dated sales receipt. Proof of the date of purchase. If replacement parts are...

Getting Started Guide
Page 25
...incidental or consequential damages, so the above limitation may not apply to use items supplied by Kodak (such as a copy of the original dated Kodak EasyShare digital camera or accessory sales receipt. (Always keep the original for your customers for such damages resulting...accessories or attachments, failure to follow the operating instructions in the Kodak EasyShare digital cameras and accessories User's Guides. This warranty gives you specific rights, and you . Kodak makes no warranty or liability exists beyond Kodak's control, nor problems caused by failure to the purchaser in...
...incidental or consequential damages, so the above limitation may not apply to use items supplied by Kodak (such as a copy of the original dated Kodak EasyShare digital camera or accessory sales receipt. (Always keep the original for your customers for such damages resulting...accessories or attachments, failure to follow the operating instructions in the Kodak EasyShare digital cameras and accessories User's Guides. This warranty gives you specific rights, and you . Kodak makes no warranty or liability exists beyond Kodak's control, nor problems caused by failure to the purchaser in...
Getting Started Guide
Page 26
... an outlet on , the user is connected; 4) consult the dealer or an experienced radio/TV technician for additional suggestions. Appendix FCC compliance and advisory Kodak EasyShare C433 zoom digital camera This equipment has been tested and found to comply with the limits for a Class B digital device, pursuant to provide reasonable protection against harmful interference in a residential installation.
... an outlet on , the user is connected; 4) consult the dealer or an experienced radio/TV technician for additional suggestions. Appendix FCC compliance and advisory Kodak EasyShare C433 zoom digital camera This equipment has been tested and found to comply with the limits for a Class B digital device, pursuant to provide reasonable protection against harmful interference in a residential installation.
User's Guide
Page 1
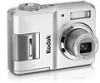
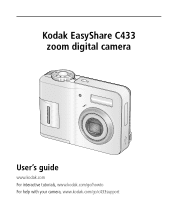
Kodak EasyShare C433 zoom digital camera User's guide www.kodak.com For interactive tutorials, www.kodak.com/go/howto For help with your camera, www.kodak.com/go/c433support
Kodak EasyShare C433 zoom digital camera User's guide www.kodak.com For interactive tutorials, www.kodak.com/go/howto For help with your camera, www.kodak.com/go/c433support
User's Guide
Page 5
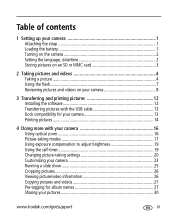
...pictures 12 Installing the software 12 Transferring pictures with the USB cable 13 Dock compatibility for your camera 13 Printing pictures 14 4 Doing more with your camera 16 Using optical zoom 16 Picture-taking modes 17 Using exposure compensation to adjust brightness 19 Using the self-timer 19... Changing picture-taking settings 20 Customizing your camera 23 Running a slide show 25 Cropping pictures 26 Viewing picture/video information 26 Copying pictures and videos 27 Pre-tagging for album names 27 Sharing your pictures 30 www.kodak.com/go/support iii
...pictures 12 Installing the software 12 Transferring pictures with the USB cable 13 Dock compatibility for your camera 13 Printing pictures 14 4 Doing more with your camera 16 Using optical zoom 16 Picture-taking modes 17 Using exposure compensation to adjust brightness 19 Using the self-timer 19... Changing picture-taking settings 20 Customizing your camera 23 Running a slide show 25 Cropping pictures 26 Viewing picture/video information 26 Copying pictures and videos 27 Pre-tagging for album names 27 Sharing your pictures 30 www.kodak.com/go/support iii


