User's Guide
Page 14
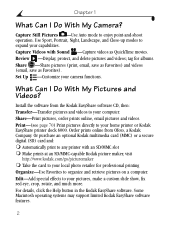
... more. What Can I Do With My Camera? Share-Print pictures, order prints online, email pictures and videos. Order prints online from the Kodak EasyShare software CD, then: Transfer-Transfer pictures and...Kodak EasyShare software features. 2 Review -Display, protect, and delete pictures and videos; Install the software from Ofoto, a Kodak Company. Make prints at an SD/MMC-capable Kodak picture maker, visit http://www.kodak.com/go/picturemaker ! Print-(see page 70) Print pictures directly to expand your computer. Or purchase an optional Kodak multimedia card (MMC) or a secure digital...
... more. What Can I Do With My Camera? Share-Print pictures, order prints online, email pictures and videos. Order prints online from the Kodak EasyShare software CD, then: Transfer-Transfer pictures and...Kodak EasyShare software features. 2 Review -Display, protect, and delete pictures and videos; Install the software from Ofoto, a Kodak Company. Make prints at an SD/MMC-capable Kodak picture maker, visit http://www.kodak.com/go/picturemaker ! Print-(see page 70) Print pictures directly to expand your computer. Or purchase an optional Kodak multimedia card (MMC) or a secure digital...

User's Guide
Page 17
.... AUTO OFF share In Still and Video modes, status icons appear on the camera screen. See Checking Camera Status, page 7. Redisplay the status icons. Press . Chapter 1 Turning On the Camera Ready light Mode dial delete AUTO OFF share EasyShare CX6445 menu review delete Rotate the Mode dial: Clockwise for still capture modes Counterclockwise for video mode...
.... AUTO OFF share In Still and Video modes, status icons appear on the camera screen. See Checking Camera Status, page 7. Redisplay the status icons. Press . Chapter 1 Turning On the Camera Ready light Mode dial delete AUTO OFF share EasyShare CX6445 menu review delete Rotate the Mode dial: Clockwise for still capture modes Counterclockwise for video mode...

User's Guide
Page 18
.... 3 Press to step 4 below, Setting the Date & Time, Anytime. The setting remains until you connect the camera. Setting the Date & Time, Anytime delete share EasyShare CX6445 Joystick/OK menu review Menu 1 Turn on your computer operating system, Kodak EasyShare software may allow your computer to adjust the date and time. Press next setting. 5 When finished, press...
.... 3 Press to step 4 below, Setting the Date & Time, Anytime. The setting remains until you connect the camera. Setting the Date & Time, Anytime delete share EasyShare CX6445 Joystick/OK menu review Menu 1 Turn on your computer operating system, Kodak EasyShare software may allow your computer to adjust the date and time. Press next setting. 5 When finished, press...

User's Guide
Page 19
..., shutter speed, and digital zoom values are displayed in the status area, press the Flash/Status button to redisplay the status information area at any time. Other icons temporarily disappear. 7 To check the current camera settings: Mode dial ! Turn the Mode dial from the Off position. More settings delete share EasyShare CX6445 menu review ! Press the...
..., shutter speed, and digital zoom values are displayed in the status area, press the Flash/Status button to redisplay the status information area at any time. Other icons temporarily disappear. 7 To check the current camera settings: Mode dial ! Turn the Mode dial from the Off position. More settings delete share EasyShare CX6445 menu review ! Press the...
User's Guide
Page 25
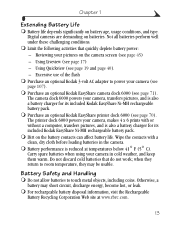
... deplete battery power: - Battery Safety and Handling ! Digital cameras are demanding on the camera screen (see page 107). ! Reviewing your camera, transfers pictures, and is also a battery charger for its included Kodak EasyShare Ni-MH rechargeable battery pack. ! Purchase an optional Kodak 3-volt AC adapter to power your camera in the camera. ! Do not allow batteries to room temperature, they...
... deplete battery power: - Battery Safety and Handling ! Digital cameras are demanding on the camera screen (see page 107). ! Reviewing your camera, transfers pictures, and is also a battery charger for its included Kodak EasyShare Ni-MH rechargeable battery pack. ! Purchase an optional Kodak 3-volt AC adapter to power your camera in the camera. ! Do not allow batteries to room temperature, they...

User's Guide
Page 27
...take the picture. When the ready light blinks green, the picture is red, wait until it on . To interrupt the EasyShare CX description, press any button. 2 Use the viewfinder or camera screen to frame your subject. (Press the OK button to turn it turns green. See page 17.) Ready light 3 ...is being saved; See Changing Optional Settings, page 25. 15 2 Taking Pictures The camera is ready to take pictures when you turn Liveview on -even if you are in Review, Share, or Setup. (In Video mode, the camera captures video.) Before you take a picture, make sure the storage location is set ...
...take the picture. When the ready light blinks green, the picture is red, wait until it on . To interrupt the EasyShare CX description, press any button. 2 Use the viewfinder or camera screen to frame your subject. (Press the OK button to turn it turns green. See page 17.) Ready light 3 ...is being saved; See Changing Optional Settings, page 25. 15 2 Taking Pictures The camera is ready to take pictures when you turn Liveview on -even if you are in Review, Share, or Setup. (In Video mode, the camera captures video.) Before you take a picture, make sure the storage location is set ...
User's Guide
Page 31
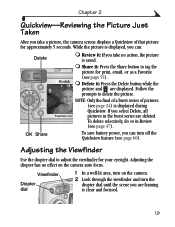
...page 55). ! Follow the prompts to adjust the viewfinder for approximately 5 seconds. Viewfinder Diopter dial 1 In a well-lit area, turn on the camera auto focus. Review it: If you are framing is saved. ! Adjusting the Viewfinder Use the diopter dial to delete the picture. Adjusting the diopter has no action...Press the Delete button while the picture and are deleted. To delete selectively, do so in the burst series are displayed. Chapter 2 Quickview-Reviewing the Picture Just Taken After you select Delete, all EasyShare CX644 pictures in Review (see page 47).
...page 55). ! Follow the prompts to adjust the viewfinder for approximately 5 seconds. Viewfinder Diopter dial 1 In a well-lit area, turn on the camera auto focus. Review it: If you are framing is saved. ! Adjusting the Viewfinder Use the diopter dial to delete the picture. Adjusting the diopter has no action...Press the Delete button while the picture and are deleted. To delete selectively, do so in the burst series are displayed. Chapter 2 Quickview-Reviewing the Picture Just Taken After you select Delete, all EasyShare CX644 pictures in Review (see page 47).

User's Guide
Page 37
All menu options are not available in all modes. Mode dial Turn for picture taking settings. Chapter 2 Changing Optional Settings Press the Menu button to access optional picture-taking modes delete AUTO OFF share EasyShare CX6445 menu Menu button review Menu Options Available Image Storage (page 10) Exposure Comp. (page 27) Picture Quality (page 28) Color Mode (page 29) White Balance (page 30) Picture Taking Modes Video Auto Sport Portrait Landscape Close-up Night 25
All menu options are not available in all modes. Mode dial Turn for picture taking settings. Chapter 2 Changing Optional Settings Press the Menu button to access optional picture-taking modes delete AUTO OFF share EasyShare CX6445 menu Menu button review Menu Options Available Image Storage (page 10) Exposure Comp. (page 27) Picture Quality (page 28) Color Mode (page 29) White Balance (page 30) Picture Taking Modes Video Auto Sport Portrait Landscape Close-up Night 25
User's Guide
Page 51
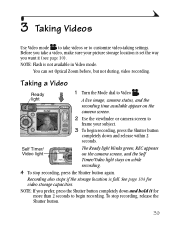
Taking a Video Ready light delete share EasyShare CX6445 1 Turn the Mode dial to begin recording, press the Shutter button completely down and hold it (see page 10). review 3 To begin recording. See page 104 for...release within 2 seconds. NOTE: If you want it for video storage capacities. A live image, camera status, and the recording time available appear on while recording. 4 To stop recording, release the...menu frame your picture storage location is set Optical Zoom before, but not during, video recording. Self Timer/ Video light The Ready light blinks green...
Taking a Video Ready light delete share EasyShare CX6445 1 Turn the Mode dial to begin recording, press the Shutter button completely down and hold it (see page 10). review 3 To begin recording. See page 104 for...release within 2 seconds. NOTE: If you want it for video storage capacities. A live image, camera status, and the recording time available appear on while recording. 4 To stop recording, release the...menu frame your picture storage location is set Optical Zoom before, but not during, video recording. Self Timer/ Video light The Ready light blinks green...
User's Guide
Page 52
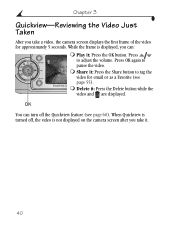
When Quickview is turned off the Quickview feature (see page 55). While the frame is not displayed on the camera screen after you take a video, the camera screen displays the first frame of the video for email or as a Favorite (see page 60). Play it : Press the Delete button while the ...the share video for approximately 5 seconds. Press OK again to delete pause the video. ! OK You can turn off , the video is displayed, you can: ! EasyShare CX ! Chapter 3 Quickview-Reviewing the Video Just Taken After you take it : Press the Share button to adjust the volume.
When Quickview is turned off the Quickview feature (see page 55). While the frame is not displayed on the camera screen after you take a video, the camera screen displays the first frame of the video for email or as a Favorite (see page 60). Play it : Press the Delete button while the ...the share video for approximately 5 seconds. Press OK again to delete pause the video. ! OK You can turn off , the video is displayed, you can: ! EasyShare CX ! Chapter 3 Quickview-Reviewing the Video Just Taken After you take it : Press the Share button to adjust the volume.

User's Guide
Page 55
.... 2 Turn the Mode dial to Video , then press the Self Timer button. 3 Press to highlight a Video Length option, then press the OK button: e e EasyShare CX6445 Unlimited-records until you stop recording or until storage is taken, press the Self Timer button. (The Self Timer setting remains active.) To turn off... Timer creates a 10-second delay between the time you are not displayed. (See page 104 for 2 seconds before the video is full. review NOTE: If the current storage location does not have adequate space, some video length options are in the scene. Move so that you press ...
.... 2 Turn the Mode dial to Video , then press the Self Timer button. 3 Press to highlight a Video Length option, then press the OK button: e e EasyShare CX6445 Unlimited-records until you stop recording or until storage is taken, press the Self Timer button. (The Self Timer setting remains active.) To turn off... Timer creates a 10-second delay between the time you are not displayed. (See page 104 for 2 seconds before the video is full. review NOTE: If the current storage location does not have adequate space, some video length options are in the scene. Move so that you press ...
User's Guide
Page 57
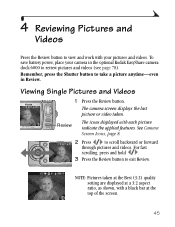
Viewing Single Pictures and Videos EasyShare CX6445 1 Press the Review button. menu Review review The camera screen displays the last picture or video taken. delete share EasyShare CX6445 2 Press to take a picture anytime-even in the optional Kodak EasyShare camera dock 6000 to view and work with your pictures and videos. NOTE: Pictures taken at the Best (3:2) quality setting are displayed at...
Viewing Single Pictures and Videos EasyShare CX6445 1 Press the Review button. menu Review review The camera screen displays the last picture or video taken. delete share EasyShare CX6445 2 Press to take a picture anytime-even in the optional Kodak EasyShare camera dock 6000 to view and work with your pictures and videos. NOTE: Pictures taken at the Best (3:2) quality setting are displayed at...
User's Guide
Page 58
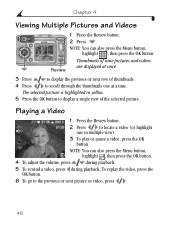
...video, press the OK button. NOTE: You can also press the Menu button, menu highlight , then press the OK button. delete AUTO OFF share EasyShare CX6445 NOTE: You can also press the Menu button, highlight , then press the OK button. 4 To adjust the volume, press during playback. 5 To... rewind a video, press during playback. review Thumbnails of thumbnails. 4 Press to the previous or next picture or video, press . 46 Review 3 Press to display the previous or next row of nine pictures and videos are displayed at a time...
...video, press the OK button. NOTE: You can also press the Menu button, menu highlight , then press the OK button. delete AUTO OFF share EasyShare CX6445 NOTE: You can also press the Menu button, highlight , then press the OK button. 4 To adjust the volume, press during playback. 5 To... rewind a video, press during playback. review Thumbnails of thumbnails. 4 Press to the previous or next picture or video, press . 46 Review 3 Press to display the previous or next row of nine pictures and videos are displayed at a time...
User's Guide
Page 60
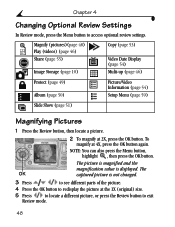
... OFF share EasyShare CX6445 OK NOTE: You can also press the Menu button, menu highlight , then press the OK button. Chapter 4 Changing Optional Review Settings In Review mode, press the Menu button to exit Review mode. 48 To magnify at 2X, press the OK button. review The picture ...Press the OK button to redisplay the picture at the 1X (original) size. 5 Press to locate a different picture, or press the Review button to access optional review settings. The captured picture is displayed. Magnify (pictures)(page 48) Play (videos) (page 46) Share (page 55) Image Storage (...
... OFF share EasyShare CX6445 OK NOTE: You can also press the Menu button, menu highlight , then press the OK button. Chapter 4 Changing Optional Review Settings In Review mode, press the Menu button to exit Review mode. 48 To magnify at 2X, press the OK button. review The picture ...Press the OK button to redisplay the picture at the 1X (original) size. 5 Press to locate a different picture, or press the Review button to access optional review settings. The captured picture is displayed. Magnify (pictures)(page 48) Play (videos) (page 46) Share (page 55) Image Storage (...
User's Guide
Page 62
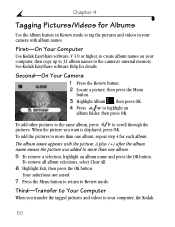
... Chapter 4 Tagging Pictures/Videos for Albums Use the Album feature in Review mode to tag the pictures and videos in your computer, the Kodak 50 Third-Transfer to your camera with the picture. First-On Your Computer Use Kodak EasyShare software, V 3.0 or higher, to create album names on your ...computer, then copy up to 32 album names to Review mode. To remove all album selections,...
... Chapter 4 Tagging Pictures/Videos for Albums Use the Album feature in Review mode to tag the pictures and videos in your computer, the Kodak 50 Third-Transfer to your camera with the picture. First-On Your Computer Use Kodak EasyShare software, V 3.0 or higher, to create album names on your ...computer, then copy up to 32 album names to Review mode. To remove all album selections,...

User's Guide
Page 63
...battery power, use an optional Kodak AC adapter, 3-volt (see page 52. Changing the Slide Show Display Interval The default interval setting displays each picture for details. The interval setting remains until you took them. Chapter 4 EasyShare software opens and categorizes your ...Review button, then press the Menu button. 2 Press to highlight Slide Show , then press the OK button. 3 Press to the Menu screen. 4 To cancel the Slide Show, press the OK button. To scroll through the seconds quickly, press and hold . 3 Press the OK button. Then the camera...
...battery power, use an optional Kodak AC adapter, 3-volt (see page 52. Changing the Slide Show Display Interval The default interval setting displays each picture for details. The interval setting remains until you took them. Chapter 4 EasyShare software opens and categorizes your ...Review button, then press the Menu button. 2 Press to highlight Slide Show , then press the OK button. 3 Press to the Menu screen. 4 To cancel the Slide Show, press the OK button. To scroll through the seconds quickly, press and hold . 3 Press the OK button. Then the camera...
User's Guide
Page 67
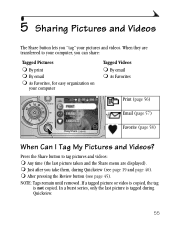
..., for easy organization on your pictures and videos. As Favorites Print (page 56) delete AUTO OFF share EasyShare CX6445 Email (page 57) Favorite (page 58) When Can I Tag My Pictures and Videos? After pressing the Review button (see page 19 and page 40). ! In a burst series, only the last picture is not copied...
..., for easy organization on your pictures and videos. As Favorites Print (page 56) delete AUTO OFF share EasyShare CX6445 Email (page 57) Favorite (page 58) When Can I Tag My Pictures and Videos? After pressing the Review button (see page 19 and page 40). ! In a burst series, only the last picture is not copied...
User's Guide
Page 90
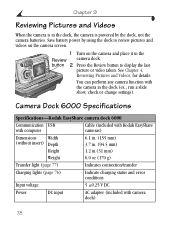
... Review button to review pictures and videos on the camera screen. 1 Turn on the camera and place it in the Review camera dock. Chapter 9 Reviewing Pictures and Videos When the camera is powered by using the dock to display the last picture or video taken. Camera Dock 6000 Specifications Specifications-Kodak EasyShare camera dock 6000 Communication USB with computer Cable (included with Kodak EasyShare cameras...
... Review button to review pictures and videos on the camera screen. 1 Turn on the camera and place it in the Review camera dock. Chapter 9 Reviewing Pictures and Videos When the camera is powered by using the dock to display the last picture or video taken. Camera Dock 6000 Specifications Specifications-Kodak EasyShare camera dock 6000 Communication USB with computer Cable (included with Kodak EasyShare cameras...

User's Guide
Page 93
...enough space number does not to decrease the decrease after number. 10 Troubleshooting When you have questions about your turn on the Kodak EasyShare software CD. the picture was taken. Battery is not properly Reinstall the battery (page 4). lens does may be in ...the ReadMe file located on . Use Review (page 45) or Quickview (page 19) to Troubleshooting information, visit www.kodak.com/go/cx6445support. turn off; Camera Problems Problem Cause Solution Camera does not Battery is not charged. Additional technical information is available ...
...enough space number does not to decrease the decrease after number. 10 Troubleshooting When you have questions about your turn on the Kodak EasyShare software CD. the picture was taken. Battery is not properly Reinstall the battery (page 4). lens does may be in ...the ReadMe file located on . Use Review (page 45) or Quickview (page 19) to Troubleshooting information, visit www.kodak.com/go/cx6445support. turn off; Camera Problems Problem Cause Solution Camera does not Battery is not charged. Additional technical information is available ...
User's Guide
Page 119
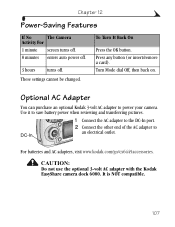
...electrical outlet. Turn Mode dial Off, then back on. For batteries and AC adapters, visit www.kodak.com/go/cx6445accessories. CAUTION: Do not use the optional 3-volt AC adapter with the Kodak EasyShare camera dock 6000. It is NOT compatible. 107 DC-In 1 Connect the AC adapter to the ...DC-In port. 2 Connect the other end of the AC adapter to power your camera. These settings cannot be changed. Use it to save battery power when reviewing and transferring ...
...electrical outlet. Turn Mode dial Off, then back on. For batteries and AC adapters, visit www.kodak.com/go/cx6445accessories. CAUTION: Do not use the optional 3-volt AC adapter with the Kodak EasyShare camera dock 6000. It is NOT compatible. 107 DC-In 1 Connect the AC adapter to the ...DC-In port. 2 Connect the other end of the AC adapter to power your camera. These settings cannot be changed. Use it to save battery power when reviewing and transferring ...


