
User's Guide
Page 3
... norme NMB-003 du Canada. The typical use is operated in a conference room, meeting room or auditorium. Declaration of Conformity Manufacturer: Eastman Kodak Company Rochester, New York 14650 USA We declare under our sole responsibility that the KODAK DP2900 Digital Projector conforms to part 15 of this equipment in which case the user will be required to provide reasonable protection...
... norme NMB-003 du Canada. The typical use is operated in a conference room, meeting room or auditorium. Declaration of Conformity Manufacturer: Eastman Kodak Company Rochester, New York 14650 USA We declare under our sole responsibility that the KODAK DP2900 Digital Projector conforms to part 15 of this equipment in which case the user will be required to provide reasonable protection...

User's Guide
Page 8
.../go/projectors. In the unlikely event of the bulb rupturing, thoroughly clean the area behind the projector viii For accessory information go to qualified service personnel. User Guide KODAK DP2900 Digital Projector Safety Issues • Warning: Don't look directly into the lens when the lamp is turned on a tablecloth or other soft covering that area. 2 ft (.6m) Do not place objects in this User's Guide. •Warning: Please use the power cord...
.../go/projectors. In the unlikely event of the bulb rupturing, thoroughly clean the area behind the projector viii For accessory information go to qualified service personnel. User Guide KODAK DP2900 Digital Projector Safety Issues • Warning: Don't look directly into the lens when the lamp is turned on a tablecloth or other soft covering that area. 2 ft (.6m) Do not place objects in this User's Guide. •Warning: Please use the power cord...

User's Guide
Page 11
... images using Digital Light Processing™ (DLP) technology, and features an M1-DA connector for more information. Image Resolution The XGA resolution of computers and video devices, including: • IBM-compatible computers, including laptops, up to 1024x768 resolution. • Apple, Macintosh, and PowerBook computers up to a lower resolution before you can display these images at their native resolutions by turning off the Auto Resize feature. The projector cannot compress screen resolutions...
... images using Digital Light Processing™ (DLP) technology, and features an M1-DA connector for more information. Image Resolution The XGA resolution of computers and video devices, including: • IBM-compatible computers, including laptops, up to 1024x768 resolution. • Apple, Macintosh, and PowerBook computers up to a lower resolution before you can display these images at their native resolutions by turning off the Auto Resize feature. The projector cannot compress screen resolutions...

User's Guide
Page 14
User Guide KODAK DP2900 Digital Projector If You Need Assistance The first place to look for assistance, please have the following information available: • the projector's serial number (located on the bottom label) • the resolution of your dealer or Kodak Technical Support for help online, by fax, or by fax: U.S. But you can also get help is in "Maintenance & Troubleshooting" on Service and Support) America Online (keyword) KODAK CompuServe...
User Guide KODAK DP2900 Digital Projector If You Need Assistance The first place to look for assistance, please have the following information available: • the projector's serial number (located on the bottom label) • the resolution of your dealer or Kodak Technical Support for help online, by fax, or by fax: U.S. But you can also get help is in "Maintenance & Troubleshooting" on Service and Support) America Online (keyword) KODAK CompuServe...

User's Guide
Page 17
.... Make sure your projector is turned off the projector If you want to project from the lens of the projector to the screen and the zoom setting determine the size of your power source and within 6 feet (1.8 m) of the projected image. Position the projector the desired distance from the screen. • The distance from behind a translucent screen, set up presentation systems, use the Quick Start card that came with the KODAK DP2900 Digital Projector. Otherwise, follow...
.... Make sure your projector is turned off the projector If you want to project from the lens of the projector to the screen and the zoom setting determine the size of your power source and within 6 feet (1.8 m) of the projected image. Position the projector the desired distance from the screen. • The distance from behind a translucent screen, set up presentation systems, use the Quick Start card that came with the KODAK DP2900 Digital Projector. Otherwise, follow...
User's Guide
Page 18
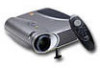
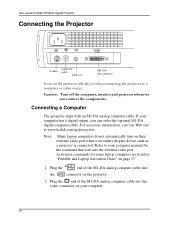
... to your computer manual for some laptop computers are listed in M1-DA data interface Connecting a Computer The projector ships with an M1-DA analog computer cable. User Guide KODAK DP2900 Digital Projector Connecting the Projector in in composite S-video video Audio in "Portable and Laptop Activation Chart" on page 57. 1. Note: Many laptop computers do not automatically turn on the projector. 2. Activation commands for the command that activates the external video port. Plug the...
... to your computer manual for some laptop computers are listed in M1-DA data interface Connecting a Computer The projector ships with an M1-DA analog computer cable. User Guide KODAK DP2900 Digital Projector Connecting the Projector in in composite S-video video Audio in "Portable and Laptop Activation Chart" on page 57. 1. Note: Many laptop computers do not automatically turn on the projector. 2. Activation commands for the command that activates the external video port. Plug the...

User's Guide
Page 22
... driver (the computer considers the projector a Plug and Play Monitor). 3. A green Lamp LED indicates that new hardware was found. If a computer source is complete, the Lamp LED lights green. Note: The first time you can select a default source to adjust the volume. 22 The fans start to run, and the Lamp LED on the top of the projector, then plug it on page 39. User Guide KODAK DP2900 Digital Projector Starting the Projector We recommend using a surge protector power strip when connecting...
... driver (the computer considers the projector a Plug and Play Monitor). 3. A green Lamp LED indicates that new hardware was found. If a computer source is complete, the Lamp LED lights green. Note: The first time you can select a default source to adjust the volume. 22 The fans start to run, and the Lamp LED on the top of the projector, then plug it on page 39. User Guide KODAK DP2900 Digital Projector Starting the Projector We recommend using a surge protector power strip when connecting...

User's Guide
Page 23
..., but the projector keeps running . (You can change the amount of time, press the standby button on immediately, you want to display your laptop's external video port is active, press the source button on the keypad or the computer button on the keypad or remote, then select the Display or Image sub-menu. The lamp won't light if it . see page 32. The computer image should be turned on last, after...
..., but the projector keeps running . (You can change the amount of time, press the standby button on immediately, you want to display your laptop's external video port is active, press the source button on the keypad or the computer button on the keypad or remote, then select the Display or Image sub-menu. The lamp won't light if it . see page 32. The computer image should be turned on last, after...

User's Guide
Page 25
... projector. Using the Projector This section describes how to use and make adjustments to the keypad and remote buttons and the options available from the on page 43. See "Using KODAK Image Manager" on -screen menus. If that doesn't clear up the image, turn Auto Image (page 36) off and adjust the sync (page 37) and/or the tracking (page 37) manually. • If the colors don't look right, check...
... projector. Using the Projector This section describes how to use and make adjustments to the keypad and remote buttons and the options available from the on page 43. See "Using KODAK Image Manager" on -screen menus. If that doesn't clear up the image, turn Auto Image (page 36) off and adjust the sync (page 37) and/or the tracking (page 37) manually. • If the colors don't look right, check...

User's Guide
Page 30
... source (computer and video) connected to the projector, select between them by pressing the source button on the keypad or the computer or video button on the remote. 30 The Lamp LED indicates the state of the lamp. When you close the menus. User Guide KODAK DP2900 Digital Projector Lamp on/off (keypad only) Press the lamp on/off button to turn the lamp on, or the lamp is currently on. A green Lamp LED indicates that you can turn the lamp...
... source (computer and video) connected to the projector, select between them by pressing the source button on the keypad or the computer or video button on the remote. 30 The Lamp LED indicates the state of the lamp. When you close the menus. User Guide KODAK DP2900 Digital Projector Lamp on/off (keypad only) Press the lamp on/off button to turn the lamp on, or the lamp is currently on. A green Lamp LED indicates that you can turn the lamp...
User's Guide
Page 32
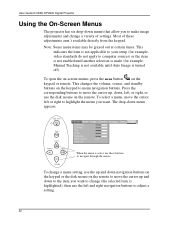
..., Manual Tracking is not available until Auto Image is not applicable to your setup (for example, video standards do not apply to move the cursor left , or right, or use the disk mouse on the keypad to adjust a setting. 32 This changes the volume, source, and standby buttons on the remote. The drop-down menu appears. >Display Audio Brightness Contrast Tint Color Sharpness Blank screen Reset all > Image Controls blue Language Status When...
..., Manual Tracking is not available until Auto Image is not applicable to your setup (for example, video standards do not apply to move the cursor left , or right, or use the disk mouse on the keypad to adjust a setting. 32 This changes the volume, source, and standby buttons on the remote. The drop-down menu appears. >Display Audio Brightness Contrast Tint Color Sharpness Blank screen Reset all > Image Controls blue Language Status When...

User's Guide
Page 36
... Image menu and clicking the left or right navigation button to select "off and back on , the projector makes the best fit of the image to adjust these features manually, you must turn Auto Image off "), the image may be used with the operation of the original theater version, but the image is Enhanced for Widescreen TVs. Note: When you 're experiencing problems, turn off your screen...
... Image menu and clicking the left or right navigation button to select "off and back on , the projector makes the best fit of the image to adjust these features manually, you must turn Auto Image off "), the image may be used with the operation of the original theater version, but the image is Enhanced for Widescreen TVs. Note: When you 're experiencing problems, turn off your screen...
User's Guide
Page 38
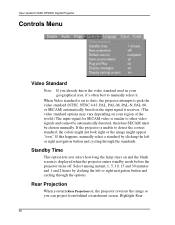
.... User Guide KODAK DP2900 Digital Projector Controls Menu Video Standard Note: If you already know the video standard used in your region of the world.) The input signal for SECAM video is similar to other video signals and cannot be automatically detected, therefore SECAM must be chosen manually. Standby Time This option lets you select how long the lamp stays on , the projector reverses the image so you can project from behind a translucent screen...
.... User Guide KODAK DP2900 Digital Projector Controls Menu Video Standard Note: If you already know the video standard used in your region of the world.) The input signal for SECAM video is similar to other video signals and cannot be automatically detected, therefore SECAM must be chosen manually. Standby Time This option lets you select how long the lamp stays on , the projector reverses the image so you can project from behind a translucent screen...

User's Guide
Page 41
.... 41 To change this, go to your computer's user's guide for details. Vertical refresh rate The time period that one video frame is a read-only window for details. To display the status window, select Show status from the menu, then click the left or right navigation button. Display Audio Image Controls Language Status >Show status Lamp hours used Computer resolution Horizontal refresh rate Vertical refresh rate Mute status Source Software version Startup screen version Boot version...
.... 41 To change this, go to your computer's user's guide for details. Vertical refresh rate The time period that one video frame is a read-only window for details. To display the status window, select Show status from the menu, then click the left or right navigation button. Display Audio Image Controls Language Status >Show status Lamp hours used Computer resolution Horizontal refresh rate Vertical refresh rate Mute status Source Software version Startup screen version Boot version...

User's Guide
Page 50
... remote to the projector is halfway. Sound Problem No sound. Cause and Solution • Adjust volume. • Verify audio / input connections. • Adjust audio source. • Make sure you don't find the answer to your computer is no more than 25 feet (7.6 m). • Point the remote control at the screen or at www.kodak.com/go/projectors for the latest updates on the image source. Poor sound quality. No audio-out port on troubleshooting. User Guide KODAK DP2900 Digital Projector Troubleshooting...
... remote to the projector is halfway. Sound Problem No sound. Cause and Solution • Adjust volume. • Verify audio / input connections. • Adjust audio source. • Make sure you don't find the answer to your computer is no more than 25 feet (7.6 m). • Point the remote control at the screen or at www.kodak.com/go/projectors for the latest updates on the image source. Poor sound quality. No audio-out port on troubleshooting. User Guide KODAK DP2900 Digital Projector Troubleshooting...

User's Guide
Page 53
... the power cord is lamp. properly connected to shut off. Lamp shuts off. • A minor power surge may cause the lamp to a fully functional AC electric outlet. The Power light blinks when the power is connected but the projector is not turned on page 46. 53 Replace the lamp as described in use for a long time. Maintenance & Troubleshooting Lamp Problem Cause and Solution No light is coming from the • Make sure that the cable...
... the power cord is lamp. properly connected to shut off. Lamp shuts off. • A minor power surge may cause the lamp to a fully functional AC electric outlet. The Power light blinks when the power is connected but the projector is not turned on page 46. 53 Replace the lamp as described in use for a long time. Maintenance & Troubleshooting Lamp Problem Cause and Solution No light is coming from the • Make sure that the cable...
User's Guide
Page 54
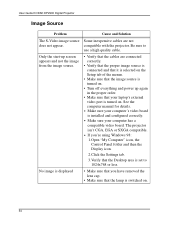
User Guide KODAK DP2900 Digital Projector Image Source Problem Cause and Solution The S-Video image source Some inexpensive cables are connected correctly. • Verify that the proper image source is connected and that it is selected on the Setup tab of the menus. • Make sure that the lamp is set to use a high quality cable. See the computer manual for details. • Make sure your computer's video board is installed and configured correctly. • Make sure...
User Guide KODAK DP2900 Digital Projector Image Source Problem Cause and Solution The S-Video image source Some inexpensive cables are connected correctly. • Verify that the proper image source is connected and that it is selected on the Setup tab of the menus. • Make sure that the lamp is set to use a high quality cable. See the computer manual for details. • Make sure your computer's video board is installed and configured correctly. • Make sure...

User's Guide
Page 67
... projected image occasionally might turn video mirroring (called SimulScan in newer PowerBooks-see below) on, the projector displays the same information that appears on your PowerBook's built-in screen. Open the Monitors control panel. 3. Move the white menu bar to Monitor 2 to open the Monitors control panel again. Appendix C Using Video Mirroring with a PowerBook Computer When you want. 3. If this happens, perform the following steps: 1. Set the number of colors...
... projected image occasionally might turn video mirroring (called SimulScan in newer PowerBooks-see below) on, the projector displays the same information that appears on your PowerBook's built-in screen. Open the Monitors control panel. 3. Move the white menu bar to Monitor 2 to open the Monitors control panel again. Appendix C Using Video Mirroring with a PowerBook Computer When you want. 3. If this happens, perform the following steps: 1. Set the number of colors...

User's Guide
Page 72
... help customer support numbers 15 fax 14 I IBM-compatible computers compatibility 11 connecting 18 image adjusting 25 centering 37 focusing 26 fuzzy lines 37 quality ??-53 resolution 11 reversed 38 size 17, 69 zooming 26 Image menu 35 Image menu options Auto Image 36 Horiz. Position 37 K keypad using 29 keystone correction 35 L lamp replacing 46 lamp hour counter 41 Lamp on/off button 30 Language menu 40 language, selecting for menus 40 laptop activation sequence 57 laptop...
... help customer support numbers 15 fax 14 I IBM-compatible computers compatibility 11 connecting 18 image adjusting 25 centering 37 focusing 26 fuzzy lines 37 quality ??-53 resolution 11 reversed 38 size 17, 69 zooming 26 Image menu 35 Image menu options Auto Image 36 Horiz. Position 37 K keypad using 29 keystone correction 35 L lamp replacing 46 lamp hour counter 41 Lamp on/off button 30 Language menu 40 language, selecting for menus 40 laptop activation sequence 57 laptop...

User's Guide
Page 73
... projector viii power cord connecting 22 power up sequence 23 PowerBook video mirroring 67 R rear projection 38 remote control replacing the batteries 49 using 27, 29 replacing projection lamp module 46 re-positioning image 37 resetting adjustments 34 resizing video 36 resolution 11 S safety guidelines vii screen projecting behind 38 sizes 17, 69 SECAM video 34, 38 security lock 49 service numbers 15 setting up 17 SimulScan, with PowerBooks 68 Source button 30 specifications 55 Standby button 31 Time 38 startup screen 40 Status menu 41 support numbers...
... projector viii power cord connecting 22 power up sequence 23 PowerBook video mirroring 67 R rear projection 38 remote control replacing the batteries 49 using 27, 29 replacing projection lamp module 46 re-positioning image 37 resetting adjustments 34 resizing video 36 resolution 11 S safety guidelines vii screen projecting behind 38 sizes 17, 69 SECAM video 34, 38 security lock 49 service numbers 15 setting up 17 SimulScan, with PowerBooks 68 Source button 30 specifications 55 Standby button 31 Time 38 startup screen 40 Status menu 41 support numbers...


