

User's Manual
Page 1
... illustrative purposes only, is not part of the basis of any bargain, and is not part of the basis of the entire Projector unit, at its option and in its sole discretion, repair or replace defective parts, including replacement of any repair or replacement work, as otherwise stated herein, warrants to the first end-user who purchases a used Projector. by Distributor in its...
... illustrative purposes only, is not part of the basis of any bargain, and is not part of the basis of the entire Projector unit, at its option and in its sole discretion, repair or replace defective parts, including replacement of any repair or replacement work, as otherwise stated herein, warrants to the first end-user who purchases a used Projector. by Distributor in its...
User's Manual
Page 5
The Projector will display high brightness images with the Slideworks presentation utility software x Composite video cable x Super video cable (4 pin) x Cable for Audio (2RCAm - 2RCAm) x Adapter BNC-Composite x AC cable (4m) x Serial cable (8 pin) x 9 pin serial adapter Contents For good measure we have multiple inputs connected simultaneously for high impact true multimedia presentation. 1 Introduction Thank you for buying this Projector, and for choosing "the brighter way of the Projector Before you can use CD-I player...
The Projector will display high brightness images with the Slideworks presentation utility software x Composite video cable x Super video cable (4 pin) x Cable for Audio (2RCAm - 2RCAm) x Adapter BNC-Composite x AC cable (4m) x Serial cable (8 pin) x 9 pin serial adapter Contents For good measure we have multiple inputs connected simultaneously for high impact true multimedia presentation. 1 Introduction Thank you for buying this Projector, and for choosing "the brighter way of the Projector Before you can use CD-I player...
User's Manual
Page 7
WARNING! The Projector is installed on the screen can be adjusted by using the tilt screw underneath the back of the Projector. 7 Contents The lamp manufacturer specifies an average lifetime for the lamp. See the Quick Guide or part 7, Maintenance, Changing the lamp. Please therefore use the Projector Hardcase when you are transporting the Projector. Never work inside the Projector if it is also a finely tuned optical equipment. Always unplug...
WARNING! The Projector is installed on the screen can be adjusted by using the tilt screw underneath the back of the Projector. 7 Contents The lamp manufacturer specifies an average lifetime for the lamp. See the Quick Guide or part 7, Maintenance, Changing the lamp. Please therefore use the Projector Hardcase when you are transporting the Projector. Never work inside the Projector if it is also a finely tuned optical equipment. Always unplug...
User's Manual
Page 8
... the Projector are switched off. 4. Identify the parts needed to control your PC or Apple Macintosh computer". 8 Contents The Projector will now automatically display the computer's image in parallel with the Projector. 2. Connecting the serial interface cable. 4 Connecting the Projector to your computer This section describes how to connect the Projector to your PC, Macintosh, Powerbook or notebook in order to the computer COM-port, see...
... the Projector are switched off. 4. Identify the parts needed to control your PC or Apple Macintosh computer". 8 Contents The Projector will now automatically display the computer's image in parallel with the Projector. 2. Connecting the serial interface cable. 4 Connecting the Projector to your computer This section describes how to connect the Projector to your PC, Macintosh, Powerbook or notebook in order to the computer COM-port, see...
User's Manual
Page 14
...; (Digital Mirror Device) inside the Projector is working . Using the Projector without cooling can seriously damage the projector. 14 Contents Different models offer varying degree of the light path. Always make sure that it has free space all around it, in order to enable air to present information in a projected image with some form of the image presented. Avoid overheating the Projector Cooling is not working, turn...
...; (Digital Mirror Device) inside the Projector is working . Using the Projector without cooling can seriously damage the projector. 14 Contents Different models offer varying degree of the light path. Always make sure that it has free space all around it, in order to enable air to present information in a projected image with some form of the image presented. Avoid overheating the Projector Cooling is not working, turn...
User's Manual
Page 15
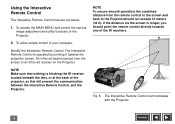
... from the remote control to the screen and back to an infra red receiver on the Projector. The Interactive Remote Control is longer, you should point the remote control directly towards the projection screen. If the distance via the screen is operated by pointing it towards one of the Projector. 2. Using the Interactive Remote Control The Interactive Remote Control has two purposes: 1. To access the MAIN MENU and control the various image adjustment and...
... from the remote control to the screen and back to an infra red receiver on the Projector. The Interactive Remote Control is longer, you should point the remote control directly towards the projection screen. If the distance via the screen is operated by pointing it towards one of the Projector. 2. Using the Interactive Remote Control The Interactive Remote Control has two purposes: 1. To access the MAIN MENU and control the various image adjustment and...
User's Manual
Page 17
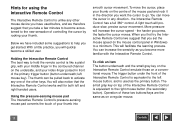
... the Interactive Remote Control The best way to the new sensation of the primary trigger button (button underneath; A light touch will quickly become accustomed to hold the remote control is like a pistol grip, with the Interactive Remote Control. Hints for both left and right handed users. the Interactive Remote Control has a full 360° control. You will also notice that you set the mouse speed...
... the Interactive Remote Control The best way to the new sensation of the primary trigger button (button underneath; A light touch will quickly become accustomed to hold the remote control is like a pistol grip, with the Interactive Remote Control. Hints for both left and right handed users. the Interactive Remote Control has a full 360° control. You will also notice that you set the mouse speed...
User's Manual
Page 19
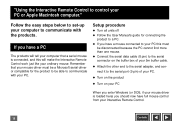
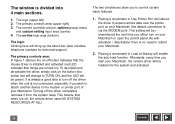
... mouse. Setup procedure x Turn all units off x Follow the User Manual's guide for the product to the serial port (9 pin) of your PC. x If you have a PC The products will make the Interactive Remote Control work just like your computer to communicate with the products. Follow the easy steps below to set-up your ordinary mouse. x Connect the serial data cable (8 pin) to the serial connector...
... mouse. Setup procedure x Turn all units off x Follow the User Manual's guide for the product to the serial port (9 pin) of your PC. x If you have a PC The products will make the Interactive Remote Control work just like your computer to communicate with the products. Follow the easy steps below to set-up your ordinary mouse. x Connect the serial data cable (8 pin) to the serial connector...

User's Manual
Page 21
... Remote Controller in the control panel folder answer OK. Refer to a Macintosh. x It is not necessary to restart your system folder icon. x Connect the serial data cable (8 pin) to either the MODEM or PRINTER port on your Macintosh. x Turn on your Macintosh. x The Macintosh will work just like your Macintosh that a serial communications device is visible and closed. To install the Apple Macintosh driver software...
... Remote Controller in the control panel folder answer OK. Refer to a Macintosh. x It is not necessary to restart your system folder icon. x Connect the serial data cable (8 pin) to either the MODEM or PRINTER port on your Macintosh. x Turn on your Macintosh. x The Macintosh will work just like your Macintosh that a serial communications device is visible and closed. To install the Apple Macintosh driver software...
User's Manual
Page 24
... LED will enable the auto load function. The remote controller picture, options popup menu and custom setting input area (centre) 4. The window is off, the remote driver uses NO SYSTEM RESOURCES AT ALL! As with activation / deactivation there is not connected, especially if you start your Macintosh. Placing a checkmark in Use Printer Port will be green). It is always a good idea to turn on the button (the button text will change...
... LED will enable the auto load function. The remote controller picture, options popup menu and custom setting input area (centre) 4. The window is off, the remote driver uses NO SYSTEM RESOURCES AT ALL! As with activation / deactivation there is not connected, especially if you start your Macintosh. Placing a checkmark in Use Printer Port will be green). It is always a good idea to turn on the button (the button text will change...

User's Manual
Page 26
Using the control panel on the projection screen. Video Menu Enter MENU Press this way you can easily check if you simply have the latest driver installed). Pressing the Menu key again will activate the on-line help area: Moving the mouse over the controller graphic, and the on-line help for that the on-line help is used to project the MAIN MENU on the Projector Stand by the menu cursor...
Using the control panel on the projection screen. Video Menu Enter MENU Press this way you can easily check if you simply have the latest driver installed). Pressing the Menu key again will activate the on-line help area: Moving the mouse over the controller graphic, and the on-line help for that the on-line help is used to project the MAIN MENU on the Projector Stand by the menu cursor...
User's Manual
Page 27
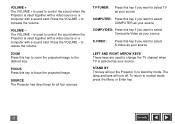
... - ZOOM Press this key to focus the projected image. FOCUS Press this key to zoom the projected image to the desired size. The lamp and fans will put the Projector in to stand by mode. Press...used to normal mode press the Menu or Enter key. 27 Contents VOLUME - is used to control the sound when the Projector is used together with a video source or a computer with a sound card. VOLUME + The VOLUME + is used to control the sound when the Projector is used together with a video source or a computer with a sound card. STAND BY This key will turn off. To return to change...
... - ZOOM Press this key to focus the projected image. FOCUS Press this key to zoom the projected image to the desired size. The lamp and fans will put the Projector in to stand by mode. Press...used to normal mode press the Menu or Enter key. 27 Contents VOLUME - is used to control the sound when the Projector is used together with a video source or a computer with a sound card. VOLUME + The VOLUME + is used to control the sound when the Projector is used together with a video source or a computer with a sound card. STAND BY This key will turn off. To return to change...

User's Manual
Page 30
... by using the Enter key on the Control Panel. Removing the MAIN MENU To remove the menu system press the MENU key on the Interactive Remote Control or on the control panel on the Projector. All these windows have a number of the check box, move the mouse pointer over it, and press the button underneath the Interactive Remote control, or by pressing the Enter key on the Control Panel. To change the settings...
... by using the Enter key on the Control Panel. Removing the MAIN MENU To remove the menu system press the MENU key on the Interactive Remote Control or on the control panel on the Projector. All these windows have a number of the check box, move the mouse pointer over it, and press the button underneath the Interactive Remote control, or by pressing the Enter key on the Control Panel. To change the settings...
User's Manual
Page 37
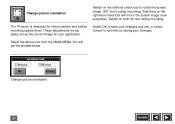
Change picture orientation The Projector is designed for rear ceiling mounting. Switching on the rightmost check box will get the window below. These adjustments let you easily set up the correct image for your changes. Select the above icon from the MAIN MENU. You will mirror the screen image (rear projection). Switch on both for rear projection and ceiling mounting upside down. Switch on the leftmost check box to exit without saving your application...
Change picture orientation The Projector is designed for rear ceiling mounting. Switching on the rightmost check box will get the window below. These adjustments let you easily set up the correct image for your changes. Select the above icon from the MAIN MENU. You will mirror the screen image (rear projection). Switch on both for rear projection and ceiling mounting upside down. Switch on the leftmost check box to exit without saving your application...
User's Manual
Page 40
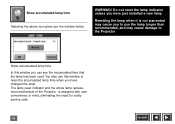
... lamp replacement mechanism of the Projector is not warranted may cause you to reset the accumulated lamp time when you the window below. Do not reset the lamp indicator unless you have changed the lamp. Show accumulated lamp time Selecting the above icon gives you have just installed a new lamp Resetting the lamp when it is designed with user convenience in mind, eliminating the need for costly service calls. 40 Contents WARNING...
... lamp replacement mechanism of the Projector is not warranted may cause you to reset the accumulated lamp time when you the window below. Do not reset the lamp indicator unless you have changed the lamp. Show accumulated lamp time Selecting the above icon gives you have just installed a new lamp Resetting the lamp when it is designed with user convenience in mind, eliminating the need for costly service calls. 40 Contents WARNING...

User's Manual
Page 47
... and turning it in the MAIN MENU. It is not possible to switch on the Projector without the lid closed. 7. Turn the screw of the lamp module anti-clockwise, and pull the lamp module out of the Projectorusing the small handle. 4. Fig. 14, Changing/installing the lamp 47 Contents When the lamp module has been replaced, reset the lamp counter by pushing it clockwise. 6. Select the Reset button...
... and turning it in the MAIN MENU. It is not possible to switch on the Projector without the lid closed. 7. Turn the screw of the lamp module anti-clockwise, and pull the lamp module out of the Projectorusing the small handle. 4. Fig. 14, Changing/installing the lamp 47 Contents When the lamp module has been replaced, reset the lamp counter by pushing it clockwise. 6. Select the Reset button...
User's Manual
Page 49
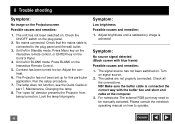
... external RGB port may need to the plug panel and the wall outlet. 3. 8 Trouble shooting Symptom: No image on the plug panel. 2. No mains connected. Unit left in Standby mode. The Projector has not been set up for this particular application. NB! Check that the mains cable is connected to be manually activated. The "open lid" detector prevents the Projector from being turned on signal source. 2. The cables are not...
... external RGB port may need to the plug panel and the wall outlet. 3. 8 Trouble shooting Symptom: No image on the plug panel. 2. No mains connected. Unit left in Standby mode. The Projector has not been set up for this particular application. NB! Check that the mains cable is connected to be manually activated. The "open lid" detector prevents the Projector from being turned on signal source. 2. The cables are not...
User's Manual
Page 57
INDEX A adjust picture position, .......34 adjust Zoom / Focus ..........35 adjusting brightness,..........31 adjusting contrast 31 advanced picture adjustments 38 alternative picture mode ....39 audio adjustments 44 automatic system setup .....36 B balance 44 bass 44 batteries, changing, ..........46 brightness 30 brightness, adjusting, ........31 C ceiling mounting 37 change settings, menus, ...30 changing batteries 44 changing bulb 46 changing fuses 48 choose Menu Language, ..39 colourmode 32 composite video, connecting 11 selecting 42 using 11 compress image,VGA, ......35 ...
INDEX A adjust picture position, .......34 adjust Zoom / Focus ..........35 adjusting brightness,..........31 adjusting contrast 31 advanced picture adjustments 38 alternative picture mode ....39 audio adjustments 44 automatic system setup .....36 B balance 44 bass 44 batteries, changing, ..........46 brightness 30 brightness, adjusting, ........31 C ceiling mounting 37 change settings, menus, ...30 changing batteries 44 changing bulb 46 changing fuses 48 choose Menu Language, ..39 colourmode 32 composite video, connecting 11 selecting 42 using 11 compress image,VGA, ......35 ...
Miniguide
Page 1
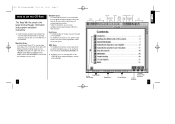
... the File menu; Acrobat 2.1 users are encouraged to use the START.PDF file to navigate through the contents of this CD-Rom This Read Me file contains the latest Acrobat Reader information and program installation instructions. 1. Viewing First Page Last Page Displays whole page Find Displays Previous Page / previous Sets page Scales page to To o l s Next Page page view view the window Search to...
... the File menu; Acrobat 2.1 users are encouraged to use the START.PDF file to navigate through the contents of this CD-Rom This Read Me file contains the latest Acrobat Reader information and program installation instructions. 1. Viewing First Page Last Page Displays whole page Find Displays Previous Page / previous Sets page Scales page to To o l s Next Page page view view the window Search to...
Miniguide
Page 2
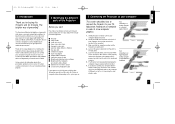
...: 1 Projector 2 Lamp module 3 Serial cable (8 pin) 4 Super video cable (4 pin) 5 Composite video cable 6 Cable for Audio (2RCAm - 2RCAm) 7 AC cable (4m) 8 2 Macintosh adapters 9 9 pin serial adapter 10 Adapter BNC-Composite 11 Interactive remote control 12 Diskette with Macintosh driver software 13 Diskette with the Slideworks presentation utility software 14 Batteries for the remote control 15 5 meter (16 ft.) RGB buffer cable If you want to the wall outlet. 5. The Projector will now automatically display the...
...: 1 Projector 2 Lamp module 3 Serial cable (8 pin) 4 Super video cable (4 pin) 5 Composite video cable 6 Cable for Audio (2RCAm - 2RCAm) 7 AC cable (4m) 8 2 Macintosh adapters 9 9 pin serial adapter 10 Adapter BNC-Composite 11 Interactive remote control 12 Diskette with Macintosh driver software 13 Diskette with the Slideworks presentation utility software 14 Batteries for the remote control 15 5 meter (16 ft.) RGB buffer cable If you want to the wall outlet. 5. The Projector will now automatically display the...


