
User Manual
Page 7
... Started 1 Install Software First 1 Need This User Guide in Larger Print 1 What Can I Do With My Camera 2 What Can I Do With My Pictures and Videos 2 Package Contents 3 Attaching the Wrist Strap 4 Attaching the Lens Cap Strap 4 Adding Optional Lenses 4 Loading the Battery 5 Mode Dial Settings 6 Turning On the Camera 7 Setting the Date and Time 8 Checking Camera Status Icons 9 Inserting an SD/MMC Card 10 Choosing Internal Memory or SD/MMC Card 11 Important Battery Information 13 2 Taking Pictures 15 Taking Pictures...
... Started 1 Install Software First 1 Need This User Guide in Larger Print 1 What Can I Do With My Camera 2 What Can I Do With My Pictures and Videos 2 Package Contents 3 Attaching the Wrist Strap 4 Attaching the Lens Cap Strap 4 Adding Optional Lenses 4 Loading the Battery 5 Mode Dial Settings 6 Turning On the Camera 7 Setting the Date and Time 8 Checking Camera Status Icons 9 Inserting an SD/MMC Card 10 Choosing Internal Memory or SD/MMC Card 11 Important Battery Information 13 2 Taking Pictures 15 Taking Pictures...

User Manual
Page 9
Protecting Pictures and Videos From Deletion 40 Running a Slide Show 41 Copying Pictures and Videos 43 Displaying Video Date 44 Viewing Picture/Video Information 44 5 Tagging Pictures and Videos 45 When Can I Tag My Pictures and Videos 45 Tagging Pictures for Printing 46 Tagging Pictures and Videos for Emailing 47 Tagging Pictures and Videos as Favorites 48 6 Customizing Your Camera Settings 49 Accessing Setup Mode/Menus 49 Setup Menus 49 Changing the Print Quantity Default 50 Turning Off Quickview 50 Turning On Liveview In...
Protecting Pictures and Videos From Deletion 40 Running a Slide Show 41 Copying Pictures and Videos 43 Displaying Video Date 44 Viewing Picture/Video Information 44 5 Tagging Pictures and Videos 45 When Can I Tag My Pictures and Videos 45 Tagging Pictures for Printing 46 Tagging Pictures and Videos for Emailing 47 Tagging Pictures and Videos as Favorites 48 6 Customizing Your Camera Settings 49 Accessing Setup Mode/Menus 49 Setup Menus 49 Changing the Print Quantity Default 50 Turning Off Quickview 50 Turning On Liveview In...
User Manual
Page 11
10 Troubleshooting 69 Troubleshooting-Camera 69 Troubleshooting-Camera Dock II 82 11 Getting Help 85 Helpful Web Links 85 Help in this Manual 85 Software Help 85 Telephone Customer Support 86 12 Appendix 89 Camera Specifications 89 Original Factory Settings-Camera 91 Upgrading Your Software and Firmware 92 Tips, Safety, Maintenance 92 Storage Capacities 93 Locating Pictures and Videos on a Card 94 Card File Naming Conventions 94 Power-Saving Features 95 Optional AC Adapter 95 Regulatory Information 95 ix
10 Troubleshooting 69 Troubleshooting-Camera 69 Troubleshooting-Camera Dock II 82 11 Getting Help 85 Helpful Web Links 85 Help in this Manual 85 Software Help 85 Telephone Customer Support 86 12 Appendix 89 Camera Specifications 89 Original Factory Settings-Camera 91 Upgrading Your Software and Firmware 92 Tips, Safety, Maintenance 92 Storage Capacities 93 Locating Pictures and Videos on a Card 94 Card File Naming Conventions 94 Power-Saving Features 95 Optional AC Adapter 95 Regulatory Information 95 ix
User Manual
Page 13
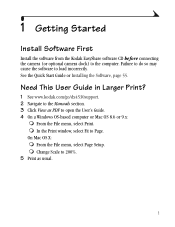
See the Quick Start Guide or Installing the Software, page 55. Need This User Guide in Larger Print? 1 See www.kodak.com/go/dx4530support. 2 Navigate to the Manuals section. 3 Click View as usual. 1 m In the Print window, select Fit to the computer. On Mac OS X: m From the File menu, select Page Setup. m Change Scale to 200%. 5 Print as PDF to load incorrectly. 1 Getting Started Install Software First Install the software from the Kodak EasyShare software CD before connecting the camera (or optional...
See the Quick Start Guide or Installing the Software, page 55. Need This User Guide in Larger Print? 1 See www.kodak.com/go/dx4530support. 2 Navigate to the Manuals section. 3 Click View as usual. 1 m In the Print window, select Fit to the computer. On Mac OS X: m From the File menu, select Page Setup. m Change Scale to 200%. 5 Print as PDF to load incorrectly. 1 Getting Started Install Software First Install the software from the Kodak EasyShare software CD before connecting the camera (or optional...

User Manual
Page 14
... Kodak EasyShare printer dock 4000. Review -Display, protect, and delete pictures and videos; Capture Still Pictures -Use Auto mode to any printer with Sound -Capture videos as Favorites). Order prints online from the Kodak EasyShare software CD, then: Transfer-Transfer pictures and videos to your local photo retailer for albums. Share -Share pictures (print, email, save as Favorites) and videos (email, save as QuickTime movies. Or purchase an optional Kodak secure digital (SD) card or multimedia card (MMC) and: m Automatically print to enjoy point-and-shoot operation. Share-Print...
... Kodak EasyShare printer dock 4000. Review -Display, protect, and delete pictures and videos; Capture Still Pictures -Use Auto mode to any printer with Sound -Capture videos as Favorites). Order prints online from the Kodak EasyShare software CD, then: Transfer-Transfer pictures and videos to your local photo retailer for albums. Share -Share pictures (print, email, save as Favorites) and videos (email, save as QuickTime movies. Or purchase an optional Kodak secure digital (SD) card or multimedia card (MMC) and: m Automatically print to enjoy point-and-shoot operation. Share-Print...

User Manual
Page 19
AUTO In Still and Video modes, a status area OFF appears on so that are in process. 2 Replace the lens cap. 7 is on whenever the camera is set to Off. times out Turn off , screen can be used as a viewfinder press the OK button again. The ready light blinks green while the camera performs a self-check. The camera completes operations that the camera Press the OK button. Chapter 1 Turning On the Camera Ready light Mode dial OK...
AUTO In Still and Video modes, a status area OFF appears on so that are in process. 2 Replace the lens cap. 7 is on whenever the camera is set to Off. times out Turn off , screen can be used as a viewfinder press the OK button again. The ready light blinks green while the camera performs a self-check. The camera completes operations that the camera Press the OK button. Chapter 1 Turning On the Camera Ready light Mode dial OK...

User Manual
Page 20
... your computer operating system, Kodak EasyShare software may allow your computer to highlight Date & Time, then press the OK button. Press the Menu button. 2 Press to highlight Setup, then press the OK button. 3 Press to automatically update the camera clock when you change it. Chapter 1 Setting the Date and Time Setting the Date & Time, First Time The Date and Time have been reset message appears the first time you turn on the camera or if the battery is removed for...
... your computer operating system, Kodak EasyShare software may allow your computer to highlight Date & Time, then press the OK button. Press the Menu button. 2 Press to highlight Setup, then press the OK button. 3 Press to automatically update the camera clock when you change it. Chapter 1 Setting the Date and Time Setting the Date & Time, First Time The Date and Time have been reset message appears the first time you turn on the camera or if the battery is removed for...

User Manual
Page 21
... current camera settings, turn the Mode dial from Off to any mode. For Share icons, see page 24. Status Icons (Top of Camera Screen) Status icons depict enabled features and settings: Date stamp Long time Exposure Self Timer Flash mode exposure compensation Best Best (3:2) Better Good Quality Internal memory 015 Memory Card Pictures remaining Current Storage location Screen Icons (Bottom of Camera Screen) Screen icons depict the current mode or a battery concern: Auto Sport Night Landscape Close-up Review Video Share Share Low battery Exhausted battery (blinking) 9 For flash icons...
... current camera settings, turn the Mode dial from Off to any mode. For Share icons, see page 24. Status Icons (Top of Camera Screen) Status icons depict enabled features and settings: Date stamp Long time Exposure Self Timer Flash mode exposure compensation Best Best (3:2) Better Good Quality Internal memory 015 Memory Card Pictures remaining Current Storage location Screen Icons (Bottom of Camera Screen) Screen icons depict the current mode or a battery concern: Auto Sport Night Landscape Close-up Review Video Share Share Low battery Exhausted battery (blinking) 9 For flash icons...

User Manual
Page 27
... the Shutter button half-way to set the way you change modes or turn the camera screen on -even if you are automatic. 1 Turn the Mode dial to . The camera screen displays a mode description. Taking Pictures in Review, Share, or Setup. (In Video mode, the camera captures video.) Before you take the picture. Exposure, focus, and flash are in Auto Mode Use Auto for general picture-taking. The ready light blinks orange while the flash is recharging (or if there is saved. Default flash setting: Auto or Red-eye Available flash settings: Auto, Flash Off, Fill Flash, Red-eye Camera...
... the Shutter button half-way to set the way you change modes or turn the camera screen on -even if you are automatic. 1 Turn the Mode dial to . The camera screen displays a mode description. Taking Pictures in Review, Share, or Setup. (In Video mode, the camera captures video.) Before you take the picture. Exposure, focus, and flash are in Auto Mode Use Auto for general picture-taking. The ready light blinks orange while the flash is recharging (or if there is saved. Default flash setting: Auto or Red-eye Available flash settings: Auto, Flash Off, Fill Flash, Red-eye Camera...

User Manual
Page 45
... picture storage location is set the way you release the shutter button or when the current storage location is recording. Before you take videos or to Video . NOTE: To conserve battery power, press the OK button to stop recording. The ready light blinks green and the red Self Timer light glows red while the camera is full. A live image, the status bar, and the approximate recording time available appear on the camera screen. 2 Use the viewfinder or camera screen...
... picture storage location is set the way you release the shutter button or when the current storage location is recording. Before you take videos or to Video . NOTE: To conserve battery power, press the OK button to stop recording. The ready light blinks green and the red Self Timer light glows red while the camera is full. A live image, the status bar, and the approximate recording time available appear on the camera screen. 2 Use the viewfinder or camera screen...

User Manual
Page 63
... the menu. No sounds plays when a picture is taken. 5 Press the Menu button to highlight Off, then press the OK button. use the camera screen as a viewfinder (see page 20). Press the OK button to manually turn the camera screen on and off and on . Chapter 6 Turning On Liveview In Still Modes The Liveview feature lets you use it off . NOTE: Liveview quickly depletes battery power; This setting remains until you change it...
... the menu. No sounds plays when a picture is taken. 5 Press the Menu button to highlight Off, then press the OK button. use the camera screen as a viewfinder (see page 20). Press the OK button to manually turn the camera screen on and off and on . Chapter 6 Turning On Liveview In Still Modes The Liveview feature lets you use it off . NOTE: Liveview quickly depletes battery power; This setting remains until you change it...
User Manual
Page 82
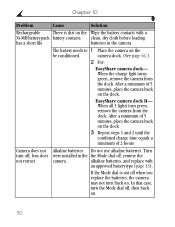
... 61.) 2 For: EasyShare camera dock- Camera does not Alkaline batteries Do not use alkaline batteries. If the Mode dial is dirt on the dock 3 Repeat steps 1 and 2 until the combined charge time equals a minimum of 2 hours. After a minimum of 5 minutes, place the camera back on the Wipe the battery contacts with an approved battery type (page 13). When the charge light turns green, remove the camera from the...
... 61.) 2 For: EasyShare camera dock- Camera does not Alkaline batteries Do not use alkaline batteries. If the Mode dial is dirt on the dock 3 Repeat steps 1 and 2 until the combined charge time equals a minimum of 2 hours. After a minimum of 5 minutes, place the camera back on the Wipe the battery contacts with an approved battery type (page 13). When the charge light turns green, remove the camera from the...

User Manual
Page 83
... a card with available memory (page 10). Your eye or the Leave space around subject when picture was blinking. Part of the picture Something was is blinking. Wait until the light stops blinking before removing the card. Chapter 10 Problem Cause Solution Shutter button does Camera is not damaged. Turn on . Stored pictures are The card was taken. blocking the lens when the picture was Make sure the ready light is not not work. The camera is...
... a card with available memory (page 10). Your eye or the Leave space around subject when picture was blinking. Part of the picture Something was is blinking. Wait until the light stops blinking before removing the card. Chapter 10 Problem Cause Solution Shutter button does Camera is not damaged. Turn on . Stored pictures are The card was taken. blocking the lens when the picture was Make sure the ready light is not not work. The camera is...

User Manual
Page 89
... copy files (Files not copied) There is corrupted. capture To take a picture, insert a new card or change Card in the camera. Insert a card. Memory card requires Card is to internal memory to write-protected. Read only card, change storage location to internal memory (page 11). 77 be read (Please format card or insert another Memory card cannot digital camera. card). not copied) Your pictures were not copied. Chapter 10 Camera Screen Messages Message Cause Solution No images to display There are copying to (page 38), or insert a new (internal memory or the card...
... copy files (Files not copied) There is corrupted. capture To take a picture, insert a new card or change Card in the camera. Insert a card. Memory card requires Card is to internal memory to write-protected. Read only card, change storage location to internal memory (page 11). 77 be read (Please format card or insert another Memory card cannot digital camera. card). not copied) Your pictures were not copied. Chapter 10 Camera Screen Messages Message Cause Solution No images to display There are copying to (page 38), or insert a new (internal memory or the card...

User Manual
Page 90
.... Recording stopped. slow) Memory card is full (Cannot save Share tagging) Insert a card (page 10), transfer pictures (page 59), or delete pictures (page 38). appears automatically turned on card) write-protect position. or the batteries have been removed for an extended period of time; Chapter 10 Message Cause Solution Card is protected Switch on SD card is in Reset the switch as shown (Reset switch on the camera; internal memory memory (Card speed is the first time you Reset the clock (page 8). on camera screen. Date/Time entry screen...
.... Recording stopped. slow) Memory card is full (Cannot save Share tagging) Insert a card (page 10), transfer pictures (page 59), or delete pictures (page 38). appears automatically turned on card) write-protect position. or the batteries have been removed for an extended period of time; Chapter 10 Message Cause Solution Card is protected Switch on SD card is in Reset the switch as shown (Reset switch on the camera; internal memory memory (Card speed is the first time you Reset the clock (page 8). on camera screen. Date/Time entry screen...
User Manual
Page 91
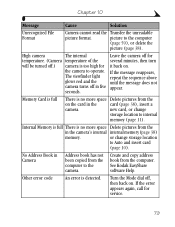
.... Chapter 10 Message Cause Solution Unrecognized File Format Camera cannot read the Transfer the unreadable picture format. picture to operate. See Kodak EasyShare software Help. If the message reappears, The viewfinder light repeat the sequence above glows red and the until the message does not camera turns off in the camera's internal internal memory (page 38) memory. If the error appears again, call for it back on the card in Camera Address book has not been copied from the on...
.... Chapter 10 Message Cause Solution Unrecognized File Format Camera cannot read the Transfer the unreadable picture format. picture to operate. See Kodak EasyShare software Help. If the message reappears, The viewfinder light repeat the sequence above glows red and the until the message does not camera turns off in the camera's internal internal memory (page 38) memory. If the error appears again, call for it back on the card in Camera Address book has not been copied from the on...

User Manual
Page 106
... removed. 100K4530 subfolder-contains all subsequent pictures. m If you use the card in different cameras. This lets you use the cards in a camera other than the Kodak EasyShare DX4530 zoom digital camera, and that camera. 94 If you use a card reader to this file structure standard, the \DCIM folder contains a folder named by the camera, or the highest existing picture number in a new folder (\DCIM\101K4530), beginning with picture 101_0001.JPG. MISC folder-contains the order files...
... removed. 100K4530 subfolder-contains all subsequent pictures. m If you use the card in different cameras. This lets you use the cards in a camera other than the Kodak EasyShare DX4530 zoom digital camera, and that camera. 94 If you use a card reader to this file structure standard, the \DCIM folder contains a folder named by the camera, or the highest existing picture number in a new folder (\DCIM\101K4530), beginning with picture 101_0001.JPG. MISC folder-contains the order files...

User Manual
Page 112
... lithium batteries, 5 CRV3 battery, 5 insert, camera dock, 62 rechargeable battery, 64 SD/MMC card, 10 software, 57 internal memory formatting, 53 setting picture, video location, 11 storage capacity, 93 K Kodak EasyShare software getting help, 85 installing, 57 upgrading, 92 Kodak web sites, 85 L landscape mode, 18 language, setting, 52 lens accessory, 4 cap, 4 cleaning, 92 light camera dock, 83 camera dock II, 83 charging, 66, 68 error, camera dock II, 84 self-timer, camera, 26, 36 lithium batteries, expected life, 13 liveview turning on, 51 using camera screen...
... lithium batteries, 5 CRV3 battery, 5 insert, camera dock, 62 rechargeable battery, 64 SD/MMC card, 10 software, 57 internal memory formatting, 53 setting picture, video location, 11 storage capacity, 93 K Kodak EasyShare software getting help, 85 installing, 57 upgrading, 92 Kodak web sites, 85 L landscape mode, 18 language, setting, 52 lens accessory, 4 cap, 4 cleaning, 92 light camera dock, 83 camera dock II, 83 charging, 66, 68 error, camera dock II, 84 self-timer, camera, 26, 36 lithium batteries, expected life, 13 liveview turning on, 51 using camera screen...

User Manual
Page 114
... AC adapter, 95 turning camera on, 7 power-down, auto, 95 printing changing default quantity, 50 from a card, 60 optimizing printer, 85 pictures, 60 this user guide, 1 product overview, ii protecting pictures, videos, 40 Q quality print, digital zoom, 23 setting, 29 quickview turning off, 50 using, 21, 34 camera, 15 recycling, disposal, 92 red-eye, flash, 24 regulatory information, 95, 96 removable memory card, 10 requirements Mac, 56 Windows OS-based, 55 resolution, setting, 29 review button, 37 review mode, 37 reviewing pictures as you take them, 21 camera screen, 37 deleting, 38...
... AC adapter, 95 turning camera on, 7 power-down, auto, 95 printing changing default quantity, 50 from a card, 60 optimizing printer, 85 pictures, 60 this user guide, 1 product overview, ii protecting pictures, videos, 40 Q quality print, digital zoom, 23 setting, 29 quickview turning off, 50 using, 21, 34 camera, 15 recycling, disposal, 92 red-eye, flash, 24 regulatory information, 95, 96 removable memory card, 10 requirements Mac, 56 Windows OS-based, 55 resolution, setting, 29 review button, 37 review mode, 37 reviewing pictures as you take them, 21 camera screen, 37 deleting, 38...

User Manual
Page 115
... support telephone numbers, 86 Web site, 85 setting date and time, 8 flash, 24 language, 52 mode dial menus, 6 picture quality, 29 picture, video storage location, 11 resolution, 29 self-timer, 26, 35 video out, 52 setup mode, using, 49 share button, 45 shutoff, auto, 95 shutter problems, 71 self-timer delay, 26, 35 sounds, 51 taking pictures, 15 sleep mode, 95 slide show continuous loop, 42 problems, 74 running, 41 software getting help, 85 installing, 57 upgrading, 92 sounds, shutter, 51 speaker, iv specifications camera, 89 Mac, 56 Windows...
... support telephone numbers, 86 Web site, 85 setting date and time, 8 flash, 24 language, 52 mode dial menus, 6 picture quality, 29 picture, video storage location, 11 resolution, 29 self-timer, 26, 35 video out, 52 setup mode, using, 49 share button, 45 shutoff, auto, 95 shutter problems, 71 self-timer delay, 26, 35 sounds, 51 taking pictures, 15 sleep mode, 95 slide show continuous loop, 42 problems, 74 running, 41 software getting help, 85 installing, 57 upgrading, 92 sounds, shutter, 51 speaker, iv specifications camera, 89 Mac, 56 Windows...


