User Guide
Page 2
... connection 1-6 2 Getting Started 2-1 Site specifications 2-1 System requirements 2-1 Registering your scanner 2-1 Making connections 2-2 Installing the IEEE-1394 card in the host computer 2-2 Installing the Kodak Driver software 2-2 Installing the FireWire cable 2-2 Attaching the power cord 2-3 Powering up the host computer 2-3 Scanner components 2-3 3 Using the Scanner 3-1 Turning the scanner on and off 3-1 Starting and stopping scanning 3-1 Manually pausing and resuming the scanner 3-2 Automatically pausing and resuming the scanner 3-2 Manually ending scanning 3-2 Document...
... connection 1-6 2 Getting Started 2-1 Site specifications 2-1 System requirements 2-1 Registering your scanner 2-1 Making connections 2-2 Installing the IEEE-1394 card in the host computer 2-2 Installing the Kodak Driver software 2-2 Installing the FireWire cable 2-2 Attaching the power cord 2-3 Powering up the host computer 2-3 Scanner components 2-3 3 Using the Scanner 3-1 Turning the scanner on and off 3-1 Starting and stopping scanning 3-1 Manually pausing and resuming the scanner 3-2 Automatically pausing and resuming the scanner 3-2 Manually ending scanning 3-2 Document...

User Guide
Page 3
... Feeding documents using multi-feed detection 3-9 Automatic feeding 3-9 Continuous feeding 3-10 Manual feeding 3-10 Feeding documents that require special handling 3-11 Calibrating the scanner 3-11 Image calibration 3-12 Ultrasonics calibration 3-15 4 The Enhanced Printer 4-1 Overview 4-1 Printer specifications 4-2 Accessing the Enhanced Printer 4-3 Changing the printer position 4-4 Replacing the ink cartridge 4-4 Replacing the blotter strips 4-6 Replacing the ink cartridge carrier 4-7 5 Maintenance 5-1 Cleaning frequency chart 5-2 Cleaning tools and materials 5-2 Supplies...
... Feeding documents using multi-feed detection 3-9 Automatic feeding 3-9 Continuous feeding 3-10 Manual feeding 3-10 Feeding documents that require special handling 3-11 Calibrating the scanner 3-11 Image calibration 3-12 Ultrasonics calibration 3-15 4 The Enhanced Printer 4-1 Overview 4-1 Printer specifications 4-2 Accessing the Enhanced Printer 4-3 Changing the printer position 4-4 Replacing the ink cartridge 4-4 Replacing the blotter strips 4-6 Replacing the ink cartridge carrier 4-7 5 Maintenance 5-1 Cleaning frequency chart 5-2 Cleaning tools and materials 5-2 Supplies...
User Guide
Page 4
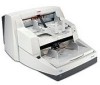
... specifications for clearing a document jam and a listing of internal and external scanner components. includes specifications and instructions on how to support the Kodak i600/i700 Series Scanners. Chapter 5, Maintenance - Instructions for scanning, document feeder and output tray adjustments, scanner calibration and how to install the scanner. provides procedures for use with the accessory. Chapter 6, Troubleshooting - 1 Introduction This User's Guide provides information and procedures for the feed module, separation roller and imaging guides. The information in this guide...
... specifications for clearing a document jam and a listing of internal and external scanner components. includes specifications and instructions on how to support the Kodak i600/i700 Series Scanners. Chapter 5, Maintenance - Instructions for scanning, document feeder and output tray adjustments, scanner calibration and how to install the scanner. provides procedures for use with the accessory. Chapter 6, Troubleshooting - 1 Introduction This User's Guide provides information and procedures for the feed module, separation roller and imaging guides. The information in this guide...

User Guide
Page 5
... the Paper Source position is set to 500 Sheets and there are for Kodak i700 Series Scanners, Firmware Version 2.1.1 (or higher). • Fast elevator - Scanner models New features • Kodak i610 Scanner is a desktop duplex black and white and grayscale scanner with an automatic document feeder that runs at 80 pages per minute which includes an enhanced printer. • Kodak i620 Scanner is a desktop duplex color scanner with an automatic document feeder that runs at 80 pages per...
... the Paper Source position is set to 500 Sheets and there are for Kodak i700 Series Scanners, Firmware Version 2.1.1 (or higher). • Fast elevator - Scanner models New features • Kodak i610 Scanner is a desktop duplex black and white and grayscale scanner with an automatic document feeder that runs at 80 pages per minute which includes an enhanced printer. • Kodak i620 Scanner is a desktop duplex color scanner with an automatic document feeder that runs at 80 pages per...

User Guide
Page 6
... sizes. • Easy installation. • ISIS and TWAIN device drivers are included on content (i700 Series Scanners only), color, black and white and grayscale deskew, auto-crop, automatic color detection, aggressive cropping, error diffusion, toggle patch, autocolor balancing (auto-white balancing) to the Kodak i610 Scanner. A-61500 April 2009 1-3 Grayscale: 100, 150, 200, 240, 300 • Multi-feed detection by multiple ultrasonic sensors as well as by length detection. • Automatic and manual feeding...
... sizes. • Easy installation. • ISIS and TWAIN device drivers are included on content (i700 Series Scanners only), color, black and white and grayscale deskew, auto-crop, automatic color detection, aggressive cropping, error diffusion, toggle patch, autocolor balancing (auto-white balancing) to the Kodak i610 Scanner. A-61500 April 2009 1-3 Grayscale: 100, 150, 200, 240, 300 • Multi-feed detection by multiple ultrasonic sensors as well as by length detection. • Automatic and manual feeding...

User Guide
Page 10
... a stable, level work surface, • within 1.52 metres (5 feet) of scanning parameters, and the host computer configuration. If the scanner is not performing at www.kodak.com/go /DIwarrantyregistration. Registering your continuous scanning. A-61500 April 2009 2-1 For more information about the scanner specifications, refer to Appendix B, Specifications. For more information about Kodak's service and support options, contact your reseller of Kodak Document Imaging products or...
... a stable, level work surface, • within 1.52 metres (5 feet) of scanning parameters, and the host computer configuration. If the scanner is not performing at www.kodak.com/go /DIwarrantyregistration. Registering your continuous scanning. A-61500 April 2009 2-1 For more information about the scanner specifications, refer to Appendix B, Specifications. For more information about Kodak's service and support options, contact your reseller of Kodak Document Imaging products or...
User Guide
Page 13
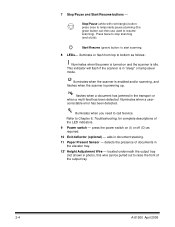
... you need to raise the front of documents in document stacking. 11 Paper Present Sensor - located underneath the output tray (not shown in photo), this wire can then use used to start scanning. 8 LEDs- illuminates when the scanner is enabled and/or scanning, and flashes when the scanner is in the transport or when a multi-feed has been detected. flashes when a document has jammed in "sleep" or lamp saver mode. illuminate or flash from...
... you need to raise the front of documents in document stacking. 11 Paper Present Sensor - located underneath the output tray (not shown in photo), this wire can then use used to start scanning. 8 LEDs- illuminates when the scanner is enabled and/or scanning, and flashes when the scanner is in the transport or when a multi-feed has been detected. flashes when a document has jammed in "sleep" or lamp saver mode. illuminate or flash from...
User Guide
Page 24
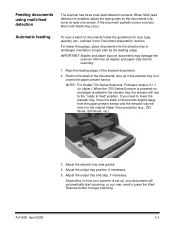
... guidelines for size, type, quantity, etc., outlined in the "Document preparation" section. IMPORTANT: Staples and paper clips on documents may occur. NOTE: For Kodak i700 Series Scanners, Firmware Version 2.1.1 (or higher): When the i700 Series Scanner is powered-on how your scanner is enabled, adjust the side guides so the documents fully cover at least one sensor. Automatic feeding To scan a batch of the stacked documents. 2. Adjust the output tray end stop, if...
... guidelines for size, type, quantity, etc., outlined in the "Document preparation" section. IMPORTANT: Staples and paper clips on documents may occur. NOTE: For Kodak i700 Series Scanners, Firmware Version 2.1.1 (or higher): When the i700 Series Scanner is powered-on how your scanner is enabled, adjust the side guides so the documents fully cover at least one sensor. Automatic feeding To scan a batch of the stacked documents. 2. Adjust the output tray end stop, if...

User Guide
Page 26
... Accessory is installed, it must be replaced with the black background strip, and the scanner must be scanned, feed them one document is to be rebooted prior to achieve the best overall quality of calibration that can be performed on the i600/ i700 Series Scanners: Image calibration and Ultrasonics calibration. • Image calibration: optimizes the optical system in your scanner in continuous feed mode is not needed or recommended...
... Accessory is installed, it must be replaced with the black background strip, and the scanner must be scanned, feed them one document is to be rebooted prior to achieve the best overall quality of calibration that can be performed on the i600/ i700 Series Scanners: Image calibration and Ultrasonics calibration. • Image calibration: optimizes the optical system in your scanner in continuous feed mode is not needed or recommended...
User Guide
Page 31
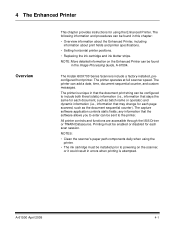
... as the document sequential counter). NOTES: • Clean the scanner's paper path components daily when using the Enhanced Printer. Printing must be found in this chapter: • Overview information about the Enhanced Printer, including information about print fields and printer specifications. • Setting horizontal printer positions. • Replacing the ink cartridge and ink blotter strips. 4 The Enhanced Printer Overview This chapter provides instructions for each page scanned, such as...
... as the document sequential counter). NOTES: • Clean the scanner's paper path components daily when using the Enhanced Printer. Printing must be found in this chapter: • Overview information about the Enhanced Printer, including information about print fields and printer specifications. • Setting horizontal printer positions. • Replacing the ink cartridge and ink blotter strips. 4 The Enhanced Printer Overview This chapter provides instructions for each page scanned, such as...
User Guide
Page 56
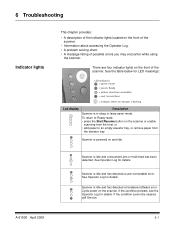
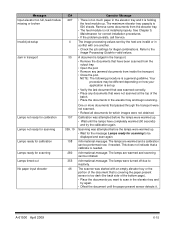
... accessing the Operator Log. • A problem solving chart. • A message listing of the scanner. Scanner is idle and a document jam or multi-feed has been detected. 6 Troubleshooting Indicator lights This chapter provides: • A description of the indicator lights located on the front of possible errors you may encounter while using the scanner. See the table below for details. Scanner is idle and has detected a user-correctable error. Scanner is powered on and...
... accessing the Operator Log. • A problem solving chart. • A message listing of the scanner. Scanner is idle and a document jam or multi-feed has been detected. 6 Troubleshooting Indicator lights This chapter provides: • A description of the indicator lights located on the front of possible errors you may encounter while using the scanner. See the table below for details. Scanner is idle and has detected a user-correctable error. Scanner is powered on and...
User Guide
Page 61
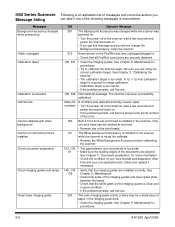
... installed correctly. See 139 Chapter 5, Maintenance. • Clean both printers installed Check document preparation Check imaging guides and lamps Clean lower imaging guide ID# Operator Message 381 The Background Accessory was changed while the scanner was detected that all FireWire connectors are securely fastened. 106, 331 • Clean the imaging guides. See Chapter 3, "Calibrating the scanner". • The calibration target is too narrow. • If the problem persists, call Service and provide the ID number of the error...
... installed correctly. See 139 Chapter 5, Maintenance. • Clean both printers installed Check document preparation Check imaging guides and lamps Clean lower imaging guide ID# Operator Message 381 The Background Accessory was changed while the scanner was detected that all FireWire connectors are securely fastened. 106, 331 • Clean the imaging guides. See Chapter 3, "Calibrating the scanner". • The calibration target is too narrow. • If the problem persists, call Service and provide the ID number of the error...
User Guide
Page 62
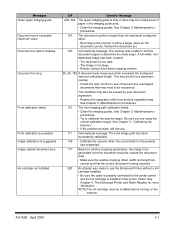
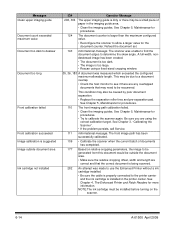
... cartridge installed. • Be sure the cable is properly connected to the printer carrier and the ink cartridge is installed in the imaging guide area. • Clean the imaging guides. See Chapter 3, "Calibrating the Scanner". • If the problem persists, call Service. 111 Informational message. Messages Clean upper imaging guide Document count exceeded maximum value Document too dark to deskew Document too long Front calibration failed Front calibration succeeded Image calibration is suggested Image outside the document area. • Make sure...
... cartridge installed. • Be sure the cable is properly connected to the printer carrier and the ink cartridge is installed in the imaging guide area. • Clean the imaging guides. See Chapter 3, "Calibrating the Scanner". • If the problem persists, call Service. 111 Informational message. Messages Clean upper imaging guide Document count exceeded maximum value Document too dark to deskew Document too long Front calibration failed Front calibration succeeded Image calibration is suggested Image outside the document area. • Make sure...

User Guide
Page 63
... and scan again. Informational message. See Chapter 5, Maintenance, for correct installation procedures. • If the problem persists, call Service. 4 The image processing values sent by the host are warmed and a calibration can be performed now, if needed . The scanner was scanned correctly. • Place any jammed documents from the elevator tray. • The feed module is set up . The lamps are warmed and scanning can be initiated. Remove some documents...
... and scan again. Informational message. See Chapter 5, Maintenance, for correct installation procedures. • If the problem persists, call Service. 4 The image processing values sent by the host are warmed and a calibration can be performed now, if needed . The scanner was scanned correctly. • Place any jammed documents from the elevator tray. • The feed module is set up . The lamps are warmed and scanning can be initiated. Remove some documents...
User Guide
Page 64
... the problem persists, call Service. 281 Informational message. The scanner has completed scanning the requested number of the default font. 112 The rear imaging path calibration failed. • Clean the imaging guides. The back-up with the scanner. 336 Informational message. Be sure you are aligned. Many ID numbers Documents passed through the transport but no images were created. • Clean document sensors. • Make sure the leading edges of your feed module...
... the problem persists, call Service. 281 Informational message. The scanner has completed scanning the requested number of the default font. 112 The rear imaging path calibration failed. • Clean the imaging guides. The back-up with the scanner. 336 Informational message. Be sure you are aligned. Many ID numbers Documents passed through the transport but no images were created. • Clean document sensors. • Make sure the leading edges of your feed module...
User Guide
Page 66
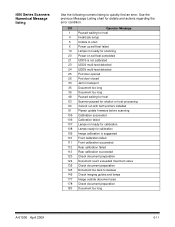
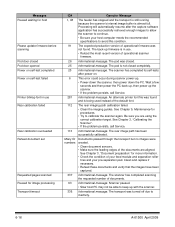
... both printers installed 91 Please update firmware before scanning 105 Calibration succeeded 106 Calibration failed 107 Lamps not ready for calibration 108 Lamps ready for details and actions regarding the error condition. i600 Series Scanners Numerical Message listing Use the following numeric listing to deskew 149 Check imaging guides and lamps 177 Image outside document area 178 Check document preparation 183 Document too long A-61500 April 2009 6-11 Use the previous Message Listing chart for calibration 109 Image calibration is suggested 110 Front calibration failed...
... both printers installed 91 Please update firmware before scanning 105 Calibration succeeded 106 Calibration failed 107 Lamps not ready for calibration 108 Lamps ready for details and actions regarding the error condition. i600 Series Scanners Numerical Message listing Use the following numeric listing to deskew 149 Check imaging guides and lamps 177 Image outside document area 178 Check document preparation 183 Document too long A-61500 April 2009 6-11 Use the previous Message Listing chart for calibration 109 Image calibration is suggested 110 Front calibration failed...
User Guide
Page 69
... correct document is being scanned. 282 An attempt was made to use the Enhanced Printer without a ink cartridge installed. • Be sure the cable is properly connected to allow a larger value for procedures. 110 The front imaging path calibration failed. • Clean the imaging guides. See Chapter 5, Maintenance for the document counter. The front image path has been successfully calibrated. 109 • Calibrate the scanner when the current batch of paper...
... correct document is being scanned. 282 An attempt was made to use the Enhanced Printer without a ink cartridge installed. • Be sure the cable is properly connected to allow a larger value for procedures. 110 The front imaging path calibration failed. • Clean the imaging guides. See Chapter 5, Maintenance for the document counter. The front image path has been successfully calibrated. 109 • Calibrate the scanner when the current batch of paper...
User Guide
Page 70
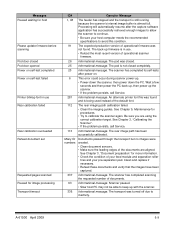
...; Open the pod. • Remove any documents that were not scanned at the top of the batch. • Place the documents in the elevator tray and try the calibration again. Calibration was started with one another. • Check the job settings for which images were not obtained. See Chapter 5, Maintenance, for valid values. 30 A document is too dark (the back side of the document that is covering the paper...
...; Open the pod. • Remove any documents that were not scanned at the top of the batch. • Place the documents in the elevator tray and try the calibration again. Calibration was started with one another. • Check the job settings for which images were not obtained. See Chapter 5, Maintenance, for valid values. 30 A document is too dark (the back side of the document that is covering the paper...
User Guide
Page 71
... calibration failed. • Clean the imaging guides. See Chapter 3, "Calibrating the Scanner". • If the problem persists, call Service. 281 Informational message. Messages Paused waiting for host Please update firmware before scanning Pod door closed Pod door opened Power on self-test completed Power on . 6 This error could occur during scanner power-up with the scanner. 336 Informational message. The back-up the scanner. • If the problem persists, call Service. 113 Informational message. Many ID numbers Documents...
... calibration failed. • Clean the imaging guides. See Chapter 3, "Calibrating the Scanner". • If the problem persists, call Service. 281 Informational message. Messages Paused waiting for host Please update firmware before scanning Pod door closed Pod door opened Power on self-test completed Power on . 6 This error could occur during scanner power-up with the scanner. 336 Informational message. The back-up the scanner. • If the problem persists, call Service. 113 Informational message. Many ID numbers Documents...

User Guide
Page 75
... sensors are clean. • the separation roller, feed module, and pre-separation pad are clean and properly installed. • the transport rollers are clean. If unsatisfactory image quality persists, call Service. Documents are jamming Make sure that : • the imaging guides are adjusted for the length of wear and replace these parts if necessary. • a very dark document on . Problem Possible Solution Scanner does not power on Make sure that: • the power cord...
... sensors are clean. • the separation roller, feed module, and pre-separation pad are clean and properly installed. • the transport rollers are clean. If unsatisfactory image quality persists, call Service. Documents are jamming Make sure that : • the imaging guides are adjusted for the length of wear and replace these parts if necessary. • a very dark document on . Problem Possible Solution Scanner does not power on Make sure that: • the power cord...


