
User's Guide
Page 1
...reception, which can radiate radio frequency energy and, if not used in residential use. Kodak KE115 Zoom 35 mm Camera Consumer Imaging EASTMAN KODAK COMPANY Rochester, NY 14650 © Eastman Kodak Company, 2002 Pt. These limits provide reasonable protection against interference in accordance with the ...Class B digital device, pursuant to radio communications. The camera generates, uses and can be determined by turning the camera off and on, you may cause undesired operation. Increase the separation between the camera and the receiver. - Reorient or relocate the receiving antenna...
...reception, which can radiate radio frequency energy and, if not used in residential use. Kodak KE115 Zoom 35 mm Camera Consumer Imaging EASTMAN KODAK COMPANY Rochester, NY 14650 © Eastman Kodak Company, 2002 Pt. These limits provide reasonable protection against interference in accordance with the ...Class B digital device, pursuant to radio communications. The camera generates, uses and can be determined by turning the camera off and on, you may cause undesired operation. Increase the separation between the camera and the receiver. - Reorient or relocate the receiving antenna...

User's Guide
Page 3
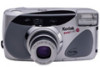
For warranty purposes, please keep your camera available. ENGLISH ENGLISH Kodak KE115 Zoom 35 mm Camera NEED HELP WITH YOUR CAMERA? for Canada) or call: Kodak (USA only) from 8:00 a.m. When you call 416-766-8233, ext. 36100. to 5:00 p.m. (Eastern time) Monday through Friday at http://www.kodak.com (for US) or http://www.kodak.ca (for the Toronto area, call...
For warranty purposes, please keep your camera available. ENGLISH ENGLISH Kodak KE115 Zoom 35 mm Camera NEED HELP WITH YOUR CAMERA? for Canada) or call: Kodak (USA only) from 8:00 a.m. When you call 416-766-8233, ext. 36100. to 5:00 p.m. (Eastern time) Monday through Friday at http://www.kodak.com (for US) or http://www.kodak.ca (for the Toronto area, call...
User's Guide
Page 4
CONTENTS CAMERA IDENTIFICATION 3 ATTACHING THE STRAP 4 LOADING THE BATTERY 5 Low-battery indicator 6 Auto power off 6 Battery tips 7 QUARTZ DATA BACK 8 Setting the date ...LOADING THE FILM 12 DIOPTER ADJUSTMENT 14 TAKING PICTURES 14 Using the focus lock 16 Tips for better pictures 17 2 USING THE ZOOM LENS 18 TAKING FLASH PICTURES 19 Flash-to-subject distance 19 FLASH MODES 20 Auto flash 21 Fill flash 21 Flash off ...-eye reduction 24 Portrait mode 25 UNLOADING THE FILM 26 Automatic rewind 26 Manual rewind 26 CARING FOR YOUR CAMERA 27 TROUBLESHOOTING 28 SPECIFICATIONS 30
CONTENTS CAMERA IDENTIFICATION 3 ATTACHING THE STRAP 4 LOADING THE BATTERY 5 Low-battery indicator 6 Auto power off 6 Battery tips 7 QUARTZ DATA BACK 8 Setting the date ...LOADING THE FILM 12 DIOPTER ADJUSTMENT 14 TAKING PICTURES 14 Using the focus lock 16 Tips for better pictures 17 2 USING THE ZOOM LENS 18 TAKING FLASH PICTURES 19 Flash-to-subject distance 19 FLASH MODES 20 Auto flash 21 Fill flash 21 Flash off ...-eye reduction 24 Portrait mode 25 UNLOADING THE FILM 26 Automatic rewind 26 Manual rewind 26 CARING FOR YOUR CAMERA 27 TROUBLESHOOTING 28 SPECIFICATIONS 30

User's Guide
Page 5
CAMERA IDENTIFICATION Unfold the front and back flaps of manual to view camera diagrams 1 Shutter button 2 Auto-focus windows 3 Light sensor 4 Flash 5 Self-timer/ red-eye-reduction bulb 6 Viewfinder 7 Lens/lens cover 8 Strap post 9 Film-door latch 10 Diopter dial 11 Viewfinder eyepiece 12 Flash-ready/camera-warning light 13 Zoom dial 14 Film-door-lock indicator 15 DATE 16 REWIND 17 LCD panel 18 TIMER 19 MODE 20 Tripod socket 21 EXPOSURE 22 LCD backlight 23 ON/OFF 24 Battery door 25 Film-guide rails 26 DX/DXN code sensors 27 Film chamber 28 Film door 29 Film window 3
CAMERA IDENTIFICATION Unfold the front and back flaps of manual to view camera diagrams 1 Shutter button 2 Auto-focus windows 3 Light sensor 4 Flash 5 Self-timer/ red-eye-reduction bulb 6 Viewfinder 7 Lens/lens cover 8 Strap post 9 Film-door latch 10 Diopter dial 11 Viewfinder eyepiece 12 Flash-ready/camera-warning light 13 Zoom dial 14 Film-door-lock indicator 15 DATE 16 REWIND 17 LCD panel 18 TIMER 19 MODE 20 Tripod socket 21 EXPOSURE 22 LCD backlight 23 ON/OFF 24 Battery door 25 Film-guide rails 26 DX/DXN code sensors 27 Film chamber 28 Film door 29 Film window 3

User's Guide
Page 7
Slide the battery door (24) and lift to open. 2. Snap the battery door closed. 5 Insert the battery into the battery chamber. 3. LOADING THE BATTERY This camera uses one 3-volt lithium KODAK KCR2 (or equivalent) Battery that supplies power for all camera operations. NOTE: Before you remove the old battery, turn off the camera. 1.
Slide the battery door (24) and lift to open. 2. Snap the battery door closed. 5 Insert the battery into the battery chamber. 3. LOADING THE BATTERY This camera uses one 3-volt lithium KODAK KCR2 (or equivalent) Battery that supplies power for all camera operations. NOTE: Before you remove the old battery, turn off the camera. 1.
User's Guide
Page 8
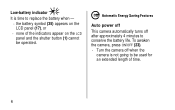
Low-battery indicator It is not going to conserve the battery life. To awaken the camera, press ON/OFF (23). • Turn the camera off after approximately 4 minutes to be operated. Auto power off This camera automatically turns off when the camera is time to replace the battery when - • the battery symbol (35) appears on the LCD panel (17), or • none of the indicators appear on the LCD panel and the shutter button (1) cannot be used for an extended length of time. 6
Low-battery indicator It is not going to conserve the battery life. To awaken the camera, press ON/OFF (23). • Turn the camera off after approximately 4 minutes to be operated. Auto power off This camera automatically turns off when the camera is time to replace the battery when - • the battery symbol (35) appears on the LCD panel (17), or • none of the indicators appear on the LCD panel and the shutter button (1) cannot be used for an extended length of time. 6
User's Guide
Page 9
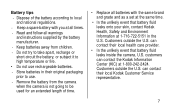
...In the unlikely event that battery fluid leaks onto your skin, contact Kodak Health, Safety and Environment Information at 1-716-722-5151 in their original packaging prior to use. • Remove the battery from the camera when the camera is not going to be used for an extended length of time... same brand and grade and as a set at the same time. • In the unlikely event that battery fluid leaks inside the camera, U.S. can contact the Kodak Information Center (KIC) at 1-800-242-2424. Customers outside the U.S. Customers outside the U.S. Battery tips • Dispose of the battery...
...In the unlikely event that battery fluid leaks onto your skin, contact Kodak Health, Safety and Environment Information at 1-716-722-5151 in their original packaging prior to use. • Remove the battery from the camera when the camera is not going to be used for an extended length of time... same brand and grade and as a set at the same time. • In the unlikely event that battery fluid leaks inside the camera, U.S. can contact the Kodak Information Center (KIC) at 1-800-242-2424. Customers outside the U.S. Customers outside the U.S. Battery tips • Dispose of the battery...

User's Guide
Page 10
...: (year/month/day, day/month/year, or month/day/year) or time format (day, hour/minute). Press DATE (15) and hold the camera horizontally to turn on the camera. 2. When you hold until the first numbers on the picture. In the vertical format with the shutter button up, it's imprinted on the...
...: (year/month/day, day/month/year, or month/day/year) or time format (day, hour/minute). Press DATE (15) and hold the camera horizontally to turn on the camera. 2. When you hold until the first numbers on the picture. In the vertical format with the shutter button up, it's imprinted on the...
User's Guide
Page 11
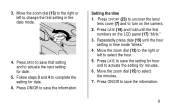
...hour and to save the information. 3. Press DATE to save the setting for minutes. 6. Move the zoom dial (13) to the right or left to actuate the next setting for date. 6. Press DATE to... save that setting and to change the first setting in time mode "blinks." 4. Move the zoom dial (13) to the right or left to turn on the LCD panel (17) "blink." 3. Press... DATE (15) and hold until the hour setting in the date mode. 4. Move the zoom dial (15) to complete the setting for date. 5. Follow steps 3 and 4 to select the minutes. 7. Repeatedly ...
...hour and to save the information. 3. Press DATE to save the setting for minutes. 6. Move the zoom dial (13) to the right or left to actuate the next setting for date. 6. Press DATE to... save that setting and to change the first setting in time mode "blinks." 4. Move the zoom dial (13) to the right or left to turn on the LCD panel (17) "blink." 3. Press... DATE (15) and hold until the hour setting in the date mode. 4. Move the zoom dial (15) to complete the setting for date. 5. Follow steps 3 and 4 to select the minutes. 7. Repeatedly ...
User's Guide
Page 12
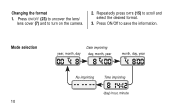
Repeatedly press DATE (15) to save the information. Mode selection 10 year, month, day ' M Date imprinting day, month, year M' month, day, year M ' No imprinting Time imprinting (day) hour, minute Press ON/Off to scroll and select the desired format. 3. Changing the format 1. Press ON/OFF (23) to uncover the lens/ lens cover (7) and to turn on the camera. 2.
Repeatedly press DATE (15) to save the information. Mode selection 10 year, month, day ' M Date imprinting day, month, year M' month, day, year M ' No imprinting Time imprinting (day) hour, minute Press ON/Off to scroll and select the desired format. 3. Changing the format 1. Press ON/OFF (23) to uncover the lens/ lens cover (7) and to turn on the camera. 2.

User's Guide
Page 13
Simply remove the peel-off label of your choice and place it with one . USING THE LCD BACKLIGHT This camera features an LCD panel backlight for the LCD control buttons are printed below the LCD panel (17). Press ON/OFF (23) to uncover the lens/ ...lens cover (7) and to turn on the camera. 2. You can manually turn off in lowlight or nighttime settings. 1. Rewind • The backlight automatically turns off the light by repressing the LCD backlight button...
Simply remove the peel-off label of your choice and place it with one . USING THE LCD BACKLIGHT This camera features an LCD panel backlight for the LCD control buttons are printed below the LCD panel (17). Press ON/OFF (23) to uncover the lens/ ...lens cover (7) and to turn on the camera. 2. You can manually turn off in lowlight or nighttime settings. 1. Rewind • The backlight automatically turns off the light by repressing the LCD backlight button...
User's Guide
Page 14
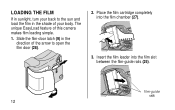
The unique EasyLoad feature of the arrow to the sun and load the film in the direction of this camera makes film loading simple. 1. OPEN 2. Insert the film leader into the film chamber (27). 3. film-guide rails 12 Place the film cartridge completely into the film slot between the film-guide rails (25). Slide the film-door latch (9) in the shade of your back to open the film door (28). LOADING THE FILM If in sunlight, turn your body.
The unique EasyLoad feature of the arrow to the sun and load the film in the direction of this camera makes film loading simple. 1. OPEN 2. Insert the film leader into the film chamber (27). 3. film-guide rails 12 Place the film cartridge completely into the film slot between the film-guide rails (25). Slide the film-door latch (9) in the shade of your back to open the film door (28). LOADING THE FILM If in sunlight, turn your body.
User's Guide
Page 16
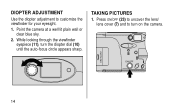
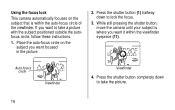
DIOPTER ADJUSTMENT Use the diopter adjustment to turn the diopter dial (10) until the auto-focus circle appears sharp. While looking through the viewfinder eyepiece (11), turn on the camera. TAKING PICTURES 1. Press ON/OFF (23) to uncover the lens/ lens cover (7) and to customize the viewfinder for your eyesight. 1. ON/OFF EASYLOAD 14 Point the camera at a well lit plain wall or clear blue sky. 2.
DIOPTER ADJUSTMENT Use the diopter adjustment to turn the diopter dial (10) until the auto-focus circle appears sharp. While looking through the viewfinder eyepiece (11), turn on the camera. TAKING PICTURES 1. Press ON/OFF (23) to uncover the lens/ lens cover (7) and to customize the viewfinder for your eyesight. 1. ON/OFF EASYLOAD 14 Point the camera at a well lit plain wall or clear blue sky. 2.
User's Guide
Page 17
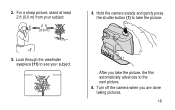
Look through the viewfinder eyepiece (11) to see your subject. 2 ft (0.6 m) 4. For a sharp picture, stand at least 2 ft (0.6 m) from your subject. • After you are done taking pictures. 15 Turn off the camera when you take the picture, the film automatically advances to take the picture. 3. 2. Hold the camera steady and gently press the shutter button (1) to the next picture. 5.
Look through the viewfinder eyepiece (11) to see your subject. 2 ft (0.6 m) 4. For a sharp picture, stand at least 2 ft (0.6 m) from your subject. • After you are done taking pictures. 15 Turn off the camera when you take the picture, the film automatically advances to take the picture. 3. 2. Hold the camera steady and gently press the shutter button (1) to the next picture. 5.
User's Guide
Page 18
... the picture. 2. Press the shutter button (1) halfway down to lock the focus. 3. Auto-focus circle Viewfinder Viewfinder 4. While still pressing the shutter button, move the camera until your subject is within the viewfinder eyepiece (11). Press the shutter button completely down to take a picture with the subject positioned outside the autofocus...
... the picture. 2. Press the shutter button (1) halfway down to lock the focus. 3. Auto-focus circle Viewfinder Viewfinder 4. While still pressing the shutter button, move the camera until your subject is within the viewfinder eyepiece (11). Press the shutter button completely down to take a picture with the subject positioned outside the autofocus...

User's Guide
Page 19
...from the flash and picture-taking lens. • Stand at the subject's level. Kneel down to take pictures of children and pets. • Hold your camera vertically to capture tall, narrow subjects, such as a waterfall, skyscraper, or a single person. • Add interest to your picture by keeping your elbows.... • Use high-speed film (ISO 400 or ISO 800) when you . Tips for better pictures • To avoid blurry pictures, hold your camera steady by framing it fills the viewfinder but not closer than 2 ft (0.6 m). • Take pictures at an angle to shiny surfaces like windows or...
...from the flash and picture-taking lens. • Stand at the subject's level. Kneel down to take pictures of children and pets. • Hold your camera vertically to capture tall, narrow subjects, such as a waterfall, skyscraper, or a single person. • Add interest to your picture by keeping your elbows.... • Use high-speed film (ISO 400 or ISO 800) when you . Tips for better pictures • To avoid blurry pictures, hold your camera steady by framing it fills the viewfinder but not closer than 2 ft (0.6 m). • Take pictures at an angle to shiny surfaces like windows or...

User's Guide
Page 20
...) to take the picture. • The lens barrel fully retracts and the camera goes into a sleep mode after 4 minutes. USING THE ZOOM LENS This camera has a motorized zoom lens that lets you turn on the camera, the lens is initially set to zoom away from the subject in the wideangle position. 18 4. When you select the...
...) to take the picture. • The lens barrel fully retracts and the camera goes into a sleep mode after 4 minutes. USING THE ZOOM LENS This camera has a motorized zoom lens that lets you turn on the camera, the lens is initially set to zoom away from the subject in the wideangle position. 18 4. When you select the...
User's Guide
Page 21
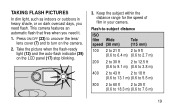
... need flash. Take the picture when the flash-ready light (12) and the auto-flash indicator (39) on the camera. 2. TAKING FLASH PICTURES In dim light, such as indoors or outdoors in your camera. Press ON/OFF (23) to uncover the lens/ lens cover (7) and to 7.6 m) 19 Flash-to-subject distance ...ISO film Wide speed (38 mm) Tele (115 mm) 100 2 to 21 ft 2 to 9 ft (0.6 to 6.4 m) (0.6 to 2.7 m) 200 2 to 30 ft 2 to ...
... need flash. Take the picture when the flash-ready light (12) and the auto-flash indicator (39) on the camera. 2. TAKING FLASH PICTURES In dim light, such as indoors or outdoors in your camera. Press ON/OFF (23) to uncover the lens/ lens cover (7) and to 7.6 m) 19 Flash-to-subject distance ...ISO film Wide speed (38 mm) Tele (115 mm) 100 2 to 21 ft 2 to 9 ft (0.6 to 6.4 m) (0.6 to 2.7 m) 200 2 to 30 ft 2 to ...

User's Guide
Page 22
...mode that best suits your pictures will be dark. 4. FLASH MODES Besides the auto-flash mode with red-eye reduction (initial default setting of the camera), you can select auto flash without flash. REWIND EXPOSURE MODE TIMER 20 • Don't take the picture. • To prevent battery drain, ...turn off the camera by pressing the on the LCD panel (17). Hold the camera steady and gently press the shutter button (1) completely down to view the choices on /off , or nightview with or ...
...mode that best suits your pictures will be dark. 4. FLASH MODES Besides the auto-flash mode with red-eye reduction (initial default setting of the camera), you can select auto flash without flash. REWIND EXPOSURE MODE TIMER 20 • Don't take the picture. • To prevent battery drain, ...turn off the camera by pressing the on the LCD panel (17). Hold the camera steady and gently press the shutter button (1) completely down to view the choices on /off , or nightview with or ...
User's Guide
Page 23
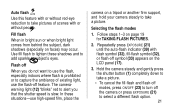
... off feature. Repeatedly press EXPOSURE (21) until the auto-flash indicator (39) with flash symbol (32), fill-flash symbol (32), or flash-off the camera or press EXPOSURE (21) to select a different flash option. 21 Fill flash When in bright sun or when bright light comes from behind the subject..., dark shadows (especially on a tripod or another firm support, and hold your camera steady to take pictures of existing light, use the flash, especially indoors where flash is prohibited or to capture the ambiance of scenes with or...
... off feature. Repeatedly press EXPOSURE (21) until the auto-flash indicator (39) with flash symbol (32), fill-flash symbol (32), or flash-off the camera or press EXPOSURE (21) to select a different flash option. 21 Fill flash When in bright sun or when bright light comes from behind the subject..., dark shadows (especially on a tripod or another firm support, and hold your camera steady to take pictures of existing light, use the flash, especially indoors where flash is prohibited or to capture the ambiance of scenes with or...

