
User's Guide
Page 1
... in accordance with the instructions, may cause interference to radio or television reception, which can radiate radio frequency energy and, if not used in residential use. Reorient or relocate the receiving antenna. - The camera generates, uses and can be determined by turning the camera off and on, you may cause undesired operation. Kodak KE85 Zoom 35 mm Camera Consumer Imaging EASTMAN KODAK COMPANY Rochester, NY...
... in accordance with the instructions, may cause interference to radio or television reception, which can radiate radio frequency energy and, if not used in residential use. Reorient or relocate the receiving antenna. - The camera generates, uses and can be determined by turning the camera off and on, you may cause undesired operation. Kodak KE85 Zoom 35 mm Camera Consumer Imaging EASTMAN KODAK COMPANY Rochester, NY...

User's Guide
Page 3
..., please keep your camera available. EENNGGLLIISSHH Kodak KE85 Zoom 35 mm Camera NEED HELP WITH YOUR CAMERA? to 7:00 p.m. (Eastern time) Monday through Friday at 1-800-465-6325, ext. 36100; to 5:00 p.m. (Eastern time) Monday through Friday at http://www.kodak.com (for US) or http://www.kodak.ca (for the Toronto area, call , please have your sales receipt as proof of the date of purchase...
..., please keep your camera available. EENNGGLLIISSHH Kodak KE85 Zoom 35 mm Camera NEED HELP WITH YOUR CAMERA? to 7:00 p.m. (Eastern time) Monday through Friday at 1-800-465-6325, ext. 36100; to 5:00 p.m. (Eastern time) Monday through Friday at http://www.kodak.com (for US) or http://www.kodak.ca (for the Toronto area, call , please have your sales receipt as proof of the date of purchase...
User's Guide
Page 4
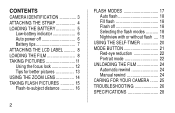
... 6 Auto power off 6 Battery tips 7 ATTACHING THE LCD LABEL .......... 8 LOADING THE FILM 8 TAKING PICTURES 11 Using the focus lock 12 Tips for better pictures 13 USING THE ZOOM LENS 14 TAKING FLASH PICTURES 15 Flash-to-subject distance 16 2 FLASH MODES 17 Auto flash 18 Fill flash 18 Flash off 18 Selecting the flash modes 18 Nightview with or without flash .... 19 USING THE SELF-TIMER 20 MODE BUTTON 21 Red-eye reduction 22 Portrait mode 22 UNLOADING THE FILM 24 Automatic rewind...
... 6 Auto power off 6 Battery tips 7 ATTACHING THE LCD LABEL .......... 8 LOADING THE FILM 8 TAKING PICTURES 11 Using the focus lock 12 Tips for better pictures 13 USING THE ZOOM LENS 14 TAKING FLASH PICTURES 15 Flash-to-subject distance 16 2 FLASH MODES 17 Auto flash 18 Fill flash 18 Flash off 18 Selecting the flash modes 18 Nightview with or without flash .... 19 USING THE SELF-TIMER 20 MODE BUTTON 21 Red-eye reduction 22 Portrait mode 22 UNLOADING THE FILM 24 Automatic rewind...
User's Guide
Page 5
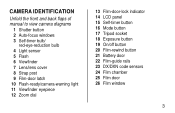
CAMERA IDENTIFICATION Unfold the front and back flaps of manual to view camera diagrams 1 Shutter button 2 Auto-focus windows 3 Self-timer bulb/ red-eye-reduction bulb 4 Light sensor 5 Flash 6 Viewfinder 7 Lens/lens cover 8 Strap post 9 Film-door latch 10 Flash-ready/camera-warning light 11 Viewfinder eyepiece 12 Zoom dial 13 Film-door-lock indicator 14 LCD panel 15 Self-timer button 16 Mode button 17 Tripod socket 18 Exposure button 19 On/off button 20 Film-rewind button 21 Battery door 22 Film-guide rails 23 DX/DXN code sensors 24 Film chamber 25 Film door 26 Film window 3
CAMERA IDENTIFICATION Unfold the front and back flaps of manual to view camera diagrams 1 Shutter button 2 Auto-focus windows 3 Self-timer bulb/ red-eye-reduction bulb 4 Light sensor 5 Flash 6 Viewfinder 7 Lens/lens cover 8 Strap post 9 Film-door latch 10 Flash-ready/camera-warning light 11 Viewfinder eyepiece 12 Zoom dial 13 Film-door-lock indicator 14 LCD panel 15 Self-timer button 16 Mode button 17 Tripod socket 18 Exposure button 19 On/off button 20 Film-rewind button 21 Battery door 22 Film-guide rails 23 DX/DXN code sensors 24 Film chamber 25 Film door 26 Film window 3
User's Guide
Page 7
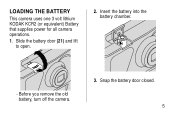
Insert the battery into the battery chamber. • Before you remove the old battery, turn off the camera. 3. Snap the battery door closed. 5 Slide the battery door (21) and lift to open. 2. LOADING THE BATTERY This camera uses one 3 volt lithium KODAK KCR2 (or equivalent) Battery that supplies power for all camera operations. 1.
Insert the battery into the battery chamber. • Before you remove the old battery, turn off the camera. 3. Snap the battery door closed. 5 Slide the battery door (21) and lift to open. 2. LOADING THE BATTERY This camera uses one 3 volt lithium KODAK KCR2 (or equivalent) Battery that supplies power for all camera operations. 1.

User's Guide
Page 8
To awaken the camera, press the on the LCD panel and the shutter button (1) cannot be used for an extended length of time. 6 Low-battery indicator It is not going to replace the battery when - • the battery symbol (32) appears on the LCD panel (14), or • none of the indicators appear on /off button (19). • Turn the camera off after approximately 4 minutes to conserve the battery life. Auto power off This camera automatically turns off when the camera is time to be operated.
To awaken the camera, press the on the LCD panel and the shutter button (1) cannot be used for an extended length of time. 6 Low-battery indicator It is not going to replace the battery when - • the battery symbol (32) appears on the LCD panel (14), or • none of the indicators appear on /off button (19). • Turn the camera off after approximately 4 minutes to conserve the battery life. Auto power off This camera automatically turns off when the camera is time to be operated.

User's Guide
Page 9
... to use. • Remove the battery from the camera when the camera is not going to high temperature or fire. • Store batteries in their local Kodak Customer Service representative. 7 Customers outside the U.S. Battery tips • Dispose of the battery according to local and national regulations. • Keep a spare battery with you at all times. • Read and follow all warnings and instructions...
... to use. • Remove the battery from the camera when the camera is not going to high temperature or fire. • Store batteries in their local Kodak Customer Service representative. 7 Customers outside the U.S. Battery tips • Dispose of the battery according to local and national regulations. • Keep a spare battery with you at all times. • Read and follow all warnings and instructions...
User's Guide
Page 10
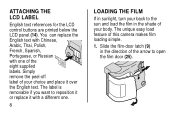
... to open the film door (25). OPEN You can replace the English text with a different one of the arrow to the sun and load the film in sunlight, turn your body. Slide the film-door latch (9) in the direction of the eight supplied labels. ATTACHING THE LCD LABEL English text references for the LCD control buttons are printed below the LCD panel (14). The label is removable...
... to open the film door (25). OPEN You can replace the English text with a different one of the arrow to the sun and load the film in sunlight, turn your body. Slide the film-door latch (9) in the direction of the eight supplied labels. ATTACHING THE LCD LABEL English text references for the LCD control buttons are printed below the LCD panel (14). The label is removable...
User's Guide
Page 14
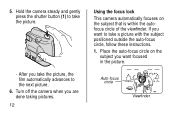
... want focused in the picture. Auto-focus circle Viewfinder 5. Place the auto-focus circle on the subject you are done taking pictures. 12 Using the focus lock This camera automatically focuses on the subject that is within the autofocus circle of the viewfinder. If you take a picture with the subject positioned outside the auto-focus circle, follow these instructions. 1. Turn off the camera when you want to take the picture, the film automatically advances...
... want focused in the picture. Auto-focus circle Viewfinder 5. Place the auto-focus circle on the subject you are done taking pictures. 12 Using the focus lock This camera automatically focuses on the subject that is within the autofocus circle of the viewfinder. If you take a picture with the subject positioned outside the auto-focus circle, follow these instructions. 1. Turn off the camera when you want to take the picture, the film automatically advances...
User's Guide
Page 16
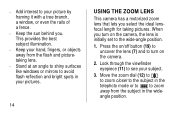
... the best subject illumination. • Keep your hand, fingers, or objects away from the subject in your pictures. 14 USING THE ZOOM LENS This camera has a motorized zoom lens that lets you select the ideal lensfocal length for taking pictures. Move the zoom dial (12) to to zoom closer to the subject in the telephoto mode or to to zoom away from the flash...
... the best subject illumination. • Keep your hand, fingers, or objects away from the subject in your pictures. 14 USING THE ZOOM LENS This camera has a motorized zoom lens that lets you select the ideal lensfocal length for taking pictures. Move the zoom dial (12) to to zoom closer to the subject in the telephoto mode or to to zoom away from the flash...

User's Guide
Page 18
Keep the subject within the distance range for the speed of film in your camera. 16 Flash-to-subject distance ISO film Wide speed (38 mm) Tele (85 mm) 100 2 to 21 ft 2 to 10 ft (0.6 to 6.4 m) (0.6 to 3.0 m) 200 2 to 30 ft 2 to 14 ft (0.6 to 9.1 m) (0.6 to 4.3 m) 400...2 to 43 ft 2 to 19 ft (0.6 to 13.1 m) (0.6 to 5.8 m) 800 2 to 60 ft 2 to 27 ft (0.6 to 18.3 m) (0.6 to 8.2 m) • Don't take pictures beyond the maximum distance or your pictures will be dark. 2. Take the picture when the flashready light (10) and the auto-flash indicator (35) on the LCD panel (14) stop blinking. 3.
Keep the subject within the distance range for the speed of film in your camera. 16 Flash-to-subject distance ISO film Wide speed (38 mm) Tele (85 mm) 100 2 to 21 ft 2 to 10 ft (0.6 to 6.4 m) (0.6 to 3.0 m) 200 2 to 30 ft 2 to 14 ft (0.6 to 9.1 m) (0.6 to 4.3 m) 400...2 to 43 ft 2 to 19 ft (0.6 to 13.1 m) (0.6 to 5.8 m) 800 2 to 60 ft 2 to 27 ft (0.6 to 18.3 m) (0.6 to 8.2 m) • Don't take pictures beyond the maximum distance or your pictures will be dark. 2. Take the picture when the flashready light (10) and the auto-flash indicator (35) on the LCD panel (14) stop blinking. 3.

User's Guide
Page 19
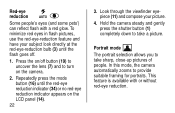
... press the exposure button (18) to take the picture. • To prevent battery drain, turn off , or nightview with or without red-eye reduction, fill flash, flash off the camera by pressing the on the LCD panel (14). 4. Hold the camera steady and gently press the shutter button (1) completely down to view the choices on /off button when you can select auto flash without flash. REWIND EXPOSURE MODE TIMER 17
... press the exposure button (18) to take the picture. • To prevent battery drain, turn off , or nightview with or without red-eye reduction, fill flash, flash off the camera by pressing the on the LCD panel (14). 4. Hold the camera steady and gently press the shutter button (1) completely down to view the choices on /off button when you can select auto flash without flash. REWIND EXPOSURE MODE TIMER 17

User's Guide
Page 20
... for TAKING FLASH PICTURES. 2. In these shadows and to add sparkle to take a picture. Repeatedly press the exposure button (18) until the auto-flash indicator (35) with flash symbol (29), fill-flash symbol (29),or flashoff symbol (30) appears on a tripod or another firm support, and hold your camera steady to take pictures of existing light, use the flash-off When you that the shutter speed is prohibited...
... for TAKING FLASH PICTURES. 2. In these shadows and to add sparkle to take a picture. Repeatedly press the exposure button (18) until the auto-flash indicator (35) with flash symbol (29), fill-flash symbol (29),or flashoff symbol (30) appears on a tripod or another firm support, and hold your camera steady to take pictures of existing light, use the flash-off When you that the shutter speed is prohibited...

User's Guide
Page 21
... to change the default setting to alert you that you want to use high-speed film, place the camera on a tripod or another firm support, and hold your camera steady to take a picture. 1. In these situations- Hold the camera steady and gently press the shutter button (1) completely down to take a picture. • To cancel the fill-flash mode and flash-off mode, turn off the camera by pressing the exposure button...
... to change the default setting to alert you that you want to use high-speed film, place the camera on a tripod or another firm support, and hold your camera steady to take a picture. 1. In these situations- Hold the camera steady and gently press the shutter button (1) completely down to take a picture. • To cancel the fill-flash mode and flash-off mode, turn off the camera by pressing the exposure button...

User's Guide
Page 22
REWIND • The self-timer symbol (33) appears on /off button (19) or select a different mode by pressing the exposure button (18). 20 EXPOSURE MODE TIMER USING THE SELF-TIMER Use this feature when you want to take the picture. • To cancel the nightview modes, turn off the camera by pressing the on the LCD panel (14). Hold the camera steady and gently press the shutter button (1) to include yourself in the...
REWIND • The self-timer symbol (33) appears on /off button (19) or select a different mode by pressing the exposure button (18). 20 EXPOSURE MODE TIMER USING THE SELF-TIMER Use this feature when you want to take the picture. • To cancel the nightview modes, turn off the camera by pressing the on the LCD panel (14). Hold the camera steady and gently press the shutter button (1) to include yourself in the...
User's Guide
Page 24
... flash pictures, use the red-eye-reduction feature and have your picture. 4. Portrait mode The portrait selection allows you to provide suitable framing for portraits. In this mode, the camera automatically zooms to take a picture. Red-eye reduction AUTO Some people's eyes (and some pets') can reflect flash with or without red-eye reduction. Hold the camera steady and gently press the shutter button...
... flash pictures, use the red-eye-reduction feature and have your picture. 4. Portrait mode The portrait selection allows you to provide suitable framing for portraits. In this mode, the camera automatically zooms to take a picture. Red-eye reduction AUTO Some people's eyes (and some pets') can reflect flash with or without red-eye reduction. Hold the camera steady and gently press the shutter button...
User's Guide
Page 26
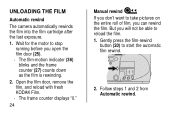
... the film is rewinding. 2. Follow steps 1 and 2 from Automatic rewind. Open the film door, remove the film, and reload with fresh KODAK Film. • The frame counter displays "0." 24 EXPOSURE MODE TIMER Manual rewind If you don't want to start the automatic film rewind. Gently press the film-rewind button (20) to take pictures on the entire roll of film, you can rewind the film. REWIND 2. UNLOADING THE FILM Automatic rewind The camera automatically rewinds the film into the film cartridge after...
... the film is rewinding. 2. Follow steps 1 and 2 from Automatic rewind. Open the film door, remove the film, and reload with fresh KODAK Film. • The frame counter displays "0." 24 EXPOSURE MODE TIMER Manual rewind If you don't want to start the automatic film rewind. Gently press the film-rewind button (20) to take pictures on the entire roll of film, you can rewind the film. REWIND 2. UNLOADING THE FILM Automatic rewind The camera automatically rewinds the film into the film cartridge after...

User's Guide
Page 27
... surface gently with a soft, lintless cloth or camera lens-cleaning tissue. Never wipe a dry lens. Do not use solvents or harsh or abrasive cleaners on the camera body. • If the lens appears dirty, breathe on it to disassemble or repair the camera or flash unit by yourself. 25 CARING FOR YOUR CAMERA • Protect the camera from dust, moisture, sudden impact, and...
... surface gently with a soft, lintless cloth or camera lens-cleaning tissue. Never wipe a dry lens. Do not use solvents or harsh or abrasive cleaners on the camera body. • If the lens appears dirty, breathe on it to disassemble or repair the camera or flash unit by yourself. 25 CARING FOR YOUR CAMERA • Protect the camera from dust, moisture, sudden impact, and...
User's Guide
Page 28
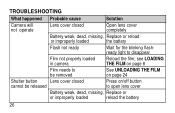
TROUBLESHOOTING What happened Probable cause Solution Camera will not operate Lens cover closed cannot be released Press on/off button to disappear Film not properly loaded in camera Reload the film; see LOADING THE FILM on page 8 Film needs to be removed See UNLOADING THE FILM on page 24 Shutter button Lens cover closed Open lens cover completely Battery weak, dead, missing, Replace or reload or improperly loaded the battery Flash not ready Wait for the blinking flashready light to open lens cover Battery weak, dead...
TROUBLESHOOTING What happened Probable cause Solution Camera will not operate Lens cover closed cannot be released Press on/off button to disappear Film not properly loaded in camera Reload the film; see LOADING THE FILM on page 8 Film needs to be removed See UNLOADING THE FILM on page 24 Shutter button Lens cover closed Open lens cover completely Battery weak, dead, missing, Replace or reload or improperly loaded the battery Flash not ready Wait for the blinking flashready light to open lens cover Battery weak, dead...
User's Guide
Page 29
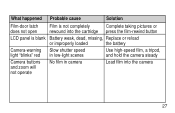
What happened Probable cause Solution Film-door latch does not open Film is not completely Complete taking pictures or rewound into the cartridge press the film-rewind button LCD panel is blank Battery weak, dead, missing, Replace or reload or improperly loaded the battery Camera-warning light "blinks" red Camera buttons and zoom will not operate Slow shutter speed in low-light scenes No film in camera Use high-speed film, a tripod, and hold the camera steady Load film into the camera 27
What happened Probable cause Solution Film-door latch does not open Film is not completely Complete taking pictures or rewound into the cartridge press the film-rewind button LCD panel is blank Battery weak, dead, missing, Replace or reload or improperly loaded the battery Camera-warning light "blinks" red Camera buttons and zoom will not operate Slow shutter speed in low-light scenes No film in camera Use high-speed film, a tripod, and hold the camera steady Load film into the camera 27


