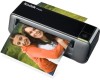
User Guide
Page 2
... VISTA Users ...11 For WINDOWS XP Users ...11 For WINDOWS 7 Users...12 For MAC Users ...12 Scanned Picture Naming Convention 12 Safely Disconnect the Scanner from PC 12 Scan PC Software for KODAK Personal Photo Scanners 12 Install Scan PC Software ...13 Using the Scan PC Software ...13 Uninstall the Scan PC Software ...13...
... VISTA Users ...11 For WINDOWS XP Users ...11 For WINDOWS 7 Users...12 For MAC Users ...12 Scanned Picture Naming Convention 12 Safely Disconnect the Scanner from PC 12 Scan PC Software for KODAK Personal Photo Scanners 12 Install Scan PC Software ...13 Using the Scan PC Software ...13 Uninstall the Scan PC Software ...13...
User Guide
Page 3
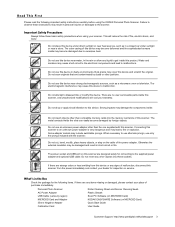
...any liquid to fire or explosion. What's in the rain or allow any other than compatible memory cards into these sockets. Personal Photo Scanner AC Power Adapter USB Cable (varies by region) MICROSD Card and Adapter 35mm Negative Adapter Calibration Card Roller Cleaning Sheet and Sensor ...If there are any signs of malfunction, disconnect this device. Failure to observe these basic safety precautions when using the KODAK Personal Photo Scanner. Important Safety Precautions Always follow these instructions may become damaged by dusts or other than the one supplied with the...
...any liquid to fire or explosion. What's in the rain or allow any other than compatible memory cards into these sockets. Personal Photo Scanner AC Power Adapter USB Cable (varies by region) MICROSD Card and Adapter 35mm Negative Adapter Calibration Card Roller Cleaning Sheet and Sensor ...If there are any signs of malfunction, disconnect this device. Failure to observe these basic safety precautions when using the KODAK Personal Photo Scanner. Important Safety Precautions Always follow these instructions may become damaged by dusts or other than the one supplied with the...

User Guide
Page 4
... on . Indicates the correct position and orientation of the scanner and memory card. (Refer to "Indicator Lights" on the memory card. Simply insert a memory card into the scanner, and power it 's just as that. Insert an original photo into this slot. For installing the 35mm Negative adapter. ... Lights" on page 5.) Indicates the operating status of the original for 300dpi mode. No computer is ready, feed your printed photo or negative film into the scanner and your PC, it on page 6.) The scanned original exits from this slot to the supplied power adapter. 4 Customer Support...
... on . Indicates the correct position and orientation of the scanner and memory card. (Refer to "Indicator Lights" on the memory card. Simply insert a memory card into the scanner, and power it 's just as that. Insert an original photo into this slot. For installing the 35mm Negative adapter. ... Lights" on page 5.) Indicates the operating status of the original for 300dpi mode. No computer is ready, feed your printed photo or negative film into the scanner and your PC, it on page 6.) The scanned original exits from this slot to the supplied power adapter. 4 Customer Support...

User Guide
Page 5
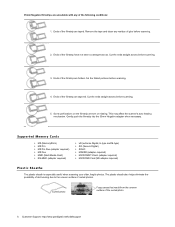
...thin materials (thin paper, cloth, etc.) Over-exposed film. Paper jam. To avoid auto-detection failure, remove any operations. Scanner Indicator Lights Listed below 1MB), more than 55mm Originals with lots of black or dark colors Originals with dark colors ...exceed the following types of originals for 300dpi mode. The scanner will back out the original so you can remove the jammed original from the beginning of the strip before using a plastic sheath): 3.5"x5" and 4"x6" photos (max size 4.1"x12") Business cards (max...
...thin materials (thin paper, cloth, etc.) Over-exposed film. Paper jam. To avoid auto-detection failure, remove any operations. Scanner Indicator Lights Listed below 1MB), more than 55mm Originals with lots of black or dark colors Originals with dark colors ...exceed the following types of originals for 300dpi mode. The scanner will back out the original so you can remove the jammed original from the beginning of the strip before using a plastic sheath): 3.5"x5" and 4"x6" photos (max size 4.1"x12") Business cards (max...
User Guide
Page 6
... have not been cut straight across before scanning. 2. Curled photo Fuzzy areas that result from the uneven surface of curled photos. 35mm Negative filmstrips are taped. Cut the ends straight across . This may affect the scanner's auto feeding mechanism. Ends of the following conditions: 1. ...The plastic sheath also helps eliminate the possibility of de-focusing due to the uneven surface of the curled photo 6 Customer Support: http://www.pandigital.net/kodaksupport ...
... have not been cut straight across before scanning. 2. Curled photo Fuzzy areas that result from the uneven surface of curled photos. 35mm Negative filmstrips are taped. Cut the ends straight across . This may affect the scanner's auto feeding mechanism. Ends of the following conditions: 1. ...The plastic sheath also helps eliminate the possibility of de-focusing due to the uneven surface of the curled photo 6 Customer Support: http://www.pandigital.net/kodaksupport ...

User Guide
Page 7
... cards in a safe place and protect them from that secures the guide lever (first time only). 2. Scanner Original Scanner Scanned image when displayed on your region. 4. Insert the KODAK MICROSD Mobile Card into the SD adapter (included) or an unlocked (writable) memory card into a power ... power indicator and Status/Card lights blink. (For more indicator lights information, refer to the photos over time. Store plastic sheaths in FAT or FAT32 file system. Insert the photo into the feed slot of your computer. 1. Insert the plastic sheath into the plastic sheath...
... cards in a safe place and protect them from that secures the guide lever (first time only). 2. Scanner Original Scanner Scanned image when displayed on your region. 4. Insert the KODAK MICROSD Mobile Card into the SD adapter (included) or an unlocked (writable) memory card into a power ... power indicator and Status/Card lights blink. (For more indicator lights information, refer to the photos over time. Store plastic sheaths in FAT or FAT32 file system. Insert the photo into the feed slot of your computer. 1. Insert the plastic sheath into the plastic sheath...

User Guide
Page 8
...are not suitable for one is completed, the Power and Status/Card indicator lights blink while the scanner stores the photo on the scanner and adjust the guide lever so that the scanner is ready. Do not insert an original into the feed slot when the power indicator... detect the orientation of a filmstrip when the printed numbers on steady, indicating that the photo aligns against the left side of the filmstrip are in certain conditions are blinking. This scanner produces JPEG (.jpg) file formats. The power indicator will automatically adjust the scanned image during...
...are not suitable for one is completed, the Power and Status/Card indicator lights blink while the scanner stores the photo on the scanner and adjust the guide lever so that the scanner is ready. Do not insert an original into the feed slot when the power indicator... detect the orientation of a filmstrip when the printed numbers on steady, indicating that the photo aligns against the left side of the filmstrip are in certain conditions are blinking. This scanner produces JPEG (.jpg) file formats. The power indicator will automatically adjust the scanned image during...

User Guide
Page 9
...a malfunction. Make sure that the feed slot is slower than that of the filmstrip when inserting. Hold up to the direction of photo scanning. Feeding Filmstrips 1. Wait until indicator lights are damaged, the auto mirror/flip function will give inaccurate results. Pay attention to... the filmstrip into position after the calibration has completed. To prevent poor image quality, reserve adequate space behind the scanner for scanning. The scanner scans filmstrips at a higher resolution; Slide the paper guide lever all the way into the slot and scanned. ...
...a malfunction. Make sure that the feed slot is slower than that of the filmstrip when inserting. Hold up to the direction of photo scanning. Feeding Filmstrips 1. Wait until indicator lights are damaged, the auto mirror/flip function will give inaccurate results. Pay attention to... the filmstrip into position after the calibration has completed. To prevent poor image quality, reserve adequate space behind the scanner for scanning. The scanner scans filmstrips at a higher resolution; Slide the paper guide lever all the way into the slot and scanned. ...

User Guide
Page 10
...Please insert the original in cropping function that are blinking. This scanner produces JPEG (.jpg) file formats. To power down the scanner, press and hold the power button for example, a photo of an original during the scan process (see following illustration). The power indicator... Power and Status/Card indicator lights blink while the scanner stores the photo on the scanner. 10 Customer Support: http://www.pandigital.net/kodaksupport Wait until the indicator lights stop blinking before inserting and scanning the next photo. CAUTION: Insert only one filmstrip at a time,...
...Please insert the original in cropping function that are blinking. This scanner produces JPEG (.jpg) file formats. To power down the scanner, press and hold the power button for example, a photo of an original during the scan process (see following illustration). The power indicator... Power and Status/Card indicator lights blink while the scanner stores the photo on the scanner. 10 Customer Support: http://www.pandigital.net/kodaksupport Wait until the indicator lights stop blinking before inserting and scanning the next photo. CAUTION: Insert only one filmstrip at a time,...

User Guide
Page 11
...WINDOWS EXPLORER setting as follows: 1. 2. The scanner will be recognized by the computer as a removable disk (WINDOWS system). To view photos on your region. 3. Customer Support: http://www.pandigital.net/kodaksupport 11 If you are using the KODAK SD memory card, the drive will be ...scanned pictures with the PC, an additional drive will be listed in the EXPLORER window. When the scanner connects with WINDOWS EXPLORER or VISTA Photo Import Wizard. 4. Insert the KODAK MICROSD Mobile Card into the SD adapter (included) or an unlocked (writable) memory card into an ...
...WINDOWS EXPLORER setting as follows: 1. 2. The scanner will be recognized by the computer as a removable disk (WINDOWS system). To view photos on your region. 3. Customer Support: http://www.pandigital.net/kodaksupport 11 If you are using the KODAK SD memory card, the drive will be ...scanned pictures with the PC, an additional drive will be listed in the EXPLORER window. When the scanner connects with WINDOWS EXPLORER or VISTA Photo Import Wizard. 4. Insert the KODAK MICROSD Mobile Card into the SD adapter (included) or an unlocked (writable) memory card into an ...

User Guide
Page 12
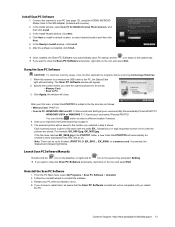
... 9 folders (PHOTO1..9, EK_0001... For example, EK_0001.jpg, EK_0002.jpg. There can safely remove the scanner's USB cable. If exceeded, the Status/Card indicator light blinks. Scan PC Software for KODAK Personal Photo Scanners With the Scan PC Software for KODAK Personal Photo Scanners (Scan PC Software), you can be saved in the PHOTO1 folder, a new folder titled...
... 9 folders (PHOTO1..9, EK_0001... For example, EK_0001.jpg, EK_0002.jpg. There can safely remove the scanner's USB cable. If exceeded, the Status/Card indicator light blinks. Scan PC Software for KODAK Personal Photo Scanners With the Scan PC Software for KODAK Personal Photo Scanners (Scan PC Software), you can be saved in the PHOTO1 folder, a new folder titled...
User Guide
Page 13
... . Click Apply; Follow the uninstall wizard to Install window, click Install. 6. In the Install window, select Scan PC for KODAK Personal Photo Scanners, and then click Install. 3. Specify the location where you want to the file structure as instructed beginning on the icon and select...digit sequential number in default location, or select desired location and then click Next. 5. For example, EK_0001.jpg, EK_0002.jpg. Connect the scanner to 9 folders (PHOTO1..9, EK_0001... Note: There can click the button to store subsequent new files, and so on a memory card. ...
... . Click Apply; Follow the uninstall wizard to Install window, click Install. 6. In the Install window, select Scan PC for KODAK Personal Photo Scanners, and then click Install. 3. Specify the location where you want to the file structure as instructed beginning on the icon and select...digit sequential number in default location, or select desired location and then click Next. 5. For example, EK_0001.jpg, EK_0002.jpg. Connect the scanner to 9 folders (PHOTO1..9, EK_0001... Note: There can click the button to store subsequent new files, and so on a memory card. ...
User Guide
Page 14
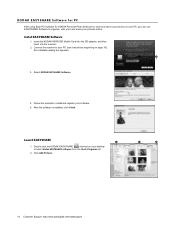
... to install and register your desktop or select Kodak EASYSHARE software from the Start>Programs list. 2. Select KODAK EASYSHARE Software. 4. Double-click the KODAK EASYSHARE shortcut on page 10); Connect the scanner to your pictures online. KODAK EASYSHARE Software for PC After using Scan PC Software for KODAK Personal Photo Scanners to scan and store your pictures on...
... to install and register your desktop or select Kodak EASYSHARE software from the Start>Programs list. 2. Select KODAK EASYSHARE Software. 4. Double-click the KODAK EASYSHARE shortcut on page 10); Connect the scanner to your pictures online. KODAK EASYSHARE Software for PC After using Scan PC Software for KODAK Personal Photo Scanners to scan and store your pictures on...

User Guide
Page 15
...inserting it is no visible dust on all features. Uninstall the EASYSHARE Software 1. Enter a new Album destination name. 6. Select Kodak EASYSHARE Software, and then click Uninstall. 4. Clean the Roller 1. Connect the power supply to an Album. 5. The cleaning sheet will be permanently ...and Status/Card indicator lights will begin. Using the top row of the scanner. Follow the prompts to other locations, and uploaded directly into Albums can be on the scanned picture photos or film will be brought into the feed slot. The power and Status...
...inserting it is no visible dust on all features. Uninstall the EASYSHARE Software 1. Enter a new Album destination name. 6. Select Kodak EASYSHARE Software, and then click Uninstall. 4. Clean the Roller 1. Connect the power supply to an Album. 5. The cleaning sheet will be permanently ...and Status/Card indicator lights will begin. Using the top row of the scanner. Follow the prompts to other locations, and uploaded directly into Albums can be on the scanned picture photos or film will be brought into the feed slot. The power and Status...
User Guide
Page 17
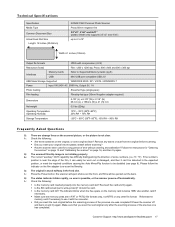
...the film adapter to write-protect)? Technical Specifications Specification Media Type Common Document Size Actual Feed Slot Size Length: 12 inches (304.8mm) KODAK P460 Personal Photo Scanner Photo/35mm negative film 3.5"x5", 4"x6" and 4x11" (plastic sheath only supports 3.5"x5" and 4"x6") up to 4.1x12" Width 4.1... the original clean? Please follow the indicator on the original, or is near the edge of some numbers, (i.e.,"6", "9"). the scanner will eject photos out the front, and films will be worn out or damaged, and then it with compression (4:2:2) Resolution (fixed) Film: 1200...
...the film adapter to write-protect)? Technical Specifications Specification Media Type Common Document Size Actual Feed Slot Size Length: 12 inches (304.8mm) KODAK P460 Personal Photo Scanner Photo/35mm negative film 3.5"x5", 4"x6" and 4x11" (plastic sheath only supports 3.5"x5" and 4"x6") up to 4.1x12" Width 4.1... the original clean? Please follow the indicator on the original, or is near the edge of some numbers, (i.e.,"6", "9"). the scanner will eject photos out the front, and films will be worn out or damaged, and then it with compression (4:2:2) Resolution (fixed) Film: 1200...


