User Manual
Page 5
... the lens cap and strap 1 Charging the battery 2 Loading the battery 2 Turning on the camera 3 Setting the language and date/time, first time 3 Setting the language and date/time, other times 4 Storing pictures on an SD or MMC card 4 2 Taking pictures and videos 5 Taking a picture 5 Using optical zoom 10 Using the flip-up flash 11 Using an external flash unit 11 Reviewing pictures and videos 12 Protecting pictures and videos from deletion 16 3 Transferring and printing pictures 18 Installing the software 18 Transferring pictures 19 Printing from a Kodak EasyShare printer dock...
... the lens cap and strap 1 Charging the battery 2 Loading the battery 2 Turning on the camera 3 Setting the language and date/time, first time 3 Setting the language and date/time, other times 4 Storing pictures on an SD or MMC card 4 2 Taking pictures and videos 5 Taking a picture 5 Using optical zoom 10 Using the flip-up flash 11 Using an external flash unit 11 Reviewing pictures and videos 12 Protecting pictures and videos from deletion 16 3 Transferring and printing pictures 18 Installing the software 18 Transferring pictures 19 Printing from a Kodak EasyShare printer dock...
User Manual
Page 6
... rapid setting changes 40 Using the histogram 41 Using highlight/shadow clipping 41 Changing picture-taking settings 42 Editing functions for Still and Video 53 RAW file development 55 Viewing picture/video information 56 Making a video action print or picture 57 Copying pictures and videos 58 Running a slide show 59 Pre-tagging for album names 60 Sharing your pictures 63 5 Troubleshooting 69 Camera problems 69 Computer/connectivity problems 71 Picture quality problems 72 Direct printing (PictBridge) problems 74 6 Getting help 75 iv www.kodak...
... rapid setting changes 40 Using the histogram 41 Using highlight/shadow clipping 41 Changing picture-taking settings 42 Editing functions for Still and Video 53 RAW file development 55 Viewing picture/video information 56 Making a video action print or picture 57 Copying pictures and videos 58 Running a slide show 59 Pre-tagging for album names 60 Sharing your pictures 63 5 Troubleshooting 69 Camera problems 69 Computer/connectivity problems 71 Picture quality problems 72 Direct printing (PictBridge) problems 74 6 Getting help 75 iv www.kodak...
User Manual
Page 7
Table of contents Helpful links 75 Telephone customer support 76 7 Appendix 77 Camera specifications 77 Storage capacities 81 Power-saving features 84 Accessories 85 Important safety instructions 86 Battery information 88 Upgrading your software and firmware 89 Additional care and maintenance 89 Warranty...90 Regulatory compliance 92 www.kodak.com/go/support v
Table of contents Helpful links 75 Telephone customer support 76 7 Appendix 77 Camera specifications 77 Storage capacities 81 Power-saving features 84 Accessories 85 Important safety instructions 86 Battery information 88 Upgrading your software and firmware 89 Additional care and maintenance 89 Warranty...90 Regulatory compliance 92 www.kodak.com/go/support v

User Manual
Page 16
...pictures and videos Capture icons in liveview (default screen) Flash mode Focus mode Drive mode Date stamp Camera mode Album name Image stabilizer Accessory lens Framing marks Picture size Zoom indicator File type Pictures/time remaining Storage location Battery indicator (flashing=exhausted) AF mode White balance Exposure metering Exposure bracketing interval Aperture Shutter speed ISO Flash compensation Exposure compensation NOTE: Your camera screen changes when you press the Status button (see page 8). Capture icons-shutter pressed halfway Framing marks Battery indicator Auto Focus...
...pictures and videos Capture icons in liveview (default screen) Flash mode Focus mode Drive mode Date stamp Camera mode Album name Image stabilizer Accessory lens Framing marks Picture size Zoom indicator File type Pictures/time remaining Storage location Battery indicator (flashing=exhausted) AF mode White balance Exposure metering Exposure bracketing interval Aperture Shutter speed ISO Flash compensation Exposure compensation NOTE: Your camera screen changes when you press the Status button (see page 8). Capture icons-shutter pressed halfway Framing marks Battery indicator Auto Focus...

User Manual
Page 17
.... www.kodak.com/go/support 10 NOTE: Digital zoom is disabled when you select None in Advanced Digital zoom (see page 46). 3 Press the Shutter button halfway to set the exposure and focus, then completely down to take the picture. (When taking videos, press and release the Shutter button.) Using digital zoom Use digital zoom in . The blue slider on the zoom indicator pauses and turns red when the picture quality reaches the limit for video recording. NOTE: To enable Advanced digital zoom...
.... www.kodak.com/go/support 10 NOTE: Digital zoom is disabled when you select None in Advanced Digital zoom (see page 46). 3 Press the Shutter button halfway to set the exposure and focus, then completely down to take the picture. (When taking videos, press and release the Shutter button.) Using digital zoom Use digital zoom in . The blue slider on the zoom indicator pauses and turns red when the picture quality reaches the limit for video recording. NOTE: To enable Advanced digital zoom...

User Manual
Page 20
Taking pictures and videos Multi-selection of pictures during review Use the Set button to create a set of 20 selected pictures 2 Press Set. 3 to highlight a picture. A blue box appears around your pictures. 4 Press Set to perform various functions, for example Delete (page 17), Protect (page 16), and Copy (page 58). To deselect a picture, press Set again and the blue box disappears. 13 www.kodak.com/go/support To deselect the entire set , press Set again...
Taking pictures and videos Multi-selection of pictures during review Use the Set button to create a set of 20 selected pictures 2 Press Set. 3 to highlight a picture. A blue box appears around your pictures. 4 Press Set to perform various functions, for example Delete (page 17), Protect (page 16), and Copy (page 58). To deselect a picture, press Set again and the blue box disappears. 13 www.kodak.com/go/support To deselect the entire set , press Set again...

User Manual
Page 28
... OK button. Transferring and printing pictures Direct printing with I PictBridge enabled printer optional Kodak 5-volt AC adapter I USB cable (U-8) Connecting the camera to the printer 1 Turn off , press any button to redisplay it into the camera and into an electrical outlet. 3 Using a USB cable for your camera, connect the camera to the printer. (See your printer user's guide for details.) Printing pictures NOTE: Raw and TIFF files are found, a message is displayed, followed by the current picture and menu. (If no pictures are not directly printable...
... OK button. Transferring and printing pictures Direct printing with I PictBridge enabled printer optional Kodak 5-volt AC adapter I USB cable (U-8) Connecting the camera to the printer 1 Turn off , press any button to redisplay it into the camera and into an electrical outlet. 3 Using a USB cable for your camera, connect the camera to the printer. (See your printer user's guide for details.) Printing pictures NOTE: Raw and TIFF files are found, a message is displayed, followed by the current picture and menu. (If no pictures are not directly printable...

User Manual
Page 31
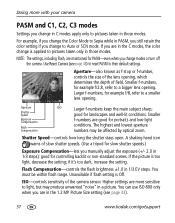
... lighting. Press the Menu button to change other settings. Press the Menu button to change other settings. Use this mode Doing more with full access to all menu options. Controlling exposure compensation, flash compensation (how much light enters the camera), and ISO speed. AUTO Program Aperture Priority Shutter Priority General picture-taking-offers an excellent balance of image quality and ease-of sharpness). NOTE: The aperture setting may be affected when using optical zoom. Shutter priority mode is primarily used to select and adjust settings...
... lighting. Press the Menu button to change other settings. Press the Menu button to change other settings. Use this mode Doing more with full access to all menu options. Controlling exposure compensation, flash compensation (how much light enters the camera), and ISO speed. AUTO Program Aperture Priority Shutter Priority General picture-taking-offers an excellent balance of image quality and ease-of sharpness). NOTE: The aperture setting may be affected when using optical zoom. Shutter priority mode is primarily used to select and adjust settings...

User Manual
Page 32
... the C modes using Copy to Custom (see page 52). Capturing video with your camera Use this mode For Manual Custom Enjoying the highest level of aperture and shutter speed to produce an acceptable exposure. Saving settings in PASM mode. Press the Menu button to change other settings. Custom Transferring settings you save settings in PASM mode. Custom Scene Video Point-and-shoot simplicity when taking pictures under 16 special conditions (see page 5). 25 www.kodak.com/go/support Use the Command...
... the C modes using Copy to Custom (see page 52). Capturing video with your camera Use this mode For Manual Custom Enjoying the highest level of aperture and shutter speed to produce an acceptable exposure. Saving settings in PASM mode. Press the Menu button to change other settings. Custom Transferring settings you save settings in PASM mode. Custom Scene Video Point-and-shoot simplicity when taking pictures under 16 special conditions (see page 5). 25 www.kodak.com/go/support Use the Command...
User Manual
Page 36
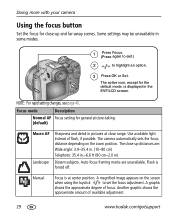
... camera Using the focus button Set the focus for close-up distances are unavailable. The active icon, except for general picture-taking. (default) Macro AF Landscape Sharpness and detail in the EVF/LCD screen. Manual Focus is displayed in pictures at center position. NOTE: For rapid setting changes, see page 40. The close range. Auto-focus framing marks are : Wide angle: 3.9-35.4 in. (10-90 cm) Telephoto: 35.4 in some modes. 1 Press Focus...
... camera Using the focus button Set the focus for close-up distances are unavailable. The active icon, except for general picture-taking. (default) Macro AF Landscape Sharpness and detail in the EVF/LCD screen. Manual Focus is displayed in pictures at center position. NOTE: For rapid setting changes, see page 40. The close range. Auto-focus framing marks are : Wide angle: 3.9-35.4 in. (10-90 cm) Telephoto: 35.4 in some modes. 1 Press Focus...
User Manual
Page 44
... you change is too light, decrease the setting; If you manually adjust the exposure (+/- 2.0 in those modes. Aperture-also known as f-stop or f-number, controls the size of the lens opening . Smaller f-numbers, for slow shutter speeds.) Exposure Compensation-lets you are in the 1.2 MP Picture Size setting (see page 48) to reset PASM to a bigger lens opening , which determines the depth of slow shutter speeds. (Use a tripod for example f/2.8, refer to their default settings. If the picture is...
... you change is too light, decrease the setting; If you manually adjust the exposure (+/- 2.0 in those modes. Aperture-also known as f-stop or f-number, controls the size of the lens opening . Smaller f-numbers, for slow shutter speeds.) Exposure Compensation-lets you are in the 1.2 MP Picture Size setting (see page 48) to reset PASM to a bigger lens opening , which determines the depth of slow shutter speeds. (Use a tripod for example f/2.8, refer to their default settings. If the picture is...

User Manual
Page 53
.../AF Button Set Choose how the Auto Exposure/Auto Focus button works. If not, the camera uses internal memory. Pre-select album names before you take are tagged with your camera Setup menu options Setup Setting Icon LCD Brightness Adjust the brightness of the LCD screen. Off-setting is continuously on. Capture Frame Grid Use the frame grid to ensure sharp, clear results for pictures and videos. This setting remains until you take pictures or videos. Then, all the pictures or videos you change it . Continuous (default)-image...
.../AF Button Set Choose how the Auto Exposure/Auto Focus button works. If not, the camera uses internal memory. Pre-select album names before you take are tagged with your camera Setup menu options Setup Setting Icon LCD Brightness Adjust the brightness of the LCD screen. Off-setting is continuously on. Capture Frame Grid Use the frame grid to ensure sharp, clear results for pictures and videos. This setting remains until you take pictures or videos. Then, all the pictures or videos you change it . Continuous (default)-image...

User Manual
Page 74
... the Menu button. 3 Highlight , then press the OK button. Favorites are restored the next time you transfer pictures from your camera To increase internal memory for your Camera Favorites Album or to turn off the Camera Favorites feature. 67 www.kodak.com/go/support Click the My Collection tab. 2 Go to the Albums view. 3 Click the Camera Favorites Album for picture taking, remove favorites from transferring to the camera 1 Open the Kodak EasyShare software. Doing...
... the Menu button. 3 Highlight , then press the OK button. Favorites are restored the next time you transfer pictures from your camera To increase internal memory for your Camera Favorites Album or to turn off the Camera Favorites feature. 67 www.kodak.com/go/support Click the My Collection tab. 2 Go to the Albums view. 3 Click the Camera Favorites Album for picture taking, remove favorites from transferring to the camera 1 Open the Kodak EasyShare software. Doing...

User Manual
Page 77
... the following Picture orientation is not I Card may be erased if formatted. I Follow action recommended on . I Insert a charged battery (page 2). Format card in Setup (page 48). www.kodak.com/go/support 70 I Wait for any blinking lights to internal memory (page 46). I Change image storage location to stop; I Remove the battery and wipe the contacts with card. then turn the camera off then back on screen. Data will be corrupted. I Delete pictures from the camera. I Memory full. Storage...
... the following Picture orientation is not I Card may be erased if formatted. I Follow action recommended on . I Insert a charged battery (page 2). Format card in Setup (page 48). www.kodak.com/go/support 70 I Wait for any blinking lights to internal memory (page 46). I Change image storage location to stop; I Remove the battery and wipe the contacts with card. then turn the camera off then back on screen. Data will be corrupted. I Delete pictures from the camera. I Memory full. Storage...
User Manual
Page 78
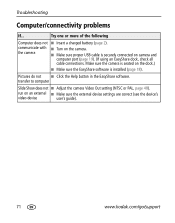
... port (page 19). (If using an EasyShare dock, check all cable connections. Make sure the camera is seated on the dock.) I Make sure proper USB cable is installed (page 18). run on the camera. Pictures do not I Make sure the external device settings are correct (see the device's video device user's guide). 71 www.kodak.com/go/support communicate with I Turn on an external I Click the Help button in the EasyShare software. Troubleshooting Computer/connectivity problems If...
... port (page 19). (If using an EasyShare dock, check all cable connections. Make sure the camera is seated on the dock.) I Make sure proper USB cable is installed (page 18). run on the camera. Pictures do not I Make sure the external device settings are correct (see the device's video device user's guide). 71 www.kodak.com/go/support communicate with I Turn on an external I Click the Help button in the EasyShare software. Troubleshooting Computer/connectivity problems If...

User Manual
Page 86
Appendix Kodak EasyShare P712 zoom digital camera Flash modes Auto, Fill, Red-eye, Slow sync (front, front red-eye, rear curtain), Off External flash Extended flash range with Kodak external flash unit: Guide no. 37 (working range 43 ft (13 m) @ ISO 100, f/2.8, Wide) Guide no. 100 (working range 88 ft (27 m) @ ISO 100, f/3.7, Tele) Flash compensation -1 to +1 EV in 0.3 EV steps Hot shoe Yes; file organization DCF Still RAW: file organization Kodak original Still TIFF: TIFF format Video: QuickTime format; (Motion...
Appendix Kodak EasyShare P712 zoom digital camera Flash modes Auto, Fill, Red-eye, Slow sync (front, front red-eye, rear curtain), Off External flash Extended flash range with Kodak external flash unit: Guide no. 37 (working range 43 ft (13 m) @ ISO 100, f/2.8, Wide) Guide no. 100 (working range 88 ft (27 m) @ ISO 100, f/3.7, Tele) Flash compensation -1 to +1 EV in 0.3 EV steps Hot shoe Yes; file organization DCF Still RAW: file organization Kodak original Still TIFF: TIFF format Video: QuickTime format; (Motion...

User Manual
Page 103
... color display, 77 color mode, 44 combined zoom, 78 command dial, for rapid setting changes, ii, 40 computer connecting camera, 18 transfer to, 18 connector dock, ii continuous AF, 45, 51 continuous shooting, 30, 31 contrast, 51 copy pictures card to memory, 58 memory to card, 58 www.kodak.com/go/support Index to computer via USB cable, 18 copy to custom, 52 custom, 25 custom exposure mode, 52 customer support, 76 customization, white balance, 50 customizing camera settings, 46 D date & time, 3, 48 date setting, 4 date stamp...
... color display, 77 color mode, 44 combined zoom, 78 command dial, for rapid setting changes, ii, 40 computer connecting camera, 18 transfer to, 18 connector dock, ii continuous AF, 45, 51 continuous shooting, 30, 31 contrast, 51 copy pictures card to memory, 58 memory to card, 58 www.kodak.com/go/support Index to computer via USB cable, 18 copy to custom, 52 custom, 25 custom exposure mode, 52 customer support, 76 customization, white balance, 50 customizing camera settings, 46 D date & time, 3, 48 date setting, 4 date stamp...

User Manual
Page 107
..., 61 taking, modes, 23 transfer via USB cable, 18 viewing information, 56 picture-taking, 5 portrait, 26, 30 scene mode, 26 power, i auto off, 84 camera, 3 power, battery, 80 preset album, 46 printer dock, 20, 89 printing from a card, 20 optimizing printer, 75 order online, 20 PictBridge, 21 tagged pictures, 20 with EasyShare printer dock, 20 program button, i, 24 program button capture, 47 program button review, 47 program button, direct access to sub menus, 34 www.kodak.com/go/support Index protecting pictures, videos...
..., 61 taking, modes, 23 transfer via USB cable, 18 viewing information, 56 picture-taking, 5 portrait, 26, 30 scene mode, 26 power, i auto off, 84 camera, 3 power, battery, 80 preset album, 46 printer dock, 20, 89 printing from a card, 20 optimizing printer, 75 order online, 20 PictBridge, 21 tagged pictures, 20 with EasyShare printer dock, 20 program button, i, 24 program button capture, 47 program button review, 47 program button, direct access to sub menus, 34 www.kodak.com/go/support Index protecting pictures, videos...
User Manual
Page 108
... self-timer, 30 self-timer/video light, i sepia, 44 service and support telephone numbers, 76 set button, ii setting AE/AF button, 46 AF control, 45, 51 auto power-off, 48 capture frame grid, 46 color mode, 44 date & time, 3, 4, 48 date stamp, 44 EVF/LCD screen time out, 48 focus zone, 51 image storage, 46 language, 4, 48 LCD brightness, 46 liveview, 47 picture quality, 35, 43, 44 picture-taking mode, 23 video length, 47, 48 video out, 48 video quality, 45 101 white balance, 50 setup mode, using, 46 share button...
... self-timer, 30 self-timer/video light, i sepia, 44 service and support telephone numbers, 76 set button, ii setting AE/AF button, 46 AF control, 45, 51 auto power-off, 48 capture frame grid, 46 color mode, 44 date & time, 3, 4, 48 date stamp, 44 EVF/LCD screen time out, 48 focus zone, 51 image storage, 46 language, 4, 48 LCD brightness, 46 liveview, 47 picture quality, 35, 43, 44 picture-taking mode, 23 video length, 47, 48 video out, 48 video quality, 45 101 white balance, 50 setup mode, using, 46 share button...

User Manual
Page 109
... time, setting, 4 tips battery guidelines, 88 care & maintenance, 89 transfer, via USB cable, 18 trash can, deleting, 6 tripod socket, ii troubleshooting, 69 tungsten white balance, 50 turning camera on and off, 3 U upgrading software, firmware, 89 URLs, Kodak web sites, 75 www.kodak.com/go/support Index USB (universal serial bus) transferring pictures, 18 USB cable (model U-8), 19 USB port, i V VCCI compliance, 93 video, 25, 79 action print, 57 video length, 47, 48 video out, 48 video output, 79 video quality, 45 videos copying...
... time, setting, 4 tips battery guidelines, 88 care & maintenance, 89 transfer, via USB cable, 18 trash can, deleting, 6 tripod socket, ii troubleshooting, 69 tungsten white balance, 50 turning camera on and off, 3 U upgrading software, firmware, 89 URLs, Kodak web sites, 75 www.kodak.com/go/support Index USB (universal serial bus) transferring pictures, 18 USB cable (model U-8), 19 USB port, i V VCCI compliance, 93 video, 25, 79 action print, 57 video length, 47, 48 video out, 48 video output, 79 video quality, 45 videos copying...


