
User Manual
Page 4
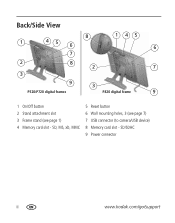
SD/SDHC 9 Power connector ii www.kodak.com/go/support Back/Side View 8 1 45 6 7 145 6 2 8 2 7 3 9 3 P520/P720 digital frames P820 digital frame 9 1 On/Off button 2 Stand attachment slot 3 Frame stand (see page 7) 7 USB connector (to camera/USB device) 8 Memory card slot - SD, MS, xD, MMC 5 Reset button 6 Wall mounting holes, 3 (see page 1) 4 Memory card slot -
SD/SDHC 9 Power connector ii www.kodak.com/go/support Back/Side View 8 1 45 6 7 145 6 2 8 2 7 3 9 3 P520/P720 digital frames P820 digital frame 9 1 On/Off button 2 Stand attachment slot 3 Frame stand (see page 7) 7 USB connector (to camera/USB device) 8 Memory card slot - SD, MS, xD, MMC 5 Reset button 6 Wall mounting holes, 3 (see page 1) 4 Memory card slot -
User Manual
Page 5
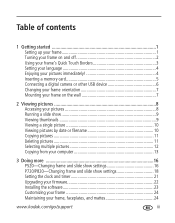
... 1 Getting started 1 Setting up your frame 1 Turning your frame on and off 2 Using your frame's Quick Touch Borders 3 Setting your language 4 Enjoying your pictures immediately 4 Inserting a memory card 5 Connecting a digital camera or other USB device 6 Changing your frame orientation 7 Mounting your frame on the wall 7 2 Viewing pictures 8... Selecting multiple pictures 12 Copying from your computer 13 3 Doing more 16 P520-Changing frame and slide show settings 16 P720/P820-Changing frame and slide show settings 18 Setting the clock and timer 21 Upgrading your firmware 22 ...
... 1 Getting started 1 Setting up your frame 1 Turning your frame on and off 2 Using your frame's Quick Touch Borders 3 Setting your language 4 Enjoying your pictures immediately 4 Inserting a memory card 5 Connecting a digital camera or other USB device 6 Changing your frame orientation 7 Mounting your frame on the wall 7 2 Viewing pictures 8... Selecting multiple pictures 12 Copying from your computer 13 3 Doing more 16 P520-Changing frame and slide show settings 16 P720/P820-Changing frame and slide show settings 18 Setting the clock and timer 21 Upgrading your firmware 22 ...

User Manual
Page 6
Table of contents Learning more about your frame 25 4 Troubleshooting and support 26 Picture frame problems 26 Screen messages 28 5 Appendix 30 Digital frame specifications 30 Important safety instructions 31 Upgrading your software and firmware 31 Additional care and maintenance 31 Limited warranty 32 FCC compliance and advisory 34 iv www.kodak.com/go/support
Table of contents Learning more about your frame 25 4 Troubleshooting and support 26 Picture frame problems 26 Screen messages 28 5 Appendix 30 Digital frame specifications 30 Important safety instructions 31 Upgrading your software and firmware 31 Additional care and maintenance 31 Limited warranty 32 FCC compliance and advisory 34 iv www.kodak.com/go/support
User Manual
Page 7
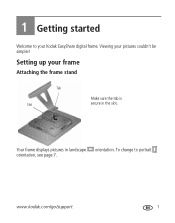
To change to your Kodak EasyShare digital frame. Setting up your pictures couldn't be simpler! www.kodak.com/go/support 1 Viewing your frame Attaching the frame stand Tab Slot Make sure the tab is secure in landscape orientation. Your frame displays pictures in the slot. 1 Getting started Welcome to portrait orientation, see page 7.
To change to your Kodak EasyShare digital frame. Setting up your pictures couldn't be simpler! www.kodak.com/go/support 1 Viewing your frame Attaching the frame stand Tab Slot Make sure the tab is secure in landscape orientation. Your frame displays pictures in the slot. 1 Getting started Welcome to portrait orientation, see page 7.
User Manual
Page 8
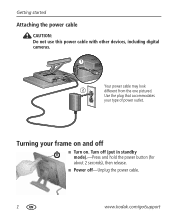
Turn off (put in standby mode).-Press and hold the power button (for about 2 seconds), then release. ■ Power off ■ Turn on and off -Unplug the power cable. 2 www.kodak.com/go/support Getting started Attaching the power cable CAUTION: Do not use this power cable with other devices, including digital cameras. 1 Your power cable may look 2 different from the one pictured. Use the plug that accommodates your frame on . Turning your type of power outlet.
Turn off (put in standby mode).-Press and hold the power button (for about 2 seconds), then release. ■ Power off ■ Turn on and off -Unplug the power cable. 2 www.kodak.com/go/support Getting started Attaching the power cable CAUTION: Do not use this power cable with other devices, including digital cameras. 1 Your power cable may look 2 different from the one pictured. Use the plug that accommodates your frame on . Turning your type of power outlet.

User Manual
Page 9
... larger numbers of pictures, touch and hold (3 seconds), then slide to the end of the scroll bar to dismiss them . Only use your frame's Quick Touch Borders Touch tips Tap and slide on bottom border only Tap next to buttons, cannot slide here Home Play Slide show Close OK...at a time. Sharp or metal objects may result. Scroll through images-Like turning the pages of a book, slide left ← to go /support 3 www.kodak.com/go back. Tap next to select them . Slide to highlight menus, pictures, videos, options.** Tap OK to or below buttons Slide on the Quick...
... larger numbers of pictures, touch and hold (3 seconds), then slide to the end of the scroll bar to dismiss them . Only use your frame's Quick Touch Borders Touch tips Tap and slide on bottom border only Tap next to buttons, cannot slide here Home Play Slide show Close OK...at a time. Sharp or metal objects may result. Scroll through images-Like turning the pages of a book, slide left ← to go /support 3 www.kodak.com/go back. Tap next to select them . Slide to highlight menus, pictures, videos, options.** Tap OK to or below buttons Slide on the Quick...

User Manual
Page 10
... page 23. ■ To view your pictures or play when there is no other USB device (see page 6). NOTE: There may be preloaded Kodak images on your frame. ■ Slide or tap below slider arrows to find your language, then tap Save. 1 Enjoying your pictures immediately! NOTE: If the software ... your slide show. To change the language at the Home screen, see page 8 to find your language, then tap OK. If you turn on your frame. Getting started Setting your language The language screen appears the first time you are at a later time: 2 ■ Tap (Home) → (Settings) &#...
... page 23. ■ To view your pictures or play when there is no other USB device (see page 6). NOTE: There may be preloaded Kodak images on your frame. ■ Slide or tap below slider arrows to find your language, then tap Save. 1 Enjoying your pictures immediately! NOTE: If the software ... your slide show. To change the language at the Home screen, see page 8 to find your language, then tap OK. If you turn on your frame. Getting started Setting your language The language screen appears the first time you are at a later time: 2 ■ Tap (Home) → (Settings) &#...
User Manual
Page 11
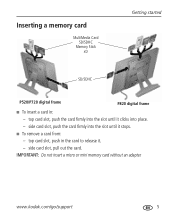
side card slot, push the card firmly into place. - side card slot, pull out the card. IMPORTANT: Do not insert a micro or mini memory card without an adapter. top card slot, push in : - www.kodak.com/go/support 5 top card slot, push the card firmly into the slot until it clicks into the slot until it . - Inserting a memory card MultiMedia Card SD/SDHC Memory Stick xD Getting started SD/SDHC P520/P720 digital frame P820 digital frame ■ To insert a card in the card to release it stops. ■ To remove a card from: -
side card slot, push the card firmly into place. - side card slot, pull out the card. IMPORTANT: Do not insert a micro or mini memory card without an adapter. top card slot, push in : - www.kodak.com/go/support 5 top card slot, push the card firmly into the slot until it clicks into the slot until it . - Inserting a memory card MultiMedia Card SD/SDHC Memory Stick xD Getting started SD/SDHC P520/P720 digital frame P820 digital frame ■ To insert a card in the card to release it stops. ■ To remove a card from: -
User Manual
Page 12
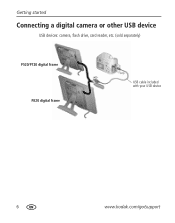
Getting started Connecting a digital camera or other USB device USB devices: camera, flash drive, card reader, etc. (sold separately) P520/P720 digital frame P820 digital frame USB cable included with your USB device 6 www.kodak.com/go/support
Getting started Connecting a digital camera or other USB device USB devices: camera, flash drive, card reader, etc. (sold separately) P520/P720 digital frame P820 digital frame USB cable included with your USB device 6 www.kodak.com/go/support

User Manual
Page 13
... holes at the top. 7 Secure power cable with attached clip www.kodak.com/go/support Wall mounting holes (on the wall Use 3 mm (1/8 inch), or larger, wall-anchoring hardware (not included) to anchor your frame securely to portrait , turn your wall. Change the stand position: ■...see page 1). Change the setting: 1 Tap (Home) → (Settings). 2 Slide to highlight (Viewing options), then tap OK. 3 Slide to highlight Frame orientation, then tap OK. 4 Slide to highlight Portrait, then tap OK. 5 Tap to display pictures in landscape orientation. You can turn it to change the...
... holes at the top. 7 Secure power cable with attached clip www.kodak.com/go/support Wall mounting holes (on the wall Use 3 mm (1/8 inch), or larger, wall-anchoring hardware (not included) to anchor your frame securely to portrait , turn your wall. Change the stand position: ■...see page 1). Change the setting: 1 Tap (Home) → (Settings). 2 Slide to highlight (Viewing options), then tap OK. 3 Slide to highlight Frame orientation, then tap OK. 4 Slide to highlight Portrait, then tap OK. 5 Tap to display pictures in landscape orientation. You can turn it to change the...
User Manual
Page 14
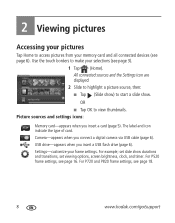
...when you insert a card (page 5). For P520 frame settings, see page 18. 8 www.kodak.com/go/support The label and icon indicate the type of card. For example; For P720 and P820 frame settings, see page 16. All connected sources and ...the Settings icon are displayed. 2 Slide to highlight a picture source, then: ■ Tap (Slide show) to start a slide show durations and transitions, set viewing options, screen brightness, clock, and timer. Use the touch borders to view thumbnails. Camera-appears when you connect a digital...
...when you insert a card (page 5). For P520 frame settings, see page 18. 8 www.kodak.com/go/support The label and icon indicate the type of card. For example; For P720 and P820 frame settings, see page 16. All connected sources and ...the Settings icon are displayed. 2 Slide to highlight a picture source, then: ■ Tap (Slide show) to start a slide show durations and transitions, set viewing options, screen brightness, clock, and timer. Use the touch borders to view thumbnails. Camera-appears when you connect a digital...
User Manual
Page 15
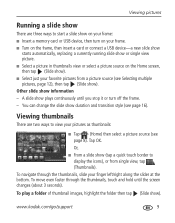
... the screen changes (about 3 seconds). To navigate through the thumbnails, touch and hold until you stop it or turn on your frame. ■ Turn on the frame, then insert a card or connect a USB device-a new slide show starts automatically, replacing a currently running slide show or single view... picture. ■ Select a picture in thumbnails view or select a picture source on your frame: ■ Insert a memory card or USB device, then turn off the frame. - www.kodak.com/go/support 9 A slide show duration and transition style (see page 8). Tap OK. To play a ...
... the screen changes (about 3 seconds). To navigate through the thumbnails, touch and hold until you stop it or turn on your frame. ■ Turn on the frame, then insert a card or connect a USB device-a new slide show starts automatically, replacing a currently running slide show or single view... picture. ■ Select a picture in thumbnails view or select a picture source on your frame: ■ Insert a memory card or USB device, then turn off the frame. - www.kodak.com/go/support 9 A slide show duration and transition style (see page 8). Tap OK. To play a ...
User Manual
Page 16
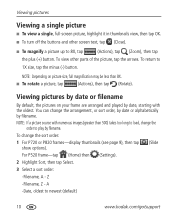
..., Z - To view other screen text, tap (Close). ■ To magnify a picture up to play by filename. NOTE: Depending on your frame are arranged and played by date, starting with numerous images (greater than 8X. ■ To rotate a picture, tap (Actions), then tap (Rotate...picture source with the oldest. To return to newest (default) 10 www.kodak.com/go/support You can change the sort order: 1 For P720 or P820 frames-display thumbnails (see page 9), then tap show options). (Slide For P520 frame-tap (Home) then (Settings). 2 Highlight Sort, then tap Select. ...
..., Z - To view other screen text, tap (Close). ■ To magnify a picture up to play by filename. NOTE: Depending on your frame are arranged and played by date, starting with numerous images (greater than 8X. ■ To rotate a picture, tap (Actions), then tap (Rotate...picture source with the oldest. To return to newest (default) 10 www.kodak.com/go/support You can change the sort order: 1 For P720 or P820 frames-display thumbnails (see page 9), then tap show options). (Slide For P520 frame-tap (Home) then (Settings). 2 Highlight Sort, then tap Select. ...
User Manual
Page 17
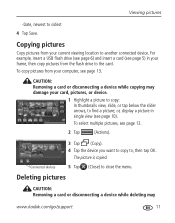
... may damage your current viewing location to , then tap OK. CAUTION: Removing a card or disconnecting a device while copying may www.kodak.com/go/support 11 Copying pictures Copy pictures from your frame, then copy pictures from the flash drive to oldest 4 Tap Save. Connected devices 5 Tap (Close) to find a picture; For example...
... may damage your current viewing location to , then tap OK. CAUTION: Removing a card or disconnecting a device while copying may www.kodak.com/go/support 11 Copying pictures Copy pictures from your frame, then copy pictures from the flash drive to oldest 4 Tap Save. Connected devices 5 Tap (Close) to find a picture; For example...

User Manual
Page 19
... card 4 Click My Devices to see page 23). 2 Insert a removable device into your computer or connected card reader. 3 Double-click (Kodak EasyShare digital display icon) on your computer that came with your frame (see the connected devices and their folders. 5 In Pictures and Videos, click the folder or location on your computer to a removable...
... card 4 Click My Devices to see page 23). 2 Insert a removable device into your computer or connected card reader. 3 Double-click (Kodak EasyShare digital display icon) on your computer that came with your frame (see the connected devices and their folders. 5 In Pictures and Videos, click the folder or location on your computer to a removable...
User Manual
Page 20
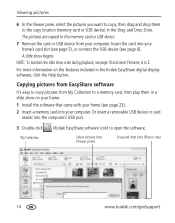
...card, then play them to the copy location (memory card or USB device) in the Kodak EasyShare digital display software, click the Help button. For more information on your frame. 1 Install the software that came with your frame (see page 23). 2 Insert a memory card into your computer. Or insert a ...pictures here (Viewer pane) Drag and drop here (Picture tray) 14 www.kodak.com/go/support A slide show order during playback, see page 6). Copying pictures from EasyShare software It's easy to copy pictures from your frame's card slot (see page 5), or connect the USB device (see page...
...card, then play them to the copy location (memory card or USB device) in the Kodak EasyShare digital display software, click the Help button. For more information on your frame. 1 Install the software that came with your frame (see page 23). 2 Insert a memory card into your computer. Or insert a ...pictures here (Viewer pane) Drag and drop here (Picture tray) 14 www.kodak.com/go/support A slide show order during playback, see page 6). Copying pictures from EasyShare software It's easy to copy pictures from your frame's card slot (see page 5), or connect the USB device (see page...
User Manual
Page 21
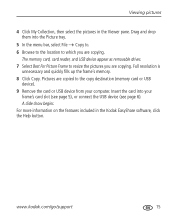
Viewing pictures 4 Click My Collection, then select the pictures in the Kodak EasyShare software, click the Help button. Full resolution is unnecessary and quickly fills up the frame's memory. 8 Click Copy. For more information on the features included in the Viewer pane. The memory card, card reader, ...device). 9 Remove the card or USB device from your frame's card slot (see page 5), or connect the USB device (see page 6). Pictures are copied to resize the pictures you are copying. A slide show begins. www.kodak.com/go/support 15 Drag and drop them into your computer...
Viewing pictures 4 Click My Collection, then select the pictures in the Kodak EasyShare software, click the Help button. Full resolution is unnecessary and quickly fills up the frame's memory. 8 Click Copy. For more information on the features included in the Viewer pane. The memory card, card reader, ...device). 9 Remove the card or USB device from your frame's card slot (see page 5), or connect the USB device (see page 6). Pictures are copied to resize the pictures you are copying. A slide show begins. www.kodak.com/go/support 15 Drag and drop them into your computer...
User Manual
Page 22
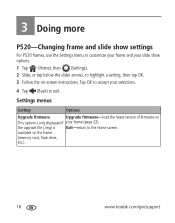
the upgrade file (.img) is only displayed if your frame (page 22). available on -screen instructions. 3 Doing more P520-Changing frame and slide show settings For P520 frames, use the Settings menu to customize your frame and your selections. 4 Tap (Back) to exit. Settings menus Setting Options Upgrade ...latest version of firmware on This option is Exit-return to highlight a setting, then tap OK. 3 Follow the on the frame (memory card, flash drive, etc.). 16 www.kodak.com/go/support Tap OK to accept your slide show options. 1 Tap (Home), then (Settings). 2 Slide, or ...
the upgrade file (.img) is only displayed if your frame (page 22). available on -screen instructions. 3 Doing more P520-Changing frame and slide show settings For P520 frames, use the Settings menu to customize your frame and your selections. 4 Tap (Back) to exit. Settings menus Setting Options Upgrade ...latest version of firmware on This option is Exit-return to highlight a setting, then tap OK. 3 Follow the on the frame (memory card, flash drive, etc.). 16 www.kodak.com/go/support Tap OK to accept your slide show options. 1 Tap (Home), then (Settings). 2 Slide, or ...
User Manual
Page 23
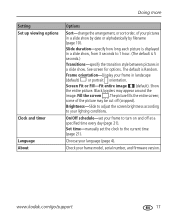
...Transitions-specify the transition style between pictures in landscape (default) or portrait orientation. Screen Fit or Fill-Fit entire image (default). Frame orientation-Display your frame in a slide show by date or alphabetically by filename (page 10). Show the entire picture. Black borders may be cut off... .The picture fills the entire screen; Brightness-Slide to adjust the screen brightness according to turn on and off (cropped). www.kodak.com/go/support 17 some of your lighting conditions. Slide duration-specify how long each picture is displayed in a slide show, from...
...Transitions-specify the transition style between pictures in landscape (default) or portrait orientation. Screen Fit or Fill-Fit entire image (default). Frame orientation-Display your frame in a slide show by date or alphabetically by filename (page 10). Show the entire picture. Black borders may be cut off... .The picture fills the entire screen; Brightness-Slide to adjust the screen brightness according to turn on and off (cropped). www.kodak.com/go/support 17 some of your lighting conditions. Slide duration-specify how long each picture is displayed in a slide show, from...
User Manual
Page 24
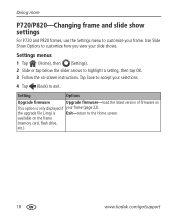
...firmware on -screen instructions. the upgrade file (.img) is only displayed if your frame. available on the frame (memory card, flash drive, etc.). 18 www.kodak.com/go/support Use Slide Show Options to customize how you view your selections.... 4 Tap (Back) to exit. Tap Save to accept your slide shows. Doing more P720/P820-Changing frame and slide show settings For P720 and P820 frames, use the Settings menu to customize your frame...
...firmware on -screen instructions. the upgrade file (.img) is only displayed if your frame. available on the frame (memory card, flash drive, etc.). 18 www.kodak.com/go/support Use Slide Show Options to customize how you view your selections.... 4 Tap (Back) to exit. Tap Save to accept your slide shows. Doing more P720/P820-Changing frame and slide show settings For P720 and P820 frames, use the Settings menu to customize your frame...


