
User Manual
Page 1
www.kodak.com/go/v803support or v1003support 1 After installing the software, return to this Getting Started Guide. ENGLISH ᕡ Installing the software IMPORTANT: Before connecting any cables, install the software that was included with your camera. Follow the on-screen instructions.
www.kodak.com/go/v803support or v1003support 1 After installing the software, return to this Getting Started Guide. ENGLISH ᕡ Installing the software IMPORTANT: Before connecting any cables, install the software that was included with your camera. Follow the on-screen instructions.

User Manual
Page 3
....kodak.com/go/v803accessories or www.kodak.com/go /dockcompatibility. www.kodak.com/go/v803support or v1003support 3 Charge until all 3 lights stay lit (approximately 2 hours). To use a dock, see your product package. Kodak EasyShare photo frame dock 2 (may be sold separately) 1 Kodak EasyShare camera or printer dock (may be sold separately) Battery 2 charging lights For package contents, see its Getting Started Guide. ENGLISH ᕣ Charging the battery 5-volt AC adapter (included) Battery charging lights blink during charging...
....kodak.com/go/v803accessories or www.kodak.com/go /dockcompatibility. www.kodak.com/go/v803support or v1003support 3 Charge until all 3 lights stay lit (approximately 2 hours). To use a dock, see your product package. Kodak EasyShare photo frame dock 2 (may be sold separately) 1 Kodak EasyShare camera or printer dock (may be sold separately) Battery 2 charging lights For package contents, see its Getting Started Guide. ENGLISH ᕣ Charging the battery 5-volt AC adapter (included) Battery charging lights blink during charging...
User Manual
Page 4
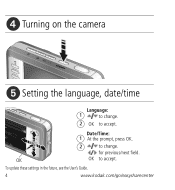
ᕤ Turning on the camera ᕥ Setting the language, date/time Language: 1 to change . OK OK to accept. Date/Time: 1 At the prompt, press OK. 2 to change . 2 OK to accept. To update these settings in the future, see the User's Guide. 4 www.kodak.com/go/easysharecenter for previous/next field.
ᕤ Turning on the camera ᕥ Setting the language, date/time Language: 1 to change . OK OK to accept. Date/Time: 1 At the prompt, press OK. 2 to change . 2 OK to accept. To update these settings in the future, see the User's Guide. 4 www.kodak.com/go/easysharecenter for previous/next field.
User Manual
Page 5
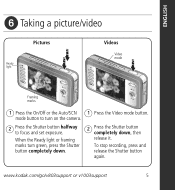
www.kodak.com/go/v803support or v1003support 5 ENGLISH ᕦ Taking a picture/video Pictures Ready light Videos Video mode Framing marks 1 Press the On/Off or the Auto/SCN mode button to focus and set exposure. To stop recording, press and release the Shutter button again. When the Ready light or framing marks turn on the camera. 2 Press the Shutter button halfway to turn green, press the Shutter button completely down. 1 Press the Video mode button. 2 Press the Shutter button completely down, then release it.
www.kodak.com/go/v803support or v1003support 5 ENGLISH ᕦ Taking a picture/video Pictures Ready light Videos Video mode Framing marks 1 Press the On/Off or the Auto/SCN mode button to focus and set exposure. To stop recording, press and release the Shutter button again. When the Ready light or framing marks turn on the camera. 2 Press the Shutter button halfway to turn green, press the Shutter button completely down. 1 Press the Video mode button. 2 Press the Shutter button completely down, then release it.
User Manual
Page 7
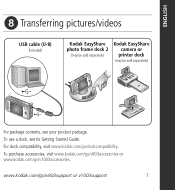
For dock compatibility, visit www.kodak.com/go /v1003accessories. To use a dock, see your product package. To purchase accessories, visit www.kodak.com/go/v803accessories or www.kodak.com/go /dockcompatibility. ENGLISH ᕨ Transferring pictures/videos USB cable (U-8) (included) Kodak EasyShare photo frame dock 2 (may be sold separately) Kodak EasyShare camera or printer dock (may be sold separately) For package contents, see its Getting Started Guide. www.kodak.com/go/v803support or v1003support 7
For dock compatibility, visit www.kodak.com/go /v1003accessories. To use a dock, see your product package. To purchase accessories, visit www.kodak.com/go/v803accessories or www.kodak.com/go /dockcompatibility. ENGLISH ᕨ Transferring pictures/videos USB cable (U-8) (included) Kodak EasyShare photo frame dock 2 (may be sold separately) Kodak EasyShare camera or printer dock (may be sold separately) For package contents, see its Getting Started Guide. www.kodak.com/go/v803support or v1003support 7

User Manual
Page 8
To better understand each menu option, use camera Help. (Highlight a menu choice, then press the Zoom telephoto T button.) Visit www.kodak.com/go/v803support or www.kodak.com/go/v1003support for: • the user's guide • interactive troubleshooting and repairs • interactive tutorials • FAQs • downloads • accessories • printing information • product registration 8 www.kodak.com/go/easysharecenter ᕩ Keep learning about your computer Keep learning...
To better understand each menu option, use camera Help. (Highlight a menu choice, then press the Zoom telephoto T button.) Visit www.kodak.com/go/v803support or www.kodak.com/go/v1003support for: • the user's guide • interactive troubleshooting and repairs • interactive tutorials • FAQs • downloads • accessories • printing information • product registration 8 www.kodak.com/go/easysharecenter ᕩ Keep learning about your computer Keep learning...

User Manual
Page 11
The zoom indicator shows the zoom status. 3 Take the picture or video. The slider pauses and turns red when the picture quality reaches the limit for video recording.) Press Telephoto (T) until the slider is at the top of the optical zoom range. Release (T), then press it again. NOTE: You may notice decreased image quality when using digital zoom. D Digital zoom range T Optical zoom range (36-108 mm) W Using digital zoom Use digital zoom in any picture-taking mode to...
The zoom indicator shows the zoom status. 3 Take the picture or video. The slider pauses and turns red when the picture quality reaches the limit for video recording.) Press Telephoto (T) until the slider is at the top of the optical zoom range. Release (T), then press it again. NOTE: You may notice decreased image quality when using digital zoom. D Digital zoom range T Optical zoom range (36-108 mm) W Using digital zoom Use digital zoom in any picture-taking mode to...
User Manual
Page 12
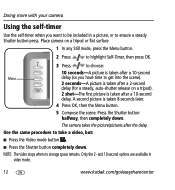
.... Only the 2- A second picture is taken after the delay. Place camera on a tripod). 2 shot-The first picture is taken 8 seconds later. 4 Press OK, then the Menu button. 5 Compose the scene. Press the Shutter button halfway, then completely down . Doing more with your camera Using the self-timer Use the self-timer when you have time to take a video, but: ■ Press the Video mode button . ■ Press the Shutter button completely down . and...
.... Only the 2- A second picture is taken after the delay. Place camera on a tripod). 2 shot-The first picture is taken 8 seconds later. 4 Press OK, then the Menu button. 5 Compose the scene. Press the Shutter button halfway, then completely down . Doing more with your camera Using the self-timer Use the self-timer when you have time to take a video, but: ■ Press the Video mode button . ■ Press the Shutter button completely down . and...

User Manual
Page 13
... flash modes. Red Eye In Red Eye flash, you take more than 2 pictures in quick succession. In low light, hold the camera steady or use a tripod. To make the camera: ■ Preflash, turn the Red Eye Preflash off. Off Never www.kodak.com/go/v803support or v1003support 13 Using the flash Doing more pictures when the Ready light turns green. NOTE: When automatic red eye reduction is in the LCD status area. Flash modes Auto Flash fires When the lighting conditions require it. Take...
... flash modes. Red Eye In Red Eye flash, you take more than 2 pictures in quick succession. In low light, hold the camera steady or use a tripod. To make the camera: ■ Preflash, turn the Red Eye Preflash off. Off Never www.kodak.com/go/v803support or v1003support 13 Using the flash Doing more pictures when the Ready light turns green. NOTE: When automatic red eye reduction is in the LCD status area. Flash modes Auto Flash fires When the lighting conditions require it. Take...

User Manual
Page 14
...-shoot simplicity when taking pictures under special conditions. (See page 15.) Video: Capturing video with your camera Using different modes Use this mode For Auto: General picture taking-offers an excellent balance of image quality and ease of flash, if possible. Press a button to choose a mode. Auto-focus framing marks are not available in the LCD status area. 14 www.kodak.com/go/easysharecenter The camera automatically sets the focus distance depending on the zoom position. Macro...
...-shoot simplicity when taking pictures under special conditions. (See page 15.) Video: Capturing video with your camera Using different modes Use this mode For Auto: General picture taking-offers an excellent balance of image quality and ease of flash, if possible. Press a button to choose a mode. Auto-focus framing marks are not available in the LCD status area. 14 www.kodak.com/go/easysharecenter The camera automatically sets the focus distance depending on the zoom position. Macro...

User Manual
Page 15
If the mode description turns off Help www.kodak.com/go/v803support or v1003support 15 Highlight a menu choice, then press the Zoom telephoto (T) button. The date/time and the mode description appear. T Turn on the LCD. 2 Press to choose a Scene mode. Using camera Help To better understand each menu option, use camera Help. Doing more with your camera Using Scene (SCN) modes Choose a Scene mode-for great pictures in practically any situation! 1 Press the Auto/SCN button until...
If the mode description turns off Help www.kodak.com/go/v803support or v1003support 15 Highlight a menu choice, then press the Zoom telephoto (T) button. The date/time and the mode description appear. T Turn on the LCD. 2 Press to choose a Scene mode. Using camera Help To better understand each menu option, use camera Help. Doing more with your camera Using Scene (SCN) modes Choose a Scene mode-for great pictures in practically any situation! 1 Press the Auto/SCN button until...
User Manual
Page 16
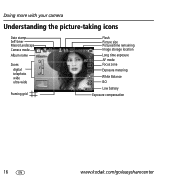
Doing more with your camera Understanding the picture-taking icons Date stamp Self timer Macro/Landscape Camera mode Album name Zoom: digital telephoto wide ultra-wide Framing grid Flash Picture size Pictures/time remaining Image storage location Long time exposure AF mode Focus zone Exposure metering White Balance ISO Low battery Exposure compensation 16 www.kodak.com/go/easysharecenter
Doing more with your camera Understanding the picture-taking icons Date stamp Self timer Macro/Landscape Camera mode Album name Zoom: digital telephoto wide ultra-wide Framing grid Flash Picture size Pictures/time remaining Image storage location Long time exposure AF mode Focus zone Exposure metering White Balance ISO Low battery Exposure compensation 16 www.kodak.com/go/easysharecenter
User Manual
Page 18
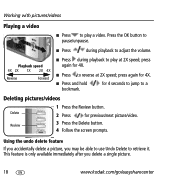
... playback to play a video. press again for previous/next picture/video. 3 Press the Delete button. 4 Follow the screen prompts. press again for 4X. ■ Press and hold bookmark. This feature is only available immediately after you may be able to use Undo Delete to retrieve it. Working with pictures/videos Playing a video ■ Press to play at 2X speed; Using the undo delete feature If you accidentally delete a picture, you delete a single picture...
... playback to play a video. press again for previous/next picture/video. 3 Press the Delete button. 4 Follow the screen prompts. press again for 4X. ■ Press and hold bookmark. This feature is only available immediately after you may be able to use Undo Delete to retrieve it. Working with pictures/videos Playing a video ■ Press to play at 2X speed; Using the undo delete feature If you accidentally delete a picture, you delete a single picture...

User Manual
Page 19
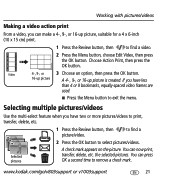
Working with pictures, not video. ■ Press the Menu button to exit the menu. Enhanced pictures cannot be used with pictures/videos Using Kodak Perfect Touch technology Kodak Perfect Touch technology helps ensure better, brighter pictures. 1 Press the Review button, then for a 4 x 6-inch (10 x 15 cm) print. 1 Press the Review button, then to exit the menu. Kodak Perfect Touch technology can choose a single frame from a video, then make a picture suitable for previous/next picture. 2 Press the Menu button, choose...
Working with pictures, not video. ■ Press the Menu button to exit the menu. Enhanced pictures cannot be used with pictures/videos Using Kodak Perfect Touch technology Kodak Perfect Touch technology helps ensure better, brighter pictures. 1 Press the Review button, then for a 4 x 6-inch (10 x 15 cm) print. 1 Press the Review button, then to exit the menu. Kodak Perfect Touch technology can choose a single frame from a video, then make a picture suitable for previous/next picture. 2 Press the Menu button, choose...
User Manual
Page 20
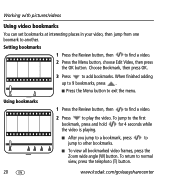
... to 9 bookmarks, press . ■ Press the Menu button to another. Working with pictures/videos Using video bookmarks You can set bookmarks at interesting places in your video, then jump from one boomark to exit the menu. To return to play the video. Using bookmarks 1 Press the Review button, then to find a video. 2 Press the Menu button, choose Edit Video, then press the OK button. To jump to the first bookmark...
... to 9 bookmarks, press . ■ Press the Menu button to another. Working with pictures/videos Using video bookmarks You can set bookmarks at interesting places in your video, then jump from one boomark to exit the menu. To return to play the video. Using bookmarks 1 Press the Review button, then to find a video. 2 Press the Menu button, choose Edit Video, then press the OK button. To jump to the first bookmark...
User Manual
Page 21
... the picture. You can press OK a second time to find a video. 2 Press the Menu button, choose Edit Video, then press the OK button. to remove a check mark. Choose Action Print, then press the OK button. the selected pictures. www.kodak.com/go/v803support or v1003support 21 You can now print, transfer, delete, etc. Working with pictures/videos Making a video action print From a video, you can make a 4-, 9-, or 16-up picture is created. Selecting multiple pictures/videos Use the...
... the picture. You can press OK a second time to find a video. 2 Press the Menu button, choose Edit Video, then press the OK button. to remove a check mark. Choose Action Print, then press the OK button. the selected pictures. www.kodak.com/go/v803support or v1003support 21 You can now print, transfer, delete, etc. Working with pictures/videos Making a video action print From a video, you can make a 4-, 9-, or 16-up picture is created. Selecting multiple pictures/videos Use the...

User Manual
Page 22
... mode.) In Review, a blue or black screen is charged and installed correctly (page 2). If the problem continues, change as needed (page 13). 3 Solving camera problems Camera problems Status Solution Camera does not turn off , then on ■ Make sure the battery is charged and installed correctly (page 2). when camera turns on ■ Turn the camera off and the lens does not retract Camera buttons and controls do not function Lens does not extend ■ Make sure the battery is displayed instead of a picture ■ Transfer all modes...
... mode.) In Review, a blue or black screen is charged and installed correctly (page 2). If the problem continues, change as needed (page 13). 3 Solving camera problems Camera problems Status Solution Camera does not turn off , then on ■ Make sure the battery is charged and installed correctly (page 2). when camera turns on ■ Turn the camera off and the lens does not retract Camera buttons and controls do not function Lens does not extend ■ Make sure the battery is displayed instead of a picture ■ Transfer all modes...
User Manual
Page 23
Kodak AC adapters and battery chargers are no user-serviceable parts inside the product, contact Kodak customer support. ■ In the unlikely event that is stored for indoor use only. If the LCD breaks, do not touch the glass or liquid. For approved accessories, visit www.kodak/go/accessories. ■ Use only a USB-certified computer equipped with water and contact your computer manufacturer if you...
Kodak AC adapters and battery chargers are no user-serviceable parts inside the product, contact Kodak customer support. ■ In the unlikely event that is stored for indoor use only. If the LCD breaks, do not touch the glass or liquid. For approved accessories, visit www.kodak/go/accessories. ■ Use only a USB-certified computer equipped with water and contact your computer manufacturer if you...

User Manual
Page 24
... solutions unless designed specifically for more information on the camera). Proof of the date of the software included on the Kodak EasyShare software CD and the camera firmware (the software that runs on batteries, visit www.kodak.com/go/batterytypes. ■ Read and follow all labor as well as suntan lotion, to repair or replace a 24 www.kodak.com/go /v1003downloads. For more information. ■ For digital camera...
... solutions unless designed specifically for more information on the camera). Proof of the date of the software included on the Kodak EasyShare software CD and the camera firmware (the software that runs on batteries, visit www.kodak.com/go/batterytypes. ■ Read and follow all labor as well as suntan lotion, to repair or replace a 24 www.kodak.com/go /v1003downloads. For more information. ■ For digital camera...

User Manual
Page 26
... 3) connect the equipment to an outlet on , the user is encouraged to try to correct the interference by the party responsible for compliance could void the user's authority to operate the equipment. This equipment generates, uses, and can be determined by turning the equipment...used with the installation of the FCC Rules. Appendix FCC compliance and advisory Kodak EasyShare V803/V1003 zoom digital camera This equipment has been tested and found to comply with the limits for a Class B digital device, pursuant to Part 15 of the product, they must be used in accordance with the instructions...
... 3) connect the equipment to an outlet on , the user is encouraged to try to correct the interference by the party responsible for compliance could void the user's authority to operate the equipment. This equipment generates, uses, and can be determined by turning the equipment...used with the installation of the FCC Rules. Appendix FCC compliance and advisory Kodak EasyShare V803/V1003 zoom digital camera This equipment has been tested and found to comply with the limits for a Class B digital device, pursuant to Part 15 of the product, they must be used in accordance with the instructions...


