
Extended user guide
Page 1
Kodak EasyShare Z1085 IS zoom digital camera Extended user guide www.kodak.com For interactive tutorials, visit www.kodak.com/go/howto For help with your camera, visit www.kodak.com/go/z1085support
Kodak EasyShare Z1085 IS zoom digital camera Extended user guide www.kodak.com For interactive tutorials, visit www.kodak.com/go/howto For help with your camera, visit www.kodak.com/go/z1085support

Extended user guide
Page 5
... the strap 1 Loading the battery 1 Turning on the camera 2 Setting the language, date/time 2 Storing pictures on an optional SD or SDHC card 3 2 Taking pictures/videos 4 Taking a picture 4 Capture modes 6 Using optical zoom 8 Using .../videos 13 Reviewing pictures/videos 13 Deleting pictures/videos 15 Using the menu button in Review 16 Adding sound tags 17 Cropping pictures 18 Using Kodak Perfect Touch technology 18 Editing videos 19 Running a slide show 21 Viewing pictures/videos in different ways 24 Selecting multiple pictures/videos 25 Copying pictures...
... the strap 1 Loading the battery 1 Turning on the camera 2 Setting the language, date/time 2 Storing pictures on an optional SD or SDHC card 3 2 Taking pictures/videos 4 Taking a picture 4 Capture modes 6 Using optical zoom 8 Using .../videos 13 Reviewing pictures/videos 13 Deleting pictures/videos 15 Using the menu button in Review 16 Adding sound tags 17 Cropping pictures 18 Using Kodak Perfect Touch technology 18 Editing videos 19 Running a slide show 21 Viewing pictures/videos in different ways 24 Selecting multiple pictures/videos 25 Copying pictures...
Extended user guide
Page 6
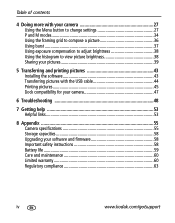
Table of contents 4 Doing more with your camera 27 Using the Menu button to change settings 27 P and M modes 34 Using the framing grid to compose a picture 36 Using burst 37 Using exposure ... pictures 43 Installing the software 43 Transferring pictures with the USB cable 44 Printing pictures 45 Dock compatibility for your camera 47 6 Troubleshooting 48 7 Getting help 53 Helpful links 53 8 Appendix 55 Camera specifications 55 Storage capacities 58 Upgrading your software and firmware 58 Important safety instructions 58 Battery life 59 Care...
Table of contents 4 Doing more with your camera 27 Using the Menu button to change settings 27 P and M modes 34 Using the framing grid to compose a picture 36 Using burst 37 Using exposure ... pictures 43 Installing the software 43 Transferring pictures with the USB cable 44 Printing pictures 45 Dock compatibility for your camera 47 6 Troubleshooting 48 7 Getting help 53 Helpful links 53 8 Appendix 55 Camera specifications 55 Storage capacities 58 Upgrading your software and firmware 58 Important safety instructions 58 Battery life 59 Care...
Extended user guide
Page 8
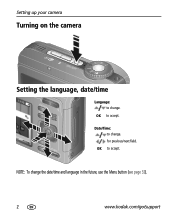
for previous/next field. NOTE: To change . Date/Time: to accept. OK to change. Setting up your camera Turning on the camera Setting the language, date/time Language: to accept. OK to change the date/time and language in the future, use the Menu button (see page 32). 2 www.kodak.com/go/support
for previous/next field. NOTE: To change . Date/Time: to accept. OK to change. Setting up your camera Turning on the camera Setting the language, date/time Language: to accept. OK to change the date/time and language in the future, use the Menu button (see page 32). 2 www.kodak.com/go/support
Extended user guide
Page 9
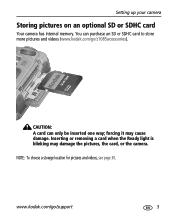
www.kodak.com/go /z1085accessories). forcing it may damage the pictures, the card, or the camera. Inserting or removing a card when the Ready light is blinking may cause damage. You can only be inserted one way; NOTE: To choose a storage location for pictures and videos, see page 30. CAUTION: A card can purchase an SD or SDHC card to store more pictures and videos (www.kodak.com/go /support 3 Setting up your camera Storing pictures on an optional SD or SDHC card Your camera has internal memory.
www.kodak.com/go /z1085accessories). forcing it may damage the pictures, the card, or the camera. Inserting or removing a card when the Ready light is blinking may cause damage. You can only be inserted one way; NOTE: To choose a storage location for pictures and videos, see page 30. CAUTION: A card can purchase an SD or SDHC card to store more pictures and videos (www.kodak.com/go /support 3 Setting up your camera Storing pictures on an optional SD or SDHC card Your camera has internal memory.
Extended user guide
Page 10
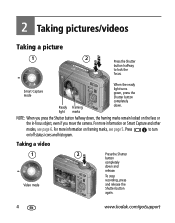
For more information on /off status icons and histogram. To stop recording, press and release the Shutter button again. 4 www.kodak.com/go/support 2 Taking pictures/videos Taking a picture 1 2 Press the Shutter button halfway to turn on framing marks, see page 6. NOTE: ...Video mode 2 Press the Shutter button completely down . For more information on the face or the in-focus object, even if you move the camera. Smart Capture mode Ready Framing light marks When the ready light turns green, press the Shutter button completely down and release. Press to lock the...
For more information on /off status icons and histogram. To stop recording, press and release the Shutter button again. 4 www.kodak.com/go/support 2 Taking pictures/videos Taking a picture 1 2 Press the Shutter button halfway to turn on framing marks, see page 6. NOTE: ...Video mode 2 Press the Shutter button completely down . For more information on the face or the in-focus object, even if you move the camera. Smart Capture mode Ready Framing light marks When the ready light turns green, press the Shutter button completely down and release. Press to lock the...
Extended user guide
Page 11
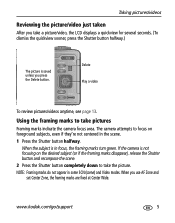
... button halfway.) The picture is saved unless you use AF Zone and set Center Zone, the framing marks are fixed at Center Wide. The camera attempts to focus on the desired subject (or if the framing marks disappear), release the Shutter button and recompose the scene. 2 Press the... Shutter button completely down to take pictures Framing marks indicate the camera focus area. If the camera is not focusing on foreground subjects, even if they're not centered in the scene. 1 Press the Shutter button halfway. When ...
... button halfway.) The picture is saved unless you use AF Zone and set Center Zone, the framing marks are fixed at Center Wide. The camera attempts to focus on the desired subject (or if the framing marks disappear), release the Shutter button and recompose the scene. 2 Press the... Shutter button completely down to take pictures Framing marks indicate the camera focus area. If the camera is not focusing on foreground subjects, even if they're not centered in the scene. 1 Press the Shutter button halfway. When ...
Extended user guide
Page 13
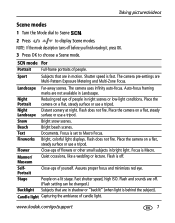
Focus is behind the subject). www.kodak.com/go/support 7 Taking pictures/videos Scene modes 1 Turn the Mode dial... Close-ups of people. SelfPortrait Close-ups of candle light. Candle light Capturing the ambiance of yourself. Place the camera on a lit stage. Stage People on a flat, steady surface or use a tripod. Flash and sounds are ..."backlit" (when light is set to Macro Focus. Assures proper focus and minimizes red eye. Place the camera on a flat, steady surface or use a tripod. Beach Bright beach scenes. Manner/ Museum Quiet occasions,...
Focus is behind the subject). www.kodak.com/go/support 7 Taking pictures/videos Scene modes 1 Turn the Mode dial... Close-ups of people. SelfPortrait Close-ups of candle light. Candle light Capturing the ambiance of yourself. Place the camera on a lit stage. Stage People on a flat, steady surface or use a tripod. Flash and sounds are ..."backlit" (when light is set to Macro Focus. Assures proper focus and minimizes red eye. Place the camera on a flat, steady surface or use a tripod. Beach Bright beach scenes. Manner/ Museum Quiet occasions,...
Extended user guide
Page 14
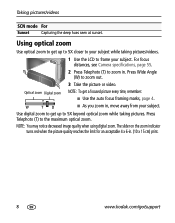
... the maximum optical zoom. NOTE: You may notice decreased image quality when using digital zoom. Press Wide Angle (W) to zoom in. W TD ■ As you zoom in . (10 x 15 cm) print. 8 www.kodak.com/go/support The slider on the zoom indicator turns red when the picture ...quality reaches the limit for an acceptable 4 x 6-in , move away from your subject while taking pictures. For focus distances, see Camera specifications, page 55. 2 Press Telephoto (T) to zoom...
... the maximum optical zoom. NOTE: You may notice decreased image quality when using digital zoom. Press Wide Angle (W) to zoom in. W TD ■ As you zoom in . (10 x 15 cm) print. 8 www.kodak.com/go/support The slider on the zoom indicator turns red when the picture ...quality reaches the limit for an acceptable 4 x 6-in , move away from your subject while taking pictures. For focus distances, see Camera specifications, page 55. 2 Press Telephoto (T) to zoom...
Extended user guide
Page 15
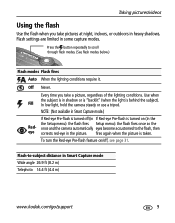
...Smart Capture mode Wide angle 26.9 ft (8.2 m) Telephoto 14.4 ft (4.4 m) www.kodak.com/go/support 9 Press the button repeatedly to the flash, then eye corrects red-eye in heavy shadows. Fill In low light, hold the camera steady or use a tripod. Flash-to-subject distance in some capture modes. Off...mode.) If Red-eye Pre-flash is turned off , see page 31. fires again when the picture is behind the subject). once and the camera automatically eyes become accustomed to scroll through flash modes. (See flash modes below.) Flash modes Flash fires Auto When the lighting conditions require it....
...Smart Capture mode Wide angle 26.9 ft (8.2 m) Telephoto 14.4 ft (4.4 m) www.kodak.com/go/support 9 Press the button repeatedly to the flash, then eye corrects red-eye in heavy shadows. Fill In low light, hold the camera steady or use a tripod. Flash-to-subject distance in some capture modes. Off...mode.) If Red-eye Pre-flash is turned off , see page 31. fires again when the picture is behind the subject). once and the camera automatically eyes become accustomed to scroll through flash modes. (See flash modes below.) Flash modes Flash fires Auto When the lighting conditions require it....
Extended user guide
Page 16
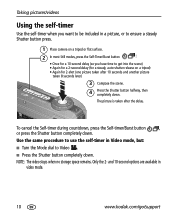
... : • Once for a 10-second delay (so you want to be included in a picture, or to ensure a steady Shutter button press. 1 Place camera on a tripod) • Again for 2-shot (one picture taken after the delay. To cancel the Self-timer during countdown, press the Self-timer/Burst button... time to Video . ■ Press the Shutter button completely down. Only the 2- and 10-second options are available in video mode. 10 www.kodak.com/go/support The picture is taken after 10 seconds and another picture taken 8 seconds later) 3 Compose the scene. 4 Press the Shutter button halfway...
... : • Once for a 10-second delay (so you want to be included in a picture, or to ensure a steady Shutter button press. 1 Place camera on a tripod) • Again for 2-shot (one picture taken after the delay. To cancel the Self-timer during countdown, press the Self-timer/Burst button... time to Video . ■ Press the Shutter button completely down. Only the 2- and 10-second options are available in video mode. 10 www.kodak.com/go/support The picture is taken after 10 seconds and another picture taken 8 seconds later) 3 Compose the scene. 4 Press the Shutter button halfway...
Extended user guide
Page 18
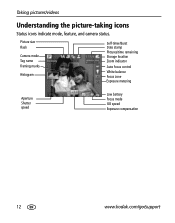
Picture size Flash Camera mode Tag name Framing marks Histogram Self-timer/Burst Date stamp Pictures/time remaining Storage location Zoom indicator Auto focus control White balance Focus zone Exposure metering Aperture Shutter speed Low battery Focus mode ISO speed Exposure compensation 12 www.kodak.com/go/support Taking pictures/videos Understanding the picture-taking icons Status icons indicate mode, feature, and camera status.
Picture size Flash Camera mode Tag name Framing marks Histogram Self-timer/Burst Date stamp Pictures/time remaining Storage location Zoom indicator Auto focus control White balance Focus zone Exposure metering Aperture Shutter speed Low battery Focus mode ISO speed Exposure compensation 12 www.kodak.com/go/support Taking pictures/videos Understanding the picture-taking icons Status icons indicate mode, feature, and camera status.
Extended user guide
Page 22
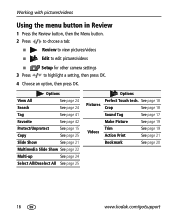
..., then the Menu button. 2 Press to choose a tab: ■ Review to view pictures/videos ■ Edit to edit pictures/videos ■ 3 Press Setup for other camera settings to highlight a setting, then press OK. 4 Choose an option, then press OK. Options View All See page 24 Search See page 24 Tag See... Tag See page 17 Make Picture See page 19 Trim Videos Action Print See page 19 See page 21 Bookmark See page 20 16 www.kodak.com/go/support
..., then the Menu button. 2 Press to choose a tab: ■ Review to view pictures/videos ■ Edit to edit pictures/videos ■ 3 Press Setup for other camera settings to highlight a setting, then press OK. 4 Choose an option, then press OK. Options View All See page 24 Search See page 24 Tag See... Tag See page 17 Make Picture See page 19 Trim Videos Action Print See page 19 See page 21 Bookmark See page 20 16 www.kodak.com/go/support
Extended user guide
Page 27
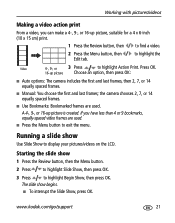
...; Manual: You choose the first and last frames; Starting the slide show begins. ■ To interrupt the Slide Show, press OK. www.kodak.com/go/support 21 The slide show 1 Press the Review button, then the Menu button. 2 Press to highlight Slide Show, then press OK.... 3 Press to highlight Begin Show, then press OK. Running a slide show Use Slide Show to highlight Action Print. the camera chooses 2, 7, or 14 equally spaced frames. ■ Use Bookmarks: Bookmarked frames are used . If you can make a 4-, 9-, or 16-up picture, suitable...
...; Manual: You choose the first and last frames; Starting the slide show begins. ■ To interrupt the Slide Show, press OK. www.kodak.com/go/support 21 The slide show 1 Press the Review button, then the Menu button. 2 Press to highlight Slide Show, then press OK.... 3 Press to highlight Begin Show, then press OK. Running a slide show Use Slide Show to highlight Action Print. the camera chooses 2, 7, or 14 equally spaced frames. ■ Use Bookmarks: Bookmarked frames are used . If you can make a 4-, 9-, or 16-up picture, suitable...

Extended user guide
Page 29
For high definition video system requirements visit www.kodak.com/go /hdtvdock. To connect the camera to a television, use an A/V cable (may be sold separately). Working with pictures/videos Displaying pictures/videos on a television You can display pictures/videos on the Kodak EasyShare HDTV dock. Visit www.kodak.com/go /hdsysreq. www.kodak.com/go/support 23 For a true HDTV experience on your television, dock your camera on a television, computer monitor, or any device equipped with a video input.
For high definition video system requirements visit www.kodak.com/go /hdtvdock. To connect the camera to a television, use an A/V cable (may be sold separately). Working with pictures/videos Displaying pictures/videos on a television You can display pictures/videos on the Kodak EasyShare HDTV dock. Visit www.kodak.com/go /hdsysreq. www.kodak.com/go/support 23 For a true HDTV experience on your television, dock your camera on a television, computer monitor, or any device equipped with a video input.

Extended user guide
Page 30
...then press OK. You can sort them . Pictures are finished choosing tabs and folders, highlight Exit and press OK. 5 To see page 25. 24 www.kodak.com/go/support Press the Wide Angle (W) button to return to multi-up view. ■ Press the Review button to exit Review. ■ For more... about tags, see page 41. ■ To select multiple pictures/videos, see the results of your camera or card, you are displayed in multi-up thumbnails. 3 Press Telephoto (T) to return to view them so that only some are visible at a time. ...
...then press OK. You can sort them . Pictures are finished choosing tabs and folders, highlight Exit and press OK. 5 To see page 25. 24 www.kodak.com/go/support Press the Wide Angle (W) button to return to multi-up view. ■ Press the Review button to exit Review. ■ For more... about tags, see page 41. ■ To select multiple pictures/videos, see the results of your camera or card, you are displayed in multi-up thumbnails. 3 Press Telephoto (T) to return to view them so that only some are visible at a time. ...
Extended user guide
Page 31
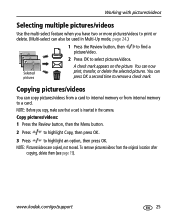
... button. 2 Press to highlight Copy, then press OK. 3 Press to select pictures/videos. to find a 2 Press OK to highlight an option, then press OK. www.kodak.com/go/support 25 NOTE: Before you have two or more pictures/videos to print or delete. (Multi-select can copy pictures/videos from a card... after copying, delete them (see page 15). Selected pictures A check mark appears on the picture. Copying pictures/videos You can also be used in the camera.
... button. 2 Press to highlight Copy, then press OK. 3 Press to select pictures/videos. to find a 2 Press OK to highlight an option, then press OK. www.kodak.com/go/support 25 NOTE: Before you have two or more pictures/videos to print or delete. (Multi-select can copy pictures/videos from a card... after copying, delete them (see page 15). Selected pictures A check mark appears on the picture. Copying pictures/videos You can also be used in the camera.

Extended user guide
Page 33
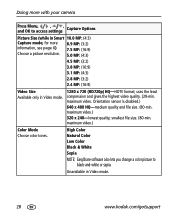
... and file size mode. 3.1 MP (4:3)-Smaller resolution and file size 2.2 MP (3:2)-For EasyShare printer docks, photo printers 2.1 MP (16:9)-HDTV format 1.2 MP (4:3)-For emailing, Internet, or conserving space www.kodak.com/go/support 27 Press the Info button for information about camera settings and options. 1 Press the Menu button. 2 Press to highlight a menu...
... and file size mode. 3.1 MP (4:3)-Smaller resolution and file size 2.2 MP (3:2)-For EasyShare printer docks, photo printers 2.1 MP (16:9)-HDTV format 1.2 MP (4:3)-For emailing, Internet, or conserving space www.kodak.com/go/support 27 Press the Info button for information about camera settings and options. 1 Press the Menu button. 2 Press to highlight a menu...
Extended user guide
Page 34
... MP: (16:9) 3.1 MP: (4:3) 2.8 MP: (3:2) 2.4 MP: (16:9) Video Size Available only in Video mode. 28 www.kodak.com/go/support High Color Natural Color Low Color Black & White Sepia NOTE: EasyShare software also lets you change a color picture to access settings Capture Options Picture Size (while in Smart 10.0 MP...: (4:3) Capture mode; for more with your camera Press Menu, , , and OK to black-and-...
... MP: (16:9) 3.1 MP: (4:3) 2.8 MP: (3:2) 2.4 MP: (16:9) Video Size Available only in Video mode. 28 www.kodak.com/go/support High Color Natural Color Low Color Black & White Sepia NOTE: EasyShare software also lets you change a color picture to access settings Capture Options Picture Size (while in Smart 10.0 MP...: (4:3) Capture mode; for more with your camera Press Menu, , , and OK to black-and-...
Extended user guide
Page 35
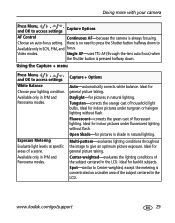
... + menu Press Menu, , , and OK to access settings White Balance Choose your camera Press Menu, , , and OK to access settings Capture Options AF Control Continuous AF-because the camera is pressed halfway down to Available only in the LCD. Daylight-for general picture taking ... bulbs. Ideal for indoor pictures under tungsten or halogen lighting without flash. Tungsten-corrects the orange cast of fluorescent lighting. www.kodak.com/go/support 29 Available only in P/M and Panorama modes. there is concentrated on a smaller area of the subject centered in...
... + menu Press Menu, , , and OK to access settings White Balance Choose your camera Press Menu, , , and OK to access settings Capture Options AF Control Continuous AF-because the camera is pressed halfway down to Available only in the LCD. Daylight-for general picture taking ... bulbs. Ideal for indoor pictures under tungsten or halogen lighting without flash. Tungsten-corrects the orange cast of fluorescent lighting. www.kodak.com/go/support 29 Available only in P/M and Panorama modes. there is concentrated on a smaller area of the subject centered in...


