
User Manual
Page 5
... the language and date/time, other times 4 Storing pictures on an SD or MMC card 4 2 Taking pictures and videos 5 Taking a picture 5 Reviewing pictures and videos 9 Using optical zoom 12 Using the flip-up flash 13 Protecting pictures and videos from deletion 14 Deleting pictures and videos 14 3 Transferring and printing pictures 15 Installing the software 15 Transferring pictures 16 Printing pictures 17 Dock compatibility for your camera 20 4 Doing more with your camera 21 Picture-taking modes 21 Changing the flash settings 25 Using the focus button 26 Using self-timer...
... the language and date/time, other times 4 Storing pictures on an SD or MMC card 4 2 Taking pictures and videos 5 Taking a picture 5 Reviewing pictures and videos 9 Using optical zoom 12 Using the flip-up flash 13 Protecting pictures and videos from deletion 14 Deleting pictures and videos 14 3 Transferring and printing pictures 15 Installing the software 15 Transferring pictures 16 Printing pictures 17 Dock compatibility for your camera 20 4 Doing more with your camera 21 Picture-taking modes 21 Changing the flash settings 25 Using the focus button 26 Using self-timer...
User Manual
Page 6
... 44 Pre-tagging for album names 45 Sharing your pictures 48 5 Troubleshooting 54 Camera problems 54 Computer/connectivity problems 56 Picture quality problems 56 Mode-dial-light indicator status 57 Direct printing (PictBridge) problems 58 6 Getting help 59 Helpful links 59 Telephone customer support 60 7 Appendix 61 Camera specifications 61 Storage capacities 65 Power-saving features 67 Important safety instructions 68 Battery information 70 Upgrading your software and firmware 71 Additional care and maintenance 71 Warranty...72...
... 44 Pre-tagging for album names 45 Sharing your pictures 48 5 Troubleshooting 54 Camera problems 54 Computer/connectivity problems 56 Picture quality problems 56 Mode-dial-light indicator status 57 Direct printing (PictBridge) problems 58 6 Getting help 59 Helpful links 59 Telephone customer support 60 7 Appendix 61 Camera specifications 61 Storage capacities 65 Power-saving features 67 Important safety instructions 68 Battery information 70 Upgrading your software and firmware 71 Additional care and maintenance 71 Warranty...72...
User Manual
Page 13
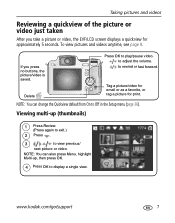
... Setup menu (page 36). NOTE: You can change the Quickview default from On to display a single view. NOTE: You can also press Menu, highlight Multi-up (thumbnails) 1 Press Review. (Press again to exit.) 2 Press . 3 to play/pause video. Taking pictures and videos Reviewing a quickview of the picture or video just taken After you press no buttons, the picture/video is saved. to rewind or fast forward. www.kodak.com/go/support 7 Tag a picture/video...
... Setup menu (page 36). NOTE: You can change the Quickview default from On to display a single view. NOTE: You can also press Menu, highlight Multi-up (thumbnails) 1 Press Review. (Press again to exit.) 2 Press . 3 to play/pause video. Taking pictures and videos Reviewing a quickview of the picture or video just taken After you press no buttons, the picture/video is saved. to rewind or fast forward. www.kodak.com/go/support 7 Tag a picture/video...

User Manual
Page 17
Taking pictures and videos Review options In Review, press the Menu button to exit.) 2 Repeatedly press for pictures and videos. Album (page 45) Slide Show (page 44) Perfect Touch tech. (page 43) Copy (page 40) Crop (page 43) Make Picture (page 42) Image Storage (see table on page 32) Multi-up (page 7) Action Print (page 41) Setup Menu (page 36) Protect (page 14) Checking camera and picture status 1 Press Review. (Press...
Taking pictures and videos Review options In Review, press the Menu button to exit.) 2 Repeatedly press for pictures and videos. Album (page 45) Slide Show (page 44) Perfect Touch tech. (page 43) Copy (page 40) Crop (page 43) Make Picture (page 42) Image Storage (see table on page 32) Multi-up (page 7) Action Print (page 41) Setup Menu (page 36) Protect (page 14) Checking camera and picture status 1 Press Review. (Press...
User Manual
Page 19
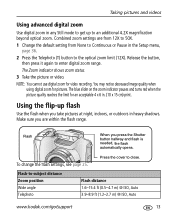
... change the flash settings, see page 25. The Zoom indicator shows zoom status. 3 Take the picture or video. The blue slider on the zoom indicator pauses and turns red when the picture quality reaches the limit for video recording. Using the flip-up to an additional 4.2X magnification beyond optical zoom. Flash When you press the Shutter button halfway and flash is needed, the flash automatically opens. You may notice decreased image quality when using digital zoom for pictures. Combined zoom settings...
... change the flash settings, see page 25. The Zoom indicator shows zoom status. 3 Take the picture or video. The blue slider on the zoom indicator pauses and turns red when the picture quality reaches the limit for video recording. Using the flip-up to an additional 4.2X magnification beyond optical zoom. Flash When you press the Shutter button halfway and flash is needed, the flash automatically opens. You may notice decreased image quality when using digital zoom for pictures. Combined zoom settings...

User Manual
Page 21
...-virus software, turn it back on your camera and software. Failure to do so may cause the software to install the software. For information on the software applications included on the Kodak EasyShare software CD, click the Help button in the Kodak EasyShare software. www.kodak.com/go /register. 5 If prompted, restart the computer. 3 Transferring and printing pictures Installing the software CAUTION: Install Kodak EasyShare software before connecting the camera or optional dock to automatically install the most commonly used applications. Windows...
...-virus software, turn it back on your camera and software. Failure to do so may cause the software to install the software. For information on the software applications included on the Kodak EasyShare software CD, click the Help button in the Kodak EasyShare software. www.kodak.com/go /register. 5 If prompted, restart the computer. 3 Transferring and printing pictures Installing the software CAUTION: Install Kodak EasyShare software before connecting the camera or optional dock to automatically install the most commonly used applications. Windows...

User Manual
Page 23
... Kodak picture maker/picture kiosk. (Contact a location prior to visiting. See www.kodak.com/go/picturemaker.) I Take the card to your printer user's guide for details. Direct printing with a PictBridge enabled printer Your camera is compatible with PictBridge technology, which lets you print directly to PictBridge enabled printers, without a computer. See your local photo retailer for professional printing. Transferring and printing pictures Printing pictures Printing with a Kodak EasyShare printer dock Dock your card into an electrical outlet. 3 Connect the appropriate USB cable...
... Kodak picture maker/picture kiosk. (Contact a location prior to visiting. See www.kodak.com/go/picturemaker.) I Take the card to your printer user's guide for details. Direct printing with a PictBridge enabled printer Your camera is compatible with PictBridge technology, which lets you print directly to PictBridge enabled printers, without a computer. See your local photo retailer for professional printing. Transferring and printing pictures Printing pictures Printing with a Kodak EasyShare printer dock Dock your card into an electrical outlet. 3 Connect the appropriate USB cable...
User Manual
Page 27
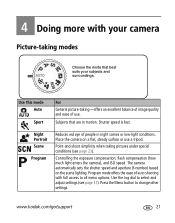
... use . www.kodak.com/go/support 21 Shutter speed is fast. Place the camera on the scene lighting. Controlling the exposure compensation, flash compensation (how much light enters the camera), and ISO speed. Night Portrait Scene Program Reduces red eye of use a tripod. Press the Menu button to all menu options. Use this mode Auto Sport For General picture-taking pictures under special conditions (see page 31). 4 Doing more with full access to change other settings. Point-and-shoot...
... use . www.kodak.com/go/support 21 Shutter speed is fast. Place the camera on the scene lighting. Controlling the exposure compensation, flash compensation (how much light enters the camera), and ISO speed. Night Portrait Scene Program Reduces red eye of use a tripod. Press the Menu button to all menu options. Use this mode Auto Sport For General picture-taking pictures under special conditions (see page 31). 4 Doing more with full access to change other settings. Point-and-shoot...
User Manual
Page 36
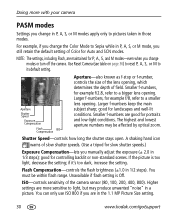
... lens opening , which determines the depth of field. Smaller f-numbers are in the 1.1 MP Picture Size setting. 30 www.kodak.com/go/support Unavailable if flash setting is too light, decrease the setting; Doing more sensitive to Sepia while in P, A, S, or M mode, you still retain the default setting of slow shutter speeds. (Use a tripod for landscapes and well-lit conditions. For example, if you are good for Auto and SCN modes. Aperture Shutter Speed Exposure...
... lens opening , which determines the depth of field. Smaller f-numbers are in the 1.1 MP Picture Size setting. 30 www.kodak.com/go/support Unavailable if flash setting is too light, decrease the setting; Doing more sensitive to Sepia while in P, A, S, or M mode, you still retain the default setting of slow shutter speeds. (Use a tripod for landscapes and well-lit conditions. For example, if you are good for Auto and SCN modes. Aperture Shutter Speed Exposure...
User Manual
Page 39
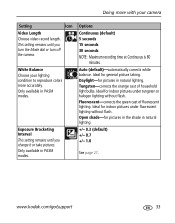
... colors more with your camera Setting Icon Video Length Choose video record length. Exposure Bracketing Interval This setting remains until you change it or take pictures. Auto (default)-automatically corrects white balance. Fluorescent-corrects the green cast of household light bulbs. Open shade-for pictures in natural lighting. +/- 0.3 (default) +/- 0.7 +/- 1.0 See page 27. This setting remains until you turn the Mode dial or turn off the camera. Ideal for general picture taking. www.kodak.com/go/support 33 Doing more accurately. Options Continuous (default...
... colors more with your camera Setting Icon Video Length Choose video record length. Exposure Bracketing Interval This setting remains until you change it or take pictures. Auto (default)-automatically corrects white balance. Fluorescent-corrects the green cast of household light bulbs. Open shade-for pictures in natural lighting. +/- 0.3 (default) +/- 0.7 +/- 1.0 See page 27. This setting remains until you turn the Mode dial or turn off the camera. Ideal for general picture taking. www.kodak.com/go/support 33 Doing more accurately. Options Continuous (default...

User Manual
Page 40
... picture taking . AF Control Choose an auto-focus setting. Camera is set to focus. Continuous AF (default)-camera continuously adjusts to Center-weight, except the metering is pressed halfway down to Multi-zone when in focus. Ideal for backlit subjects. If used with your camera Setting Icon Exposure Metering Evaluate light levels at specific areas of focus. Options Multi-pattern (default)-evaluates lighting conditions throughout the image to give an even picture focus. This option uses less battery power. 34 www.kodak...
... picture taking . AF Control Choose an auto-focus setting. Camera is set to focus. Continuous AF (default)-camera continuously adjusts to Center-weight, except the metering is pressed halfway down to Multi-zone when in focus. Ideal for backlit subjects. If used with your camera Setting Icon Exposure Metering Evaluate light levels at specific areas of focus. Options Multi-pattern (default)-evaluates lighting conditions throughout the image to give an even picture focus. This option uses less battery power. 34 www.kodak...

User Manual
Page 41
... pictures with your camera (page 36). Setup Menu Choose additional settings. See page 45. See Customizing your camera Setting Icon Color Mode Choose color tones. Sharpness Control picture sharpness. This setting remains until you change it. High Normal (default) Low On Off (default) Pre-select album names before you take pictures or videos. www.kodak.com/go/support 35 Only available in the camera. Options High Color Natural Color (default) Low Color Black & White Sepia-for pictures and videos. Auto (default)-the camera uses the card...
... pictures with your camera (page 36). Setup Menu Choose additional settings. See page 45. See Customizing your camera Setting Icon Color Mode Choose color tones. Sharpness Control picture sharpness. This setting remains until you change it. High Normal (default) Low On Off (default) Pre-select album names before you take pictures or videos. www.kodak.com/go/support 35 Only available in the camera. Options High Color Natural Color (default) Low Color Black & White Sepia-for pictures and videos. Auto (default)-the camera uses the card...
User Manual
Page 43
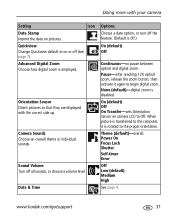
... Orient pictures so that they are displayed with your camera Setting Icon Date Stamp Imprint the date on or off .) On (default) Off Continuous-no pause between optical and digital zoom. Quickview Change Quickview default to begin digital zoom. None (default)-digital zoom is rotated to Off. Doing more with the correct side up. Date & Time Options Choose a date option, or turn off the feature. (Default is employed. Sound Volume Turn off all sounds, or choose a volume level. Power On Focus Lock Shutter Self-timer Error...
... Orient pictures so that they are displayed with your camera Setting Icon Date Stamp Imprint the date on or off .) On (default) Off Continuous-no pause between optical and digital zoom. Quickview Change Quickview default to begin digital zoom. None (default)-digital zoom is rotated to Off. Doing more with the correct side up. Date & Time Options Choose a date option, or turn off the feature. (Default is employed. Sound Volume Turn off all sounds, or choose a volume level. Power On Focus Lock Shutter Self-timer Error...

User Manual
Page 44
... with your camera Setting Icon Auto Power-Off Select when you connect the camera to a television or other external device. Mode Description Display mode description at the start -up or mode change. Print Warning Language Choose a language. Reset Camera Reset all picture-taking settings to turn off. The slider turns red when the picture may no pause. Options 1, 3 (default), 5, or 10 minutes NTSC (default)-used in Europe and China. most common format. PAL-used in . (10 x 15 cm) print. Video Out Choose the...
... with your camera Setting Icon Auto Power-Off Select when you connect the camera to a television or other external device. Mode Description Display mode description at the start -up or mode change. Print Warning Language Choose a language. Reset Camera Reset all picture-taking settings to turn off. The slider turns red when the picture may no pause. Options 1, 3 (default), 5, or 10 minutes NTSC (default)-used in Europe and China. most common format. PAL-used in . (10 x 15 cm) print. Video Out Choose the...
User Manual
Page 57
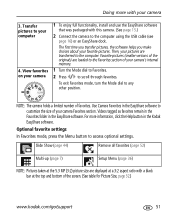
... the Help button in the Kodak EasyShare software. The first time you transfer pictures, the software helps you make choices about your computer 4. Videos tagged as favorites remain in the Favorites folder in the EasyShare software to the computer using the USB cable (see page 16) or an EasyShare dock. For more with this camera. (See page 15.) 2 Connect the camera to customize the size of favorites. Transfer pictures to the Favorites section of the screen...
... the Help button in the Kodak EasyShare software. The first time you transfer pictures, the software helps you make choices about your computer 4. Videos tagged as favorites remain in the Favorites folder in the EasyShare software to the computer using the USB cable (see page 16) or an EasyShare dock. For more with this camera. (See page 15.) 2 Connect the camera to customize the size of favorites. Transfer pictures to the Favorites section of the screen...
User Manual
Page 58
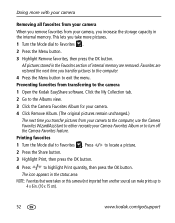
... camera 1 Open the Kodak EasyShare software. This lets you take more with your camera Removing all favorites from your camera When you remove favorites from your camera, you transfer pictures from your camera to the computer, use the Camera Favorites Wizard/Assistant to either recreate your camera. 4 Click Remove Album. (The original pictures remain unchanged.) The next time you increase the storage capacity in . (10 x 15 cm). 52 www.kodak.com/go/support Printing...
... camera 1 Open the Kodak EasyShare software. This lets you take more with your camera Removing all favorites from your camera When you remove favorites from your camera, you transfer pictures from your camera to the computer, use the Camera Favorites Wizard/Assistant to either recreate your camera. 4 Click Remove Album. (The original pictures remain unchanged.) The next time you increase the storage capacity in . (10 x 15 cm). 52 www.kodak.com/go/support Printing...
User Manual
Page 62
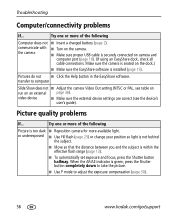
Troubleshooting Computer/connectivity problems If... Picture quality problems If... I Click the Help button in the EasyShare software. Pictures do not I Use P mode to adjust the exposure compensation (page 30). 56 www.kodak.com/go/support video device I Make sure the external device settings are correct (see table on run on the dock.) I To automatically set exposure and focus, press the Shutter button halfway. I Make sure the EasyShare software is installed (page 15). Make sure the camera is not behind the subject...
Troubleshooting Computer/connectivity problems If... Picture quality problems If... I Click the Help button in the EasyShare software. Pictures do not I Use P mode to adjust the exposure compensation (page 30). 56 www.kodak.com/go/support video device I Make sure the external device settings are correct (see table on run on the dock.) I To automatically set exposure and focus, press the Shutter button halfway. I Make sure the EasyShare software is installed (page 15). Make sure the camera is not behind the subject...
User Manual
Page 63
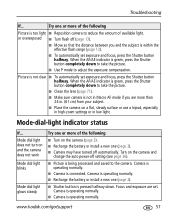
.... I To automatically set exposure and focus, press the Shutter button halfway. I Recharge the battery or install a new one or more of the following I Turn on and the camera does not work Mode dial light blinks Mode dial light glows steady Try one (page 2). I Camera is being processed and saved to reduce the amount of the following Picture is pressed halfway down to adjust the exposure compensation. I Picture is connected. Camera is operating normally. I Move...
.... I To automatically set exposure and focus, press the Shutter button halfway. I Recharge the battery or install a new one or more of the following I Turn on and the camera does not work Mode dial light blinks Mode dial light glows steady Try one (page 2). I Camera is being processed and saved to reduce the amount of the following Picture is pressed halfway down to adjust the exposure compensation. I Picture is connected. Camera is operating normally. I Move...

User Manual
Page 84
... support, 60 customizing camera settings, 36 D D-22 adapter, 20 date & time, 3, 4, 37 date stamp, 37 daylight, lighting, 33 delete button, ii deleting during quickview, 7 from internal memory, 14 from SD/MMC card, 14 protecting pictures, videos, 14 digital zoom, 37 digital zoom, using, 13 displaying slide show, 44 disposal, recycling, 71 dock camera, 20, 71 compatibility, 20 connector, ii printer, 17, 20, 71 docking configuration, 20 downloading pictures, 15, 16 drive button, i drive modes first burst, 27 last burst, 27 self-timer, 27 shutter...
... support, 60 customizing camera settings, 36 D D-22 adapter, 20 date & time, 3, 4, 37 date stamp, 37 daylight, lighting, 33 delete button, ii deleting during quickview, 7 from internal memory, 14 from SD/MMC card, 14 protecting pictures, videos, 14 digital zoom, 37 digital zoom, using, 13 displaying slide show, 44 disposal, recycling, 71 dock camera, 20, 71 compatibility, 20 connector, ii printer, 17, 20, 71 docking configuration, 20 downloading pictures, 15, 16 drive button, i drive modes first burst, 27 last burst, 27 self-timer, 27 shutter...

User Manual
Page 89
flash compensation, 30 format, 39 image stabilizer, 36 image storage, 35 language, 4, 38 LCD brightness, 36 mode description, 38 orientation sensor, 37 PASM, 30 picture size/quality, 32 picture-taking mode, 21 quickview, 37 reset camera, 38 return, 36 review, 11 set album, 35 sharpness, 35 sound volume, 37 video date display, 38 video length, 33, 38 video out, 38 video size/quality, 32 white balance, 33 setup menu, 11 setup mode, using, 36 share button, ii, 48 sharpness, 35 shutoff, auto, 67 shutter button, i press halfway...
flash compensation, 30 format, 39 image stabilizer, 36 image storage, 35 language, 4, 38 LCD brightness, 36 mode description, 38 orientation sensor, 37 PASM, 30 picture size/quality, 32 picture-taking mode, 21 quickview, 37 reset camera, 38 return, 36 review, 11 set album, 35 sharpness, 35 sound volume, 37 video date display, 38 video length, 33, 38 video out, 38 video size/quality, 32 white balance, 33 setup menu, 11 setup mode, using, 36 share button, ii, 48 sharpness, 35 shutoff, auto, 67 shutter button, i press halfway...


