
User Manual
Page 5
... the lens cap 1 Attaching the neck strap 1 Loading the batteries 2 Turning on the camera 2 Setting the date/time, first time 3 Storing pictures on an SD or ... pictures with the USB cable 14 Printing pictures 14 Dock compatibility for your camera 17 4 Doing more with your camera 18 Using the self-timer 18 Using burst 19 Taking close-up and ... show 20 Changing the flash settings 22 Picture-taking modes 23 Changing picture-taking settings 27 Customizing your camera 30 Viewing picture/video information 32 Copying pictures and videos 32 Adjusting exposure compensation 33 P, A, S,...
... the lens cap 1 Attaching the neck strap 1 Loading the batteries 2 Turning on the camera 2 Setting the date/time, first time 3 Storing pictures on an SD or ... pictures with the USB cable 14 Printing pictures 14 Dock compatibility for your camera 17 4 Doing more with your camera 18 Using the self-timer 18 Using burst 19 Taking close-up and ... show 20 Changing the flash settings 22 Picture-taking modes 23 Changing picture-taking settings 27 Customizing your camera 30 Viewing picture/video information 32 Copying pictures and videos 32 Adjusting exposure compensation 33 P, A, S,...
User Manual
Page 8
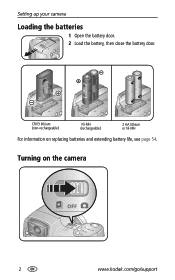
Setting up your camera Loading the batteries 1 Open the battery door. 2 Load the battery, then close the battery door. Turning on replacing batteries and extending battery life, see page 54. CRV3 lithium (non-rechargeable) Ni-MH (rechargeable) 2 AA lithium or Ni-MH For information on the camera 2 www.kodak.com/go/support
Setting up your camera Loading the batteries 1 Open the battery door. 2 Load the battery, then close the battery door. Turning on replacing batteries and extending battery life, see page 54. CRV3 lithium (non-rechargeable) Ni-MH (rechargeable) 2 AA lithium or Ni-MH For information on the camera 2 www.kodak.com/go/support

User Manual
Page 11
To stop recording, press and release the Shutter button again. When AF/AE Indicator turns green, press Shutter button completely down. 2 Taking a video 1 2 3 Choose LCD or EFV (electronic viewfinder) AF/AE Indicator: Green-successful Red-failed Failed focus Failed exposure 3 Press the Shutter button completely down and release. 2 Taking pictures and videos Taking a picture 1 Press Shutter button 4 halfway to focus and set exposure. www.kodak.com/go/support 5
To stop recording, press and release the Shutter button again. When AF/AE Indicator turns green, press Shutter button completely down. 2 Taking a video 1 2 3 Choose LCD or EFV (electronic viewfinder) AF/AE Indicator: Green-successful Red-failed Failed focus Failed exposure 3 Press the Shutter button completely down and release. 2 Taking pictures and videos Taking a picture 1 Press Shutter button 4 halfway to focus and set exposure. www.kodak.com/go/support 5
User Manual
Page 12
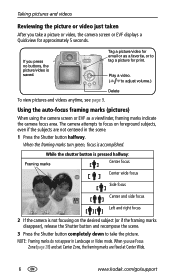
...focus Center wide focus Side focus Center and side focus Left and right focus 2 If the camera is not focusing on foreground subjects, even if the subjects are fixed at Center Wide. 6 www.kodak.com/go/support When you press no buttons, the picture/video is accomplished. Play a video... for email or as a viewfinder, framing marks indicate the camera focus area. Tag a picture/video for print. Taking pictures and videos Reviewing the picture or video just taken After you take the picture. When the framing marks turn green, focus is saved. NOTE: Framing marks do not ...
...focus Center wide focus Side focus Center and side focus Left and right focus 2 If the camera is not focusing on foreground subjects, even if the subjects are fixed at Center Wide. 6 www.kodak.com/go/support When you press no buttons, the picture/video is accomplished. Play a video... for email or as a viewfinder, framing marks indicate the camera focus area. Tag a picture/video for print. Taking pictures and videos Reviewing the picture or video just taken After you take the picture. When the framing marks turn green, focus is saved. NOTE: Framing marks do not ...

User Manual
Page 13
Taking pictures and videos Checking camera and picture status To turn on/off the camera and picture icons, press the Status button. Status Capture modes Self-timer Landscape/ Close-up Date stamp Album name Flash Zoom: digital telephoto wide PASM Setting Aperture Shutter speed Picture ...Focus zone Exposure metering White balance ISO Low battery Camera mode Exposure compensation Capture modes-shutter pressed halfway Open flash warning Slow shutter speed warning Auto Focus/ Auto Exposure (AF/AE indicator) ISO Aperture Shutter speed Exposure compensation www.kodak.com/go/support 7
Taking pictures and videos Checking camera and picture status To turn on/off the camera and picture icons, press the Status button. Status Capture modes Self-timer Landscape/ Close-up Date stamp Album name Flash Zoom: digital telephoto wide PASM Setting Aperture Shutter speed Picture ...Focus zone Exposure metering White balance ISO Low battery Camera mode Exposure compensation Capture modes-shutter pressed halfway Open flash warning Slow shutter speed warning Auto Focus/ Auto Exposure (AF/AE indicator) ISO Aperture Shutter speed Exposure compensation www.kodak.com/go/support 7
User Manual
Page 14
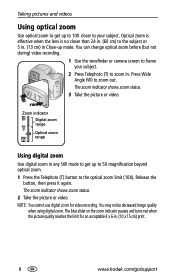
...Zoom indicator Digital zoom range Optical zoom range Using digital zoom Use digital zoom in . (10 x 15 cm) print. 8 www.kodak.com/go/support You may notice decreased image quality when using digital zoom. You can change optical zoom before (but not during) video recording. 1 Use the viewfinder or camera screen to... cannot use digital zoom for an acceptable 4 x 6-in any Still mode to get up to 10X closer to your subject. 2 Press Telephoto (T) to zoom in. The zoom indicator shows zoom status. 3 Take the picture or video. The blue slider on the zoom indicator pauses and turns red when...
...Zoom indicator Digital zoom range Optical zoom range Using digital zoom Use digital zoom in . (10 x 15 cm) print. 8 www.kodak.com/go/support You may notice decreased image quality when using digital zoom. You can change optical zoom before (but not during) video recording. 1 Use the viewfinder or camera screen to... cannot use digital zoom for an acceptable 4 x 6-in any Still mode to get up to 10X closer to your subject. 2 Press Telephoto (T) to zoom in. The zoom indicator shows zoom status. 3 Take the picture or video. The blue slider on the zoom indicator pauses and turns red when...
User Manual
Page 15
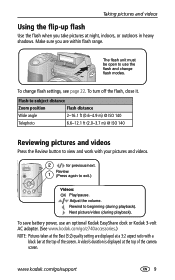
...flip-up flash Use the flash when you are displayed at the top of the camera screen. Rewind to use an optional Kodak EasyShare dock or Kodak 3-volt AC adapter. (See www.kodak.com/go /support 9 www.kodak.com/go /z740accessories.) NOTE: Pictures taken at the Best (3:2) quality setting are within... @ ISO 140 Telephoto 6.6-12.1 ft (2.0-3.7 m) @ ISO 140 Reviewing pictures and videos Press the Review button to exit.) Videos: OK Play/pause. To turn off the flash, close it. Adjust the volume. To change flash modes. Make sure you take pictures at the top of the screen.
...flip-up flash Use the flash when you are displayed at the top of the camera screen. Rewind to use an optional Kodak EasyShare dock or Kodak 3-volt AC adapter. (See www.kodak.com/go /support 9 www.kodak.com/go /z740accessories.) NOTE: Pictures taken at the Best (3:2) quality setting are within... @ ISO 140 Telephoto 6.6-12.1 ft (2.0-3.7 m) @ ISO 140 Reviewing pictures and videos Press the Review button to exit.) Videos: OK Play/pause. To turn off the flash, close it. Adjust the volume. To change flash modes. Make sure you take pictures at the top of the screen.
User Manual
Page 19
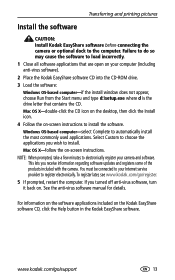
This lets you turned off anti-virus software, turn it back on. For information on the software applications included on -screen instructions. Transferring and printing pictures Install the software CAUTION: Install Kodak EasyShare software before connecting the camera or optional dock to electronically register your camera and software. NOTE: When prompted, take a few minutes to the computer...
This lets you turned off anti-virus software, turn it back on. For information on the software applications included on -screen instructions. Transferring and printing pictures Install the software CAUTION: Install Kodak EasyShare software before connecting the camera or optional dock to electronically register your camera and software. NOTE: When prompted, take a few minutes to the computer...
User Manual
Page 20
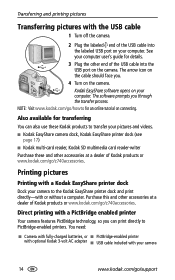
The software prompts you . 4 Turn on the camera. Printing pictures Printing with a Kodak EasyShare printer dock Dock your camera to the Kodak EasyShare printer dock and print directly-with a PictBridge enabled printer Your camera features PictBridge technology, so you can also use these Kodak products to PictBridge-enabled printers. Also available for transferring You can print directly to transfer your...
The software prompts you . 4 Turn on the camera. Printing pictures Printing with a Kodak EasyShare printer dock Dock your camera to the Kodak EasyShare printer dock and print directly-with a PictBridge enabled printer Your camera features PictBridge technology, so you can also use these Kodak products to PictBridge-enabled printers. Also available for transferring You can print directly to transfer your...

User Manual
Page 21
... computer, see page 12. Transferring and printing pictures Connecting the camera to a PictBridge-enabled printer 1 Turn off the camera and printer. 2 Optional: If you tagged for details. IMPORTANT: Do not use the AC adapter included with the Kodak EasyShare camera dock or printer dock to power your camera. 3 Connect the appropriate USB cable from a PictBridge-enabled printer...
... computer, see page 12. Transferring and printing pictures Connecting the camera to a PictBridge-enabled printer 1 Turn off the camera and printer. 2 Optional: If you tagged for details. IMPORTANT: Do not use the AC adapter included with the Kodak EasyShare camera dock or printer dock to power your camera. 3 Connect the appropriate USB cable from a PictBridge-enabled printer...

User Manual
Page 24
... . To cancel the Self-timer before the picture is taken in 2 or 10 seconds. NOTE: The video stops when no storage space remains. 18 www.kodak.com/go/support 4 Doing more for a 2-second delay (for a 10-second delay (so you have time to Video . ■ Press the Shutter ...Self-timer button. (The Self-timer setting remains active.) Use the same procedure to take a video, but: ■ Turn the Mode dial to get into the scene) . Once more with your camera Using the self-timer 1 Place camera on a tripod) 3 Compose the scene. 4 Press the Shutter button halfway, then completely down .
... . To cancel the Self-timer before the picture is taken in 2 or 10 seconds. NOTE: The video stops when no storage space remains. 18 www.kodak.com/go/support 4 Doing more for a 2-second delay (for a 10-second delay (so you have time to Video . ■ Press the Shutter ...Self-timer button. (The Self-timer setting remains active.) Use the same procedure to take a video, but: ■ Turn the Mode dial to get into the scene) . Once more with your camera Using the self-timer 1 Place camera on a tripod) 3 Compose the scene. 4 Press the Shutter button halfway, then completely down .
User Manual
Page 27
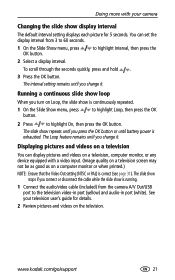
... (yellow) and audio-in port (white). The Loop feature remains until you change it . www.kodak.com/go/support 21 The interval setting remains until you change it . See your camera Changing the slide show is exhausted. to highlight Loop, then press the OK 2 Press to highlight Interval... or PAL) is continuously repeated. 1 On the Slide Show menu, press button. The slide show stops if you turn on a television You can set the display interval from the camera A/V Out/USB port to 60 seconds. 1 On the Slide Show menu, press OK button. You can display pictures...
... (yellow) and audio-in port (white). The Loop feature remains until you change it . www.kodak.com/go/support 21 The interval setting remains until you change it . See your camera Changing the slide show is exhausted. to highlight Loop, then press the OK 2 Press to highlight Interval... or PAL) is continuously repeated. 1 On the Slide Show menu, press button. The slide show stops if you turn on a television You can set the display interval from the camera A/V Out/USB port to 60 seconds. 1 On the Slide Show menu, press OK button. You can display pictures...

User Manual
Page 30
...children in White balance, Center-Zone Focus, bright light. f/2.8-f/3.7, Macro Focus, CenterWeight Metering, Center-Zone Focus, ISO 100 24 www.kodak.com/go/support f/5.6, 2 second exposure, Infinity Focus, Center-Weight Metering, Daylight White Balance, ISO 100 Snow Bright snow scenes. Metering... Compensation, Center-Weight Metering, Multi-Zone Focus, ISO 100 Backlight Subjects that are in . (70 cm). Doing more with your camera Scene modes 1 Turn the Mode dial to Scene . 2 Press to choose a Scene mode. f/2.8-f/3.7, Multi-Pattern Exposure Metering, Multi-Zone Focus, Red-...
...children in White balance, Center-Zone Focus, bright light. f/2.8-f/3.7, Macro Focus, CenterWeight Metering, Center-Zone Focus, ISO 100 24 www.kodak.com/go/support f/5.6, 2 second exposure, Infinity Focus, Center-Weight Metering, Daylight White Balance, ISO 100 Snow Bright snow scenes. Metering... Compensation, Center-Weight Metering, Multi-Zone Focus, ISO 100 Backlight Subjects that are in . (70 cm). Doing more with your camera Scene modes 1 Turn the Mode dial to Scene . 2 Press to choose a Scene mode. f/2.8-f/3.7, Multi-Pattern Exposure Metering, Multi-Zone Focus, Red-...
User Manual
Page 34
...lighting conditions throughout the image to give an optimum picture exposure. Daylight-for pictures in the shade in PASM mode. 28 www.kodak.com/go/support Tungsten-corrects the orange cast of a scene. Center-weight-evaluates the lighting conditions of a specific area in ...Available only in natural lighting. Ideal for backlit subjects. This setting remains until you turn the Mode dial or turn off the camera. Ideal when you turn the Mode dial or turn off the camera. Focus Zone Select a large or concentrated area of fluorescent lighting. Fluorescent-corrects the...
...lighting conditions throughout the image to give an optimum picture exposure. Daylight-for pictures in the shade in PASM mode. 28 www.kodak.com/go/support Tungsten-corrects the orange cast of a scene. Center-weight-evaluates the lighting conditions of a specific area in ...Available only in natural lighting. Ideal for backlit subjects. This setting remains until you turn the Mode dial or turn off the camera. Ideal when you turn the Mode dial or turn off the camera. Focus Zone Select a large or concentrated area of fluorescent lighting. Fluorescent-corrects the...
User Manual
Page 35
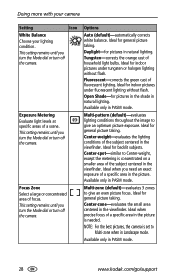
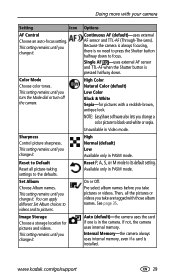
...change it . This setting remains until you turn the Mode dial or turn off the camera. Available only in PASM mode. On or Off. Internal Memory-the camera always uses internal memory, even if a ... default setting. Set Album Choose Album names. Auto (default)-the camera uses the card if one is installed. www.kodak.com/go/support 29 Sharpness Control picture sharpness. Pre-select album ...a storage location for pictures with your camera Setting Icon AF Control Choose an auto-focus setting. NOTE: EasyShare software also lets you take pictures or videos.
...change it . This setting remains until you turn the Mode dial or turn off the camera. Available only in PASM mode. On or Off. Internal Memory-the camera always uses internal memory, even if a ... default setting. Set Album Choose Album names. Auto (default)-the camera uses the card if one is installed. www.kodak.com/go/support 29 Sharpness Control picture sharpness. Pre-select album ...a storage location for pictures with your camera Setting Icon AF Control Choose an auto-focus setting. NOTE: EasyShare software also lets you take pictures or videos.
User Manual
Page 36
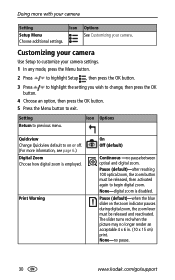
...to exit. Doing more information, see page 6.) Digital Zoom Choose how digital zoom is disabled. Customizing your camera Use Setup to begin digital zoom. None-digital zoom is employed. The slider turns red when the picture may no pause. 30 www.kodak.com/go/support Pause (default)-when the blue ...slider on or off. (For more with your camera settings. 1 In any ...
...to exit. Doing more information, see page 6.) Digital Zoom Choose how digital zoom is disabled. Customizing your camera Use Setup to begin digital zoom. None-digital zoom is employed. The slider turns red when the picture may no pause. 30 www.kodak.com/go/support Pause (default)-when the blue ...slider on or off. (For more with your camera settings. 1 In any ...

User Manual
Page 37
...minutes 1 minutes On (default) Off See page 3. PAL-used in Europe and China. www.kodak.com/go/support 31 Video Out Choose the regional setting that they are displayed with your camera Setting Icon Sound Themes Sound Volume Auto Power Off Choose amount of video playback. Video Date ...Display Display Date/Time at the start of inactivity time until camera turns off .) On (default)- most common format. On (default) Off Choose a date option, or turn off the feature. (Default is off . Orientation Sensor Orient pictures so that lets you ...
...minutes 1 minutes On (default) Off See page 3. PAL-used in Europe and China. www.kodak.com/go/support 31 Video Out Choose the regional setting that they are displayed with your camera Setting Icon Sound Themes Sound Volume Auto Power Off Choose amount of video playback. Video Date ...Display Display Date/Time at the start of inactivity time until camera turns off .) On (default)- most common format. On (default) Off Choose a date option, or turn off the feature. (Default is off . Orientation Sensor Orient pictures so that lets you ...

User Manual
Page 39
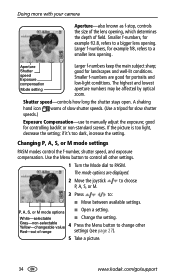
...exposure compensation to make pictures lighter or darker. 1 In any capture mode, move the joystick . The setting remains until you change modes or turn off the camera. Use Reset to Default (see page 11. To apply protection to a picture or video, see page 29) to reset P, A, S, or... for P, A, S, and M modes-even when you change the Color Mode to the Review menu. Protection settings are copied, not moved. www.kodak.com/go/support 33 To make pictures lighter, move the joystick . NOTE: The settings, including Flash, are maintained for print, email, and favorites...
...exposure compensation to make pictures lighter or darker. 1 In any capture mode, move the joystick . The setting remains until you change modes or turn off the camera. Use Reset to Default (see page 11. To apply protection to a picture or video, see page 29) to reset P, A, S, or... for P, A, S, and M modes-even when you change the Color Mode to the Review menu. Protection settings are copied, not moved. www.kodak.com/go/support 33 To make pictures lighter, move the joystick . NOTE: The settings, including Flash, are maintained for print, email, and favorites...
User Manual
Page 40
... A shaking hand icon warns of range settings (see page 27). 5 Take a picture. 34 www.kodak.com/go/support if it's too dark, increase the setting. P, A, S, or M mode options ... setting. Grey-non-selectable Yellow-changeable value 4 Press the Menu button to change other settings. 1 Turn the Mode dial to a bigger lens opening , which determines the depth of field. good for landscapes...Move between available settings. White-selectable ■ Change the setting. Doing more with your camera Aperture-also known as f-stop, controls the size of the lens opening . Smaller f-...
... A shaking hand icon warns of range settings (see page 27). 5 Take a picture. 34 www.kodak.com/go/support if it's too dark, increase the setting. P, A, S, or M mode options ... setting. Grey-non-selectable Yellow-changeable value 4 Press the Menu button to change other settings. 1 Turn the Mode dial to a bigger lens opening , which determines the depth of field. good for landscapes...Move between available settings. White-selectable ■ Change the setting. Doing more with your camera Aperture-also known as f-stop, controls the size of the lens opening . Smaller f-...
User Manual
Page 41
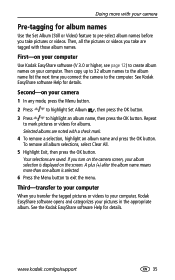
... copy up to 32 album names to the album name list the next time you connect the camera to your computer, Kodak EasyShare software opens and categorizes your pictures in the appropriate album. Third-transfer to your camera 1 In any mode, press the Menu button. 2 Press to highlight Set Album , then ... select Clear All. 5 Highlight Exit, then press the OK button. First-on your camera Pre-tagging for album names Use the Set Album (Still or Video) feature to pre-select album names before you turn on your album selection is selected. 6 Press the Menu button to highlight an album ...
... copy up to 32 album names to the album name list the next time you connect the camera to your computer, Kodak EasyShare software opens and categorizes your pictures in the appropriate album. Third-transfer to your camera 1 In any mode, press the Menu button. 2 Press to highlight Set Album , then ... select Clear All. 5 Highlight Exit, then press the OK button. First-on your camera Pre-tagging for album names Use the Set Album (Still or Video) feature to pre-select album names before you turn on your album selection is selected. 6 Press the Menu button to highlight an album ...


