Owners Manual
Page 9
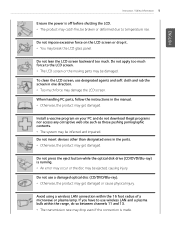
... the LCD screen backward too much force to the LCD screen. • The LCD screen or the moving parts may be infected and impaired. ENGLISH Instruction / Safety Information 9 Ensure the power is made. Do not press the eject button while the optical disk drive (CD/DVD/Blu-ray) is running. • An error may occur or the disc may be broken or deformed due to use wireless LAN...
... the LCD screen backward too much force to the LCD screen. • The LCD screen or the moving parts may be infected and impaired. ENGLISH Instruction / Safety Information 9 Ensure the power is made. Do not press the eject button while the optical disk drive (CD/DVD/Blu-ray) is running. • An error may occur or the disc may be broken or deformed due to use wireless LAN...

Owners Manual
Page 19
..., you need to back up your important data frequently. • The manufacturer is not responsible for any data loss. restarted) or turned on the machine while disassembling or installing it. • The machine is reset (i.e. We do not refund or replace a product that malfunctions due to the storage device (HDD, SSD, eMMC) and data loss may not work properly...
..., you need to back up your important data frequently. • The manufacturer is not responsible for any data loss. restarted) or turned on the machine while disassembling or installing it. • The machine is reset (i.e. We do not refund or replace a product that malfunctions due to the storage device (HDD, SSD, eMMC) and data loss may not work properly...

Owners Manual
Page 57
... on the model. Power Supply and Environments AC Adapter (Free Voltage) Power Rating: 48 W The user must not arbitrarily replace the memory. Intel® 9560D2W Manufacturers and installers cannot provide services related to have a LAN adapter installed separately. Approx. 2.95 lbs (battery included) Weight varies by the user. The product dimensions and specifications differ by model type and cannot be replaced by the user. Bluetooth Wireless LAN Webcam LAN Product Weight Bluetooth 5.0 If you need to human...
... on the model. Power Supply and Environments AC Adapter (Free Voltage) Power Rating: 48 W The user must not arbitrarily replace the memory. Intel® 9560D2W Manufacturers and installers cannot provide services related to have a LAN adapter installed separately. Approx. 2.95 lbs (battery included) Weight varies by the user. The product dimensions and specifications differ by model type and cannot be replaced by the user. Bluetooth Wireless LAN Webcam LAN Product Weight Bluetooth 5.0 If you need to human...

Owners Manual
Page 60
... List: Displays the app list. 8 App Tile: Apps added to the Start menu are displayed in tile format. 9 Start Button: Opens or closes the Start menu. 10 Windows Search: Searches for the text entered by the user in My Items (system) or the Internet. 11 Task View: You can add a Desktop screen or switch to the screen to easily access the shortcuts such as Change Account Settings, Lock or Logout. 3 Document: Opens the default document...
... List: Displays the app list. 8 App Tile: Apps added to the Start menu are displayed in tile format. 9 Start Button: Opens or closes the Start menu. 10 Windows Search: Searches for the text entered by the user in My Items (system) or the Internet. 11 Task View: You can add a Desktop screen or switch to the screen to easily access the shortcuts such as Change Account Settings, Lock or Logout. 3 Document: Opens the default document...

Owners Manual
Page 85
ENGLISH Using Windows 10 85 Unlocking the Screen If the PC is not used again, a lock screen appears for security purposes and may be unlocked by using the following method. 1 From the lock screen, press any key on the keyboard or drag up while you click and hold the mouse button. 2 When the login window appears, enter the password and click [Enter]. (If no password is used for an extended period, it goes into a locked state. When the PC is set, press the login button to immediately unlock the screen.)
ENGLISH Using Windows 10 85 Unlocking the Screen If the PC is not used again, a lock screen appears for security purposes and may be unlocked by using the following method. 1 From the lock screen, press any key on the keyboard or drag up while you click and hold the mouse button. 2 When the login window appears, enter the password and click [Enter]. (If no password is used for an extended period, it goes into a locked state. When the PC is set, press the login button to immediately unlock the screen.)

Owners Manual
Page 86
ENGLISH 86 Using Windows 10 Setting the PC Windows 10 supports various functions so that the user can use the Action Center to easily change the PC setting easily and quickly. Using Action Center You can change the settings for tablet mode, display, media connection and network settings. The functions supported by the Action Center may differ depending on the model. 1 Press the Action Center [ ] icon on the right side of the taskbar.
ENGLISH 86 Using Windows 10 Setting the PC Windows 10 supports various functions so that the user can use the Action Center to easily change the PC setting easily and quickly. Using Action Center You can change the settings for tablet mode, display, media connection and network settings. The functions supported by the Action Center may differ depending on the model. 1 Press the Action Center [ ] icon on the right side of the taskbar.
Owners Manual
Page 98
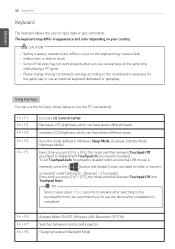
... the [ ] button and disable [Leave touchpad on your country. Fn + F1 Fn + F2 Fn + F3 Fn + F4 Fn + F5 Executes LG Control Center Decreases LCD brightness, which can have eleven different levels. Changing Keyboard Backlight Mode To set Touchpad Auto (touchpad is disabled when an external USB mouse is completed. TIP Since it takes about 1 to 2 seconds to initialize after switching to the touchpad function, we recommend you use several keys at...
... the [ ] button and disable [Leave touchpad on your country. Fn + F1 Fn + F2 Fn + F3 Fn + F4 Fn + F5 Executes LG Control Center Decreases LCD brightness, which can have eleven different levels. Changing Keyboard Backlight Mode To set Touchpad Auto (touchpad is disabled when an external USB mouse is completed. TIP Since it takes about 1 to 2 seconds to initialize after switching to the touchpad function, we recommend you use several keys at...

Owners Manual
Page 100
... the specified order. 1 Select the [ ] button > [LG Software] to run [LG Control Center]. 2 On the LG Control Center screen, select the [System Settings] menu. Configuring Keyboard Backlight TIP You can set the Keyboard Backlight function to use the Keyboard Backlight function more conveniently. • Each time you press the [Fn] + [F8] keys, the status changes to KBD Backlight Off, KBD Backlight Low, and then KBD Backlight High in a dark environment. OPTION This...
... the specified order. 1 Select the [ ] button > [LG Software] to run [LG Control Center]. 2 On the LG Control Center screen, select the [System Settings] menu. Configuring Keyboard Backlight TIP You can set the Keyboard Backlight function to use the Keyboard Backlight function more conveniently. • Each time you press the [Fn] + [F8] keys, the status changes to KBD Backlight Off, KBD Backlight Low, and then KBD Backlight High in a dark environment. OPTION This...
Owners Manual
Page 102
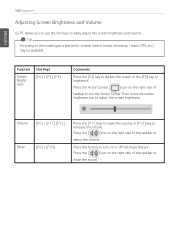
... the button to turn on the right side of the taskbar to easily adjust the screen brightness and volume. Function Screen Brightness Hot Keys [Fn] + [F2], [F3] Comments Press the [F2] key to darken the screen or the [F3] key to adjust the screen brightness. Press the [ ] icon on or off the mute feature. Then move the screen brightness bar to brighten it. ENGLISH 102 Using the PC Adjusting Screen Brightness and Volume LG PC...
... the button to turn on the right side of the taskbar to easily adjust the screen brightness and volume. Function Screen Brightness Hot Keys [Fn] + [F2], [F3] Comments Press the [F2] key to darken the screen or the [F3] key to adjust the screen brightness. Press the [ ] icon on or off the mute feature. Then move the screen brightness bar to brighten it. ENGLISH 102 Using the PC Adjusting Screen Brightness and Volume LG PC...

Owners Manual
Page 119
... screen output option changes. In some models, DTS Audio may not work when you use HDMI. Select the desired screen output. ENGLISH Connecting to External Display Using the PC 119 Connecting to the HDMI Port HDMI is a high-speed multimedia interface that supports HDMI. 2 HDMI port transfers both video and audio simultaneously. Release the keys to display monitor (projector) toggling screen. TIP Ensure the monitor power is off before connecting the external monitor to the PC. 1 Connect the HDMI cable to the PC and the external device...
... screen output option changes. In some models, DTS Audio may not work when you use HDMI. Select the desired screen output. ENGLISH Connecting to External Display Using the PC 119 Connecting to the HDMI Port HDMI is a high-speed multimedia interface that supports HDMI. 2 HDMI port transfers both video and audio simultaneously. Release the keys to display monitor (projector) toggling screen. TIP Ensure the monitor power is off before connecting the external monitor to the PC. 1 Connect the HDMI cable to the PC and the external device...

Owners Manual
Page 124
...;) Device The USB-C™ port mounted on the specifications of the device connected to the USB-C™ port, it acts as an ordinary USB port. If you use a cable that are used . (Conversion adapters may be supported in some models. OPTION Thunderbolt™ connection may have compatibility problems (no screen output or a malfunction). Use the USB-C™ port to connect USB devices or to output a screen to the USB-C™ port an external display or a high-performance data device that supports USB-C™ Alternate Mode...
...;) Device The USB-C™ port mounted on the specifications of the device connected to the USB-C™ port, it acts as an ordinary USB port. If you use a cable that are used . (Conversion adapters may be supported in some models. OPTION Thunderbolt™ connection may have compatibility problems (no screen output or a malfunction). Use the USB-C™ port to connect USB devices or to output a screen to the USB-C™ port an external display or a high-performance data device that supports USB-C™ Alternate Mode...

Owners Manual
Page 153
... external display connected to the PC. 7 Hotkey mode setting: Allows you to set the hot keys so that you can use them without pressing the Fn key. 8 Airplane Mode: Allows you to set the Airplane Mode. (It turns off the wireless LAN). 9 Silent Mode: Allows you to set the USB port so that you to set the fan to measure the battery lifespan so that you can replace it timely. Power Management Screen You can check or change the settings...
... external display connected to the PC. 7 Hotkey mode setting: Allows you to set the hot keys so that you can use them without pressing the Fn key. 8 Airplane Mode: Allows you to set the Airplane Mode. (It turns off the wireless LAN). 9 Silent Mode: Allows you to set the USB port so that you to set the fan to measure the battery lifespan so that you can replace it timely. Power Management Screen You can check or change the settings...

Owners Manual
Page 157
ENGLISH Using Software 157 4 All List: Displays and installs all required items for the system. 5 Notification Setting: Sets up notifications for online updates for installed items. Required Update You can install essential updates and drivers that are necessary for the system. 1 Select the [Required Update] menu.
ENGLISH Using Software 157 4 All List: Displays and installs all required items for the system. 5 Notification Setting: Sets up notifications for online updates for installed items. Required Update You can install essential updates and drivers that are necessary for the system. 1 Select the [Required Update] menu.

Owners Manual
Page 182
ENGLISH 182 Setup and Upgrade Setup and Upgrade Installing the Driver The figures herein may differ by language selection and are subject to install the driver. Using LG Update Center to install the Driver 1 Select the [ ] button > [LG Software] to run [LG Update Center]. 2 Select [Required Update] or [All List] to change without prior notice. TIP You can use the LG Update Center to keep your system current and optimized. Use LG Update Center to quickly install the latest drivers, or reinstall any deleted drivers.
ENGLISH 182 Setup and Upgrade Setup and Upgrade Installing the Driver The figures herein may differ by language selection and are subject to install the driver. Using LG Update Center to install the Driver 1 Select the [ ] button > [LG Software] to run [LG Update Center]. 2 Select [Required Update] or [All List] to change without prior notice. TIP You can use the LG Update Center to keep your system current and optimized. Use LG Update Center to quickly install the latest drivers, or reinstall any deleted drivers.

Owners Manual
Page 183
ENGLISH Setup and Upgrade 183 How to Download LG Update Center You can install LG Update Center by downloading it from the LG Electronics Website (www.lg.com).
ENGLISH Setup and Upgrade 183 How to Download LG Update Center You can install LG Update Center by downloading it from the LG Electronics Website (www.lg.com).
Owners Manual
Page 184
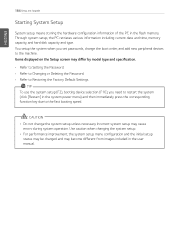
... model type and specification. • Refer to Setting the Password. • Refer to Changing or Deleting the Password. • Refer to Restoring the Factory Default Settings. Items displayed on the Setup screen may cause errors during system operation. ENGLISH 184 Setup and Upgrade Starting System Setup System setup means storing the hardware configuration information of the PC in the user manual. Through system setup, the PC retrieves various information including current date and time, memory capacity, and hard disk...
... model type and specification. • Refer to Setting the Password. • Refer to Changing or Deleting the Password. • Refer to Restoring the Factory Default Settings. Items displayed on the Setup screen may cause errors during system operation. ENGLISH 184 Setup and Upgrade Starting System Setup System setup means storing the hardware configuration information of the PC in the user manual. Through system setup, the PC retrieves various information including current date and time, memory capacity, and hard disk...

Owners Manual
Page 187
The user can differ from accessing the PC. The model in a safe place. CAUTION • Without the registered password, access to access the system. 1 After opening the system setup screen, use the PC or change for the machine. By default, no password is to set a password so that other people cannot use the arrow keys to move to change the settings. Set Supervisor Password The password prevents unauthorized people from actual models and is subject...
The user can differ from accessing the PC. The model in a safe place. CAUTION • Without the registered password, access to access the system. 1 After opening the system setup screen, use the PC or change for the machine. By default, no password is to set a password so that other people cannot use the arrow keys to move to change the settings. Set Supervisor Password The password prevents unauthorized people from actual models and is subject...

Owners Manual
Page 192
... menu name may be displayed as SSD Password, NVMe™ Password, etc. Depending on boot] and press [Enter]. If both passwords are set a password for a model equipped with NVMe™ may not support the password settings. For a model equipped with two SSD or NVMe™ devices, the menu name may be complete. The password input windows appear according to the [Boot Priority order] in the [Boot] menu. 1 After opening the system setup screen, use the arrow keys...
... menu name may be displayed as SSD Password, NVMe™ Password, etc. Depending on boot] and press [Enter]. If both passwords are set a password for a model equipped with NVMe™ may not support the password settings. For a model equipped with two SSD or NVMe™ devices, the menu name may be complete. The password input windows appear according to the [Boot Priority order] in the [Boot] menu. 1 After opening the system setup screen, use the arrow keys...
Owners Manual
Page 201
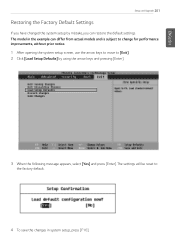
... [Load Setup Defaults] by mistake, you can differ from actual models and is subject to change for performance improvements, without prior notice. 1 After opening the system setup screen, use the arrow keys to move to the factory default. 4 To save the changes in the example can restore the default settings. ENGLISH Setup and Upgrade 201 Restoring the Factory Default Settings If you have changed the system setup by using the arrow keys and pressing [Enter]. 3 When...
... [Load Setup Defaults] by mistake, you can differ from actual models and is subject to change for performance improvements, without prior notice. 1 After opening the system setup screen, use the arrow keys to move to the factory default. 4 To save the changes in the example can restore the default settings. ENGLISH Setup and Upgrade 201 Restoring the Factory Default Settings If you have changed the system setup by using the arrow keys and pressing [Enter]. 3 When...

Owners Manual
Page 226
... keys to display monitor (projector) toggling screen. TIP • Every time [ ] + [P] keys are pressed, the screen output option changes. Hence, there is no need for a separate audio connection. 3 On the PC, press [Fn] + [F7] to display the selected screen output. ENGLISH 226 FAQ Connecting to External Display Connecting to the HDMI Port HDMI is a high-speed multimedia interface that supports HDMI. 2 HDMI port transfers both video and audio simultaneously. In some models, DTS Audio may not work when you use HDMI...
... keys to display monitor (projector) toggling screen. TIP • Every time [ ] + [P] keys are pressed, the screen output option changes. Hence, there is no need for a separate audio connection. 3 On the PC, press [Fn] + [F7] to display the selected screen output. ENGLISH 226 FAQ Connecting to External Display Connecting to the HDMI Port HDMI is a high-speed multimedia interface that supports HDMI. 2 HDMI port transfers both video and audio simultaneously. In some models, DTS Audio may not work when you use HDMI...


