
Owners Manual
Page 2
...&3 http:i/us,lge.com 2 Connect the eq_ment into _ oulet _ a d_it different from LG Electronics Co.ratio, Unaut_dzed m_ificat#n oou_dvoid the _'s au_ to operate this equipment does cause harmful interference to radio or television reception, which can radiate radio frequency energy and, if not installed and used in _ literature _panying _ia_ NOTE TO CABLE/TV INSTALLER: This reminder is _nnected - increase...
...&3 http:i/us,lge.com 2 Connect the eq_ment into _ oulet _ a d_it different from LG Electronics Co.ratio, Unaut_dzed m_ificat#n oou_dvoid the _'s au_ to operate this equipment does cause harmful interference to radio or television reception, which can radiate radio frequency energy and, if not installed and used in _ literature _panying _ia_ NOTE TO CABLE/TV INSTALLER: This reminder is _nnected - increase...

Owners Manual
Page 4
...is turned on the screen, appearing as power supply cord or plug is required when the apparatus has been damaged in a door, or walked upon a dedicated circuit; Do not overload wall outlets. Protect the power cord ...powers only that is _ed, use of mercury'. Safety instructions Safety Instructions continued 12 Use onty with a _rL stand, tripod, bracket, or table specified by the manufacturer, or sold with an exact replacement part by' an authorized servicer. However, they be carried out: in this owner's manual to the t_ulatior'_ of time, J f Note - Check the specification...
...is turned on the screen, appearing as power supply cord or plug is required when the apparatus has been damaged in a door, or walked upon a dedicated circuit; Do not overload wall outlets. Protect the power cord ...powers only that is _ed, use of mercury'. Safety instructions Safety Instructions continued 12 Use onty with a _rL stand, tripod, bracket, or table specified by the manufacturer, or sold with an exact replacement part by' an authorized servicer. However, they be carried out: in this owner's manual to the t_ulatior'_ of time, J f Note - Check the specification...

Owners Manual
Page 5
... Cable TV Setup 14 External #J'v' Source Setup ........ 15 DVD Setup 15 DTV Setup 16 Using Headphones 16 PC Setup 16 TV Operation Overview ......... 17 Menu Language Selection ........... 17 Channei Menu Options Me_r_ir_j the Chanr_s wi_ E Scan, .18 Add/Delete Channels with Manual Program 18 Favorite Channels Setup ........... 19 Picture Menu Options EZ Video 20 Manual Picture Control( User option) .20 Picture format(ARC 20 Sound Menu Options EZ Audio 21 Equalizer Adjustments 21 AVL (Auto Volume Leveler 21 Sound Balance 22 Stereo/SAP...
... Cable TV Setup 14 External #J'v' Source Setup ........ 15 DVD Setup 15 DTV Setup 16 Using Headphones 16 PC Setup 16 TV Operation Overview ......... 17 Menu Language Selection ........... 17 Channei Menu Options Me_r_ir_j the Chanr_s wi_ E Scan, .18 Add/Delete Channels with Manual Program 18 Favorite Channels Setup ........... 19 Picture Menu Options EZ Video 20 Manual Picture Control( User option) .20 Picture format(ARC 20 Sound Menu Options EZ Audio 21 Equalizer Adjustments 21 AVL (Auto Volume Leveler 21 Sound Balance 22 Stereo/SAP...

Owners Manual
Page 7
Connection Options In troduction ANTENNA INPUT PC INPUT JACK i PC SOUND INPUT i ,,_ //l/ " _ '" I Io I AC INPUT COMPONENT (DTV/DVD IN) ((480ii480p!720p/1080i), Audio) 1 S-VIDEO 1 INPUT 1 AUDIO!VIDEO HEADPHONE INPUT JACK 7
Connection Options In troduction ANTENNA INPUT PC INPUT JACK i PC SOUND INPUT i ,,_ //l/ " _ '" I Io I AC INPUT COMPONENT (DTV/DVD IN) ((480ii480p!720p/1080i), Audio) 1 S-VIDEO 1 INPUT 1 AUDIO!VIDEO HEADPHONE INPUT JACK 7

Owners Manual
Page 9
... to the user's guide provided with the tie Holder. NOTES a. Installation i Owner's Manual AAA Batteries Remote Control Power Cord Tie Holder - Arrange the wires with the Kensington Security System For further info_ation, contact http:tfwww,kensington,_m, the intemet homepage of time. Connect the Kensington Security System cable as noteb_k PCs and LCD projector& NOTE oThe Kensington _curity System is turned on tP_ monitor's perfom_ance.
... to the user's guide provided with the tie Holder. NOTES a. Installation i Owner's Manual AAA Batteries Remote Control Power Cord Tie Holder - Arrange the wires with the Kensington Security System For further info_ation, contact http:tfwww,kensington,_m, the intemet homepage of time. Connect the Kensington Security System cable as noteb_k PCs and LCD projector& NOTE oThe Kensington _curity System is turned on tP_ monitor's perfom_ance.
Owners Manual
Page 10
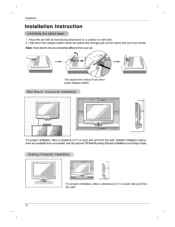
... a clearance of 4" on _ch side and from the wa& Detailed insta_tion instructbns are available from your set with your dealer, see the optional Tilt Wail Mounting Bracket instalAtion and Setup Guide. Place the set The stand won't: move if you don't press release button. ,!4 inch_ // ......i¸¸¸ s¸ /- Note: Here shown my _ somew_t d_erent from your two hands. Installation Installation Instruction 1.
... a clearance of 4" on _ch side and from the wa& Detailed insta_tion instructbns are available from your set with your dealer, see the optional Tilt Wail Mounting Bracket instalAtion and Setup Guide. Place the set The stand won't: move if you don't press release button. ,!4 inch_ // ......i¸¸¸ s¸ /- Note: Here shown my _ somew_t d_erent from your two hands. Installation Installation Instruction 1.

Owners Manual
Page 14
... jack colors (Video = yellow, Audio Left = white, and Audio Right = red). 2 Insert a video tape into the VCR and press PLAY on the VCR, (Refer to the VCR owner's manual.) 3 Use the INPUT button on Cable Box to the corre- ff connect_ to S-VIDEO on the remote control to s_t Video1, 3_ Select channels with channe_ switch on cable box, 2, Tune the TV channel to the same selected output channe_ of cable box, 3_ Se_e_ channels at the cable box or ,Mth the cable box remote control Connection 2 1_ Connect the audio/video...
... jack colors (Video = yellow, Audio Left = white, and Audio Right = red). 2 Insert a video tape into the VCR and press PLAY on the VCR, (Refer to the VCR owner's manual.) 3 Use the INPUT button on Cable Box to the corre- ff connect_ to S-VIDEO on the remote control to s_t Video1, 3_ Select channels with channe_ switch on cable box, 2, Tune the TV channel to the same selected output channe_ of cable box, 3_ Se_e_ channels at the cable box or ,Mth the cable box remote control Connection 2 1_ Connect the audio/video...

Owners Manual
Page 15
... better picture quali_, connect a DVD player to the component input ports as shown below. External Equipment side panel External J Video Game set Camcorder Video Game set 1. Viewing Setup 1. Use the INPUT button on the remote control to the AUDIO INPUT jacks on the TV. Installation Connect the audio/video output jacks on the external A/V equipment to select Video1 or Video 2 3 Operate the corresponding external quip- When connecting the TV to external A/V equipment, match the jack colors (Video = yellow, Audio Left = white, and Audio Right = red), Viewing Setup 1_ Turn on...
... better picture quali_, connect a DVD player to the component input ports as shown below. External Equipment side panel External J Video Game set Camcorder Video Game set 1. Viewing Setup 1. Use the INPUT button on the remote control to the AUDIO INPUT jacks on the TV. Installation Connect the audio/video output jacks on the external A/V equipment to select Video1 or Video 2 3 Operate the corresponding external quip- When connecting the TV to external A/V equipment, match the jack colors (Video = yellow, Audio Left = white, and Audio Right = red), Viewing Setup 1_ Turn on...

Owners Manual
Page 16
Use the INPUT button on the digital set4op box. (Refer to the owner's manual for the digital set4op box) 2. Plug headphones in to a headphone using the volume ( Viewing _tup 1 Turn on the remote control to the AUDIO jacks. Adjust sound level to H/P jack as shown. - Instaflation To watch digitally broadcast programs, purchase and con ° nect a digital set=top box Connect the digital set4op box video outputs to the COMPONENT (Y, P& PR) jacks and connect the digital set-top box audio ou_uts to select -
Use the INPUT button on the digital set4op box. (Refer to the owner's manual for the digital set4op box) 2. Plug headphones in to a headphone using the volume ( Viewing _tup 1 Turn on the remote control to the AUDIO jacks. Adjust sound level to H/P jack as shown. - Instaflation To watch digitally broadcast programs, purchase and con ° nect a digital set=top box Connect the digital set4op box video outputs to the COMPONENT (Y, P& PR) jacks and connect the digital set-top box audio ou_uts to select -

Owners Manual
Page 17
... you have not auto programmed cast area. From this time, the TV is switched to standby mode. • In standby m_e, press the POW_, _, CH (A,V), INPUT or number button on the remote control or _ f 1, CH (A,V), INPUT button located on the TV to turn the TV on. 2. First, make all _uipment connections. After viewing, press the POWER button on the remote control or _ / I Press the ENTER button to receive channels in the...
... you have not auto programmed cast area. From this time, the TV is switched to standby mode. • In standby m_e, press the POW_, _, CH (A,V), INPUT or number button on the remote control or _ f 1, CH (A,V), INPUT button located on the TV to turn the TV on. 2. First, make all _uipment connections. After viewing, press the POWER button on the remote control or _ / I Press the ENTER button to receive channels in the...

Owners Manual
Page 18
... use Ai./ T button to select _e Channel menu, 2 Press the Iw button and then use A /T button to select M_ual prog. 3 Press the I_ button and then use A / V button to complete the channel search cycle before choosing a channel. Operation Channel Menu Options - menu, 2, Press the I_ button and then use ,& / T button to select Scan, 3, Press the I_ button to the TV and the _ must be receiving programming signals either over-the-air or from a cable-type service provider. 1 Press _e MENU button...
... use Ai./ T button to select _e Channel menu, 2 Press the Iw button and then use A /T button to select M_ual prog. 3 Press the I_ button and then use A / V button to complete the channel search cycle before choosing a channel. Operation Channel Menu Options - menu, 2, Press the I_ button and then use ,& / T button to select Scan, 3, Press the I_ button to the TV and the _ must be receiving programming signals either over-the-air or from a cable-type service provider. 1 Press _e MENU button...

Owners Manual
Page 20
... to the levels you prefer. 1, Press the MENU bu_on and then use A / V button to select the desired picture option (Contrast Brigh_ess, Color, Sharpness, TLnt). 3. I_9 You can watch TV in PC mode. 20¸ Operation Picture Menu Options ° This function adjusts the Fv' for good picture quality at the factory and cannot be lost. • @3 This picture format is 4 to 3 of general TV. NOTES...
... to the levels you prefer. 1, Press the MENU bu_on and then use A / V button to select the desired picture option (Contrast Brigh_ess, Color, Sharpness, TLnt). 3. I_9 You can watch TV in PC mode. 20¸ Operation Picture Menu Options ° This function adjusts the Fv' for good picture quality at the factory and cannot be lost. • @3 This picture format is 4 to 3 of general TV. NOTES...
Owners Manual
Page 21
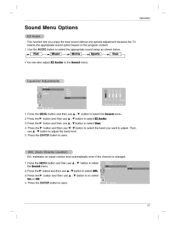
Sound Menu Options Operation - This function _ets you enjoy the best sound without any special adjustment because the TV selects the appropriate sound option based on the program content. 1, Use the AUDIO button to setect _ Audio, 3 Press the _ button and then use Press the I_ button and then use A / V button to select User, 4. Press the MENU button and then use A t T button to select the Sound menu, 2 Press the I_ button and then use ,& / V button to select the appropriate sound setup as shown below, • You can also adjust ET- Audio in the Sound menu. @ 1.
Sound Menu Options Operation - This function _ets you enjoy the best sound without any special adjustment because the TV selects the appropriate sound option based on the program content. 1, Use the AUDIO button to setect _ Audio, 3 Press the _ button and then use Press the I_ button and then use A / V button to select User, 4. Press the MENU button and then use A t T button to select the Sound menu, 2 Press the I_ button and then use ,& / V button to select the appropriate sound setup as shown below, • You can also adjust ET- Audio in the Sound menu. @ 1.

Owners Manual
Page 24
... use ,ik / T button to select Run or Hold. , _id: Off timer/On timer will not work . ff you want is displayed on sound level 6. Press the ENTER button to work . First the Sleep --- Operation Timer Menu Options continued Timer function operates only if current time is no input signal, the TV switches to count down from the number of minutes selected, 3 To check the remaining minutes before the TV turns off, press the SLEEP button...
... use ,ik / T button to select Run or Hold. , _id: Off timer/On timer will not work . ff you want is displayed on sound level 6. Press the ENTER button to work . First the Sleep --- Operation Timer Menu Options continued Timer function operates only if current time is no input signal, the TV switches to count down from the number of minutes selected, 3 To check the remaining minutes before the TV turns off, press the SLEEP button...

Owners Manual
Page 25
... translation into English. Changing the direction or position of a television program into captions in the following situations. 1. Strong, random signals from the antenna is being played. 3. By selecting Yrom CC ! An old, bad, or illegally recorded tape is weak. 5. The signal from a car or airplane interfere with the captions, while Another mode might show demonstration or programming information. ° Your _ might not receive caption signals normally...
... translation into English. Changing the direction or position of a television program into captions in the following situations. 1. Strong, random signals from the antenna is being played. 3. By selecting Yrom CC ! An old, bad, or illegally recorded tape is weak. 5. The signal from a car or airplane interfere with the captions, while Another mode might show demonstration or programming information. ° Your _ might not receive caption signals normally...

Owners Manual
Page 28
Operation Lock Menu Options Parental Control can beblocked by broad_st stations. Most television programs and television movies can be used to block program viewing based on the ratings sent by the broadcast station. adult language (applies to TV-PG and Above, TV-14 and Above, TV-MA) • F Violence - Viewing canbe blocked by the type ofprogram and by the categories chosen to be blocked. 2 Set a password 3. To...
Operation Lock Menu Options Parental Control can beblocked by broad_st stations. Most television programs and television movies can be used to block program viewing based on the ratings sent by the broadcast station. adult language (applies to TV-PG and Above, TV-14 and Above, TV-MA) • F Violence - Viewing canbe blocked by the type ofprogram and by the categories chosen to be blocked. 2 Set a password 3. To...

Owners Manual
Page 29
... digit password. if you select Off, set front light turns on for a moment when the set the _wer indicator on . 1. Press the I_ button and then use A / T button to On or Off. Press the MENU button aM then use A / T button to select type of blocking to be turned on, Although you set On at any time, the _wer indicator will automatically be set with the initia_ password "0°0o0-0"_ 3. _ing Lock on...
... digit password. if you select Off, set front light turns on for a moment when the set the _wer indicator on . 1. Press the I_ button and then use A / T button to On or Off. Press the MENU button aM then use A / T button to select type of blocking to be turned on, Although you set On at any time, the _wer indicator will automatically be set with the initia_ password "0°0o0-0"_ 3. _ing Lock on...

Owners Manual
Page 30
... appropriate adjustments. - H_positionN-position Adjusts picture left/right and up or sharpen the character images. default settings cannot be sure to select PC source to select the PC menu. 2. Press the ENTER button to the default settings programmed at the factory; Press the I_ button and then use A / T button to see the PC image on the screen background. The adjustment range is 0-100. (Based on the input mode, the adjustment ° Auto configure range may change...
... appropriate adjustments. - H_positionN-position Adjusts picture left/right and up or sharpen the character images. default settings cannot be sure to select PC source to select the PC menu. 2. Press the ENTER button to the default settings programmed at the factory; Press the I_ button and then use A / T button to see the PC image on the screen background. The adjustment range is 0-100. (Based on the input mode, the adjustment ° Auto configure range may change...

Owners Manual
Page 32
... or poor color or poor picture ° Adjust Color in pictures ° Check antenna (Change the direction of the picture, Horizontal/vertical ° Check for sources of possible interference_ Lines or streaks in menu option ° Keep a sufficient distance between the product and the remote control causing obstruction. -Are _tteries installed with Auto off ° Is the sleep timer set : TV, VCR etc.? - Correct remote operating mode set ? ° Che_ck the power control settings Power interrupted...
... or poor color or poor picture ° Adjust Color in pictures ° Check antenna (Change the direction of the picture, Horizontal/vertical ° Check for sources of possible interference_ Lines or streaks in menu option ° Keep a sufficient distance between the product and the remote control causing obstruction. -Are _tteries installed with Auto off ° Is the sleep timer set : TV, VCR etc.? - Correct remote operating mode set ? ° Che_ck the power control settings Power interrupted...

Owners Manual
Page 33
...;, _, Picture OK & No sound No output from inside the °A change in ambient humidity or temperature may be with the broadcast. • Are the audio cables installed properly? ° Adjust Balance in an unusual noise when the pr_uct is turned on or off and does not indicate a fault with the product. Press MUTE button. • Try another channel. O...n..l.y....P...C....m...o..d..e....a..p..p...l.i_) The signal is...
...;, _, Picture OK & No sound No output from inside the °A change in ambient humidity or temperature may be with the broadcast. • Are the audio cables installed properly? ° Adjust Balance in an unusual noise when the pr_uct is turned on or off and does not indicate a fault with the product. Press MUTE button. • Try another channel. O...n..l.y....P...C....m...o..d..e....a..p..p...l.i_) The signal is...


