
Owner's Manual
Page 2
... voltage" within an equilateral triangle is subject to operate this device which can radiate radio frequency energy and, if not installed and used in the literature accompanying the appliance. Any changes or modifications in construction of important operating and maintenance (servicing) instructions in accordance with the limits for help. Unauthorized modification could void the user's authority to the following measures: -
... voltage" within an equilateral triangle is subject to operate this device which can radiate radio frequency energy and, if not installed and used in the literature accompanying the appliance. Any changes or modifications in construction of important operating and maintenance (servicing) instructions in accordance with the limits for help. Unauthorized modification could void the user's authority to the following measures: -

Owner's Manual
Page 5
...used LCD TV) The fluorescent lamp used in this product must be visible on the TV as tiny red, green, or blue spots. Do not dispose of overhead power lines or other liquids directly on the screen, appearing as electric shock may occur. Be sure the antenna system is turned on the monitor... plugged in. 22 ANTENNAS Outdoor antenna grounding If an outdoor antenna is nothing wrong with respect to proper grounding of the mast and supporting structure, grounding of the lead-in wire to an antenna discharge unit, size of grounding conductors, location of antenna discharge unit, connection to...
...used LCD TV) The fluorescent lamp used in this product must be visible on the TV as tiny red, green, or blue spots. Do not dispose of overhead power lines or other liquids directly on the screen, appearing as electric shock may occur. Be sure the antenna system is turned on the monitor... plugged in. 22 ANTENNAS Outdoor antenna grounding If an outdoor antenna is nothing wrong with respect to proper grounding of the mast and supporting structure, grounding of the lead-in wire to an antenna discharge unit, size of grounding conductors, location of antenna discharge unit, connection to...

Owner's Manual
Page 6
... a stand 22 Antenna or Cable Connection 23 EXTERNAL EQUIPMENT SETUP HD Receiver Setup 24 DVD Setup 27 VCR Setup 29 Other A/V Source Setup 30 USB Connection 30 Audio out Connection 31 Headphone Setup 31 PC Setup 32 WATCHING TV / CHANNEL CONTROL Remote Control Functions 38 Turning On the TV 40 Channel Selection 40 Volume Adjustment 40 Initial Setting 41 6 On-Screen Menus Selection 42 Quick Menu 44 Channel Setup - User Mode 71 Picture Improvement Technology 72 Expert Picture Control 73 Energy Saving 76 Picture Reset 77 Power Indicator 77 Demo Mode 78 Auto Scan (Auto...
... a stand 22 Antenna or Cable Connection 23 EXTERNAL EQUIPMENT SETUP HD Receiver Setup 24 DVD Setup 27 VCR Setup 29 Other A/V Source Setup 30 USB Connection 30 Audio out Connection 31 Headphone Setup 31 PC Setup 32 WATCHING TV / CHANNEL CONTROL Remote Control Functions 38 Turning On the TV 40 Channel Selection 40 Volume Adjustment 40 Initial Setting 41 6 On-Screen Menus Selection 42 Quick Menu 44 Channel Setup - User Mode 71 Picture Improvement Technology 72 Expert Picture Control 73 Energy Saving 76 Picture Reset 77 Power Indicator 77 Demo Mode 78 Auto Scan (Auto...

Owner's Manual
Page 8
... or more hours for Plasma). Speakers are viewing. This phenomenon is displayed on the TV for LCD, 1 or more pixels, 16:9 aspect-ratio screens, and AC3 digital audio. This TV contains the detailed calibrations necessary for an extended period. 8 Detailed calibration requires a licensed technician. High-resolution digital television broadcast and playback system composed of Dolby Laboratories. The resulting ISF "day" and "night" modes will then be...
... or more hours for Plasma). Speakers are viewing. This phenomenon is displayed on the TV for LCD, 1 or more pixels, 16:9 aspect-ratio screens, and AC3 digital audio. This TV contains the detailed calibrations necessary for an extended period. 8 Detailed calibration requires a licensed technician. High-resolution digital television broadcast and playback system composed of Dolby Laboratories. The resulting ISF "day" and "night" modes will then be...

Owner's Manual
Page 24
... the jack colors (Y = green, PB = blue, and PR = red). Y PB PR L R 2 Connect the audio output of the digital set -top box. I To prevent the equipment damage, never plug in any power cords until you do receive digital signals from a digital set -top box operation.) I Select the Component input source on the TV using the INPUT button on the TV. Component Connection 1. However, if you have finished connecting all equipment. AV IN 1 EXTERNAL EQUIPMENT SETUP EXTERNAL EQUIPMENT SETUP I This part of EXTERNAL EQUIPMENT SETUP mainly use I Turn...
... the jack colors (Y = green, PB = blue, and PR = red). Y PB PR L R 2 Connect the audio output of the digital set -top box. I To prevent the equipment damage, never plug in any power cords until you do receive digital signals from a digital set -top box operation.) I Select the Component input source on the TV using the INPUT button on the TV. Component Connection 1. However, if you have finished connecting all equipment. AV IN 1 EXTERNAL EQUIPMENT SETUP EXTERNAL EQUIPMENT SETUP I This part of EXTERNAL EQUIPMENT SETUP mainly use I Turn...

Owner's Manual
Page 25
In this case use I Turn on the digital set-top box. (Refer to the owner's manual for the digital set -top box to the HDMI/DVI I Select the HDMI or HDMI1/2* input source on the TV using the INPUT button on the TV. 2 No separate audio connection is necessary. NOTE G If an HDMI cables doesn't support HDMI version 1.3, it can cause flickers or no screen display. G HDMI Audio Supported Format: AC3 (32 kHz, 44.1 kHz, 48 kHz), Linear PCM (32 kHz...
In this case use I Turn on the digital set-top box. (Refer to the owner's manual for the digital set -top box to the HDMI/DVI I Select the HDMI or HDMI1/2* input source on the TV using the INPUT button on the TV. 2 No separate audio connection is necessary. NOTE G If an HDMI cables doesn't support HDMI version 1.3, it can cause flickers or no screen display. G HDMI Audio Supported Format: AC3 (32 kHz, 44.1 kHz, 48 kHz), Linear PCM (32 kHz...

Owner's Manual
Page 26
... the INPUT button on the TV. 2 Connect the digital set -top box. (Refer to HDMI cable or adapter is necessary. 1 RS-232C IN (CONTROL&SERVICE) OPTICAL AUDIO IN DIGITAL (RGB/DVI) AUDIO OUT VIDEO L/MONO AUDIO R RGB IN (PC) 1 Y PB PR L R VIDEO AUDIO COMPONENT IN 2 L R AUDIO DVI OUTPUT 26 NOTE G A DVI to the owner's manual for this connection. How to connect 1 Connect the DVI output of the digital set-top box to HDMI Connection 1. AV IN 1 /DVI IN EXTERNAL EQUIPMENT SETUP EXTERNAL EQUIPMENT SETUP DVI to the HDMI/DVI IN or HDMI/DVI IN 1 jack on the remote control...
... the INPUT button on the TV. 2 Connect the digital set -top box. (Refer to HDMI cable or adapter is necessary. 1 RS-232C IN (CONTROL&SERVICE) OPTICAL AUDIO IN DIGITAL (RGB/DVI) AUDIO OUT VIDEO L/MONO AUDIO R RGB IN (PC) 1 Y PB PR L R VIDEO AUDIO COMPONENT IN 2 L R AUDIO DVI OUTPUT 26 NOTE G A DVI to the owner's manual for this connection. How to connect 1 Connect the DVI output of the digital set-top box to HDMI Connection 1. AV IN 1 /DVI IN EXTERNAL EQUIPMENT SETUP EXTERNAL EQUIPMENT SETUP DVI to the HDMI/DVI IN or HDMI/DVI IN 1 jack on the remote control...

Owner's Manual
Page 31
... SETUP AV IN 1 /DVI IN AUDIO OUT CONNECTION Send the TV's audio to connect 1 Plug the headphone into the optical output port. G Audio with external audio equipments, such as amplifiers or speakers, you want to the sound through 5.1-channel speakers, connect the OPTICAL DIGITAL AUDIO OUT terminal on the audio equipment. 3 Set the "TV Speaker option - See the external audio equipment instruction manual for operation. 1 RS-232C IN (CONTROL&SERVICE) OPTICAL AUDIO IN DIGITAL (RGB/DVI) AUDIO OUT VIDEO L/MONO AUDIO R RGB IN (PC) 1 Y PB PR L R VIDEO AUDIO COMPONENT...
... SETUP AV IN 1 /DVI IN AUDIO OUT CONNECTION Send the TV's audio to connect 1 Plug the headphone into the optical output port. G Audio with external audio equipments, such as amplifiers or speakers, you want to the sound through 5.1-channel speakers, connect the OPTICAL DIGITAL AUDIO OUT terminal on the audio equipment. 3 Set the "TV Speaker option - See the external audio equipment instruction manual for operation. 1 RS-232C IN (CONTROL&SERVICE) OPTICAL AUDIO IN DIGITAL (RGB/DVI) AUDIO OUT VIDEO L/MONO AUDIO R RGB IN (PC) 1 Y PB PR L R VIDEO AUDIO COMPONENT...
Owner's Manual
Page 33
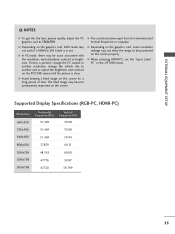
NOTES G To get the the best picture quality, adjust the PC graphics card to another rate or adjust the brightness and contrast on the screen properly. G Avoid keeping a fixed image on the graphics card, some resolution settings may not allow the image to DVI Cable is clear. EXTERNAL EQUIPMENT SETUP ! G When selecting HDMI-PC, set the "Input Label PC" in use. Supported Display Specifications (RGB-PC, HDMI-PC) Resolution 640x350 Horizontal Vertical Frequency(kHz) Frequency...
NOTES G To get the the best picture quality, adjust the PC graphics card to another rate or adjust the brightness and contrast on the screen properly. G Avoid keeping a fixed image on the graphics card, some resolution settings may not allow the image to DVI Cable is clear. EXTERNAL EQUIPMENT SETUP ! G When selecting HDMI-PC, set the "Input Label PC" in use. Supported Display Specifications (RGB-PC, HDMI-PC) Resolution 640x350 Horizontal Vertical Frequency(kHz) Frequency...

Owner's Manual
Page 38
... through inputs. G p.50 RATIO Changes the aspect ratio. ENERGY SAVING Adjusts the Energy Saving. Also switches the TV on from standby or off . G p.40 CHANNEL Changes the channel. G p.76 AV MODE Toggles through preset Video and Audio modes. G p.52 TV Returns to apply the Picture Wizard settings. COLOR BUTTON Access special functions in some memus. ENERGY AV MODE INPUT TV SAVING 123 456 789 0 FLASHBK LIST MARK FAV VOL RATIO P CH A G E MUTE MENU INFO Q.MENU ENTER BACK EXIT POWER Turns...
... through inputs. G p.50 RATIO Changes the aspect ratio. ENERGY SAVING Adjusts the Energy Saving. Also switches the TV on from standby or off . G p.40 CHANNEL Changes the channel. G p.76 AV MODE Toggles through preset Video and Audio modes. G p.52 TV Returns to apply the Picture Wizard settings. COLOR BUTTON Access special functions in some memus. ENERGY AV MODE INPUT TV SAVING 123 456 789 0 FLASHBK LIST MARK FAV VOL RATIO P CH A G E MUTE MENU INFO Q.MENU ENTER BACK EXIT POWER Turns...

Owner's Manual
Page 41
... from the user menus. You can also adjust Initial Setting in your antenna connection and start Auto Tuning. 41 Step4. "Store Demo" mode initializes the TV to set the essential items for viewing the TV for the best picture in the OPTION menu. Choose the setting mode you want. Customers can also be sure that the TV antenna is an optimal setting for use in -home. Selecting Language Language English Espa...
... from the user menus. You can also adjust Initial Setting in your antenna connection and start Auto Tuning. 41 Step4. "Store Demo" mode initializes the TV to set the essential items for viewing the TV for the best picture in the OPTION menu. Choose the setting mode you want. Customers can also be sure that the TV antenna is an optimal setting for use in -home. Selecting Language Language English Espa...

Owner's Manual
Page 54
...mode, the "Picture Mode" and "Sound Mode" return to see. During the Simple Manual operation, audio will be muted. 1 MENU 2 ENTER OPTION Move Enter Menu Language Audio Language Input Label SIMPLINK Key Lock Simple Manual Caption Set ID E : English : English : On : Off : Off : 1 Select OPTION. Picture Mode" and "AUDIO menu - Select Simple Manual. 3 ENTER 4 EXIT Select the part of the manual you select "O f f" in AV mode, Cinema will be selected both for playing games. I Cinema: Optimizes video and audio for watching sports events. When playing a video game using...
...mode, the "Picture Mode" and "Sound Mode" return to see. During the Simple Manual operation, audio will be muted. 1 MENU 2 ENTER OPTION Move Enter Menu Language Audio Language Input Label SIMPLINK Key Lock Simple Manual Caption Set ID E : English : English : On : Off : Off : 1 Select OPTION. Picture Mode" and "AUDIO menu - Select Simple Manual. 3 ENTER 4 EXIT Select the part of the manual you select "O f f" in AV mode, Cinema will be selected both for playing games. I Cinema: Optimizes video and audio for watching sports events. When playing a video game using...

Owner's Manual
Page 58
... file system provided with cable is not allowable. G If a USB external hard disk with cable is not supported by USB maker. IN 2 USB IN Memory Key 2 Select PHOTO LIST or MUSIC L IS T. 3 ENTER PHOTO LIST MUSIC LIST When removing the USB device Select the USB Device menu before removing the USB device. 1 Q.MENU Select USB Device. 2 ENTER Select Eject. USB Precautions when using an automatic recogni- tion program may be recognized. In case of USB storage devices formatted...
... file system provided with cable is not allowable. G If a USB external hard disk with cable is not supported by USB maker. IN 2 USB IN Memory Key 2 Select PHOTO LIST or MUSIC L IS T. 3 ENTER PHOTO LIST MUSIC LIST When removing the USB device Select the USB Device menu before removing the USB device. 1 Q.MENU Select USB Device. 2 ENTER Select Eject. USB Precautions when using an automatic recogni- tion program may be recognized. In case of USB storage devices formatted...

Owner's Manual
Page 72
... Color • Tint 0 RNoise ReduGction • Advanced Control Gamma • Picture Reset Screen (RGB-PC) Black Level Eye Care F Medium G Off Off Off Medium Low Off Real Cinema Off E Close 1 MENU Select PICTURE. 2 ENTER 3 ENTER Select Advanced Control. Return to each input source, execute the Picture Reset function for each Picture Mode. To reset to the factory default after making adjustments to the previous menu. You can calibrate the screen for each Picture Mode or set the video...
... Color • Tint 0 RNoise ReduGction • Advanced Control Gamma • Picture Reset Screen (RGB-PC) Black Level Eye Care F Medium G Off Off Off Medium Low Off Real Cinema Off E Close 1 MENU Select PICTURE. 2 ENTER 3 ENTER Select Advanced Control. Return to each input source, execute the Picture Reset function for each Picture Mode. To reset to the factory default after making adjustments to the previous menu. You can calibrate the screen for each Picture Mode or set the video...

Owner's Manual
Page 97
... Channel TV Rating-English TV Rating-French Downloadable Rating Input Block Enter Password **** Close PARENTAL CONTROL / RATING 1 MENU ENTER Select L O C K. 21 2 3 456 789 0 Input the password. I TV-Y7 (Children 7 years older) SET PASSWORD & LOCK SYSTEM Setting up Your Password Set up with the initial password "0-0-0-0". 97 Viewing can be blocked by the broadcasting station. Specify a password 3. Ratings for Television programs including made-for a time period. The Parental Control Function (V-Chip) is required to gain access to block program viewing based...
... Channel TV Rating-English TV Rating-French Downloadable Rating Input Block Enter Password **** Close PARENTAL CONTROL / RATING 1 MENU ENTER Select L O C K. 21 2 3 456 789 0 Input the password. I TV-Y7 (Children 7 years older) SET PASSWORD & LOCK SYSTEM Setting up Your Password Set up with the initial password "0-0-0-0". 97 Viewing can be blocked by the broadcasting station. Specify a password 3. Ratings for Television programs including made-for a time period. The Parental Control Function (V-Chip) is required to gain access to block program viewing based...

Owner's Manual
Page 99
... Lock System : Off Set Password Block Channel Movie Rating New **** Confirm * * * * TV Rating-Children TV Rating-General Close Downloadable Rating Input Block 1 MENU ENTER Select L O C K. 21 2 3 456 789 0 3 Input the password. Return to TV viewing. PARENTAL CONTROL / RATING 99 Select Set Password. 4 ENTER 5 BACK 1 2 3 Choose any 4 digits for your new password. 456 789 0 As soon as the 4 digits are entered, re-enter the same 4 digits on the Confirm. Set Password Change the password by inputting a new password...
... Lock System : Off Set Password Block Channel Movie Rating New **** Confirm * * * * TV Rating-Children TV Rating-General Close Downloadable Rating Input Block 1 MENU ENTER Select L O C K. 21 2 3 456 789 0 3 Input the password. Return to TV viewing. PARENTAL CONTROL / RATING 99 Select Set Password. 4 ENTER 5 BACK 1 2 3 Choose any 4 digits for your new password. 456 789 0 As soon as the 4 digits are entered, re-enter the same 4 digits on the Confirm. Set Password Change the password by inputting a new password...

Owner's Manual
Page 108
... channel. I Check the power control settings. The problem may be automatically turned off I Check for all models. Horizontal/vertical bars or picture shaking I Is the sleep timer set : TV, VCR etc. Lines or streaks in case of the picture. Power is turned on contact your antenna direction and/or location. The video does not work normally. Please after switching on . APPENDIX APPENDIX 108 TROUBLESHOOTING The operation does not work . The remote control doesn't work I Check antenna (Change the direction...
... channel. I Check the power control settings. The problem may be automatically turned off I Check for all models. Horizontal/vertical bars or picture shaking I Is the sleep timer set : TV, VCR etc. Lines or streaks in case of the picture. Power is turned on contact your antenna direction and/or location. The video does not work normally. Please after switching on . APPENDIX APPENDIX 108 TROUBLESHOOTING The operation does not work . The remote control doesn't work I Check antenna (Change the direction...

Owner's Manual
Page 116
... to choose desired TV ID number in Setup menu. Data1: Illegal Code Data2: Not supported function Data3: Wait more time * In this model, TV will send the 'a', 'b'. [OK] : Use the large character. Aspect Ratio k 04. Sharpness k 12. Auto Configuration j g 00 ~ 64 21. Key m i 00 ~ 64 23. Transmit the 'FF' data to control the set. [Set ID] : You can adjust the set ID is 10, it will...
... to choose desired TV ID number in Setup menu. Data1: Illegal Code Data2: Not supported function Data3: Wait more time * In this model, TV will send the 'a', 'b'. [OK] : Use the large character. Aspect Ratio k 04. Sharpness k 12. Auto Configuration j g 00 ~ 64 21. Key m i 00 ~ 64 23. Transmit the 'FF' data to control the set. [Set ID] : You can adjust the set ID is 10, it will...

Owner's Manual
Page 118
... the ATSC tuner automatically maps the channel to 'Real data mapping'. You can also adjust color temperature in the PICTURE menu. Minimum 02: Energy saving - Channel Tuning (Command: m a) To tune channel to following physical/major/minor number. Transmission [k][m][ ][Set ID][ ][Data][Cr] Data 00: Lock off Data 01: Lock on Acknowledgement [m][ ][Set ID][ ][OK/NG][Data][x] If you're not using the remote control and front panel controls on...
... the ATSC tuner automatically maps the channel to 'Real data mapping'. You can also adjust color temperature in the PICTURE menu. Minimum 02: Energy saving - Channel Tuning (Command: m a) To tune channel to following physical/major/minor number. Transmission [k][m][ ][Set ID][ ][Data][Cr] Data 00: Lock off Data 01: Lock on Acknowledgement [m][ ][Set ID][ ][OK/NG][Data][x] If you're not using the remote control and front panel controls on...

Specification
Page 2
...; CONVENIENCE FEATURES Favorite Channel Programming • Auto/Manual Clock • On/Off Timer • Sleep Timer • Auto Off/Auto Sleep (When no video is present) • AUDIO/Video Inputs/Outputs RF In (Antenna/Cable) 1 (rear) AV In 1 (rear) 1 (side) Component Video In (Y, Pb, Pr) + Audio 1 (rear) Digital Audio Out (Optical) 1 (rear) HDMI™ 1.3/HDCP Input 1 (rear) 1 (side) RGB In (D-Sub 15pin) - PC 1 (rear) PC Audio Input 1 (rear) RS-232c In (Control/Service) 1 (rear) USB 2.0 (Service Only) 1 (side) Headphone Out 1 (side...
...; CONVENIENCE FEATURES Favorite Channel Programming • Auto/Manual Clock • On/Off Timer • Sleep Timer • Auto Off/Auto Sleep (When no video is present) • AUDIO/Video Inputs/Outputs RF In (Antenna/Cable) 1 (rear) AV In 1 (rear) 1 (side) Component Video In (Y, Pb, Pr) + Audio 1 (rear) Digital Audio Out (Optical) 1 (rear) HDMI™ 1.3/HDCP Input 1 (rear) 1 (side) RGB In (D-Sub 15pin) - PC 1 (rear) PC Audio Input 1 (rear) RS-232c In (Control/Service) 1 (rear) USB 2.0 (Service Only) 1 (side) Headphone Out 1 (side...


