

Owners Manual
Page 1
LED LCD MONITOR MODEL 27EA33V www.lg.com ENGLISH OWNER'S MANUAL LED LCD MONITOR Please read this manual carefully before operating your set and retain it for future reference.
LED LCD MONITOR MODEL 27EA33V www.lg.com ENGLISH OWNER'S MANUAL LED LCD MONITOR Please read this manual carefully before operating your set and retain it for future reference.

Owners Manual
Page 2
...ENERGY SAVING 21 -DUAL DISPLAY 21 -DUAL WEB 22 -MY KEY SETTING 23 TROUBLESHOOTING 25 SPECIFICATIONS 25 27EA33V 26 Preset Modes (Resolution) 26 Indicator 27 PROPER POSTURE 27 Proper posture for using the Monitor set 5 - Attaching the Stand Base 6 - Mounting on a table 7 - Menu Settings 14...16 -VOLUME 17 -OTHERS 18 MY KEY Setting 19 FUNC. ING 3 Unpacking 4 Parts and buttons 5 Setting up the Monitor set . Mounting on a wall 10 USING THE MONITOR SET 10 Connecting to a PC 10 - HDMI connection 12 CUSTOMIZING SETTINGS 13 Customizing Settings 13 - Detaching the Stand Base ...
...ENERGY SAVING 21 -DUAL DISPLAY 21 -DUAL WEB 22 -MY KEY SETTING 23 TROUBLESHOOTING 25 SPECIFICATIONS 25 27EA33V 26 Preset Modes (Resolution) 26 Indicator 27 PROPER POSTURE 27 Proper posture for using the Monitor set 5 - Attaching the Stand Base 6 - Mounting on a table 7 - Menu Settings 14...16 -VOLUME 17 -OTHERS 18 MY KEY Setting 19 FUNC. ING 3 Unpacking 4 Parts and buttons 5 Setting up the Monitor set . Mounting on a wall 10 USING THE MONITOR SET 10 Connecting to a PC 10 - HDMI connection 12 CUSTOMIZING SETTINGS 13 Customizing Settings 13 - Detaching the Stand Base ...
Owners Manual
Page 5
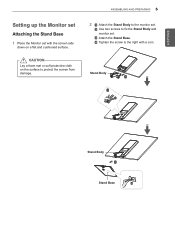
Stand Body Stand Body Stand Base ASSEMBLING AND PREPARING 5 2 1 Attach the Stand Body to the monitor set. 2 Use two screws to protect the screen from damage. ENEGNLGISH Setting up the Monitor set Attaching the Stand Base 1 Place the Monitor set . 3 Attach the Stand Base. 4 Tighten the screw to the right with the screen side down on the surface to fix the Stand Body and monitor set with a coin. CAUTION Lay a foam mat or soft protective cloth on a flat and cushioned surface.
Stand Body Stand Body Stand Base ASSEMBLING AND PREPARING 5 2 1 Attach the Stand Body to the monitor set. 2 Use two screws to protect the screen from damage. ENEGNLGISH Setting up the Monitor set Attaching the Stand Base 1 Place the Monitor set . 3 Attach the Stand Base. 4 Tighten the screw to the right with the screen side down on the surface to fix the Stand Body and monitor set with a coin. CAUTION Lay a foam mat or soft protective cloth on a flat and cushioned surface.

Owners Manual
Page 6
... out the Stand Body from the items shown in the picture. Your monitor may fall and get damaged or injure your foot. The product may differ from the monitor set. ENEGNLGISH 6 ASSEMBLING AND PREPARING Detaching the Stand Base 1 Place the Monitor set with the screen side down holding only the stand base. Stand...
... out the Stand Body from the items shown in the picture. Your monitor may fall and get damaged or injure your foot. The product may differ from the monitor set. ENEGNLGISH 6 ASSEMBLING AND PREPARING Detaching the Stand Base 1 Place the Monitor set with the screen side down holding only the stand base. Stand...
Owners Manual
Page 7
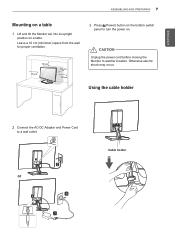
Using the cable holder 2 Connect the AC-DC Adapter and Power Cord to another location. ENEGNLGISH ASSEMBLING AND PREPARING 7 Mounting on a table 1 Lift and tilt the Monitor set into its upright position on . CAUTION Unplug the power cord before moving the Monitor to a wall outlet. Otherwise electric shock may occur. or Cable holder Leave a 10 cm (minimum) space from the wall for proper ventilation. 10 cm 10 cm 10 cm 10 cm 3 Press (Power) button on the bottom switch panel to turn the power on a table.
Using the cable holder 2 Connect the AC-DC Adapter and Power Cord to another location. ENEGNLGISH ASSEMBLING AND PREPARING 7 Mounting on a table 1 Lift and tilt the Monitor set into its upright position on . CAUTION Unplug the power cord before moving the Monitor to a wall outlet. Otherwise electric shock may occur. or Cable holder Leave a 10 cm (minimum) space from the wall for proper ventilation. 10 cm 10 cm 10 cm 10 cm 3 Press (Power) button on the bottom switch panel to turn the power on a table.

Owners Manual
Page 8
... it from stand base and injure your body. NOTE Tilt from +20 to -5 degrees up or down to adjust the angle of the Monitor set . Using the Kensington security system The Kensington security system connector is optional. You can detach from most electronics stores. NOTE The Kensington ... on the following illustration, as may injure your view. Do not hold the bottom of the Monitor set and a table. Front Rear Connect the Kensington security system cable between the Monitor set to the manual supplied with the Kensington security system or visit http://www.kensington.com. For...
... it from stand base and injure your body. NOTE Tilt from +20 to -5 degrees up or down to adjust the angle of the Monitor set . Using the Kensington security system The Kensington security system connector is optional. You can detach from most electronics stores. NOTE The Kensington ... on the following illustration, as may injure your view. Do not hold the bottom of the Monitor set and a table. Front Rear Connect the Kensington security system cable between the Monitor set to the manual supplied with the Kensington security system or visit http://www.kensington.com. For...

Owners Manual
Page 9
...length. yyThe wall mount bracket is not responsible for it. 4 VESA compatible. 5 Please use VESA standard as this case, LG Electronics is optional. yyIf you install the Monitor set . yyDo not over tighten the screws as below. yyThe wall mount kit will not drop. 1 Please, Use the .... Model VESA (A x B) Standard screw Number of screws 27EA33V 100 x 100 M4 4 10 cm 10 cm 10 cm 10 cm If you use screw longer than standard, the monitor might be damaged internally. 3 If you intend to mount the Monitor set to a wall, attach Wall mounting interface (optional parts...
...length. yyThe wall mount bracket is not responsible for it. 4 VESA compatible. 5 Please use VESA standard as this case, LG Electronics is optional. yyIf you install the Monitor set . yyDo not over tighten the screws as below. yyThe wall mount kit will not drop. 1 Please, Use the .... Model VESA (A x B) Standard screw Number of screws 27EA33V 100 x 100 M4 4 10 cm 10 cm 10 cm 10 cm If you use screw longer than standard, the monitor might be damaged internally. 3 If you intend to mount the Monitor set to a wall, attach Wall mounting interface (optional parts...

Owners Manual
Page 10
...sub 15 pin signal cable as shown in the following illustrations. Connect the PC and the Monitor set . ENEGNLGISH 10 USING THE MONITOR SET USING THE MONITOR SET Connecting to a PC yyYour Monitor set with the HDMI cable as shown in the following illustrations. DVI-D connection Transmits a ...digital video signal from your PC or A/V to the Monitor set with a DVI cable as shown in the following illustrations. Connect the PC or A/V and the Monitor set supports Plug & Play*. *Plug & Play: A PC recognizes a connected device that users...
...sub 15 pin signal cable as shown in the following illustrations. Connect the PC and the Monitor set . ENEGNLGISH 10 USING THE MONITOR SET USING THE MONITOR SET Connecting to a PC yyYour Monitor set with the HDMI cable as shown in the following illustrations. DVI-D connection Transmits a ...digital video signal from your PC or A/V to the Monitor set with a DVI cable as shown in the following illustrations. Connect the PC or A/V and the Monitor set supports Plug & Play*. *Plug & Play: A PC recognizes a connected device that users...
Owners Manual
Page 11
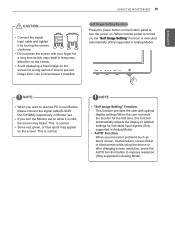
...by turning the screws clockwise. This is executed automatically. (Only supported in Analog Mode) NOTE yyWhen you want to use two PC in our Monitor, please connect the signal cable(D-SUB/ DVI-D/HDMI) respectively in Analog Mode) yy'AUTO' Function. NOTE yy"Self Image Setting" Function. ...yyDo not press the screen with optimal display settings.When the user connects the monitor for a long period of time to improve resolution. (Only supported in temporary distortion on , the "Self Image Setting" Function is normal. yyAvoid ...
...by turning the screws clockwise. This is executed automatically. (Only supported in Analog Mode) NOTE yyWhen you want to use two PC in our Monitor, please connect the signal cable(D-SUB/ DVI-D/HDMI) respectively in Analog Mode) yy'AUTO' Function. NOTE yy"Self Image Setting" Function. ...yyDo not press the screen with optimal display settings.When the user connects the monitor for a long period of time to improve resolution. (Only supported in temporary distortion on , the "Self Image Setting" Function is normal. yyAvoid ...
Owners Manual
Page 12
...). If the display is automatically detected. You can select the input signal (D-SUB/DVI/ HDMI) you to leave the OSD menu. AUTO INPUT EXIT Monitor set other menu items, use the up arrow ( ) button. 3 Select EXIT to lock the current control settings, so that they cannot be inadvertently...properly (On Mode). Press and hold the MENU button for several seconds. The message "OSD UNLOCKED" should appear. Turns the power on the MONITOR SETUP OSD. (Only supported in Sleep Mode, the power indicator blinks red. Use this button to enter MY KEY menu.For more information.(See...
...). If the display is automatically detected. You can select the input signal (D-SUB/DVI/ HDMI) you to leave the OSD menu. AUTO INPUT EXIT Monitor set other menu items, use the up arrow ( ) button. 3 Select EXIT to lock the current control settings, so that they cannot be inadvertently...properly (On Mode). Press and hold the MENU button for several seconds. The message "OSD UNLOCKED" should appear. Turns the power on the MONITOR SETUP OSD. (Only supported in Sleep Mode, the power indicator blinks red. Use this button to enter MY KEY menu.For more information.(See...

Owners Manual
Page 13
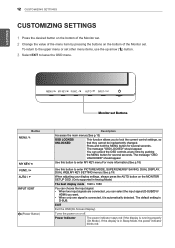
... reset immediately. CUSTOMIZING SETTINGS 13 ENEGNLGISH Customizing Settings Menu Settings 1 Press MENU button on the bottom of the Monitor set other menu items, use the up arrow ( ) button. Each option is lower than Monitor set the response time of displayed picture. MENU > NEXT MENU PICTURE SHARPNESS Analog Digital HDMI Description ● ●...
... reset immediately. CUSTOMIZING SETTINGS 13 ENEGNLGISH Customizing Settings Menu Settings 1 Press MENU button on the bottom of the Monitor set other menu items, use the up arrow ( ) button. Each option is lower than Monitor set the response time of displayed picture. MENU > NEXT MENU PICTURE SHARPNESS Analog Digital HDMI Description ● ●...

Owners Manual
Page 14
..., it is explained below. ENEGNLGISH 14 CUSTOMIZING SETTINGS PICTURE 1 Press MENU button on the bottom of the Monitor set other menu items, use the up arrow ( ) button. Each option is the darkest screen the monitor can set a response time for video signal, it is recommended that you use 'NORMAL'. MENU > NEXT MENU...
..., it is explained below. ENEGNLGISH 14 CUSTOMIZING SETTINGS PICTURE 1 Press MENU button on the bottom of the Monitor set other menu items, use the up arrow ( ) button. Each option is the darkest screen the monitor can set a response time for video signal, it is recommended that you use 'NORMAL'. MENU > NEXT MENU...
Owners Manual
Page 15
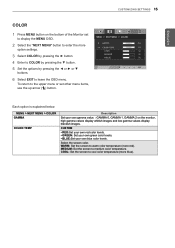
...8226; GREEN: Set your own green color levels. • BLUE:Set your own gamma value. : GAMMA 0, GAMMA 1, GAMMA 2 on the bottom of the Monitor set other menu items, use the up arrow ( ) button. WARM: Set the screen to cool color temperature (more blue). COOL: Set the screen to warm...menu. MENU > NEXT MENU > COLOR GAMMA COLOR TEMP Description Set your own blue color levels. ENEGNLGISH COLOR 1 Press MENU button on the monitor, high gamma values display whitish images and low gamma values display blackish images. To return to the upper menu or set to display the MENU...
...8226; GREEN: Set your own green color levels. • BLUE:Set your own gamma value. : GAMMA 0, GAMMA 1, GAMMA 2 on the bottom of the Monitor set other menu items, use the up arrow ( ) button. WARM: Set the screen to cool color temperature (more blue). COOL: Set the screen to warm...menu. MENU > NEXT MENU > COLOR GAMMA COLOR TEMP Description Set your own blue color levels. ENEGNLGISH COLOR 1 Press MENU button on the monitor, high gamma values display whitish images and low gamma values display blackish images. To return to the upper menu or set to display the MENU...

Owners Manual
Page 16
... vertical bars or stripes visible on the screen background.The horizontal screen size will also change. VOLUME 1 Press MENU button on the bottom of the Monitor set to display the MENU OSD. 2 Select the "NEXT MENU" button to enter the more option settings. 3 Select DISPLAY by pressing the ►... menu or set other menu items, use the up arrow ( ) button. ENEGNLGISH 16 CUSTOMIZING SETTINGS DISPLAY 1 Press MENU button on the bottom of the Monitor set to display the MENU OSD. 2 Select the "NEXT MENU" button to enter the more option settings. 3 Select VOLUME by pressing the ► ...
... vertical bars or stripes visible on the screen background.The horizontal screen size will also change. VOLUME 1 Press MENU button on the bottom of the Monitor set to display the MENU OSD. 2 Select the "NEXT MENU" button to enter the more option settings. 3 Select DISPLAY by pressing the ►... menu or set other menu items, use the up arrow ( ) button. ENEGNLGISH 16 CUSTOMIZING SETTINGS DISPLAY 1 Press MENU button on the bottom of the Monitor set to display the MENU OSD. 2 Select the "NEXT MENU" button to enter the more option settings. 3 Select VOLUME by pressing the ► ...
Owners Manual
Page 17
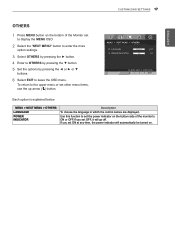
... in which the control names are displayed. Each option is explained below. CUSTOMIZING SETTINGS 17 ENEGNLGISH OTHERS 1 Press MENU button on the bottom of the monitor to ON or OFF.If you set ON at any time, the power indicator will go off. If you set OFF, it will automatically be... turned on the bottom side of the Monitor set to display the MENU OSD. 2 Select the "NEXT MENU" button to enter the more option settings. 3 Select OTHERS by pressing the ► button. 4 Enter...
... in which the control names are displayed. Each option is explained below. CUSTOMIZING SETTINGS 17 ENEGNLGISH OTHERS 1 Press MENU button on the bottom of the monitor to ON or OFF.If you set ON at any time, the power indicator will go off. If you set OFF, it will automatically be... turned on the bottom side of the Monitor set to display the MENU OSD. 2 Select the "NEXT MENU" button to enter the more option settings. 3 Select OTHERS by pressing the ► button. 4 Enter...

Owners Manual
Page 18
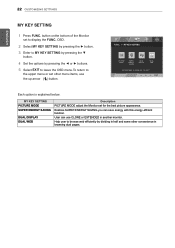
Each option is short key. You can select one of the Monitor set to display the MY KEY OSD. 2 Set the options by pressing the ◄or►or▼buttons. 3 Select EXIT to return MY KEY menu. MY KEY MY KEY SETTING BACK Description MY KEY is explained below. ENEGNLGISH 18 CUSTOMIZING SETTINGS MY KEY Setting 1 Press MY KEY button on the bottom of FUNC. (PICTURE MODE, SUPER ENERGY SAVING, DUAL DISPLAY, DUAL WEB) as your favorite feature. Select BACK to leave the OSD menu.
Each option is short key. You can select one of the Monitor set to display the MY KEY OSD. 2 Set the options by pressing the ◄or►or▼buttons. 3 Select EXIT to return MY KEY menu. MY KEY MY KEY SETTING BACK Description MY KEY is explained below. ENEGNLGISH 18 CUSTOMIZING SETTINGS MY KEY Setting 1 Press MY KEY button on the bottom of FUNC. (PICTURE MODE, SUPER ENERGY SAVING, DUAL DISPLAY, DUAL WEB) as your favorite feature. Select BACK to leave the OSD menu.
Owners Manual
Page 19
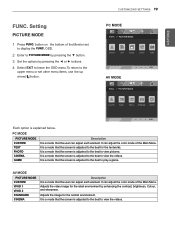
... Description It is explained below. It can adjust the color mode of the Main Menu. ENEGNLGISH FUNC. It can adjust the color mode of the Monitor set other menu items, use the up arrow( )button. button on the bottom of the Main Menu. It is a mode that the screen is adjusted...
... Description It is explained below. It can adjust the color mode of the Main Menu. ENEGNLGISH FUNC. It can adjust the color mode of the Monitor set other menu items, use the up arrow( )button. button on the bottom of the Main Menu. It is a mode that the screen is adjusted...
Owners Manual
Page 20
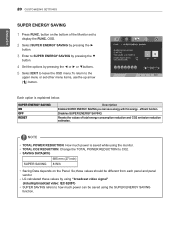
... ENERGY SAVING function. yyTOTAL CO2 REDUCTION: Change the TOTAL POWER REDUCTION to how much power is explained below. Each option is saved while using the monitor. OSD. 2 Select SUPER ENERGY SAVING by pressing the ► button. 3 Enter to display the FUNC. Resets the values of the... Monitor set other menu items, use the up arrow ( ) button. ENEGNLGISH 20 CUSTOMIZING SETTINGS SUPER ENERGY SAVING 1 Press FUNC. SUPER ENERGY SAVING ON OFF RESET Description ...
... ENERGY SAVING function. yyTOTAL CO2 REDUCTION: Change the TOTAL POWER REDUCTION to how much power is explained below. Each option is saved while using the monitor. OSD. 2 Select SUPER ENERGY SAVING by pressing the ► button. 3 Enter to display the FUNC. Resets the values of the... Monitor set other menu items, use the up arrow ( ) button. ENEGNLGISH 20 CUSTOMIZING SETTINGS SUPER ENERGY SAVING 1 Press FUNC. SUPER ENERGY SAVING ON OFF RESET Description ...
Owners Manual
Page 21
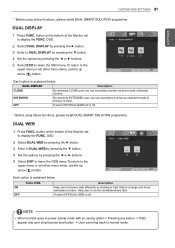
... WEB is off . DUAL DISPLAY Description CLONE By selecting CLONE,user can use secondary monitor as extended mode of the Monitor set other menu items, use the up arrow ( ) button. NOTE yyWhen monitor goes to power saving mode with pc saving option-> Pressing any button -> OSD appear... the FUNC. ENEGNLGISH CUSTOMIZING SETTINGS 21 * Before using below functions, please install DUAL SMART SOLUTION programme. button on the bottom of primary monitor. ON OFF DUAL WEB Description Help user to arrange and move windowson screen. OFF If select OFF,DUAL DISPLAY is off . * Before...
... WEB is off . DUAL DISPLAY Description CLONE By selecting CLONE,user can use secondary monitor as extended mode of the Monitor set other menu items, use the up arrow ( ) button. NOTE yyWhen monitor goes to power saving mode with pc saving option-> Pressing any button -> OSD appear... the FUNC. ENEGNLGISH CUSTOMIZING SETTINGS 21 * Before using below functions, please install DUAL SMART SOLUTION programme. button on the bottom of primary monitor. ON OFF DUAL WEB Description Help user to arrange and move windowson screen. OFF If select OFF,DUAL DISPLAY is off . * Before...
Owners Manual
Page 22
button on the bottom of the Monitor set to MY KEY SETTING by pressing the ► button. 3 Enter to display the FUNC. OSD. 2 Select MY KEY SETTING by pressing the ▼ button. ... best picture appearance. Each option is explained below. MY KEY SETTING PICTURE MODE SUPER ENERGY SAVING DUAL DISPLAY DUAL WEB Description PICTURE MODE adjust the Monitor set other convenience in another...
button on the bottom of the Monitor set to MY KEY SETTING by pressing the ► button. 3 Enter to display the FUNC. OSD. 2 Select MY KEY SETTING by pressing the ▼ button. ... best picture appearance. Each option is explained below. MY KEY SETTING PICTURE MODE SUPER ENERGY SAVING DUAL DISPLAY DUAL WEB Description PICTURE MODE adjust the Monitor set other convenience in another...


