
Owners Manual
Page 2
... 14 - Installing on the Wall 13 - Installing the Wall Mount Bracket 14 USING THE MONITOR 14 Connecting to Use the Joystick Button 6 - Main Menu Features 19 User Settings 19 - Picture Mode 24 - Reset 29 TROUBLESHOOTING 31 PRODUCT SPECIFICATION 33 Factory Support Mode 33 Power LED 34 PROPER POSTURE 34 Proper Posture for Using the Monitor Installing on a Table 10 - HDMI Connection 15 - Thunderbolt ( ) Connection 16 Connecting Peripherals 16 - PC 17 - PBP 23 - General 28 - Adjusting the Angle 11 - USB Cable connection - Menu Settings 20 - Picture Adjust 26 - 2 Table...
... 14 - Installing on the Wall 13 - Installing the Wall Mount Bracket 14 USING THE MONITOR 14 Connecting to Use the Joystick Button 6 - Main Menu Features 19 User Settings 19 - Picture Mode 24 - Reset 29 TROUBLESHOOTING 31 PRODUCT SPECIFICATION 33 Factory Support Mode 33 Power LED 34 PROPER POSTURE 34 Proper Posture for Using the Monitor Installing on a Table 10 - HDMI Connection 15 - Thunderbolt ( ) Connection 16 Connecting Peripherals 16 - PC 17 - PBP 23 - General 28 - Adjusting the Angle 11 - USB Cable connection - Menu Settings 20 - Picture Adjust 26 - 2 Table...

Owners Manual
Page 4
CD (Owner's Manual / Software / Guides) / Cards Power Cord AC/DC Adapter HDMI Cable Cable Tie Stand Body Stand Base 4 Screws (M4 x L10) Screw Cover Wall Mount Bracket (Varies depending upon the region. yy It is recommend that the product and related components may look different from those illustrated here. yy If you use the supplied components. If there are any missing components, contact the retailer where you purchased the product. yy The...
CD (Owner's Manual / Software / Guides) / Cards Power Cord AC/DC Adapter HDMI Cable Cable Tie Stand Body Stand Base 4 Screws (M4 x L10) Screw Cover Wall Mount Bracket (Varies depending upon the region. yy It is recommend that the product and related components may look different from those illustrated here. yy If you use the supplied components. If there are any missing components, contact the retailer where you purchased the product. yy The...

Owners Manual
Page 5
... finger. NOTE yy The joystick button is On. (29UC97 model only) Product and Button Description ASSEMBLING AND PREPARING 5 ENGLISH Joystick Button / Power LED yy On Power on yy Off Power off How to turn on the monitor. Power off Press and hold the joystick button once with your finger to Use the Joystick Button You can control the volume by pressing the joystick button or moving the joystick button left/right.
... finger. NOTE yy The joystick button is On. (29UC97 model only) Product and Button Description ASSEMBLING AND PREPARING 5 ENGLISH Joystick Button / Power LED yy On Power on yy Off Power off How to turn on the monitor. Power off Press and hold the joystick button once with your finger to Use the Joystick Button You can control the volume by pressing the joystick button or moving the joystick button left/right.

Owners Manual
Page 9
... screw covers. NOTE yy You can disassemble the stand in this document represent typical procedures, so they may look different from the wall to ensure sufficient ventilation. 10 cm 10 cm 10 cm 10 cm 2 Connect the power adapter to the monitor and then plug the power cord into the wall outlet. 3 Press the joystick button on the bottom of the monitor to turn on the monitor...
... screw covers. NOTE yy You can disassemble the stand in this document represent typical procedures, so they may look different from the wall to ensure sufficient ventilation. 10 cm 10 cm 10 cm 10 cm 2 Connect the power adapter to the monitor and then plug the power cord into the wall outlet. 3 Press the joystick button on the bottom of the monitor to turn on the monitor...
Owners Manual
Page 11
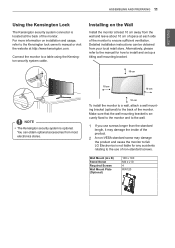
... and cause the monitor to fall. Make sure that the wall mounting bracket is securely fixed to the monitor and to the wall. 1 If you use of non-standard screws. Detailed installation instructions can obtain optional accessories from your local retail store. Wall Mount (A x B) Stand Screw Required Screws Wall Mount Plate (Optional) 100 x 100 M4 x L10 4 RW120 ENGLISH ASSEMBLING AND PREPARING 11 Using the Kensington Lock The Kensington security system connector is located...
... and cause the monitor to fall. Make sure that the wall mounting bracket is securely fixed to the monitor and to the wall. 1 If you use of non-standard screws. Detailed installation instructions can obtain optional accessories from your local retail store. Wall Mount (A x B) Stand Screw Required Screws Wall Mount Plate (Optional) 100 x 100 M4 x L10 4 RW120 ENGLISH ASSEMBLING AND PREPARING 11 Using the Kensington Lock The Kensington security system connector is located...

Owners Manual
Page 14
... image on the screen. Use a screensaver if possible. yy Sometimes red, green, or blue spots may appear on the screen for a prolonged time. yy Connecting your PC to the monitor using the HDMI cable may flicker when turned on the 29UC97 model. ENGLISH 14 Using the Monitor USING THE MONITOR yy The following instructions are based on in an area where the temperature is low. Press the joystick button, go to malfunction. HDMI Connection Transmits digital video and audio signals...
... image on the screen. Use a screensaver if possible. yy Sometimes red, green, or blue spots may appear on the screen for a prolonged time. yy Connecting your PC to the monitor using the HDMI cable may flicker when turned on the 29UC97 model. ENGLISH 14 Using the Monitor USING THE MONITOR yy The following instructions are based on in an area where the temperature is low. Press the joystick button, go to malfunction. HDMI Connection Transmits digital video and audio signals...
Owners Manual
Page 16
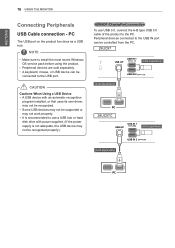
... Using a USB Device yy A USB device with power supplied. (If the power supply is not adequate, the USB device may not be recognized properly.) HDMI/DP (DisplayPort) connection To use a USB hub or hard disk drive with an automatic recognition program installed, or that uses its own driver, may not be supported or may not be recognized. ENGLISH 16 Using the Monitor Connecting Peripherals USB Cable connection - Peripheral devices connected to the USB port. NOTE yy Make...
... Using a USB Device yy A USB device with power supplied. (If the power supply is not adequate, the USB device may not be recognized properly.) HDMI/DP (DisplayPort) connection To use a USB hub or hard disk drive with an automatic recognition program installed, or that uses its own driver, may not be supported or may not be recognized. ENGLISH 16 Using the Monitor Connecting Peripherals USB Cable connection - Peripheral devices connected to the USB port. NOTE yy Make...

Owners Manual
Page 19
...screen. Optimizes the screen for picture mode. Adjusts Language, SMART ENERGY SAVING, Power LED, Automatic Standby, and OSD Lock. Quick Settings Menu Description Brightness Adjusts the color contrast and brightness of the screen. NOTE yy You can adjust Mute/ Unmute by moving the joystick button to ▼ in this manual. Exits the OSD menu. Adjusts the MaxxAudio, MaxxAudio Settings, and Midnight Mode. Restores the default settings. PBP Picture Sound General Reset ◄ Input Ratio Picture Mode Picture Adjust Exit Selects the input mode. ENGLISH User Settings...
...screen. Optimizes the screen for picture mode. Adjusts Language, SMART ENERGY SAVING, Power LED, Automatic Standby, and OSD Lock. Quick Settings Menu Description Brightness Adjusts the color contrast and brightness of the screen. NOTE yy You can adjust Mute/ Unmute by moving the joystick button to ▼ in this manual. Exits the OSD menu. Adjusts the MaxxAudio, MaxxAudio Settings, and Midnight Mode. Restores the default settings. PBP Picture Sound General Reset ◄ Input Ratio Picture Mode Picture Adjust Exit Selects the input mode. ENGLISH User Settings...

Owners Manual
Page 20
.... Displays video according to the aspect ratio of the video signal input. Enlarges the screen with an aspect ratio of 21:9. (at 1080p) Enlarges the screen with an aspect ratio of 21:9, including the black box at the bottom for Wide, Original, and 1:1 options at the recommended resolution (2560 x 1080). yy The ratio is not adjusted from the original. Quick Settings Brightness Quick Settings Contrast PBP Volume Input Picture Ratio Sound...
.... Displays video according to the aspect ratio of the video signal input. Enlarges the screen with an aspect ratio of 21:9. (at 1080p) Enlarges the screen with an aspect ratio of 21:9, including the black box at the bottom for Wide, Original, and 1:1 options at the recommended resolution (2560 x 1080). yy The ratio is not adjusted from the original. Quick Settings Brightness Quick Settings Contrast PBP Volume Input Picture Ratio Sound...
Owners Manual
Page 21
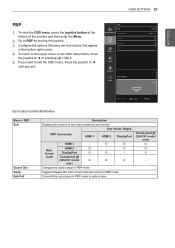
Sub Screen (Right) PBP Connection HDMI 1 HDMI 2 DisplayPort HDMI 1 - Toggles between the main screen and sub screen in PBP mode. O O Main HDMI 2 O - Thunderbolt ( ) (29UC97 model only) O O X - O Screen DisplayPort O O - (Left) Thunderbolt ( ) (29UC97 model O O X only) Changes the audio output in PBP mode. User Settings 21 ENGLISH PBP 1 To view the OSD menu, press the joystick button at the bottom of two input modes on one monitor. PBP Sub Quick Settings Sound Out PBP Swap Sub Full Picture Ratio Sound General Reset PBP Preview Off > HDMI1 > > HDMI1...
Sub Screen (Right) PBP Connection HDMI 1 HDMI 2 DisplayPort HDMI 1 - Toggles between the main screen and sub screen in PBP mode. O O Main HDMI 2 O - Thunderbolt ( ) (29UC97 model only) O O X - O Screen DisplayPort O O - (Left) Thunderbolt ( ) (29UC97 model O O X only) Changes the audio output in PBP mode. User Settings 21 ENGLISH PBP 1 To view the OSD menu, press the joystick button at the bottom of two input modes on one monitor. PBP Sub Quick Settings Sound Out PBP Swap Sub Full Picture Ratio Sound General Reset PBP Preview Off > HDMI1 > > HDMI1...

Owners Manual
Page 22
... signal. yy The optimal resolution for Ratio become disabled. Sub Wide Displays the video to fit the PBP screen, regardless of the main screen or sub screen. Main Wide Displays the video to fit the PBP screen, regardless of the video signal input on the PBP screen. NOTE yy When the Sub mode is Off, Sound Out, Swap, Sub Full, and Ratio menus become disabled if there is set. (29UC97C model only) 22 User Settings ENGLISH Menu...
... signal. yy The optimal resolution for Ratio become disabled. Sub Wide Displays the video to fit the PBP screen, regardless of the main screen or sub screen. Main Wide Displays the video to fit the PBP screen, regardless of the video signal input on the PBP screen. NOTE yy When the Sub mode is Off, Sound Out, Swap, Sub Full, and Ratio menus become disabled if there is set. (29UC97C model only) 22 User Settings ENGLISH Menu...
Owners Manual
Page 23
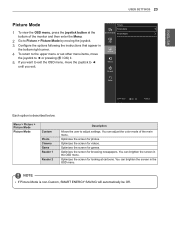
... following the instructions that appear in the OSD menu. Menu > Picture > Picture Mode Picture Mode Custom Photo Cinema Game Reader 1 Reader 2 Description Allows the user to ◄ Sound until you exit. Optimizes the screen for browsing newspapers. Optimizes the screen for videos. Optimizes the screen for looking at the Quick Settings Picture Adjust > bottom of the main menu. Optimizes the screen for photos. NOTE yy If Picture Mode is described below. You can adjust the color mode of the monitor and...
... following the instructions that appear in the OSD menu. Menu > Picture > Picture Mode Picture Mode Custom Photo Cinema Game Reader 1 Reader 2 Description Allows the user to ◄ Sound until you exit. Optimizes the screen for browsing newspapers. Optimizes the screen for videos. Optimizes the screen for looking at the Quick Settings Picture Adjust > bottom of the main menu. Optimizes the screen for photos. NOTE yy If Picture Mode is described below. You can adjust the color mode of the monitor and...
Owners Manual
Page 24
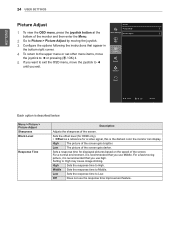
Menu > Picture > Picture Adjust Sharpness Black Level Response Time Description Adjusts the sharpness of the screen gets brighter. For a normal environment, it is recommended that you use high. Setting to High. High Sets the response time to High may cause image sticking. Sets a response time for a video signal, this is the darkest color the monitor can display. High The picture of the screen. Low Sets the response time to ◄ Sound until...
Menu > Picture > Picture Adjust Sharpness Black Level Response Time Description Adjusts the sharpness of the screen gets brighter. For a normal environment, it is recommended that you use high. Setting to High. High Sets the response time to High may cause image sticking. Sets a response time for a video signal, this is the darkest color the monitor can display. High The picture of the screen. Low Sets the response time to ◄ Sound until...
Owners Manual
Page 26
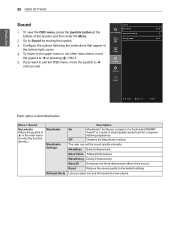
... MaxxAudio function. Maxx3D Enhances the three dimensional effect of the monitor and then enter the Menu. ENGLISH 26 User Settings Sound Sound MaxxAudio On > 1 To view the OSD menu, press the joystick button at a low volume. Lets you enjoy rich and full sound at the Quick Settings MaxxAudio Settings > bottom of the sound. The user can set other menu items, move the joystick to ◄ or pressing ( / OK) it. 5 If...
... MaxxAudio function. Maxx3D Enhances the three dimensional effect of the monitor and then enter the Menu. ENGLISH 26 User Settings Sound Sound MaxxAudio On > 1 To view the OSD menu, press the joystick button at a low volume. Lets you enjoy rich and full sound at the Quick Settings MaxxAudio Settings > bottom of the sound. The user can set other menu items, move the joystick to ◄ or pressing ( / OK) it. 5 If...
Owners Manual
Page 27
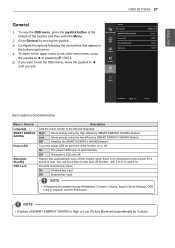
... button. Off Disables the SMART ENERGY SAVING feature. High Saves energy using the low-efficiency SMART ENERGY SAVING feature. On Disables key input Off Enables key input NOTE yy All features are disabled except Brightness, Contrast, Volume, Input in Quick Settings, OSD Lock in the bottom right corner. 4 To return to the upper menu or set a timer for a period of SMART ENERGY SAVING is described below. Menu > General Language SMART ENERGY SAVING Power LED Automatic Standby OSD Lock...
... button. Off Disables the SMART ENERGY SAVING feature. High Saves energy using the low-efficiency SMART ENERGY SAVING feature. On Disables key input Off Enables key input NOTE yy All features are disabled except Brightness, Contrast, Volume, Input in Quick Settings, OSD Lock in the bottom right corner. 4 To return to the upper menu or set a timer for a period of SMART ENERGY SAVING is described below. Menu > General Language SMART ENERGY SAVING Power LED Automatic Standby OSD Lock...

Owners Manual
Page 29
... the selected resolution is enabled (Menu > Quick Settings > Input). Troubleshooting 29 ENGLISH TROUBLESHOOTING Nothing is correctly plugged into the power outlet. Is the power on ? Is the power LED blinking? Go to display an image, the screen must be supported depending upon the Mac product. NOTE yy Vertical Frequency: In order to Menu > General and set the appropriate frequency. yy Check if the power cord is displayed on . yy Horizontal Frequency: The time it . yy Check the power cable connection and press the power button. yy...
... the selected resolution is enabled (Menu > Quick Settings > Input). Troubleshooting 29 ENGLISH TROUBLESHOOTING Nothing is correctly plugged into the power outlet. Is the power on ? Is the power LED blinking? Go to display an image, the screen must be supported depending upon the Mac product. NOTE yy Vertical Frequency: In order to Menu > General and set the appropriate frequency. yy Check if the power cord is displayed on . yy Horizontal Frequency: The time it . yy Check the power cable connection and press the power button. yy...

Owners Manual
Page 30
... to the recommended (optimal) resolution in blurred text, a dimmed screen, a truncated display area or misalignment of the display. yy When using the monitor, pixilated spots (red, green, blue, white, or black) may not be displayed, contact the manufacturer of the PC to 24 bit (true color) or higher. yy Make sure that the headphone port connections are using DP (DisplayPort) or HDMI input without sound? yy Set the audio output of your graphics card.
... to the recommended (optimal) resolution in blurred text, a dimmed screen, a truncated display area or misalignment of the display. yy When using the monitor, pixilated spots (red, green, blue, white, or black) may not be displayed, contact the manufacturer of the PC to 24 bit (true color) or higher. yy Make sure that the headphone port connections are using DP (DisplayPort) or HDMI input without sound? yy Set the audio output of your graphics card.

Owners Manual
Page 31
... more information, refer to 75 Hz Synchronization Separate Sync. Product Specification 31 ENGLISH PRODUCT SPECIFICATION 29UC97 LCD Screen Type TFT (Thin Film Transistor) LCD (Liquid Crystal Display) Screen Color Depth 8-bit color is provided separately.) Pixel Pitch 0.2628 mm x 0.2628 mm Resolution Max Resolution 2560 x 1080 @ 60 Hz Recommended Resolution 2560 x 1080 @ 60 Hz Video Signal Horizontal Frequency 30 kHz to 90 kHz Vertical Frequency 56 Hz to the support information card of Mac which is...
... more information, refer to 75 Hz Synchronization Separate Sync. Product Specification 31 ENGLISH PRODUCT SPECIFICATION 29UC97 LCD Screen Type TFT (Thin Film Transistor) LCD (Liquid Crystal Display) Screen Color Depth 8-bit color is provided separately.) Pixel Pitch 0.2628 mm x 0.2628 mm Resolution Max Resolution 2560 x 1080 @ 60 Hz Recommended Resolution 2560 x 1080 @ 60 Hz Video Signal Horizontal Frequency 30 kHz to 90 kHz Vertical Frequency 56 Hz to the support information card of Mac which is...

Owners Manual
Page 32
...;C Humidity Less than 85 % 7 W + 7 W Win 7, Win 8.1, Mac OS Dimensions Weight (Without Packaging) Monitor Size (Width x Height x Depth) With Stand 700.9 mm x 420.9 mm x 225.6 mm Without Stand 700.9 mm x 316.5 mm x 99.0 mm With Stand 6.0 kg Without Stand 5.3 kg Specifications are subject to 75 Hz Synchronization Separate Sync. 32 Product Specification ENGLISH 29UC97C LCD Screen Resolution Video Signal Input Connector Type TFT (Thin Film Transistor) LCD (Liquid Crystal Display) Screen Color Depth 8-bit color is supported.
...;C Humidity Less than 85 % 7 W + 7 W Win 7, Win 8.1, Mac OS Dimensions Weight (Without Packaging) Monitor Size (Width x Height x Depth) With Stand 700.9 mm x 420.9 mm x 225.6 mm Without Stand 700.9 mm x 316.5 mm x 99.0 mm With Stand 6.0 kg Without Stand 5.3 kg Specifications are subject to 75 Hz Synchronization Separate Sync. 32 Product Specification ENGLISH 29UC97C LCD Screen Resolution Video Signal Input Connector Type TFT (Thin Film Transistor) LCD (Liquid Crystal Display) Screen Color Depth 8-bit color is supported.

Owners Manual
Page 36
Read the owner's manual (CD) carefully and keep it at hand. Please note that this product meets the ENERGY STAR® guidelines for home usage. ENERGY STAR® is intended for energy efficiency. ... for more information on the ENERGY STAR® program. has determined that the label attached to ENERGY STAR.gov for technical support. This device meets the EMC requirements for home appliances (Class B) and is a set of power-saving guidelines issued by the U.S.Environmental Protection Agency (EPA). Model Serial No. This device can be used in all regions.
Read the owner's manual (CD) carefully and keep it at hand. Please note that this product meets the ENERGY STAR® guidelines for home usage. ENERGY STAR® is intended for energy efficiency. ... for more information on the ENERGY STAR® program. has determined that the label attached to ENERGY STAR.gov for technical support. This device meets the EMC requirements for home appliances (Class B) and is a set of power-saving guidelines issued by the U.S.Environmental Protection Agency (EPA). Model Serial No. This device can be used in all regions.


