

Owner's Manual
Page 6
... 6 Home Menu 7 Controls / Connection Options 8-9 Remote Control Key Functions 10-11 INSTALLATION Wire Arrangement 12 Attaching the TV to a Wall 13 Desktop Pedestal Installation 13 CONNECTIONS & SETUP Antenna Connection 14 VCR Setup 15-16 External Equipment Connections 17 External Stereo 17 AV out Setup 18 DVD Setup 19-20 HDSTB (Set-top box) Setup 21-23 PC Setup 24-26 BASIC OPERATION Turning the TV On 27 Channel Selection 27 Volume Adjustment 27 On-Screen Menus Language Selection 28 SPECIAL FUNCTIONS DVR (Digital Video Recorder) Time Control 29...
... 6 Home Menu 7 Controls / Connection Options 8-9 Remote Control Key Functions 10-11 INSTALLATION Wire Arrangement 12 Attaching the TV to a Wall 13 Desktop Pedestal Installation 13 CONNECTIONS & SETUP Antenna Connection 14 VCR Setup 15-16 External Equipment Connections 17 External Stereo 17 AV out Setup 18 DVD Setup 19-20 HDSTB (Set-top box) Setup 21-23 PC Setup 24-26 BASIC OPERATION Turning the TV On 27 Channel Selection 27 Volume Adjustment 27 On-Screen Menus Language Selection 28 SPECIAL FUNCTIONS DVR (Digital Video Recorder) Time Control 29...

Owner's Manual
Page 7
... 47 Favorite Channels setup 48 Picture Adjustment Auto Picture Control (APC 49 Manual Picture Control (APC-User Option 50 Auto Color Temperature Control (ACC) 51 Manual Color Temperature Control (ACC-User Option) . . 52 XD 53 Advanced Cinema Mode Setup 54 Advanced Black Level 55 Reset 56 Sound Adjustment Digital Auto Sound Processing (DASP 57 Manual Sound Control (DASP-User Option) . . . . . 58 Auto Volume Leveler (AVL) 59 Balance Adjustment 60 TV Speaker Setup 61 Stereo/SAP Broadcasts Setup 62 Time Setting Clock Setup 63 On/Off Timer Setup 64 Auto Off 65 Sleep Timer 66...
... 47 Favorite Channels setup 48 Picture Adjustment Auto Picture Control (APC 49 Manual Picture Control (APC-User Option 50 Auto Color Temperature Control (ACC) 51 Manual Color Temperature Control (ACC-User Option) . . 52 XD 53 Advanced Cinema Mode Setup 54 Advanced Black Level 55 Reset 56 Sound Adjustment Digital Auto Sound Processing (DASP 57 Manual Sound Control (DASP-User Option) . . . . . 58 Auto Volume Leveler (AVL) 59 Balance Adjustment 60 TV Speaker Setup 61 Stereo/SAP Broadcasts Setup 62 Time Setting Clock Setup 63 On/Off Timer Setup 64 Auto Off 65 Sleep Timer 66...

Owner's Manual
Page 8
... where you purchased the product. PIP CH+ SWAP PIP INPUT MEMORY/ERASE EXIT MARK LIVE TV TIME MENU MACHINE SLEEP TIME CONTROL ENTER TIME CONTROL FCR VOL CH MUTE 1 2 3 4 5 6 7 8 9 MTS 0 REVIEW Remote Control Power Cord 2-TV Bracket Bolts 2-TV Brackets, 2-Wall Brackets Cable Management (Refer to the antenna wire after fixing in Argentina. If an accessory is only supplied in Antenna Input. INTRODUCTION INTRODUCTION ACCESSORIES Ensure that excessive power may cause scratch or discoloration. 6
... where you purchased the product. PIP CH+ SWAP PIP INPUT MEMORY/ERASE EXIT MARK LIVE TV TIME MENU MACHINE SLEEP TIME CONTROL ENTER TIME CONTROL FCR VOL CH MUTE 1 2 3 4 5 6 7 8 9 MTS 0 REVIEW Remote Control Power Cord 2-TV Bracket Bolts 2-TV Brackets, 2-Wall Brackets Cable Management (Refer to the antenna wire after fixing in Argentina. If an accessory is only supplied in Antenna Input. INTRODUCTION INTRODUCTION ACCESSORIES Ensure that excessive power may cause scratch or discoloration. 6

Owner's Manual
Page 12
... on mode. G p.45 TIME MACHINE Brings up the Home menu. PIP CH+ SWAP PIP INPUT MEMORY/ERASE EXIT MARK LIVE TV TIME MENU MACHINE SLEEP TIME CONTROL ENTER TIME CONTROL FCR VOL CH MUTE 1 2 3 4 5 6 7 8 9 MTS 0 REVIEW 10 CHANNEL Select available channels. ARC Change the aspect ratio. MENU Displays the main menu. MUTE Switches the sound on screen as shown. Press the D / E button and then ENTER button to TV viewing from any other programmed equipment on or off . G p.73 Brightness adjustment Adjusts brightness...
... on mode. G p.45 TIME MACHINE Brings up the Home menu. PIP CH+ SWAP PIP INPUT MEMORY/ERASE EXIT MARK LIVE TV TIME MENU MACHINE SLEEP TIME CONTROL ENTER TIME CONTROL FCR VOL CH MUTE 1 2 3 4 5 6 7 8 9 MTS 0 REVIEW 10 CHANNEL Select available channels. ARC Change the aspect ratio. MENU Displays the main menu. MUTE Switches the sound on screen as shown. Press the D / E button and then ENTER button to TV viewing from any other programmed equipment on or off . G p.73 Brightness adjustment Adjusts brightness...

Owner's Manual
Page 13
... INPUT MEMORY/ERASE MARK LIVE TV MENU I Close cover. G p.42 POSITION Moves the sub picture. G p.41 VCR/DVD Control video cassette recorders or DVD players. control buttons These buttons are used batteries in PIP/Double window mode. Installing Batteries Remote control effective range I Open the battery compartment cover on -screen menus and adjust the system settings to preserve environment. 11 I Install two 1.5V AA batteries. PIP Switches the sub picture PIP, DW, POP mode. MARK Selects...
... INPUT MEMORY/ERASE MARK LIVE TV MENU I Close cover. G p.42 POSITION Moves the sub picture. G p.41 VCR/DVD Control video cassette recorders or DVD players. control buttons These buttons are used batteries in PIP/Double window mode. Installing Batteries Remote control effective range I Open the battery compartment cover on -screen menus and adjust the system settings to preserve environment. 11 I Install two 1.5V AA batteries. PIP Switches the sub picture PIP, DW, POP mode. MARK Selects...

Owner's Manual
Page 17
... channel number. the fixed images on the sides of the screen may remain visible on the VCR. (Refer to the RF antenna in consequence the manufactures warranty does not cover the product bearing this phenomenon. When connecting with an antenna T COMPONENT IN NO) UDIO VIDEO AUDIO ANTENNA IN 1 ANT OUT S-VIDEO VIDEO L R ANT IN OUTPUT SWITCH Wall Jack 2 Antenna 1. CONNECTIONS & SETUP VCR SETUP I To avoid picture noise (interference), leave an adequate distance between the VCR and TV I Set VCR output switch...
... channel number. the fixed images on the sides of the screen may remain visible on the VCR. (Refer to the RF antenna in consequence the manufactures warranty does not cover the product bearing this phenomenon. When connecting with an antenna T COMPONENT IN NO) UDIO VIDEO AUDIO ANTENNA IN 1 ANT OUT S-VIDEO VIDEO L R ANT IN OUTPUT SWITCH Wall Jack 2 Antenna 1. CONNECTIONS & SETUP VCR SETUP I To avoid picture noise (interference), leave an adequate distance between the VCR and TV I Set VCR output switch...

Owner's Manual
Page 21
...Match the jack colors (Y = green, PB = blue, and PR = red). Connect the audio outputs of the DVD to the 2 COMPONENT IN AUDIO1 jacks on the set . I Refer to COMPONENT IN 2 input, select Component 2 input source. CONNECTIONS & SETUP DVD SETUP When connecting with using the INPUT button on the remote control. O) IO I If connected to the DVD player's manual for operating instructions. I Turn on the DVD player, insert a DVD. Y PB PR L R 1 2 VARIABLE AUDIO OUT COMPONENT IN VIDEO AUDIO Component Input ports To get better picture quality, connect a DVD player to use...
...Match the jack colors (Y = green, PB = blue, and PR = red). Connect the audio outputs of the DVD to the 2 COMPONENT IN AUDIO1 jacks on the set . I Refer to COMPONENT IN 2 input, select Component 2 input source. CONNECTIONS & SETUP DVD SETUP When connecting with using the INPUT button on the remote control. O) IO I If connected to the DVD player's manual for operating instructions. I Turn on the DVD player, insert a DVD. Y PB PR L R 1 2 VARIABLE AUDIO OUT COMPONENT IN VIDEO AUDIO Component Input ports To get better picture quality, connect a DVD player to use...

Owner's Manual
Page 22
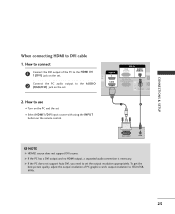
...remote control. S-VIDEO VIDEO (MONO) AUDIO VIDEO CONNECTIONS & SETUP When connecting HDMI cable 1. Connect the audio outputs of the DVD to the DVD player's manual for operating instructions. ! S-232C IN TROL & SERVICE) AV IN 1 I Select A V 1 input source with an S-Video cable 1. RGB IN RGB PC/DTV) AUDIO (RGB/DVI) AV OUT I Refer to the HDMI IN 1(DVI) or HDMI 2 jack on the set . How to the S -VIDEO input on the set . 2 No separated audio connection is necessary. 2. VIDEO S-VIDEO L R ANT IN OUTPUT SWITCH ANT OUT 1 2 2. NOTE G If the DVD supports...
...remote control. S-VIDEO VIDEO (MONO) AUDIO VIDEO CONNECTIONS & SETUP When connecting HDMI cable 1. Connect the audio outputs of the DVD to the DVD player's manual for operating instructions. ! S-232C IN TROL & SERVICE) AV IN 1 I Select A V 1 input source with an S-Video cable 1. RGB IN RGB PC/DTV) AUDIO (RGB/DVI) AV OUT I Refer to the HDMI IN 1(DVI) or HDMI 2 jack on the set . How to the S -VIDEO input on the set . 2 No separated audio connection is necessary. 2. VIDEO S-VIDEO L R ANT IN OUTPUT SWITCH ANT OUT 1 2 2. NOTE G If the DVD supports...

Owner's Manual
Page 23
... the COMPONENT IN VIDEO 1 jacks on the set . 2. I Select Component1 input source with a component cable 1. Signal 480i 480p 720p 1080i Component 1/2 Yes Yes Yes Yes HDMI1/DVI, RGB-DTV, HDMI2 No Yes Yes Yes Y PB PR L R 1 2 VARIABLE AUDIO OUT COMPONENT IN VIDEO AUDIO VIDEO AUDIO 21 CONNECTIONS & SETUP HDSTB (SET-TOP BOX) SETUP When connecting with using the INPUT button on the remote control. Match the jack colors (Y = green, PB = blue, and PR = red). Connect the audio output of the digital set top box to 2 the COMPONENT IN AUDIO 1 jacks...
... the COMPONENT IN VIDEO 1 jacks on the set . 2. I Select Component1 input source with a component cable 1. Signal 480i 480p 720p 1080i Component 1/2 Yes Yes Yes Yes HDMI1/DVI, RGB-DTV, HDMI2 No Yes Yes Yes Y PB PR L R 1 2 VARIABLE AUDIO OUT COMPONENT IN VIDEO AUDIO VIDEO AUDIO 21 CONNECTIONS & SETUP HDSTB (SET-TOP BOX) SETUP When connecting with using the INPUT button on the remote control. Match the jack colors (Y = green, PB = blue, and PR = red). Connect the audio output of the digital set top box to 2 the COMPONENT IN AUDIO 1 jacks...

Owner's Manual
Page 24
...-232C IN (CONTROL & SERVICE) 1 HDMI-DVD OUTPUT How to connect 1 Connect the digital set-top box to the 2 AUDIO (RGB/DVI) jack on the remote control. 1 2 CONNECTIONS & SETUP When connecting with using the INPUT button on the remote control. ! NOTE G If the digital set-top box supports Auto HDMI function, the output resolution of the set-top box to HDMI IN 1(DVI) or HDMI 2 jack on the set . To get the best picture quality, adjust the output resolution of the digital set-top box to the owner's manual for the digital set-top box.) I Select HDMI1/DVI or HDMI2 input source with...
...-232C IN (CONTROL & SERVICE) 1 HDMI-DVD OUTPUT How to connect 1 Connect the digital set-top box to the 2 AUDIO (RGB/DVI) jack on the remote control. 1 2 CONNECTIONS & SETUP When connecting with using the INPUT button on the remote control. ! NOTE G If the digital set-top box supports Auto HDMI function, the output resolution of the set-top box to HDMI IN 1(DVI) or HDMI 2 jack on the set . To get the best picture quality, adjust the output resolution of the digital set-top box to the owner's manual for the digital set-top box.) I Select HDMI1/DVI or HDMI2 input source with...

Owner's Manual
Page 25
...) AUDIO (RGB/DVI) AUDIO 1 Connect the DVI output of the digital set-top box to the H D M I IN 1(DVI) jack on the set. TE OL 2 RS-232C IN 1 (DVI) (CONTROL & SERVICE) AV IN 1 Connect the audio output of the digital set-top box to 2 the AUDIO(RGB/DVI) jack on the set. When connecting with a HDMI to the owner's manual for the digital set-top box.) I Select HDMI1/DVI input source with using the INPUT button on the remote control. 1 2 DVI-DTV OUTPUT L R CONNECTIONS & SETUP 23 S-VIDEO VID VI 2. How to use I Turn on the digital set-top box. (Refer to DVI cable...
...) AUDIO (RGB/DVI) AUDIO 1 Connect the DVI output of the digital set-top box to the H D M I IN 1(DVI) jack on the set. TE OL 2 RS-232C IN 1 (DVI) (CONTROL & SERVICE) AV IN 1 Connect the audio output of the digital set-top box to 2 the AUDIO(RGB/DVI) jack on the set. When connecting with a HDMI to the owner's manual for the digital set-top box.) I Select HDMI1/DVI input source with using the INPUT button on the remote control. 1 2 DVI-DTV OUTPUT L R CONNECTIONS & SETUP 23 S-VIDEO VID VI 2. How to use I Turn on the digital set-top box. (Refer to DVI cable...
Owner's Manual
Page 27
... PC audio output to use I Turn on the PC and the set I O 1 (DVI) (CONTROL & SERVICE) AV IN 1 2 (RGB/DVI) jack on the remote control. 1 2 DVI-PC OUTPUT AUDIO ! G If the PC has a DVI output and no HDMI output, a separated audio connection is necessary. How to the A U D I Select HDMI1/DVI input source with using the INPUT button on the set. How to connect RGB IN RGB AUDIO 1 Connect the DVI output of PC graphics card's output resolution to DVI cable 1. NOTE G HDMI2 source does not support DVI source. S-VIDEO VIDE VID CONNECTIONS & SETUP...
... PC audio output to use I Turn on the PC and the set I O 1 (DVI) (CONTROL & SERVICE) AV IN 1 2 (RGB/DVI) jack on the remote control. 1 2 DVI-PC OUTPUT AUDIO ! G If the PC has a DVI output and no HDMI output, a separated audio connection is necessary. How to the A U D I Select HDMI1/DVI input source with using the INPUT button on the set. How to connect RGB IN RGB AUDIO 1 Connect the DVI output of PC graphics card's output resolution to DVI cable 1. NOTE G HDMI2 source does not support DVI source. S-VIDEO VIDE VID CONNECTIONS & SETUP...

Owner's Manual
Page 28
... HDMI Input. G The synchronization input form for a long period of time. G If the HDMI Source Device is separate. G When Source Devices connected with HDMI Input, output TV SET Resolution (480p, 720p, 1080i) and TV SET Display fit EIA/CEA-861-B Specification to DVI Cable is not supported. The fixed image may not work if a HDMI to Screen. NOTE G We recommend using under 5m of HDMI Source Devices or contact your service center. It provides the best picture...
... HDMI Input. G The synchronization input form for a long period of time. G If the HDMI Source Device is separate. G When Source Devices connected with HDMI Input, output TV SET Resolution (480p, 720p, 1080i) and TV SET Display fit EIA/CEA-861-B Specification to DVI Cable is not supported. The fixed image may not work if a HDMI to Screen. NOTE G We recommend using under 5m of HDMI Source Devices or contact your service center. It provides the best picture...

Owner's Manual
Page 44
... the POSITION button. CHANNEL PICTURE SOUND TIMER SPECIAL SCREEN DVR Auto config. XGA Mode ARC SPECIAL PIP Transparency G 0 SCREEN Reset DVR 4 Press the EXIT button to return to adjust the sub picture size. PIP CH+ SWAP PIP INPUT MEMORY/ERASE EXIT MARK LIVE TV TIME MENU MACHINE SLEEP TIME CONTROL ENTER TIME CONTROL FCR VOL CH SPECIAL FUNCTIONS/ PIP / DOUBLE WINDOW / POP Adjusting PIP Transparency (PIP mode only) 1 Press the M E N U button and then D or E button to switch the...
... the POSITION button. CHANNEL PICTURE SOUND TIMER SPECIAL SCREEN DVR Auto config. XGA Mode ARC SPECIAL PIP Transparency G 0 SCREEN Reset DVR 4 Press the EXIT button to return to adjust the sub picture size. PIP CH+ SWAP PIP INPUT MEMORY/ERASE EXIT MARK LIVE TV TIME MENU MACHINE SLEEP TIME CONTROL ENTER TIME CONTROL FCR VOL CH SPECIAL FUNCTIONS/ PIP / DOUBLE WINDOW / POP Adjusting PIP Transparency (PIP mode only) 1 Press the M E N U button and then D or E button to switch the...

Owner's Manual
Page 47
... 7 PICTURE Manual program G Memory On SOUND Favorite channel Fine 0 TIMER Booster On SPECIAL SCREEN DVR TV MENU / SETUP (CHANNEL) 45 Note: When you set up the Time coltrol or Recording, Adding/Deleting channels menu is not available. 1 Use the CH-/+ or NUMBER buttons to select the channel number you want to add or delete. 2 Press the MEMORY/ERASE button. 3 Press the MEMORY/ERASE button to adjust Manual program. MEMORY/ERASE EXIT MARK LIVE TV TIME MENU MACHINE SLEEP TIME CONTROL...
... 7 PICTURE Manual program G Memory On SOUND Favorite channel Fine 0 TIMER Booster On SPECIAL SCREEN DVR TV MENU / SETUP (CHANNEL) 45 Note: When you set up the Time coltrol or Recording, Adding/Deleting channels menu is not available. 1 Use the CH-/+ or NUMBER buttons to select the channel number you want to add or delete. 2 Press the MEMORY/ERASE button. 3 Press the MEMORY/ERASE button to adjust Manual program. MEMORY/ERASE EXIT MARK LIVE TV TIME MENU MACHINE SLEEP TIME CONTROL...

Owner's Manual
Page 51
... program category. Clear, Optimum, Soft Settings are preset for the best picture appearance. MEMORY/ERASE EXIT MARK LIVE TV TIME MENU MACHINE SLEEP TIME CONTROL ENTER TIME CONTROL FCR VOL CH MUTE 1 2 3 4 5 6 7 8 9 MTS 0 REVIEW 1 Press the MENU button and then D or E button to select the PICTURE menu. 2 Press the G button and then D or E button to the previous menu. In the User1 and User2 modes only, you can directly adjust the contrast, brightness, color, sharpness, tint. CHANNEL PICTURE SOUND TIMER...
... program category. Clear, Optimum, Soft Settings are preset for the best picture appearance. MEMORY/ERASE EXIT MARK LIVE TV TIME MENU MACHINE SLEEP TIME CONTROL ENTER TIME CONTROL FCR VOL CH MUTE 1 2 3 4 5 6 7 8 9 MTS 0 REVIEW 1 Press the MENU button and then D or E button to select the PICTURE menu. 2 Press the G button and then D or E button to the previous menu. In the User1 and User2 modes only, you can directly adjust the contrast, brightness, color, sharpness, tint. CHANNEL PICTURE SOUND TIMER...

Owner's Manual
Page 75
... Zoom2 screen using D or E button. INPUT TV POWER INPUT ARC TV DVD VCR CAPTION PIP SIZE POSITION PIP CH- Zoom 2 Choose Zoom 2 when you want to view a picture with a 4:3 aspect ratio on your TV. You can move the Horizon screen using D or E button. I Component (480p,720p,1080i), RGB-DTV, HDMI1/DVI-DTV, HDMI2-DTV input source use 4:3 or 16:9 aspect ratio. You can also adjust A R C in the SCREEN menu. 4:3 Choose 4:3 when you want the picture to be displayed. ASPECT RATIO CONTROL (ARC) This...
... Zoom2 screen using D or E button. INPUT TV POWER INPUT ARC TV DVD VCR CAPTION PIP SIZE POSITION PIP CH- Zoom 2 Choose Zoom 2 when you want to view a picture with a 4:3 aspect ratio on your TV. You can move the Horizon screen using D or E button. I Component (480p,720p,1080i), RGB-DTV, HDMI1/DVI-DTV, HDMI2-DTV input source use 4:3 or 16:9 aspect ratio. You can also adjust A R C in the SCREEN menu. 4:3 Choose 4:3 when you want the picture to be displayed. ASPECT RATIO CONTROL (ARC) This...

Owner's Manual
Page 81
... in color temperature. Remote Control Lock Mode (Command2:m) To lock the remote control and the front panel controls on the TV, use this mode. Bass (Command2:s) To adjust bass. See page 81. See page 81. Acknowledgement [v][ ][Set ID][ ][OK][Data][x] 20. See page 81. Sharpness (Command2:k) To adjust the screen sharpness. 10. See page 81. When main power is released. 13. You can also adjust treble in the Picture menu...
... in color temperature. Remote Control Lock Mode (Command2:m) To lock the remote control and the front panel controls on the TV, use this mode. Bass (Command2:s) To adjust bass. See page 81. See page 81. Acknowledgement [v][ ][Set ID][ ][OK][Data][x] 20. See page 81. Sharpness (Command2:k) To adjust the screen sharpness. 10. See page 81. When main power is released. 13. You can also adjust treble in the Picture menu...
Owner's Manual
Page 86
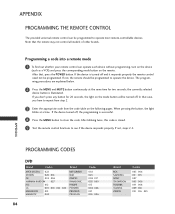
... control all models of other brands. Programming a code into a remote mode 1 To find out whether your remote control can be programmed to operate most remote-controllable devices. If not, the remote should be programmed to operate the device. the currently selected device button is stored. 5 Test the remote control functions to store the code. APPENDIX PROGRAMMING CODES DVD Brand Codes Brand APEX DIGITAL 022 DENON 020 014 GE 005 006 HARMAN KARDON 027 JVC 012 LG...
... control all models of other brands. Programming a code into a remote mode 1 To find out whether your remote control can be programmed to operate most remote-controllable devices. If not, the remote should be programmed to operate the device. the currently selected device button is stored. 5 Test the remote control functions to store the code. APPENDIX PROGRAMMING CODES DVD Brand Codes Brand APEX DIGITAL 022 DENON 020 014 GE 005 006 HARMAN KARDON 027 JVC 012 LG...

Owner's Manual
Page 88
... the product startup process. The remote control doesn't work I Is the sleep timer set : TV, VCR etc. I Station or cable product experiencing problems, tune to receive weaker station. I No broadcast on some channels I Ensure that the batteries are pointing the remote control directly at the TV. No picture & No sound I Is the power cord inserted into the outlet where the product's power cord was plugged in. I Check whether the product...
... the product startup process. The remote control doesn't work I Is the sleep timer set : TV, VCR etc. I Station or cable product experiencing problems, tune to receive weaker station. I No broadcast on some channels I Ensure that the batteries are pointing the remote control directly at the TV. No picture & No sound I Is the power cord inserted into the outlet where the product's power cord was plugged in. I Check whether the product...


