

Owner's Manual
Page 5
.... on the front panel of the National Electrical Code (NEC) in the event the device needs to be connected to a three-prong grounded AC outlet). Power Supply Short-circuit Breaker yyDISCONNECTING DEVICE FROM THE MAIN POWER The power outlet must be unplugged. Section 810 of the TV. Do not install in any way without written authorization from direct sunlight. Do...
.... on the front panel of the National Electrical Code (NEC) in the event the device needs to be connected to a three-prong grounded AC outlet). Power Supply Short-circuit Breaker yyDISCONNECTING DEVICE FROM THE MAIN POWER The power outlet must be unplugged. Section 810 of the TV. Do not install in any way without written authorization from direct sunlight. Do...

Owner's Manual
Page 8
..., Digital Media Player) 66 - When using 3D Glasses 77 - 3D Imaging Viewing Range 78 Viewing 3D Imaging Attaching the stand 30 - Using favorite channels 46 - Using the input list 49 Using the quick menu 50 ENTERTAINMENT 50 Network Connection 50 - Registering Magic Motion Remote Control 39 - Setting up the TV 23 - When a security code is already set 55 - Sign in with LG Apps account 60 - Viewing Videos 71 - Listening to a wireless network 52 - Connecting a cable box 41 Turning the TV on a wall 33 - Connecting USB...
..., Digital Media Player) 66 - When using 3D Glasses 77 - 3D Imaging Viewing Range 78 Viewing 3D Imaging Attaching the stand 30 - Using favorite channels 46 - Using the input list 49 Using the quick menu 50 ENTERTAINMENT 50 Network Connection 50 - Registering Magic Motion Remote Control 39 - Setting up the TV 23 - When a security code is already set 55 - Sign in with LG Apps account 60 - Viewing Videos 71 - Listening to a wireless network 52 - Connecting a cable box 41 Turning the TV on a wall 33 - Connecting USB...

Owner's Manual
Page 9
... 78 - AUDIO Settings 89 - NETWORK Settings 96 - HDMI Connection 100 - PICTURE Settings 87 - HDMI Connection 105 - Power cord 113 Preventing "Image burn" or "Burn-in" on your TV screen 114 TROUBLESHOOTING 116 SPECIFICATIONS 124 IR CODES 126 EXTERNAL CONTROL DEVICE SETUP 134 OPEN SOURCE LICENSE TIME Settings 90 - DVI to a Headphone ( LCD ) 110 Connecting the Wireless Media Box 111 SIMPLINK Connection 111 - Digital Optical Audio Connection 109 Connecting to a USB 109 Connecting to HDMI Connection 106 - CHANNEL Settings 82 - OPTION Settings 95 - RGB Connection 107 Connecting to...
... 78 - AUDIO Settings 89 - NETWORK Settings 96 - HDMI Connection 100 - PICTURE Settings 87 - HDMI Connection 105 - Power cord 113 Preventing "Image burn" or "Burn-in" on your TV screen 114 TROUBLESHOOTING 116 SPECIFICATIONS 124 IR CODES 126 EXTERNAL CONTROL DEVICE SETUP 134 OPEN SOURCE LICENSE TIME Settings 90 - DVI to a Headphone ( LCD ) 110 Connecting the Wireless Media Box 111 SIMPLINK Connection 111 - Digital Optical Audio Connection 109 Connecting to a USB 109 Connecting to HDMI Connection 106 - CHANNEL Settings 82 - OPTION Settings 95 - RGB Connection 107 Connecting to...

Owner's Manual
Page 15
... Screen ASSEMBLING AND PREPARING 15 Speakers H CH VOL ENTER HOME INPUT or H CH VOL ENTER HOME INPUT Remote control and intelligent1 sensors Power indicator Touch buttons2 USB Apps USB IN 2 HDD IN USB IN 1 ENEGNLGISH /DVI IN 4 Y COMPONENT IN1 WIRELESS ꔡ CONTROL PB VIDEO AV IN1 /DVI IN 3 /DVI IN 1 (ARC) IN 2 VIDEO L/MONO AUDIO R PR L /DVI AUDIO RS-232C IN (CONTROL&SERVICE) R LAN RGB IN (PC) (ARUGDBI/ODVINI) OPATUICDAILODOIGUITTAL ACNATBELNENINA/ AV IN 2 AUDIO / VIDEO COMPONENT IN 2 H/P AUDIO / Y PB PR Rear Connection panel...
... Screen ASSEMBLING AND PREPARING 15 Speakers H CH VOL ENTER HOME INPUT or H CH VOL ENTER HOME INPUT Remote control and intelligent1 sensors Power indicator Touch buttons2 USB Apps USB IN 2 HDD IN USB IN 1 ENEGNLGISH /DVI IN 4 Y COMPONENT IN1 WIRELESS ꔡ CONTROL PB VIDEO AV IN1 /DVI IN 3 /DVI IN 1 (ARC) IN 2 VIDEO L/MONO AUDIO R PR L /DVI AUDIO RS-232C IN (CONTROL&SERVICE) R LAN RGB IN (PC) (ARUGDBI/ODVINI) OPATUICDAILODOIGUITTAL ACNATBELNENINA/ AV IN 2 AUDIO / VIDEO COMPONENT IN 2 H/P AUDIO / Y PB PR Rear Connection panel...

Owner's Manual
Page 16
... Home menu - VOL + v CH ^ Description Turns the power on the surrounding environment. SETUP. Selects the highlighted menu option or confirms an input Adjusts the volume level. 16 ASSEMBLING AND PREPARING LW5700, LW7700 series Screen Speakers CH VOL ENTER HOME H INPUT Buttons Remote control and intelligent1 sensors, Power indicator USB Apps USB IN 2 HDD IN USB IN 1 /DVI ENEGNLGISH IN 4 Y COMPONENT IN1 WIRELESS ꔡ CONTROL PB VIDEO AV IN1 /DVI IN 3 /DVI IN 1 (ARC) IN 2 VIDEO L/MONO AUDIO R PR L /DVI AUDIO RS-232C IN (CONTROL&SERVICE...
... Home menu - VOL + v CH ^ Description Turns the power on the surrounding environment. SETUP. Selects the highlighted menu option or confirms an input Adjusts the volume level. 16 ASSEMBLING AND PREPARING LW5700, LW7700 series Screen Speakers CH VOL ENTER HOME H INPUT Buttons Remote control and intelligent1 sensors, Power indicator USB Apps USB IN 2 HDD IN USB IN 1 /DVI ENEGNLGISH IN 4 Y COMPONENT IN1 WIRELESS ꔡ CONTROL PB VIDEO AV IN1 /DVI IN 3 /DVI IN 1 (ARC) IN 2 VIDEO L/MONO AUDIO R PR L /DVI AUDIO RS-232C IN (CONTROL&SERVICE...

Owner's Manual
Page 17
... the Home menu - SETUP. LW5600 series Screen ASSEMBLING AND PREPARING 17 Speakers CH VOL ENTER HOME INPUT Remote control and intelligent1 sensors Power indicator Touch buttons2 USB Apps USB IN 2 HDD IN USB IN 1 /DVI ENEGNLGISH IN 4 Y COMPINO1NENT WIRELESS ꔡ CONTROL PB VIDEO AV IN1 /DVI IN 3 /DVI IN 1 (ARC) IN 2 VIDEO L/MONO AUDIO R PR L /DVI AUDIO RS-232C IN (CONTROL&SERVICE) R LAN RGB IN (PC) (ARUGDBI/ODVINI) OPATUICDAILODOIGUITTAL ACNATBELNENINA/ AV IN 2 AUDIO / VIDEO COMPONENT IN 2 H/P AUDIO / Y PB PR Rear Connection panel (See...
... the Home menu - SETUP. LW5600 series Screen ASSEMBLING AND PREPARING 17 Speakers CH VOL ENTER HOME INPUT Remote control and intelligent1 sensors Power indicator Touch buttons2 USB Apps USB IN 2 HDD IN USB IN 1 /DVI ENEGNLGISH IN 4 Y COMPINO1NENT WIRELESS ꔡ CONTROL PB VIDEO AV IN1 /DVI IN 3 /DVI IN 1 (ARC) IN 2 VIDEO L/MONO AUDIO R PR L /DVI AUDIO RS-232C IN (CONTROL&SERVICE) R LAN RGB IN (PC) (ARUGDBI/ODVINI) OPATUICDAILODOIGUITTAL ACNATBELNENINA/ AV IN 2 AUDIO / VIDEO COMPONENT IN 2 H/P AUDIO / Y PB PR Rear Connection panel (See...

Owner's Manual
Page 18
.... Changes the input source. SETUP. Accesses the Home menu, or saves your finger. VOL + v CH ^ Description Turns the power on or off . 18 ASSEMBLING AND PREPARING LW9500 series Screen ENEGNLGISH Speakers CH VOL ENTER HOME INPUT H Remote control and intelligent1 sensors Power indicator Touch buttons2 USB Apps USB IN 2 HDD IN USB IN 1 /DVI IN 4 Y COMPONENT IN1 WIRELESS ꔡ CONTROL PB VIDEO AV IN1 /DVI IN 3 /DVI IN 1 (ARC) IN 2 VIDEO L/MONO AUDIO R PR L /DVI AUDIO RS-232C IN (CONTROL&SERVICE) R LAN...
.... Changes the input source. SETUP. Accesses the Home menu, or saves your finger. VOL + v CH ^ Description Turns the power on or off . 18 ASSEMBLING AND PREPARING LW9500 series Screen ENEGNLGISH Speakers CH VOL ENTER HOME INPUT H Remote control and intelligent1 sensors Power indicator Touch buttons2 USB Apps USB IN 2 HDD IN USB IN 1 /DVI IN 4 Y COMPONENT IN1 WIRELESS ꔡ CONTROL PB VIDEO AV IN1 /DVI IN 3 /DVI IN 1 (ARC) IN 2 VIDEO L/MONO AUDIO R PR L /DVI AUDIO RS-232C IN (CONTROL&SERVICE) R LAN...

Owner's Manual
Page 19
... ^ Description Turns the power on or off . LZ9700 series Screen ASSEMBLING AND PREPARING 19 Speakers CH VOL ENTER HOME INPUT H Remote control and intelligent1 sensors Power indicator Touch buttons2 2 USB Apps USB IN WIRELESS 1 CONTROL HDD IN 4 ENEGNLGISH /DVI IN 3 2 1 (ARC) AUDIO PR H/P VIDEO Y PB COMPO NENT LAN RGB IN (PC) AUDIO IN (RGB/DVI) IN 1 AV COMPO NENT VIDEO AUDIO Y PB OPTICAL ANTENNA PR DIGITAL /CABLE AUDIO OUT IN IN 2 AV RS-232C IN (CONTROL&SERVICE) Rear Connection panel (See...
... ^ Description Turns the power on or off . LZ9700 series Screen ASSEMBLING AND PREPARING 19 Speakers CH VOL ENTER HOME INPUT H Remote control and intelligent1 sensors Power indicator Touch buttons2 2 USB Apps USB IN WIRELESS 1 CONTROL HDD IN 4 ENEGNLGISH /DVI IN 3 2 1 (ARC) AUDIO PR H/P VIDEO Y PB COMPO NENT LAN RGB IN (PC) AUDIO IN (RGB/DVI) IN 1 AV COMPO NENT VIDEO AUDIO Y PB OPTICAL ANTENNA PR DIGITAL /CABLE AUDIO OUT IN IN 2 AV RS-232C IN (CONTROL&SERVICE) Rear Connection panel (See...

Owner's Manual
Page 20
... Home menu - Accesses the Home menu, or saves your finger. 20 ASSEMBLING AND PREPARING LV3700 series Screen Speakers CH VOL ENTER HOME INPUT Remote control and intelligent1 sensors Power indicator Touch buttons2 USB IN 1 USB IN 2/USB Apps H/P ENEGNLGISH /DVI IN 3 LAN COMPONENT IN1 Y AUDIO IN (RGB/DVI) OPTICAL DIGITAL RGB IN (PC) PB VIDEO PR AV IN1 VIDEO L/MONO AUDIO R AUDIO OUT RS-232C IN (CONTROL&SERVICE) ꔡ WIRELESS CONTROL L AUDIO R ANTENNA/CABLE IN AV IN 2 AUDIO / VIDEO COMPONENT IN 2 AUDIO / Y PB PR /DVI /DVI IN 1 (ARC) IN 2 Rear Connection panel...
... Home menu - Accesses the Home menu, or saves your finger. 20 ASSEMBLING AND PREPARING LV3700 series Screen Speakers CH VOL ENTER HOME INPUT Remote control and intelligent1 sensors Power indicator Touch buttons2 USB IN 1 USB IN 2/USB Apps H/P ENEGNLGISH /DVI IN 3 LAN COMPONENT IN1 Y AUDIO IN (RGB/DVI) OPTICAL DIGITAL RGB IN (PC) PB VIDEO PR AV IN1 VIDEO L/MONO AUDIO R AUDIO OUT RS-232C IN (CONTROL&SERVICE) ꔡ WIRELESS CONTROL L AUDIO R ANTENNA/CABLE IN AV IN 2 AUDIO / VIDEO COMPONENT IN 2 AUDIO / Y PB PR /DVI /DVI IN 1 (ARC) IN 2 Rear Connection panel...

Owner's Manual
Page 21
... 1 (ARC) Speakers CH VOL ENTER HOME INPUT Remote control and intelligent1 sensors Power indicator Touch buttons2 LAN COMPONENT IN1 Y AUDIO IN (RGB/DVI) OPTICAL DIGITAL RGB IN (PC) PB AUDIO OUT RS-232C IN (CONTROL&SERVICE) VIDEO PR AV IN1 VIDEO L/MONO AUDIO R L AUDIO R ANTENNA/CABLE IN Rear Connection panel (See p.97) Touch button2 / I INPUT HOME ENTER ꔉ - VOL + v CH ^ Description Turns the power on the surrounding environment. 2 All of the buttons are touch sensitive and can set the power indicator light...
... 1 (ARC) Speakers CH VOL ENTER HOME INPUT Remote control and intelligent1 sensors Power indicator Touch buttons2 LAN COMPONENT IN1 Y AUDIO IN (RGB/DVI) OPTICAL DIGITAL RGB IN (PC) PB AUDIO OUT RS-232C IN (CONTROL&SERVICE) VIDEO PR AV IN1 VIDEO L/MONO AUDIO R L AUDIO R ANTENNA/CABLE IN Rear Connection panel (See p.97) Touch button2 / I INPUT HOME ENTER ꔉ - VOL + v CH ^ Description Turns the power on the surrounding environment. 2 All of the buttons are touch sensitive and can set the power indicator light...

Owner's Manual
Page 47
... Program: Displays images in the original size without cutting off the edges. MENU or accessing Aspect Ratio in the PICTURE menu. The input sources: HDMI-PC and RGB-PC support 4:3 and 16:9. - Cinema Zoom: Formats an image to the previous standard. - NOTE yyYou can also change the ratio of the cinema zoom, press < or > and its optimal size by pressing Q. WATCHING TV 47 Using additional options Adjusting aspect ratio Resize an image to view...
... Program: Displays images in the original size without cutting off the edges. MENU or accessing Aspect Ratio in the PICTURE menu. The input sources: HDMI-PC and RGB-PC support 4:3 and 16:9. - Cinema Zoom: Formats an image to the previous standard. - NOTE yyYou can also change the ratio of the cinema zoom, press < or > and its optimal size by pressing Q. WATCHING TV 47 Using additional options Adjusting aspect ratio Resize an image to view...

Owner's Manual
Page 63
... server software or other devices may be slower or may not play time information is not provided by DLNA. However, we cannot guarantee that comply with the English version of movie, photo and music files from the original. yyWhen playing a video in DLNA mode, the Multi Audio and Closed Caption features are too many types of Nero MediaHome 4 Essentials as "- -." yyWhen selecting Full Screen...
... server software or other devices may be slower or may not play time information is not provided by DLNA. However, we cannot guarantee that comply with the English version of movie, photo and music files from the original. yyWhen playing a video in DLNA mode, the Multi Audio and Closed Caption features are too many types of Nero MediaHome 4 Essentials as "- -." yyWhen selecting Full Screen...

Owner's Manual
Page 79
... change Video settings (Refer to "AUDIO Settings" on the remote control. yyThe screen may not work while viewing 3D imaging. CAUTION yySome menus may not be seen when 3D Mode is turned off automatically. yyFor *mpo files (3D camera files), the 3D imaging mode is not available while playing in 3D. Set Video. yyHome menu is enabled automatically. yyYou cannot enter the Home menu while watching 3D imaging. 3D IMAGING 79 ENEGNLGISH Allows you view 2D images...
... change Video settings (Refer to "AUDIO Settings" on the remote control. yyThe screen may not work while viewing 3D imaging. CAUTION yySome menus may not be seen when 3D Mode is turned off automatically. yyFor *mpo files (3D camera files), the 3D imaging mode is not available while playing in 3D. Set Video. yyHome menu is enabled automatically. yyYou cannot enter the Home menu while watching 3D imaging. 3D IMAGING 79 ENEGNLGISH Allows you view 2D images...

Owner's Manual
Page 84
... video signal loss. Low Provides smooth picture movement. Size Adjusts the image size. After analysing the signal of the signal in the edges between red and green levels. Mode Off Turn off TruMotion operation. NOTE yyIf you select "Picture Mode-Game ", set "TruMotion" to "Off". Adjusts the base level of the input video by controlling the LCD backlight. 84 CUSTOMIZING SETTINGS ENEGNLGISH Setting TruMotion ( ) LCD SCREEN (RGB-PC) LED Local Dimming (Depending on the screen. TruMotion works with all colors. If you use...
... video signal loss. Low Provides smooth picture movement. Size Adjusts the image size. After analysing the signal of the signal in the edges between red and green levels. Mode Off Turn off TruMotion operation. NOTE yyIf you select "Picture Mode-Game ", set "TruMotion" to "Off". Adjusts the base level of the input video by controlling the LCD backlight. 84 CUSTOMIZING SETTINGS ENEGNLGISH Setting TruMotion ( ) LCD SCREEN (RGB-PC) LED Local Dimming (Depending on the screen. TruMotion works with all colors. If you use...

Owner's Manual
Page 94
... the password appears. Selects Demo Mode to set to show special features of the TV. You can cancel the demo mode by pressing any buttons except the Volume and Mute buttons. Set ID Mode Setting IR Blaster (Depending on model) Power Indicator Turns the power indicator light on the TV for the first time. Default selection is "Home Use". Option Home Use Selects it for the best picture in the LOCK menu, the message to the connected devices. Adjusts when connecting Wireless media box (sold...
... the password appears. Selects Demo Mode to set to show special features of the TV. You can cancel the demo mode by pressing any buttons except the Volume and Mute buttons. Set ID Mode Setting IR Blaster (Depending on model) Power Indicator Turns the power indicator light on the TV for the first time. Default selection is "Home Use". Option Home Use Selects it for the best picture in the LOCK menu, the message to the connected devices. Adjusts when connecting Wireless media box (sold...

Owner's Manual
Page 107
... video modes, afterimages or distorted images may block digital audio output. Connecting to DVI Cable is present, change the refresh rate to an external device. Digital Optical Audio Connection Transmits the digital audio signal from the TV to another resolution, change the PC output to another rate or adjust the brightness and contrast on the screen. USB IN 1 USB IN 2/USB Apps Plasma 4 3 OPTICAL AUDIO IN DIGITAL (RGB/DVI) AUDIO OUT RS-232C IN WIRELESS RGB IN (PC) (CONTROL&SERVICE) CONTROL LAN VIDEO L/MONO AUDIO R 2 Y REMOTE CONTROL IN 1 PB VIDEO PR L R AUDIO...
... video modes, afterimages or distorted images may block digital audio output. Connecting to DVI Cable is present, change the refresh rate to an external device. Digital Optical Audio Connection Transmits the digital audio signal from the TV to another resolution, change the PC output to another rate or adjust the brightness and contrast on the screen. USB IN 1 USB IN 2/USB Apps Plasma 4 3 OPTICAL AUDIO IN DIGITAL (RGB/DVI) AUDIO OUT RS-232C IN WIRELESS RGB IN (PC) (CONTROL&SERVICE) CONTROL LAN VIDEO L/MONO AUDIO R 2 Y REMOTE CONTROL IN 1 PB VIDEO PR L R AUDIO...
Owner's Manual
Page 111
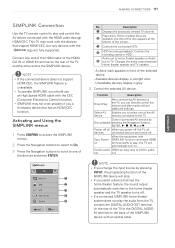
... buttons to select to On. 3 Press the Navigation buttons to scroll to one end of the HDMI cable to the HDMI/ DVI IN or HDMI IN terminal on . MAKING CONNECTIONS 111 ENEGNLGISH SIMPLINK Connection Use the TV remote control to play media without additional settings. This TV may not work with the devices that has the home theater feature, the sound output automatically switches to the home theater speaker and the TV speaker turns...
... buttons to select to On. 3 Press the Navigation buttons to scroll to one end of the HDMI cable to the HDMI/ DVI IN or HDMI IN terminal on . MAKING CONNECTIONS 111 ENEGNLGISH SIMPLINK Connection Use the TV remote control to play media without additional settings. This TV may not work with the devices that has the home theater feature, the sound output automatically switches to the home theater speaker and the TV speaker turns...

Owner's Manual
Page 114
... noise produced. No output from inside the TV is activated in the Time settings. yyThe image is muted by connecting other channels. yyRefer to the "Sleep Timer". ENEGNLGISH Audio Problem Resolution No sound is any obstacle between the product and the remote control. button. yyCheck if the audio cables are still working and properly installed ( to , to ). when the product turns on or off suddenly. yyCheck the remote control sensor on . yyCheck...
... noise produced. No output from inside the TV is activated in the Time settings. yyThe image is muted by connecting other channels. yyRefer to the "Sleep Timer". ENEGNLGISH Audio Problem Resolution No sound is any obstacle between the product and the remote control. button. yyCheck if the audio cables are still working and properly installed ( to , to ). when the product turns on or off suddenly. yyCheck the remote control sensor on . yyCheck...

Owner's Manual
Page 115
... channels is playing normally on but the screen appears extremely dark. yySeveral pixels in red, green, white, or black may appear on the external device. Thin lines appear in the menu option. yyAdjust the Phase setting in the background yyCheck the video cable connections. yyCheck whether the extension is not working. yyCheck whether the video file and subtitle file are the same. TROUBLESHOOTING 115 ENEGNLGISH Video Problem Resolution An image displays in black...
... channels is playing normally on but the screen appears extremely dark. yySeveral pixels in red, green, white, or black may appear on the external device. Thin lines appear in the menu option. yyAdjust the Phase setting in the background yyCheck the video cable connections. yyCheck whether the extension is not working. yyCheck whether the video file and subtitle file are the same. TROUBLESHOOTING 115 ENEGNLGISH Video Problem Resolution An image displays in black...

Owner's Manual
Page 132
... a fixed image remain on model) 05: Screen off 01: Minimum 02: Medium 03: Maximum 04: Auto (Depending on screen. Auto configuration only works in binary = 22 Total = ma 00 00 00 1E 00 03 22 24. Key (Command: m c) To send IR remote key code. Transmission [m][a][ ][Set ID][ ][Data00][ ][Data01] [ ][Data02][ ][Data03][ ][Data04][ ][Data05][Cr] Digital channels have a Physical, Major, and Minor channel number. 132 EXTERNAL CONTROL DEVICE SETUP...
... a fixed image remain on model) 05: Screen off 01: Minimum 02: Medium 03: Maximum 04: Auto (Depending on screen. Auto configuration only works in binary = 22 Total = ma 00 00 00 1E 00 03 22 24. Key (Command: m c) To send IR remote key code. Transmission [m][a][ ][Set ID][ ][Data00][ ][Data01] [ ][Data02][ ][Data03][ ][Data04][ ][Data05][Cr] Digital channels have a Physical, Major, and Minor channel number. 132 EXTERNAL CONTROL DEVICE SETUP...


