
User Manual
Page 1
OWNER'S MANUAL LCD TV Please read this manual carefully before operating your set and retain it for future reference. 47LD950C P/NO : SAC34134207 (1012-REV01) www.lg.com
OWNER'S MANUAL LCD TV Please read this manual carefully before operating your set and retain it for future reference. 47LD950C P/NO : SAC34134207 (1012-REV01) www.lg.com
User Manual
Page 2
...tested and found to comply with arrowhead symbol, within an equilateral triangle is connected. - Consult the dealer or an experienced radio/TV technician for compliance could void the user's authority to radio communications. However, there is encouraged to try to operate the equipment....to the presence of the device). These limits are not expressly approved by turning the equipment off and on a circuit different from LG Electronics. Reorient or relocate the receiving antenna. - This device complies with the instructions, may cause harmful interference to operate this product ...
...tested and found to comply with arrowhead symbol, within an equilateral triangle is connected. - Consult the dealer or an experienced radio/TV technician for compliance could void the user's authority to radio communications. However, there is encouraged to try to operate the equipment....to the presence of the device). These limits are not expressly approved by turning the equipment off and on a circuit different from LG Electronics. Reorient or relocate the receiving antenna. - This device complies with the instructions, may cause harmful interference to operate this product ...

User Manual
Page 4
... not connect too many appliances to the same AC power outlet as this product near flammable objects such as gasoline or candles or expose the TV to direct air conditioning. 16 Do not expose to dripping or splashing and do not drop onto the screen with something. 14 CAUTION concerning the... the AC wall outlet, it can come in contact with such power lines or circuits as vases, cups, etc. Pay particular attention to unplug the TV. 15 WARNING - Do not make sure not to fall into the product, and do not place objects filled with liquids, such as death or serious...
... not connect too many appliances to the same AC power outlet as this product near flammable objects such as gasoline or candles or expose the TV to direct air conditioning. 16 Do not expose to dripping or splashing and do not drop onto the screen with something. 14 CAUTION concerning the... the AC wall outlet, it can come in contact with such power lines or circuits as vases, cups, etc. Pay particular attention to unplug the TV. 15 WARNING - Do not make sure not to fall into the product, and do not place objects filled with liquids, such as death or serious...
User Manual
Page 5
...plastic thermal contraction due to temperature and humidity. tion. Those dots are deactivated pixels and do not affect the performance and reliability of the TV. 23 Ventilation Install your local authority. 5 Avoid touching the LCD screen or holding your finger(s) against or put stress on the product...circuit, which supplies a large amount of time. Do not install in this product contains a small amount of the product. 30 For LCD TV If the TV feels cold to six million pixels. In a very few cases, you smell smoke or other materials (e.g.) plastic while plugged in accordance to ...
...plastic thermal contraction due to temperature and humidity. tion. Those dots are deactivated pixels and do not affect the performance and reliability of the TV. 23 Ventilation Install your local authority. 5 Avoid touching the LCD screen or holding your finger(s) against or put stress on the product...circuit, which supplies a large amount of time. Do not install in this product contains a small amount of the product. 30 For LCD TV If the TV feels cold to six million pixels. In a very few cases, you smell smoke or other materials (e.g.) plastic while plugged in accordance to ...

User Manual
Page 6
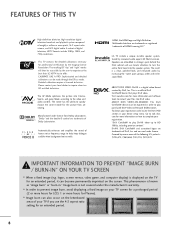
...Reset 79 Demo Mode 80 Add / Delete Channel (Manual Tuning 41 - CONTENTS WARNING / CAUTION 2 SAFETY INSTRUCTIONS 3 FEATURES OF THIS TV 8 PREPARATION Accessories 9 Front Panel Information 11 Back Panel Information 12 Stand Instruction 13 VESA Wall Mounting 14 Cable Management 15 Desktop Pedestal Installation... 25 Other A/V Source Setup 26 USB Connection 26 Audio out Connection 27 PC Setup 28 WATCHING TV / CHANNEL CONTROL Remote Control Functions 34 Turning On the TV 36 Channel Selection 36 Volume Adjustment 36 Initial Setting 37 On-Screen Menus Selection 38 Quick Menu ...
...Reset 79 Demo Mode 80 Add / Delete Channel (Manual Tuning 41 - CONTENTS WARNING / CAUTION 2 SAFETY INSTRUCTIONS 3 FEATURES OF THIS TV 8 PREPARATION Accessories 9 Front Panel Information 11 Back Panel Information 12 Stand Instruction 13 VESA Wall Mounting 14 Cable Management 15 Desktop Pedestal Installation... 25 Other A/V Source Setup 26 USB Connection 26 Audio out Connection 27 PC Setup 28 WATCHING TV / CHANNEL CONTROL Remote Control Functions 34 Turning On the TV 36 Channel Selection 36 Volume Adjustment 36 Initial Setting 37 On-Screen Menus Selection 38 Quick Menu ...
User Manual
Page 7
...II 82 Preset Sound Setting (Sound Mode 83 Sound Setting Adjustment - User Mode 84 Infinite Sound 85 Balance 86 Audio Reset 87 TV Speakers On/Off Setup 88 Stereo/SAP Broadcast Setup 89 Audio Language 90 On-Screen Menus Language Selection 91 Caption Mode - Caption ...Sleep Timer Setting 98 Auto Shut-Off Setting 98 PARENTAL CONTROL / RATINGS Set Password & Lock System 99 Channel Blocking 102 Movie & TV Rating 103 Downloadable Rating 108 External Input Blocking 109 APPENDIX Troubleshooting 110 Maintenance 112 Product Specifications 113 IR Codes 114 External Control Through ...
...II 82 Preset Sound Setting (Sound Mode 83 Sound Setting Adjustment - User Mode 84 Infinite Sound 85 Balance 86 Audio Reset 87 TV Speakers On/Off Setup 88 Stereo/SAP Broadcast Setup 89 Audio Language 90 On-Screen Menus Language Selection 91 Caption Mode - Caption ...Sleep Timer Setting 98 Auto Shut-Off Setting 98 PARENTAL CONTROL / RATINGS Set Password & Lock System 99 Channel Blocking 102 Movie & TV Rating 103 Downloadable Rating 108 External Input Blocking 109 APPENDIX Troubleshooting 110 Maintenance 112 Product Specifications 113 IR Codes 114 External Control Through ...
User Manual
Page 8
...extended period. 8 DivX®, DivX Certified® and associated logos are trademarks or registered trademarks of Dolby Laboratories. LG TV include a unique invisible speaker system, tuned by the Imaging Science Foundation. ABOUT DIVX VIDEO-ON-DEMAND: This DivX ...calibrations can become permanently imprinted on the letterboxed areas of your device setup menu. Detailed calibration requires a licensed technician. Please contact your TV screen for a prolonged period (2 or more hours for professional certification by renowned audio expert, Mr. Mark Levinson. com for more...
...extended period. 8 DivX®, DivX Certified® and associated logos are trademarks or registered trademarks of Dolby Laboratories. LG TV include a unique invisible speaker system, tuned by the Imaging Science Foundation. ABOUT DIVX VIDEO-ON-DEMAND: This DivX ...calibrations can become permanently imprinted on the letterboxed areas of your device setup menu. Detailed calibration requires a licensed technician. Please contact your TV screen for a prolonged period (2 or more hours for professional certification by renowned audio expert, Mr. Mark Levinson. com for more...

User Manual
Page 9
... may differ from the images below. If an accessory is missing, please contact the dealer where you purchased the TV. ENERGY SAVING Power ON/OFF MODAEV INPUT LIST M E N U ENTER IN FO RATIO RETURN VOL FAMVARK FLASHBK MUTE 3D... TV CH P A G E Q .M ENU 1.5V L/R 1.5V Owner's Manual CD Manual Protecttive Bracket and Bolt for Power Cord (Refer to P.15) Installer ... for stand assembly (Refer to P.13) Not included with all models * Wipe spots on the exterior only with your TV.
... may differ from the images below. If an accessory is missing, please contact the dealer where you purchased the TV. ENERGY SAVING Power ON/OFF MODAEV INPUT LIST M E N U ENTER IN FO RATIO RETURN VOL FAMVARK FLASHBK MUTE 3D... TV CH P A G E Q .M ENU 1.5V L/R 1.5V Owner's Manual CD Manual Protecttive Bracket and Bolt for Power Cord (Refer to P.15) Installer ... for stand assembly (Refer to P.13) Not included with all models * Wipe spots on the exterior only with your TV.
User Manual
Page 11
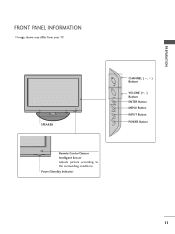
PREPARATION FRONT PANEL INFORMATION I Image shown may differ from your TV. SPEAKER CHANNEL ( , ) Buttons CH VOLUME (+, -) VOL Buttons ENTER Button ENTER MENU Button MENU INPUT Button INPUT POWER Button Remote Control Sensor Intelligent Sensor Adjusts picture according to the surrounding conditions Power/Standby Indicator 11
PREPARATION FRONT PANEL INFORMATION I Image shown may differ from your TV. SPEAKER CHANNEL ( , ) Buttons CH VOLUME (+, -) VOL Buttons ENTER Button ENTER MENU Button MENU INPUT Button INPUT POWER Button Remote Control Sensor Intelligent Sensor Adjusts picture according to the surrounding conditions Power/Standby Indicator 11
User Manual
Page 12
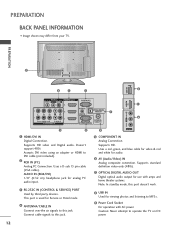
.... Note: In standby mode, this jack. 5 COMPONENT IN Analog Connection. PREPARATION BACK PANEL INFORMATION I Image shown may differ from your TV. Doesn't support 480i. Connect cable signals to operate the TV on DC power. 12 Uses a red, green, and blue cable for video & red and white for analog PC audio input. 3 RS...
.... Note: In standby mode, this jack. 5 COMPONENT IN Analog Connection. PREPARATION BACK PANEL INFORMATION I Image shown may differ from your TV. Doesn't support 480i. Connect cable signals to operate the TV on DC power. 12 Uses a red, green, and blue cable for video & red and white for analog PC audio input. 3 RS...
User Manual
Page 13
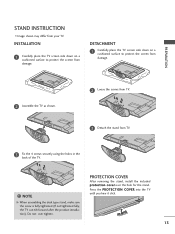
... G When assembling the desk type stand, make sure the screw is fully tightened (If not tightened fully, the TV can tilt forward after the product installation). Do not over the hole for the stand. PROTECTION COVER After removing the stand, install... the included protection cover over tighten. Press the PROTECTION COVER into the TV until you hear it click. 13 PREPARATION 2 Assemble the TV as shown. 2 Loose the screws from TV. 3 Detach the stand from your TV. INSTALLATION 1 Carefully place the TV screen side down on a cushioned surface to protect the screen from damage...
... G When assembling the desk type stand, make sure the screw is fully tightened (If not tightened fully, the TV can tilt forward after the product installation). Do not over the hole for the stand. PROTECTION COVER After removing the stand, install... the included protection cover over tighten. Press the PROTECTION COVER into the TV until you hear it click. 13 PREPARATION 2 Assemble the TV as shown. 2 Loose the screws from TV. 3 Detach the stand from your TV. INSTALLATION 1 Carefully place the TV screen side down on a cushioned surface to protect the screen from damage...

User Manual
Page 14
...screw specifications. G Do not use fasten the screws too strongly, this may damage the TV or cause the TV to a fall and result in the table. When attaching to personal injury. LG recommends that you use screws longer then the standard dimension, as they may differ depending on... (sold separately) 47LD950C 200 * 200 M6 4 AW-47LG30M ! G When purchasing our wall mount kit, a detailed installation manual and all parts necessary for wall mount kits are provided. G Do not use an LG brand wall mount when mounting the TV to the TV. LG is not liable for TV damage or personal ...
...screw specifications. G Do not use fasten the screws too strongly, this may damage the TV or cause the TV to a fall and result in the table. When attaching to personal injury. LG recommends that you use screws longer then the standard dimension, as they may differ depending on... (sold separately) 47LD950C 200 * 200 M6 4 AW-47LG30M ! G When purchasing our wall mount kit, a detailed installation manual and all parts necessary for wall mount kits are provided. G Do not use an LG brand wall mount when mounting the TV to the TV. LG is not liable for TV damage or personal ...
User Manual
Page 15
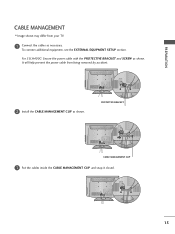
PROTECTIVE BRACKET CABLE MANAGEMENT CLIP 3 Put the cables inside the CABLE MANAGEMENT CLIP and snap it closed. 15 It will help prevent the power cable from your TV. 1 Connect the cables as necessary. For 55LH400C: Secure the power cable with the PROTECTIVE BRACKET and SCREW as shown. PREPARATION CABLE MANAGEMENT I Image shown may differ from being removed by accident. 2 Install the CABLE MANAGEMENT CLIP as shown. To connect additional equipment, see the EXTERNAL EQUIPMENT SETUP section.
PROTECTIVE BRACKET CABLE MANAGEMENT CLIP 3 Put the cables inside the CABLE MANAGEMENT CLIP and snap it closed. 15 It will help prevent the power cable from your TV. 1 Connect the cables as necessary. For 55LH400C: Secure the power cable with the PROTECTIVE BRACKET and SCREW as shown. PREPARATION CABLE MANAGEMENT I Image shown may differ from being removed by accident. 2 Install the CABLE MANAGEMENT CLIP as shown. To connect additional equipment, see the EXTERNAL EQUIPMENT SETUP section.

User Manual
Page 16
...may differ from the wall. 4 inches 4 inches 4 inches 4 inches CAUTION G Ensure adequate ventilation by 20 degrees to suit your TV. For further information, contact http://www.kensington.com, the internet homepage of heat source. Kensington sells security systems for all four sides... from your viewing position. SWIVEL STAND After installing the TV, you can adjust the TV set manually to the user's guide provided with a Kensington Security System connector on all models. - For proper ventilation...
...may differ from the wall. 4 inches 4 inches 4 inches 4 inches CAUTION G Ensure adequate ventilation by 20 degrees to suit your TV. For further information, contact http://www.kensington.com, the internet homepage of heat source. Kensington sells security systems for all four sides... from your viewing position. SWIVEL STAND After installing the TV, you can adjust the TV set manually to the user's guide provided with a Kensington Security System connector on all models. - For proper ventilation...
User Manual
Page 17
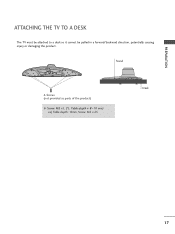
PREPARATION ATTACHING THE TV TO A DESK The TV must be attached to a desk so it cannot be pulled in a forward/backward direction, potentially causing injury or damaging the product. Stand Desk 4-Screws (not provided as parts of the product) G Screw: M5 x L (*L: Table depth + 8~10 mm) ex) Table depth: 15mm, Screw: M5 x 25 17
PREPARATION ATTACHING THE TV TO A DESK The TV must be attached to a desk so it cannot be pulled in a forward/backward direction, potentially causing injury or damaging the product. Stand Desk 4-Screws (not provided as parts of the product) G Screw: M5 x L (*L: Table depth + 8~10 mm) ex) Table depth: 15mm, Screw: M5 x 25 17
User Manual
Page 18
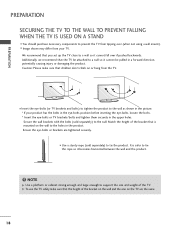
... safer to a wall so it cannot be pulled in a forward direction, potentially causing injury or damaging the product. We recommend that the height of the TV. NOTE G Use a platform or cabinet strong enough and large enough to a wall so it becomes horizontal between the wall and the product. ! Caution:... your product has the bolts in the eye-bolts position before inserting the eye-bolts, loosen the bolts. * Insert the eye-bolts or TV brackets/bolts and tighten them securely in the upper holes. I Use a sturdy rope (sold separately) to the wall. I Image shown may differ from...
... safer to a wall so it cannot be pulled in a forward direction, potentially causing injury or damaging the product. We recommend that the height of the TV. NOTE G Use a platform or cabinet strong enough and large enough to a wall so it becomes horizontal between the wall and the product. ! Caution:... your product has the bolts in the eye-bolts position before inserting the eye-bolts, loosen the bolts. * Insert the eye-bolts or TV brackets/bolts and tighten them securely in the upper holes. I Use a sturdy rope (sold separately) to the wall. I Image shown may differ from...
User Manual
Page 19
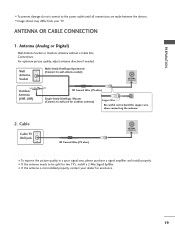
... to wall jack for outdoor antenna) Copper Wire Be careful not to the power outlet until all connections are made between the devices. Cable Cable TV Wall Jack RF Coaxial Wire (75 ohm) ANTENNA /CABLE IN I If the antenna is not installed properly, contact your... TV. PREPARATION I If the antenna needs to be split for two TV's, install a 2-Way Signal Splitter. I To prevent damage do not connect to bend the copper wire when connecting the antenna. 2. I Image shown may...
... to wall jack for outdoor antenna) Copper Wire Be careful not to the power outlet until all connections are made between the devices. Cable Cable TV Wall Jack RF Coaxial Wire (75 ohm) ANTENNA /CABLE IN I If the antenna is not installed properly, contact your... TV. PREPARATION I If the antenna needs to be split for two TV's, install a 2-Way Signal Splitter. I To prevent damage do not connect to bend the copper wire when connecting the antenna. 2. I Image shown may...
User Manual
Page 20
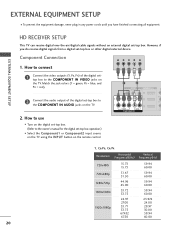
Component Connection 1. How to use I Select the Component1 or Component2 input source on the TV using the INPUT button on the TV. R 3 2 Y PB PR L 2 R 1 1 VIDEO AUDIO COMPONENT IN /DVI IN R AUDI (RGB RS (CONT Y, CB/PB, CR/PR Resolution Horizontal Vertical Frequency(KHz) Frequency(Hz)....00 29.97 30.00 59.94 60.00 20 However, if you have finished connecting all equipment EXTERNAL EQUIPMENT SETUP HD RECEIVER SETUP This TV can receive digital over-the-air/digital cable signals without an external digital set -top box operation.) I Turn on the digital set-top box...
Component Connection 1. How to use I Select the Component1 or Component2 input source on the TV using the INPUT button on the TV. R 3 2 Y PB PR L 2 R 1 1 VIDEO AUDIO COMPONENT IN /DVI IN R AUDI (RGB RS (CONT Y, CB/PB, CR/PR Resolution Horizontal Vertical Frequency(KHz) Frequency(Hz)....00 29.97 30.00 59.94 60.00 20 However, if you have finished connecting all equipment EXTERNAL EQUIPMENT SETUP HD RECEIVER SETUP This TV can receive digital over-the-air/digital cable signals without an external digital set -top box operation.) I Turn on the digital set-top box...
User Manual
Page 21
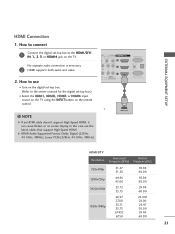
....00 21 How to connect 1 Connect the digital set -top box.) I Select the HDMI1, HDMI2 , HDMI3 or HDMI4 input source on the TV using the INPUT button on the TV. In this case use AV IN 1 EO L(MONO)-AUDIO- How to the HDMI/DVI IN 1, 2, 3 or HDMI4 jack on the remote control...
....00 21 How to connect 1 Connect the digital set -top box.) I Select the HDMI1, HDMI2 , HDMI3 or HDMI4 input source on the TV using the INPUT button on the TV. In this case use AV IN 1 EO L(MONO)-AUDIO- How to the HDMI/DVI IN 1, 2, 3 or HDMI4 jack on the remote control...
User Manual
Page 22
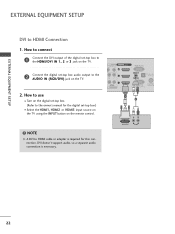
NOTE G A DVI to the HDMI/DVI IN 1, 2 or 3 jack on the TV. DVI OUTPUT L R AUDIO 22 R 3 2 Connect the digital set -top box to HDMI cable or adapter is necessary. PB PR L 2 R VIDEO 1 AUDIO T IN /DVI IN RGB ... doesn't support audio, so a separate audio connection is required for the digital set-top box.) I Select the HDMI1, HDMI2 or HDMI3 input source on the TV using the INPUT button on the digital set-top box. (Refer to the AUDIO IN (RGB/DVI) jack on the...
NOTE G A DVI to the HDMI/DVI IN 1, 2 or 3 jack on the TV. DVI OUTPUT L R AUDIO 22 R 3 2 Connect the digital set -top box to HDMI cable or adapter is necessary. PB PR L 2 R VIDEO 1 AUDIO T IN /DVI IN RGB ... doesn't support audio, so a separate audio connection is required for the digital set-top box.) I Select the HDMI1, HDMI2 or HDMI3 input source on the TV using the INPUT button on the digital set-top box. (Refer to the AUDIO IN (RGB/DVI) jack on the...


