

User Guide
Page 2
... peripherals (digital input/output devices, terminals, printers, etc.) certified to comply with the Class B limits may cause harmful interference to Part 15 of the following measures: - i Connect the equipment into an outlet on ), the user is likely to result in a particular installation. Only shielded Signal Cables may be used in accordance with the instructions, may be determined by turning the equipment...
... peripherals (digital input/output devices, terminals, printers, etc.) certified to comply with the Class B limits may cause harmful interference to Part 15 of the following measures: - i Connect the equipment into an outlet on ), the user is likely to result in a particular installation. Only shielded Signal Cables may be used in accordance with the instructions, may be determined by turning the equipment...
User Guide
Page 4
... of Controls Front View...A7 Rear View ...A7 On Screen Display (OSD) Control Adjustment A8 Control Panel Function A8 On Screen Display (OSD) Selection and Adjustment A10 Video Memory Modes Factory Preset Timing Signal Chart A13 Factory Preset modes A13 User Modes A15 Recalling Display Modes A15 Power Management System Power Consumption A16 MPR II, Self Diagnostics and DDC Low Radiation Compliance (MPR II A17 Self Diagnostics A17 DDC (Display Data Channel A17 Troubleshooting and Service Troubleshooting A18 Service ...A19 Input Specifications Specifications A20 LCD Monitor...
... of Controls Front View...A7 Rear View ...A7 On Screen Display (OSD) Control Adjustment A8 Control Panel Function A8 On Screen Display (OSD) Selection and Adjustment A10 Video Memory Modes Factory Preset Timing Signal Chart A13 Factory Preset modes A13 User Modes A15 Recalling Display Modes A15 Power Management System Power Consumption A16 MPR II, Self Diagnostics and DDC Low Radiation Compliance (MPR II A17 Self Diagnostics A17 DDC (Display Data Channel A17 Troubleshooting and Service Troubleshooting A18 Service ...A19 Input Specifications Specifications A20 LCD Monitor...
User Guide
Page 5
... supports resolutions up to 1024x768, and has a wide viewing angle of 18 memory modes. In addition, there are permanently resident. This monitor is a 15.1-inch (15.1 inches viewable) intelligent micropro-cessor based monitor. The monitor is done with the stringent Swedish TCO '95 requirements for a total of 60 degrees horizontal and 45 degrees vertical. Introduction The LG 500LC Flat Panel Monitor has an active matrix TFT (Thin-Film Transistor) LCD...
... supports resolutions up to 1024x768, and has a wide viewing angle of 18 memory modes. In addition, there are permanently resident. This monitor is a 15.1-inch (15.1 inches viewable) intelligent micropro-cessor based monitor. The monitor is done with the stringent Swedish TCO '95 requirements for a total of 60 degrees horizontal and 45 degrees vertical. Introduction The LG 500LC Flat Panel Monitor has an active matrix TFT (Thin-Film Transistor) LCD...
User Guide
Page 7
... magnets or motors near the picture tube. On Safety 1. To prevent Fire or Hazards: Always turn the monitor OFF if you use another power cord, make sure that have in your home, consult your dealer. 3. Do not try to be left unattended for replacement. 4. Call your service technician for an extended period of this manual or listed on a sloping shelf...
... magnets or motors near the picture tube. On Safety 1. To prevent Fire or Hazards: Always turn the monitor OFF if you use another power cord, make sure that have in your home, consult your dealer. 3. Do not try to be left unattended for replacement. 4. Call your service technician for an extended period of this manual or listed on a sloping shelf...
User Guide
Page 8
... Matrix LCD permanently. 5. Important Precautions On Installation 1. On Repacking Do not throw away the carton and packing materials. Place the monitor near a swimming pool. 3. Do not use the VESA 1024x768 @60Hz video mode to damage. 2. On Cleaning Unplug the monitor before cleaning the face of the LCD panel which to allow anything hard as this may appear on the screen, like Red, Green or Blue spots...
... Matrix LCD permanently. 5. Important Precautions On Installation 1. On Repacking Do not throw away the carton and packing materials. Place the monitor near a swimming pool. 3. Do not use the VESA 1024x768 @60Hz video mode to damage. 2. On Cleaning Unplug the monitor before cleaning the face of the LCD panel which to allow anything hard as this may appear on the screen, like Red, Green or Blue spots...
User Guide
Page 9
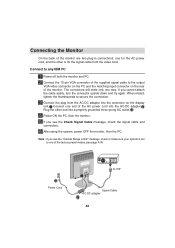
... monitor. Connect to the output VGA video connector on the PC and the matching input connector on the display unit. If you see page A14) Power Cord D-15P Signal Cable AC-DC adapter A5 Connect the plug from the video card. Connect one for the signal cable from the AC-DC adapter into the AC-DC adapter. If you cannot attach the cable easily, turn the connector upside down and try again. After using the system, power...
... monitor. Connect to the output VGA video connector on the PC and the matching input connector on the display unit. If you see page A14) Power Cord D-15P Signal Cable AC-DC adapter A5 Connect the plug from the video card. Connect one for the signal cable from the AC-DC adapter into the AC-DC adapter. If you cannot attach the cable easily, turn the connector upside down and try again. After using the system, power...

User Guide
Page 10
... monitor and the PC. Plug the other end of the signal cable to the side of the factory preset modes.(see page A14) Power Cord Adapter 15P D-15P Signal Cable AC-DC adapter A6 If you see the Check Signal Cable message, check the signal cable and connectors. Note : If you see the "Outside Range Limits" message, check to make sure your local computer store. Connect one of the adapter block with your MAC. After using...
... monitor and the PC. Plug the other end of the signal cable to the side of the factory preset modes.(see page A14) Power Cord Adapter 15P D-15P Signal Cable AC-DC adapter A6 If you see the Check Signal Cable message, check the signal cable and connectors. Note : If you see the "Outside Range Limits" message, check to make sure your local computer store. Connect one of the adapter block with your MAC. After using...
User Guide
Page 11
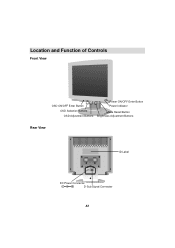
Location and Function of Controls Front View OSD ON/OFF Enter Button OSD Selection Buttons OSD Adjustment Buttons Power ON/OFF Enter Button Power Indicator Mode Recall Button Brightness Adjustment Buttons Rear View ID Label DC Power Connecter -+ D-Sub Signal Connecter A7
Location and Function of Controls Front View OSD ON/OFF Enter Button OSD Selection Buttons OSD Adjustment Buttons Power ON/OFF Enter Button Power Indicator Mode Recall Button Brightness Adjustment Buttons Rear View ID Label DC Power Connecter -+ D-Sub Signal Connecter A7
User Guide
Page 12
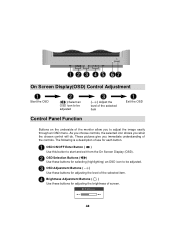
... the image easily through an OSD menu. OSD Adjustment Buttons ( ) Use these buttons for adjusting the brightness of screen. Brightness Adjustment Buttons ( ) Use these buttons for each button. Brightness Min Max A8 On Screen Display(OSD) Control Adjustment Start the OSD ( ) Select an OSD icon to be adjusted. OSD ON/OFF Enter Button ( ) Use this button to be adjusted Control Panel Function ( ) Adjust the level of the selected item Exit the OSD Buttons on the underside of the monitor allow you what the chosen control will do. OSD Selection Buttons ( ) Use these buttons...
... the image easily through an OSD menu. OSD Adjustment Buttons ( ) Use these buttons for adjusting the brightness of screen. Brightness Adjustment Buttons ( ) Use these buttons for each button. Brightness Min Max A8 On Screen Display(OSD) Control Adjustment Start the OSD ( ) Select an OSD icon to be adjusted. OSD ON/OFF Enter Button ( ) Use this button to be adjusted Control Panel Function ( ) Adjust the level of the selected item Exit the OSD Buttons on the underside of the monitor allow you what the chosen control will do. OSD Selection Buttons ( ) Use these buttons...
User Guide
Page 13
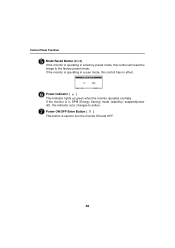
Power ON/OFF Enter Button ( ) This button is operating in a user mode, this control has no effect. Mode Recall NO YES SEL : ENT : -+ Power Indicator ( ) This Indicator lights up green when the monitor operates normally. A9 If the monitor is used to turn the monitor ON and OFF. If the monitor is operating in a factory preset mode, this control will reset the image to the factory preset mode. Control Panel Function Mode Recall Button ( ) If the monitor is in DPM (Energy Saving) mode (stand-by/ suspend/power off), this indicator color changes to amber.
Power ON/OFF Enter Button ( ) This button is operating in a user mode, this control has no effect. Mode Recall NO YES SEL : ENT : -+ Power Indicator ( ) This Indicator lights up green when the monitor operates normally. A9 If the monitor is used to turn the monitor ON and OFF. If the monitor is operating in a factory preset mode, this control will reset the image to the factory preset mode. Control Panel Function Mode Recall Button ( ) If the monitor is in DPM (Energy Saving) mode (stand-by/ suspend/power off), this indicator color changes to amber.
User Guide
Page 15
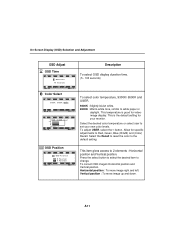
... the default setting for videoimage display. Allow for specific adjustments to 2 elements : Horizontal position and Vertical position. OSD OSD Position SEL: OSD O S D P o s i t i o n H Position V Position OSD ADJ: -+ This item gives access to Red, Green, Blue (R/G/B) and (Color) Recall. Horizontal position : To move image up and down. To adjust USER, select the button. Select the Recall to reset the color to white paper or daylight. On Screen Display (OSD) Selection and Adjustment OSD Adjust OSD Time SEL: OSD Time 50 Seconds OSD ADJ: -+ Color Select 9300K 6500K User OSD MAIN...
... the default setting for videoimage display. Allow for specific adjustments to 2 elements : Horizontal position and Vertical position. OSD OSD Position SEL: OSD O S D P o s i t i o n H Position V Position OSD ADJ: -+ This item gives access to Red, Green, Blue (R/G/B) and (Color) Recall. Horizontal position : To move image up and down. To adjust USER, select the button. Select the Recall to reset the color to white paper or daylight. On Screen Display (OSD) Selection and Adjustment OSD Adjust OSD Time SEL: OSD Time 50 Seconds OSD ADJ: -+ Color Select 9300K 6500K User OSD MAIN...
User Guide
Page 18
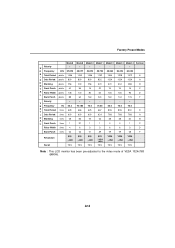
...Factory Preset Modes Mode8 Polarity H O Frequency + kHz 37.879 R Total Period pixels I Z Data Period pixels 1056 800 O Blanking pixels 256 N T Front Porch pixels 40 A Pulse Width pixels 128 L Back Porch pixels 88 Polarity V E Frequency + Hz 60.3 R Total Period lines 628 T I Data Period lines 600 C Blanking lines 28 A L Front Porch lines 1 Pulse Width lines 4 Back Porch lines 23 Resolution... 29 28 F 800 600 YES 800 600 YES 832 624 (MAC) YES 1024 768 YES 1024 768 YES 1024 768 YES Note : This LCD monitor has been pre-adjusted to the video mode of VESA 1024x768 @60Hz.
...Factory Preset Modes Mode8 Polarity H O Frequency + kHz 37.879 R Total Period pixels I Z Data Period pixels 1056 800 O Blanking pixels 256 N T Front Porch pixels 40 A Pulse Width pixels 128 L Back Porch pixels 88 Polarity V E Frequency + Hz 60.3 R Total Period lines 628 T I Data Period lines 600 C Blanking lines 28 A L Front Porch lines 1 Pulse Width lines 4 Back Porch lines 23 Resolution... 29 28 F 800 600 YES 800 600 YES 832 624 (MAC) YES 1024 768 YES 1024 768 YES 1024 768 YES Note : This LCD monitor has been pre-adjusted to the video mode of VESA 1024x768 @60Hz.
User Guide
Page 19
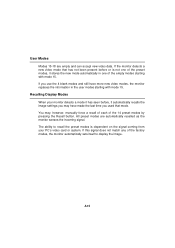
... use the 4 blank modes and still have made the last time you may , however, manually force a recall of each of the 14 preset modes by pressing the Recall button. The ability to recall the preset modes is not one of the factory modes, the monitor automatically sets itself to display the image. A15 If this signal does not match any of the empty modes starting...
... use the 4 blank modes and still have made the last time you may , however, manually force a recall of each of the 14 preset modes by pressing the Recall button. The ability to recall the preset modes is not one of the factory modes, the monitor automatically sets itself to display the image. A15 If this signal does not match any of the empty modes starting...
User Guide
Page 20
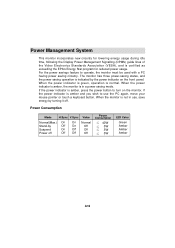
... Mode H.Sync V.Sync Video Normal(Max.) On Stand-by Off Suspend On Power off . The monitor has three power-saving states, and the power saving operation is normal. When the power indicator is green, operation is indicated by turning it off Off On Normal On Off Off Off Off Off Power Consumpion 40W 5W 5W 5W LED Color Green Amber Amber Amber A16 If the power indicator is in use...
... Mode H.Sync V.Sync Video Normal(Max.) On Stand-by Off Suspend On Power off . The monitor has three power-saving states, and the power saving operation is normal. When the power indicator is green, operation is indicated by turning it off Off On Normal On Off Off Off Off Off Power Consumpion 40W 5W 5W 5W LED Color Green Amber Amber Amber A16 If the power indicator is in use...
User Guide
Page 21
... : PC must support DDC functions to a DDC compatible VGA card. Self Diagnostics This monitor can sense when there is detected. Under these situations, the PC sends display data to the monitor but no signal is a possible problem present and informs you to control the monitor settings. This OSD may pop up when it is ON but not commands to check the signal cable connections. Some older computer...
... : PC must support DDC functions to a DDC compatible VGA card. Self Diagnostics This monitor can sense when there is detected. Under these situations, the PC sends display data to the monitor but no signal is a possible problem present and informs you to control the monitor settings. This OSD may pop up when it is ON but not commands to check the signal cable connections. Some older computer...
User Guide
Page 22
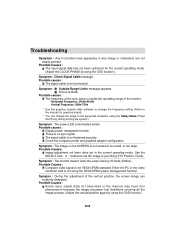
... : Display power management mode. Symptom : The monitor doesn't enter the power saving off mode (Amber). Symptom : Outside Range Limits message appears. Symptom : The power LED is blank. Check the computer power and graphics adapter configuration. Use the SELECT and or buttons to set the image to the supported resolution using the VESA DPMS power management function. These is not VESA DPMS standard. Possible Causes : Computer video signal is no sync signal. Symptom : The image on the SCREEN is not using...
... : Display power management mode. Symptom : The monitor doesn't enter the power saving off mode (Amber). Symptom : Outside Range Limits message appears. Symptom : The power LED is blank. Check the computer power and graphics adapter configuration. Use the SELECT and or buttons to set the image to the supported resolution using the VESA DPMS power management function. These is not VESA DPMS standard. Possible Causes : Computer video signal is no sync signal. Symptom : The image on the SCREEN is not using...
User Guide
Page 23
... other controls may expose you to make occasional sounds when being turned on or off, or when changing video modes. 2. Liquid has been spilled into the monitor. The monitor does not operate normally following the operating instructions. Upon completion of the monitor. Ask a qualified service technician to dispose of any service or repairs to the monitor, ask the service technician to perform the safety check described in a picture...
... other controls may expose you to make occasional sounds when being turned on or off, or when changing video modes. 2. Liquid has been spilled into the monitor. The monitor does not operate normally following the operating instructions. Upon completion of the monitor. Ask a qualified service technician to dispose of any service or repairs to the monitor, ask the service technician to perform the safety check described in a picture...
User Guide
Page 24
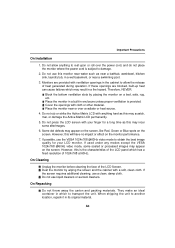
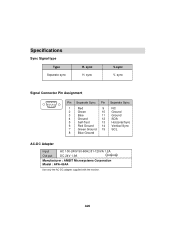
sync V.sync V. sync Signal Connector Pin Assignment 1 6 11 5 10 15 Pin Separate Sync Pin Separate Sync 1 Red 9 NC 2 Green 10 Ground 3 Blue 11 Ground 4 Ground 12 SDA 5 Self-Test 13 Horizontal Sync 6 Red Ground 14 Vertical Sync 7 Green Ground 15 SCL 8 Blue Ground AC-DC Adapter Input Out put AC 100-240V 50-60Hz 81-120VA 1.2A DC 24V 1.9A -+ Manufacturer : AMBIT Microsystems Corporation Model : APA-45AA Use only the AC-DC adapter supplied with the monitor. sync H. A20 Specifications Sync Signal type Type Separate sync H.
sync V.sync V. sync Signal Connector Pin Assignment 1 6 11 5 10 15 Pin Separate Sync Pin Separate Sync 1 Red 9 NC 2 Green 10 Ground 3 Blue 11 Ground 4 Ground 12 SDA 5 Self-Test 13 Horizontal Sync 6 Red Ground 14 Vertical Sync 7 Green Ground 15 SCL 8 Blue Ground AC-DC Adapter Input Out put AC 100-240V 50-60Hz 81-120VA 1.2A DC 24V 1.9A -+ Manufacturer : AMBIT Microsystems Corporation Model : APA-45AA Use only the AC-DC adapter supplied with the monitor. sync H. A20 Specifications Sync Signal type Type Separate sync H.
User Guide
Page 25
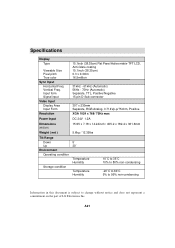
Specifications Display Type Viewable Size Pixel pitch True color Sync Input Horizontal Freq. Input form Signal input Video Input Display Area Input Form Resolution Power Input Dimensions (WxDxH) Weight ( net ) Tilt Range Down Up Environment Operating condition Storage condition 15.1inch (38.35cm) Flat Panel Active matrix-TFT LCD, Anti-Glare coating 15.1inch (38.35cm) 0.3 x 0.3mm 16.5million 31kHz - 61kHz (Automatic) 56Hz - 75Hz (Automatic) Separate, TTL, Positive/Negative 15 pin D-Sub connector 307 x 230mm Separate, RGB Analog, 0.714Vp...
Specifications Display Type Viewable Size Pixel pitch True color Sync Input Horizontal Freq. Input form Signal input Video Input Display Area Input Form Resolution Power Input Dimensions (WxDxH) Weight ( net ) Tilt Range Down Up Environment Operating condition Storage condition 15.1inch (38.35cm) Flat Panel Active matrix-TFT LCD, Anti-Glare coating 15.1inch (38.35cm) 0.3 x 0.3mm 16.5million 31kHz - 61kHz (Automatic) 56Hz - 75Hz (Automatic) Separate, TTL, Positive/Negative 15 pin D-Sub connector 307 x 230mm Separate, RGB Analog, 0.714Vp...

User Guide
Page 26
...problems which proves to be submitted with a copy of sales receipt and proper packing material to insure safe delivery of warranty, LGE will repair your unit in 2 working day repair service after receiving at LG Electronics. thereafter, the customer must pay for freight in Serial # WARRANTY PERIOD: PARTS HOW SERVICE...and call Product Assistance to confirm the product needs servicing and to obtain Return Authorization (RA). When you a return shipping label; so these costs are paid by the consumer. For further BACK LIGHT instructions please see our web site at http://www...
...problems which proves to be submitted with a copy of sales receipt and proper packing material to insure safe delivery of warranty, LGE will repair your unit in 2 working day repair service after receiving at LG Electronics. thereafter, the customer must pay for freight in Serial # WARRANTY PERIOD: PARTS HOW SERVICE...and call Product Assistance to confirm the product needs servicing and to obtain Return Authorization (RA). When you a return shipping label; so these costs are paid by the consumer. For further BACK LIGHT instructions please see our web site at http://www...


