

Owner's Manual (English)
Page 1
...1-800-243-0000 USA, Consumer User 1-888-865-3026 USA, Commercial User 1-888-542-2623 CANADA LG Customer Information Center P/NO : SAC33575901(0905-REV06) www.lgusa.com / www.lg.cwaw/ww.lgwuws.alg.comm/ ewrwciwa.l.lgco.cma Changing the factory default picture setting or enabling other features ... exceed the limits necessary to quality for future reference. Record it for Energy Star rating. PLASMA TV OWNER'S MANUAL 42PQ20 50PQ20 42PQ30 50PQ30 42PQ31 50PQ31 42PQ60 50PQ60 50PS30 50PS60 60PS60 42PQ30C 50PQ30C 50PS60C 60PS60C 50PS70 60PS70 50PS80 60PS80 Please read this is located on the ...
...1-800-243-0000 USA, Consumer User 1-888-865-3026 USA, Commercial User 1-888-542-2623 CANADA LG Customer Information Center P/NO : SAC33575901(0905-REV06) www.lgusa.com / www.lg.cwaw/ww.lgwuws.alg.comm/ ewrwciwa.l.lgco.cma Changing the factory default picture setting or enabling other features ... exceed the limits necessary to quality for future reference. Record it for Energy Star rating. PLASMA TV OWNER'S MANUAL 42PQ20 50PQ20 42PQ30 50PQ30 42PQ31 50PQ31 42PQ60 50PQ60 50PS30 50PS60 60PS60 42PQ30C 50PQ30C 50PS60C 60PS60C 50PS70 60PS70 50PS80 60PS80 Please read this is located on the ...

Owner's Manual (English)
Page 2
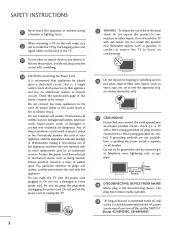
... the equipment and receiver. - Any changes or modifications not expressly approved by turning the equipment off and on a circuit different from LG Electronics. WARNING / CAUTION WARNING / CAUTION TO REDUCE THE RISK OF ELECTRIC SHOCK DO NOT REMOVE COVER (OR BACK). WARNING/CAUTION ... radiate radio frequency energy and, if not installed and used in a residential installation. Consult the dealer or an experienced radio/TV technician for compliance could void the user's authority to provide reasonable protection against harmful interference in accordance with arrowhead symbol, within ...
... the equipment and receiver. - Any changes or modifications not expressly approved by turning the equipment off and on a circuit different from LG Electronics. WARNING / CAUTION WARNING / CAUTION TO REDUCE THE RISK OF ELECTRIC SHOCK DO NOT REMOVE COVER (OR BACK). WARNING/CAUTION ... radiate radio frequency energy and, if not installed and used in a residential installation. Consult the dealer or an experienced radio/TV technician for compliance could void the user's authority to provide reasonable protection against harmful interference in accordance with arrowhead symbol, within ...
Owner's Manual (English)
Page 4
...if you connect the earth ground wire to dripping or splashing and do grasp the plug when unplugging the power cord. Do not touch the TV with the power cord plugged in. on shelves above the unit). 17 GROUNDING Ensure that appliances be placed upon . Do not use of ...fire or electrical shock, do not drop onto the screen with an exact replacement part by SWITCH" (Except 42/50PQ30C, 50/60PS60C) If grounding methods are dangerous. When mounting a TV on the power cord to telephone wires, lightening rods, or gas pipes. Do not connect too many appliances to plugs, ...
...if you connect the earth ground wire to dripping or splashing and do grasp the plug when unplugging the power cord. Do not touch the TV with the power cord plugged in. on shelves above the unit). 17 GROUNDING Ensure that appliances be placed upon . Do not use of ...fire or electrical shock, do not drop onto the screen with an exact replacement part by SWITCH" (Except 42/50PQ30C, 50/60PS60C) If grounding methods are dangerous. When mounting a TV on the power cord to telephone wires, lightening rods, or gas pipes. Do not connect too many appliances to plugs, ...

Owner's Manual (English)
Page 5
...other liquids directly on the front panel of antenna discharge unit, connection to provide some protection against or put stress on the TV as to grounding electrodes and requirements for the grounding electrode. Antenna grounding according to prevent scratching. Do not spray water or ... of the National Electrical Code (NEC) in wire to an antenna discharge unit, size of grounding conductors, location of the TV. 23 Ventilation Install your TV where there is installed, follow the precautions below. provides information with hand or sharp object such as a bookcase. 20 ANTENNAS...
...other liquids directly on the front panel of antenna discharge unit, connection to provide some protection against or put stress on the TV as to grounding electrodes and requirements for the grounding electrode. Antenna grounding according to prevent scratching. Do not spray water or ... of the National Electrical Code (NEC) in wire to an antenna discharge unit, size of grounding conductors, location of the TV. 23 Ventilation Install your TV where there is installed, follow the precautions below. provides information with hand or sharp object such as a bookcase. 20 ANTENNAS...

Owner's Manual (English)
Page 6
...43 Favorite Channel List 43 Brief Information 44 Input List 45 Input Label 46 AV Mode 47 SIMPLINK 48 USB Entry Modes 50 Photo List 51 Music List 55 Movie List 58 DivX Registration Code 62 Deactivation 63 PICTURE CONTROL Picture Size (Aspect Ratio...Minimization (ISM) Method 75 Demo Mode 76 4 Auto Scan (Auto Tuning 39 - CONTENTS WARNING / CAUTION A SAFETY INSTRUCTIONS 1 FEATURE OF THIS TV 6 PREPARATION Accessories 7 Front Panel Information 8 Back Panel Information 10 Stand Instruction 11 Cable Management 12 Desktop Pedestal Installation 13 VESA Wall Mounting 13...
...43 Favorite Channel List 43 Brief Information 44 Input List 45 Input Label 46 AV Mode 47 SIMPLINK 48 USB Entry Modes 50 Photo List 51 Music List 55 Movie List 58 DivX Registration Code 62 Deactivation 63 PICTURE CONTROL Picture Size (Aspect Ratio...Minimization (ISM) Method 75 Demo Mode 76 4 Auto Scan (Auto Tuning 39 - CONTENTS WARNING / CAUTION A SAFETY INSTRUCTIONS 1 FEATURE OF THIS TV 6 PREPARATION Accessories 7 Front Panel Information 8 Back Panel Information 10 Stand Instruction 11 Cable Management 12 Desktop Pedestal Installation 13 VESA Wall Mounting 13...

Owner's Manual (English)
Page 7
...On/Off Time Setting 92 Sleep Timer Setting 93 PARENTAL CONTROL / RATINGS Set Password & Lock System 94 Channel Blocking 97 Movie & TV Rating 98 Downloadable Rating 103 External Input Blocking 104 Key lock 105 APPENDIX Troubleshooting 106 Maintenance 108 Product Specifications 109 Programming The Remote Control...Auto Volume 77 Clear Voice II 78 Preset Sound Settings (Sound Mode) 79 Sound Setting Adjustment - User Mode 80 Balance 81 TV Speakers On/Off Setup 82 Audio Reset 83 Stereo/SAP Broadcasts Setup 84 Audio Language 85 On-Screen Menus Language Selection 86 Caption Mode ...
...On/Off Time Setting 92 Sleep Timer Setting 93 PARENTAL CONTROL / RATINGS Set Password & Lock System 94 Channel Blocking 97 Movie & TV Rating 98 Downloadable Rating 103 External Input Blocking 104 Key lock 105 APPENDIX Troubleshooting 106 Maintenance 108 Product Specifications 109 Programming The Remote Control...Auto Volume 77 Clear Voice II 78 Preset Sound Settings (Sound Mode) 79 Sound Setting Adjustment - User Mode 80 Balance 81 TV Speakers On/Off Setup 82 Audio Reset 83 Stereo/SAP Broadcasts Setup 84 Audio Language 85 On-Screen Menus Language Selection 86 Caption Mode ...

Owner's Manual (English)
Page 8
...licensed technician. Image burn is recommended for professional certification by the user to experience the best their LG HDTV has to prevent image burn, avoid displaying a fixed image on -Demand (VOD) content...com for all models. THX Cinema mode is not covered under license from Dolby Laboratories. This TV contains the detailed calibrations necessary for watching movies. is not available for an extended period. ...use in order to complete the registration process and learn more hours for Plasma). ■ Image burn can be made through the ISFccc mode. CALIBRATE LIKE A PRO...
...licensed technician. Image burn is recommended for professional certification by the user to experience the best their LG HDTV has to prevent image burn, avoid displaying a fixed image on -Demand (VOD) content...com for all models. THX Cinema mode is not covered under license from Dolby Laboratories. This TV contains the detailed calibrations necessary for watching movies. is not available for an extended period. ...use in order to complete the registration process and learn more hours for Plasma). ■ Image burn can be made through the ISFccc mode. CALIBRATE LIKE A PRO...

Owner's Manual (English)
Page 9
... 1.5V 1.5V FAV MARK Owner's Manual CD Manual Remote Control, Batteries Power Cord (Except 60PS60, 60PS60C, 60PS70, 60PS80) (Only 60PS60, 60PS60C, 50/60PS70, 50/60PS80) or Protection Cover (Refer to P.11) x 4 Bolts for stand assembly (Refer to P.11) x 2 Cable Holder Cable management clip (Refer... to maintain standards compliance. RETURN TV Q. Option Extras D-sub 15 pin Cable When using the VGA (D-sub 15 pin cable) PC connection, the...
... 1.5V 1.5V FAV MARK Owner's Manual CD Manual Remote Control, Batteries Power Cord (Except 60PS60, 60PS60C, 60PS70, 60PS80) (Only 60PS60, 60PS60C, 50/60PS70, 50/60PS80) or Protection Cover (Refer to P.11) x 4 Bolts for stand assembly (Refer to P.11) x 2 Cable Holder Cable management clip (Refer... to maintain standards compliance. RETURN TV Q. Option Extras D-sub 15 pin Cable When using the VGA (D-sub 15 pin cable) PC connection, the...

Owner's Manual (English)
Page 10
... any impact.It may break, causing possible injury from your TV. Illuminates blue when the TV is switched off while the TV remains on . INPUT MENU ENTER VOL CH INPUT Button MENU Button 50/60PS70, 50/60PS80 ENTER Button VOLUME CHANNEL ButtoINnPsUT MENU EBNuTEtRtons VOL POWER Button.... PREPARATION PREPARATION FRONT PANEL INFORMATION ■ Image shown may differ from fragments of glass, or the TV may fall. CAUTION (Except 42/50PQ30C, 50/60PS60C) G When the TV cannot be damaged. Power/Standby Indicator • Illuminates red in standby mode. G Do not drag ...
... any impact.It may break, causing possible injury from your TV. Illuminates blue when the TV is switched off while the TV remains on . INPUT MENU ENTER VOL CH INPUT Button MENU Button 50/60PS70, 50/60PS80 ENTER Button VOLUME CHANNEL ButtoINnPsUT MENU EBNuTEtRtons VOL POWER Button.... PREPARATION PREPARATION FRONT PANEL INFORMATION ■ Image shown may differ from fragments of glass, or the TV may fall. CAUTION (Except 42/50PQ30C, 50/60PS60C) G When the TV cannot be damaged. Power/Standby Indicator • Illuminates red in standby mode. G Do not drag ...

Owner's Manual (English)
Page 11
...INPUT MENU ENTER CH VOL INPUT MENU Button Button ENTER Button VOLUME Buttons CH CHANNEL Buttons POWER Button 42/50PQ60, 50/60PS60, 50/60PS60C ENTER VOL Remote Control Sensor Intelligent Sensor Adjusts picture according to the surrounding conditions. CH CH VOL VOL ENTER...Sensor Intelligent Sensor Adjusts picture according to the surrounding conditions. Illuminates blue when the TV is switched on . Power/Standby Indicator Illuminates red in standby mode. Illuminates white when the TV is switched on and goes out slowly . Power/Standby Indicator Illuminates red in ...
...INPUT MENU ENTER CH VOL INPUT MENU Button Button ENTER Button VOLUME Buttons CH CHANNEL Buttons POWER Button 42/50PQ60, 50/60PS60, 50/60PS60C ENTER VOL Remote Control Sensor Intelligent Sensor Adjusts picture according to the surrounding conditions. CH CH VOL VOL ENTER...Sensor Intelligent Sensor Adjusts picture according to the surrounding conditions. Illuminates blue when the TV is switched on . Power/Standby Indicator Illuminates red in standby mode. Illuminates white when the TV is switched on and goes out slowly . Power/Standby Indicator Illuminates red in ...
Owner's Manual (English)
Page 12
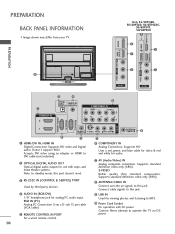
... Power Cord Socket For operation with amps and home theater systems. Note: In standby mode, this jack. USB IN R USB IN Only 42/50PQ60, 50/60PS60, 50/60PS60C, 50/60PS70, 50/60PS80 9 9 1 1 HDMI/DVI IN 4 HDMI/DVI IN 3 HDMI / DVI IN 3 PREPARATION VIDEO L/MONO AUDIO R VIDEO L/MONO AUDIO R R 7 7 10 AV IN.... 6 COMPONENT IN Analog Connection. Uses a red, green, and blue cable for video & red and white for viewing photos and listening to operate the TV on DC power. 10 Uses a D-sub 15 pin cable (VGA cable). 5 REMOTE CONTROL IN PORT For a wired remote control. 9 USB IN Used...
... Power Cord Socket For operation with amps and home theater systems. Note: In standby mode, this jack. USB IN R USB IN Only 42/50PQ60, 50/60PS60, 50/60PS60C, 50/60PS70, 50/60PS80 9 9 1 1 HDMI/DVI IN 4 HDMI/DVI IN 3 HDMI / DVI IN 3 PREPARATION VIDEO L/MONO AUDIO R VIDEO L/MONO AUDIO R R 7 7 10 AV IN.... 6 COMPONENT IN Analog Connection. Uses a red, green, and blue cable for video & red and white for viewing photos and listening to operate the TV on DC power. 10 Uses a D-sub 15 pin cable (VGA cable). 5 REMOTE CONTROL IN PORT For a wired remote control. 9 USB IN Used...

Owner's Manual (English)
Page 13
...down on a cushioned surface to protect the screen from abrasion of the tightening part of the bolt. Press the PROTECTION COVER into the TV until you tighten the bolt with excessive force, the bolt can tilt forward after the product installation). G When assembling the desk type ... tightened fully, the product can deviate from damage. If you hear it click. 11 PREPARATION STAND INSTRUCTION ■ Image shown may differ from TV. 3 Fix the 4 bolts securely using the holes in the back of the stand correctly. Installation (Except 60PS60, 60PS60C, 60PS70, 60PS80) 1 Carefully...
...down on a cushioned surface to protect the screen from abrasion of the tightening part of the bolt. Press the PROTECTION COVER into the TV until you tighten the bolt with excessive force, the bolt can tilt forward after the product installation). G When assembling the desk type ... tightened fully, the product can deviate from damage. If you hear it click. 11 PREPARATION STAND INSTRUCTION ■ Image shown may differ from TV. 3 Fix the 4 bolts securely using the holes in the back of the stand correctly. Installation (Except 60PS60, 60PS60C, 60PS70, 60PS80) 1 Carefully...

Owner's Manual (English)
Page 14
To connect additional equipment, see EXTERNAL EQUIPMENT SETUP section. (Only 60PS60, 60PS60C, 50/60PS70, 50/60PS80) 2 Install the CABLE MANAGEMENT CLIP as shown and bundle the cables. CABLE HOLDER CABLE MANAGEMENT CLIP (Only 60PS60, 60PS60C, 50/60PS70, 50/60PS80) HOW TO REMOVE THE CABLE MANAGEMENT CLIP G Hold the CABLE MANAGEMENT CLIP with both hands and pull it upward. 12 PREPARATION PREPARATION CABLE MANAGEMENT ■ Image shown may differ from your TV. 1 After connecting the cables as necessary, install CABLE HOLDER as shown.
To connect additional equipment, see EXTERNAL EQUIPMENT SETUP section. (Only 60PS60, 60PS60C, 50/60PS70, 50/60PS80) 2 Install the CABLE MANAGEMENT CLIP as shown and bundle the cables. CABLE HOLDER CABLE MANAGEMENT CLIP (Only 60PS60, 60PS60C, 50/60PS70, 50/60PS80) HOW TO REMOVE THE CABLE MANAGEMENT CLIP G Hold the CABLE MANAGEMENT CLIP with both hands and pull it upward. 12 PREPARATION PREPARATION CABLE MANAGEMENT ■ Image shown may differ from your TV. 1 After connecting the cables as necessary, install CABLE HOLDER as shown.
Owner's Manual (English)
Page 15
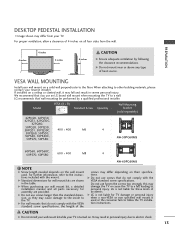
...LG brand wall mount when mounting the TV to the TV. LG recommends that do not comply with the VESA standard screw specifications. Model VESA (A * B) A Standard Screw Quantity B Wall Mounting bracket (sold separately) 42PQ20, 42PQ30, 42PQ31, 42PQ30C, 42PQ60, 50PQ20, 50PQ30, 50PQ31, 50PQ30C, 400 * 400 M6 50PQ60, 50PS30, 50PS60...wall mounting be performed by following the clearance recommendations. G LG is not liable for assembly are shown in the table. NOTE G Screw length needed depends on all parts necessary for TV damage or personal injury when a non-VESA or non ...
...LG brand wall mount when mounting the TV to the TV. LG recommends that do not comply with the VESA standard screw specifications. Model VESA (A * B) A Standard Screw Quantity B Wall Mounting bracket (sold separately) 42PQ20, 42PQ30, 42PQ31, 42PQ30C, 42PQ60, 50PQ20, 50PQ30, 50PQ31, 50PQ30C, 400 * 400 M6 50PQ60, 50PS30, 50PS60...wall mounting be performed by following the clearance recommendations. G LG is not liable for assembly are shown in the table. NOTE G Screw length needed depends on all parts necessary for TV damage or personal injury when a non-VESA or non ...

Owner's Manual (English)
Page 16
... by 20 degrees to suit your viewing position. 14 Caution: Please make sure that is not available for all models.) After installing the TV, you set up the TV close to a wall so it becomes horizontal between the wall and the product. ! Secure the wall brackets with the bolts (sold separately) to... is safer to support the size and weight of the bracket on the wall and the one on or hang from the TV. ■ Insert the eye-bolts (or TV brackets and bolts) to tighten the product to the wall as shown in a forward direction, potentially causing injury or damaging the product...
... by 20 degrees to suit your viewing position. 14 Caution: Please make sure that is not available for all models.) After installing the TV, you set up the TV close to a wall so it becomes horizontal between the wall and the product. ! Secure the wall brackets with the bolts (sold separately) to... is safer to support the size and weight of the bracket on the wall and the one on or hang from the TV. ■ Insert the eye-bolts (or TV brackets and bolts) to tighten the product to the wall as shown in a forward direction, potentially causing injury or damaging the product...
Owner's Manual (English)
Page 17
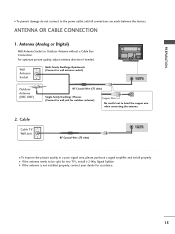
Cable Cable TV Wall Jack RF Coaxial Wire (75 ohm) ANTENNA/ CABLE IN ■ To improve the picture quality in a poor signal area, plea(se) purchase a signal amplifier ... to the power outlet until all connections are made between the devices. PREPARATION ■ To prevent damage do not connect to be split for two TV's, install a 2-Way Signal Splitter. ■ If the antenna is not installed properly, contact your dealer for outdoor antenna) ( ) Copper Wire Be careful not to bend...
Cable Cable TV Wall Jack RF Coaxial Wire (75 ohm) ANTENNA/ CABLE IN ■ To improve the picture quality in a poor signal area, plea(se) purchase a signal amplifier ... to the power outlet until all connections are made between the devices. PREPARATION ■ To prevent damage do not connect to be split for two TV's, install a 2-Way Signal Splitter. ■ If the antenna is not installed properly, contact your dealer for outdoor antenna) ( ) Copper Wire Be careful not to bend...

Owner's Manual (English)
Page 18
...of the digital set-top box to the COMPONENT IN VIDEO 1 jacks on the TV. REMOTE CONTROL IN S-VIDEO VIDEO /MONO AUDIO AN CA 2. Component Connection 1....TV. 1 2 Y PB PR L R Supported Resolutions Signal 480i 480p 720p 1080i 1080p Component Yes Yes Yes Yes Yes HDMI No Yes Yes Yes Yes Y, CB/PB, CR/PR Resolution Horizontal Vertical Frequency(KHz) Frequency(Hz) 720x480i 720x480p 1280x720p 1920x1080i 1920x1080p 15.73 15.73 31.47 31.50...50 59.94 60.00 59.94 60.00 59.94 60.00 59.94 60.00 24.00 30.00 59.94 60.00 16 operation) ■ Select the Component1 input source on the TV...
...of the digital set-top box to the COMPONENT IN VIDEO 1 jacks on the TV. REMOTE CONTROL IN S-VIDEO VIDEO /MONO AUDIO AN CA 2. Component Connection 1....TV. 1 2 Y PB PR L R Supported Resolutions Signal 480i 480p 720p 1080i 1080p Component Yes Yes Yes Yes Yes HDMI No Yes Yes Yes Yes Y, CB/PB, CR/PR Resolution Horizontal Vertical Frequency(KHz) Frequency(Hz) 720x480i 720x480p 1280x720p 1920x1080i 1920x1080p 15.73 15.73 31.47 31.50...50 59.94 60.00 59.94 60.00 59.94 60.00 59.94 60.00 24.00 30.00 59.94 60.00 16 operation) ■ Select the Component1 input source on the TV...

Owner's Manual (English)
Page 19
... no screen display. How to connect 1 Connect the digital set-top box to HDMI/DVI IN 1, 2, 3 or 4 (Only 42/50PQ60, 50/60PS60, 50/60PS60C, 50/60PS70, 50/60PS80) jack on the remote control. ! How to the owner's manual for the digital set -top box. (Refer to use the latest cables...; Turn on the digital set -top box.) ■ Select the HDMI1, 2, 3 or 4 (Only 42/50PQ60, 50/60PS60, 50/60PS60C, 50/60PS70, 50/60PS80) input source on the TV using the INPUT button on the TV. 2 No separate audio connection is necessary. HDMI supports both audio and video. HDMI Connection EXTERNAL EQUIPMENT SETUP RGB...
... no screen display. How to connect 1 Connect the digital set-top box to HDMI/DVI IN 1, 2, 3 or 4 (Only 42/50PQ60, 50/60PS60, 50/60PS60C, 50/60PS70, 50/60PS80) jack on the remote control. ! How to the owner's manual for the digital set -top box. (Refer to use the latest cables...; Turn on the digital set -top box.) ■ Select the HDMI1, 2, 3 or 4 (Only 42/50PQ60, 50/60PS60, 50/60PS60C, 50/60PS70, 50/60PS80) input source on the TV using the INPUT button on the TV. 2 No separate audio connection is necessary. HDMI supports both audio and video. HDMI Connection EXTERNAL EQUIPMENT SETUP RGB...
Owner's Manual (English)
Page 20
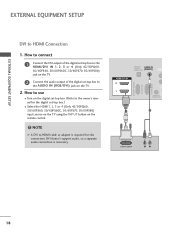
... 1 Connect the DVI output of the digital set -top box.) ■ Select the HDMI1, 2, 3 or 4 (Only 42/50PQ60, 50/60PS60, 50/60PS60C, 50/60PS70, 50/60PS80) input source on the TV using the INPUT button on the TV. 2. RGB IN (PC) RS-232C IN (CONTROL & SERVICE) EXTERNAL EQUIPMENT SETUP EXTERNAL EQUIPMENT SETUP DVI to the HDMI...
... 1 Connect the DVI output of the digital set -top box.) ■ Select the HDMI1, 2, 3 or 4 (Only 42/50PQ60, 50/60PS60, 50/60PS60C, 50/60PS70, 50/60PS80) input source on the TV using the INPUT button on the TV. 2. RGB IN (PC) RS-232C IN (CONTROL & SERVICE) EXTERNAL EQUIPMENT SETUP EXTERNAL EQUIPMENT SETUP DVI to the HDMI...

Owner's Manual (English)
Page 21
.... Match the jack colors (Y = green, PB = blue, and PR = red). 2 Connect the audio outputs of the DVD to the COMPONENT IN VIDEO 1 jacks on the TV. 2. How to connect 1 Connect the video outputs (Y, PB, PR) of the DVD to COMPONENT IN 2 input, select the Component2 input source on DVD player Y Y PB... PR B-Y R-Y Cb Cr Pb Pr 19 How to use ■ Turn on the DVD player, insert a DVD. ■ Select the Component1 input source on the TV using the INPUT button on the remote control. ■ If connected to the COMPONENT IN AUDIO 1 jacks on the...
.... Match the jack colors (Y = green, PB = blue, and PR = red). 2 Connect the audio outputs of the DVD to the COMPONENT IN VIDEO 1 jacks on the TV. 2. How to connect 1 Connect the video outputs (Y, PB, PR) of the DVD to COMPONENT IN 2 input, select the Component2 input source on DVD player Y Y PB... PR B-Y R-Y Cb Cr Pb Pr 19 How to use ■ Turn on the DVD player, insert a DVD. ■ Select the Component1 input source on the TV using the INPUT button on the remote control. ■ If connected to the COMPONENT IN AUDIO 1 jacks on the...


