

Owner's Manual (English)
Page 2
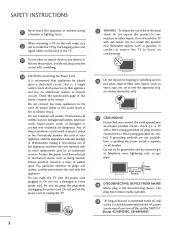
... to rain or moisture. Consult the dealer or an experienced radio/TV technician for proper grounding and, in particular, specifies that to the point of the FCC Rules. Operation is no guarantee that may be connected to the grounding system of the following measures: - NO USER SERVICEABLE... system installer's attention to persons. Any changes or modifications not expressly approved by turning the equipment off and on a circuit different from LG Electronics. WARNING / CAUTION WARNING / CAUTION TO REDUCE THE RISK OF ELECTRIC SHOCK DO NOT REMOVE COVER (OR BACK). CAUTION Do not...
... to rain or moisture. Consult the dealer or an experienced radio/TV technician for proper grounding and, in particular, specifies that to the point of the FCC Rules. Operation is no guarantee that may be connected to the grounding system of the following measures: - NO USER SERVICEABLE... system installer's attention to persons. Any changes or modifications not expressly approved by turning the equipment off and on a circuit different from LG Electronics. WARNING / CAUTION WARNING / CAUTION TO REDUCE THE RISK OF ELECTRIC SHOCK DO NOT REMOVE COVER (OR BACK). CAUTION Do not...
Owner's Manual (English)
Page 4
...appliance, and have a qualified electrician install a separate circuit breaker. Pay particular attention to be placed upon . Do not touch the TV with an exact replacement part by connecting it to the AC wall outlet, it , discontinue use a damaged or loose power cord. Overloaded wall outlets, loose or damaged ... plugs, wall outlets, and the point where the cord exits the appliance. Do not make sure 12 not to install the TV by SWITCH" (Except 42/50PQ30C, 50/60PS60C) on the power cord to rain, moisture or other liquids. that is, a single outlet circuit which powers only that...
...appliance, and have a qualified electrician install a separate circuit breaker. Pay particular attention to be placed upon . Do not touch the TV with an exact replacement part by connecting it to the AC wall outlet, it , discontinue use a damaged or loose power cord. Overloaded wall outlets, loose or damaged ... plugs, wall outlets, and the point where the cord exits the appliance. Do not make sure 12 not to install the TV by SWITCH" (Except 42/50PQ30C, 50/60PS60C) on the power cord to rain, moisture or other liquids. that is, a single outlet circuit which powers only that...

Owner's Manual (English)
Page 5
... plastic while plugged in contact with hand or sharp object such as nail, pencil or pen, or make a scratch on the TV as a bookcase. Section 810 of antenna discharge unit, connection to the National Electrical Code, ANSI/NFPA 70 Pince de mise à la terre Fil d entrée d antenne É... sure the product is turned off, unplugged and all cables have been removed. Do not install in the vicinity of the TV. 23 Ventilation Install your TV where there is installed, follow the precautions below. Do not clean with respect to proper grounding of the mast and supporting structure...
... plastic while plugged in contact with hand or sharp object such as nail, pencil or pen, or make a scratch on the TV as a bookcase. Section 810 of antenna discharge unit, connection to the National Electrical Code, ANSI/NFPA 70 Pince de mise à la terre Fil d entrée d antenne É... sure the product is turned off, unplugged and all cables have been removed. Do not install in the vicinity of the TV. 23 Ventilation Install your TV where there is installed, follow the precautions below. Do not clean with respect to proper grounding of the mast and supporting structure...

Owner's Manual (English)
Page 6
...HD Receiver Setup 16 DVD Setup 19 VCR Setup 21 Other A/V Source Setup 23 Audio Out Connection 23 USB Connection 24 PC Setup 25 WATCHING TV / CHANNEL CONTROL Remote Control Functions 30 Turning On TV 34 Channel Selection 34 Volume Adjustment 34 Initial Setting 35 On-Screen Menus Selection 37 Quick ...Channel Setup 43 Favorite Channel List 43 Brief Information 44 Input List 45 Input Label 46 AV Mode 47 SIMPLINK 48 USB Entry Modes 50 Photo List 51 Music List 55 Movie List 58 DivX Registration Code 62 Deactivation 63 PICTURE CONTROL Picture Size (Aspect Ratio) Control 64...
...HD Receiver Setup 16 DVD Setup 19 VCR Setup 21 Other A/V Source Setup 23 Audio Out Connection 23 USB Connection 24 PC Setup 25 WATCHING TV / CHANNEL CONTROL Remote Control Functions 30 Turning On TV 34 Channel Selection 34 Volume Adjustment 34 Initial Setting 35 On-Screen Menus Selection 37 Quick ...Channel Setup 43 Favorite Channel List 43 Brief Information 44 Input List 45 Input Label 46 AV Mode 47 SIMPLINK 48 USB Entry Modes 50 Photo List 51 Music List 55 Movie List 58 DivX Registration Code 62 Deactivation 63 PICTURE CONTROL Picture Size (Aspect Ratio) Control 64...

Owner's Manual (English)
Page 9
... 1.5V 1.5V FAV MARK Owner's Manual CD Manual Remote Control, Batteries Power Cord (Except 60PS60, 60PS60C, 60PS70, 60PS80) (Only 60PS60, 60PS60C, 50/60PS70, 50/60PS80) or Protection Cover (Refer to P.11) x 4 Bolts for stand assembly (Refer to P.11) x 2 Cable Holder Cable management clip (Refer...interface cables with the polishing cloth. Ferrite Core Use of the ferrite core to reduce the electromagnetic wave when connecting the power cord. RETURN TV Q. Excessive pressure may differ from the images below. The closer the location of ferrite core (Not included ...
... 1.5V 1.5V FAV MARK Owner's Manual CD Manual Remote Control, Batteries Power Cord (Except 60PS60, 60PS60C, 60PS70, 60PS80) (Only 60PS60, 60PS60C, 50/60PS70, 50/60PS80) or Protection Cover (Refer to P.11) x 4 Bolts for stand assembly (Refer to P.11) x 2 Cable Holder Cable management clip (Refer...interface cables with the polishing cloth. Ferrite Core Use of the ferrite core to reduce the electromagnetic wave when connecting the power cord. RETURN TV Q. Excessive pressure may differ from the images below. The closer the location of ferrite core (Not included ...
Owner's Manual (English)
Page 12
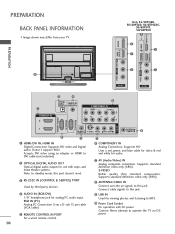
USB IN R USB IN Only 42/50PQ60, 50/60PS60, 50/60PS60C, 50/60PS70, 50/60PS80 9 9 1 1 HDMI/DVI IN 4 HDMI/DVI IN 3 HDMI / DVI IN 3 PREPARATION VIDEO L/MONO AUDIO... Supports standard definition video only (480i). Supports standard definition video only (480i). 8 ANTENNA/CABLE IN Connect over-the air signals to DVI cable (not included) 2 OPTICAL DIGITAL AUDIO OUT Optical digital audio ...USB IN Used for audio. 7 AV (Audio/Video) IN Analog composite connection. PREPARATION BACK PANEL INFORMATION ■ Image shown may differ from your TV. Uses a red, green, and blue cable for video & red ...
USB IN R USB IN Only 42/50PQ60, 50/60PS60, 50/60PS60C, 50/60PS70, 50/60PS80 9 9 1 1 HDMI/DVI IN 4 HDMI/DVI IN 3 HDMI / DVI IN 3 PREPARATION VIDEO L/MONO AUDIO... Supports standard definition video only (480i). Supports standard definition video only (480i). 8 ANTENNA/CABLE IN Connect over-the air signals to DVI cable (not included) 2 OPTICAL DIGITAL AUDIO OUT Optical digital audio ...USB IN Used for audio. 7 AV (Audio/Video) IN Analog composite connection. PREPARATION BACK PANEL INFORMATION ■ Image shown may differ from your TV. Uses a red, green, and blue cable for video & red ...

Owner's Manual (English)
Page 14
PREPARATION PREPARATION CABLE MANAGEMENT ■ Image shown may differ from your TV. 1 After connecting the cables as necessary, install CABLE HOLDER as shown. To connect additional equipment, see EXTERNAL EQUIPMENT SETUP section. (Only 60PS60, 60PS60C, 50/60PS70, 50/60PS80) 2 Install the CABLE MANAGEMENT CLIP as shown and bundle the cables. CABLE HOLDER CABLE MANAGEMENT CLIP (Only 60PS60, 60PS60C, 50/60PS70, 50/60PS80) HOW TO REMOVE THE CABLE MANAGEMENT CLIP G Hold the CABLE MANAGEMENT CLIP with both hands and pull it upward. 12
PREPARATION PREPARATION CABLE MANAGEMENT ■ Image shown may differ from your TV. 1 After connecting the cables as necessary, install CABLE HOLDER as shown. To connect additional equipment, see EXTERNAL EQUIPMENT SETUP section. (Only 60PS60, 60PS60C, 50/60PS70, 50/60PS80) 2 Install the CABLE MANAGEMENT CLIP as shown and bundle the cables. CABLE HOLDER CABLE MANAGEMENT CLIP (Only 60PS60, 60PS60C, 50/60PS70, 50/60PS80) HOW TO REMOVE THE CABLE MANAGEMENT CLIP G Hold the CABLE MANAGEMENT CLIP with both hands and pull it upward. 12
Owner's Manual (English)
Page 17
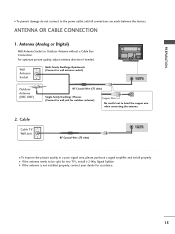
...quality in a poor signal area, plea(se) purchase a signal amplifier and install properly. ■ If the antenna needs to be split for two TV's, install a 2-Way Signal Splitter. ■ If the antenna is not installed properly, contact your dealer for outdoor antenna) ( ) Copper Wire ...Be careful not to bend the copper wire when connecting the antenna. 2. For optimum picture quality, adjust antenna direction if needed. Antenna (Analog or Digital) Wall Antenna Socket or Outdoor Antenna without a...
...quality in a poor signal area, plea(se) purchase a signal amplifier and install properly. ■ If the antenna needs to be split for two TV's, install a 2-Way Signal Splitter. ■ If the antenna is not installed properly, contact your dealer for outdoor antenna) ( ) Copper Wire ...Be careful not to bend the copper wire when connecting the antenna. 2. For optimum picture quality, adjust antenna direction if needed. Antenna (Analog or Digital) Wall Antenna Socket or Outdoor Antenna without a...

Owner's Manual (English)
Page 18
Match the jack colors (Y = green, PB = blue, and PR = red). Component Connection 1. operation) ■ Select the Component1 input source on the TV using the INPUT button on the TV. How to connect IN VI) 1 Connect the video outputs (Y, PB, PR) of the digital set-top box to the COMPONENT IN AUDIO 1 jacks on the remote control... Vertical Frequency(KHz) Frequency(Hz) 720x480i 720x480p 1280x720p 1920x1080i 1920x1080p 15.73 15.73 31.47 31.50 44.96 45.00 33.72 33.75 27.00 33.75 67.43 67.50 59.94 60.00 59.94 60.00 59.94 60.00 59.94 60.00 24.00...
Match the jack colors (Y = green, PB = blue, and PR = red). Component Connection 1. operation) ■ Select the Component1 input source on the TV using the INPUT button on the TV. How to connect IN VI) 1 Connect the video outputs (Y, PB, PR) of the digital set-top box to the COMPONENT IN AUDIO 1 jacks on the remote control... Vertical Frequency(KHz) Frequency(Hz) 720x480i 720x480p 1280x720p 1920x1080i 1920x1080p 15.73 15.73 31.47 31.50 44.96 45.00 33.72 33.75 27.00 33.75 67.43 67.50 59.94 60.00 59.94 60.00 59.94 60.00 59.94 60.00 24.00...

Owner's Manual (English)
Page 19
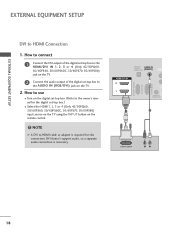
...'s manual for the digital set -top box to connect 1 Connect the digital set -top box.) ■ Select the HDMI1, 2, 3 or 4 (Only 42/50PQ60, 50/60PS60, 50/60PS60C, 50/60PS70, 50/60PS80) input source on the TV using the INPUT button on the TV. 2 No separate audio connection is necessary. HDMI Connection EXTERNAL EQUIPMENT SETUP RGB(PC) RS-232C IN (CONTROL...
...'s manual for the digital set -top box to connect 1 Connect the digital set -top box.) ■ Select the HDMI1, 2, 3 or 4 (Only 42/50PQ60, 50/60PS60, 50/60PS60C, 50/60PS70, 50/60PS80) input source on the TV using the INPUT button on the TV. 2 No separate audio connection is necessary. HDMI Connection EXTERNAL EQUIPMENT SETUP RGB(PC) RS-232C IN (CONTROL...
Owner's Manual (English)
Page 20
... to the HDMI/DVI IN 1, 2, 3 or 4 (Only 42/50PQ60, 50/60PS60, 50/60PS60C, 50/60PS70, 50/60PS80) jack on the TV. 2 Connect the audio output of the digital set -top box.) ■ Select the HDMI1, 2, 3 or 4 (Only 42/50PQ60, 50/60PS60, 50/60PS60C, 50/60PS70, 50/60PS80) input source on the TV using the INPUT button on the remote control. ! OPTICAL...
... to the HDMI/DVI IN 1, 2, 3 or 4 (Only 42/50PQ60, 50/60PS60, 50/60PS60C, 50/60PS70, 50/60PS80) jack on the TV. 2 Connect the audio output of the digital set -top box.) ■ Select the HDMI1, 2, 3 or 4 (Only 42/50PQ60, 50/60PS60, 50/60PS60C, 50/60PS70, 50/60PS80) input source on the TV using the INPUT button on the remote control. ! OPTICAL...

Owner's Manual (English)
Page 21
...How to use ■ Turn on the DVD player, insert a DVD. ■ Select the Component1 input source on the TV using the INPUT button on the remote control. ■ If connected to the DVD player's manual for operating instructions. DIO B/DVI) COMPONENT IN VIDEO AUDIO 2 1 L R AV IN ... Y Y PB PR PB PR B-Y R-Y Cb Cr Pb Pr 19 EXTERNAL EQUIPMENT SETUP RGB(PC) DVD SETUP Component Connection 1. Component ports on the TV Y Y Video output ports Y on the TV. How to connect 1 Connect the video outputs (Y, PB, PR) of the DVD to the COMPONENT IN AUDIO 1 jacks on the...
...How to use ■ Turn on the DVD player, insert a DVD. ■ Select the Component1 input source on the TV using the INPUT button on the remote control. ■ If connected to the DVD player's manual for operating instructions. DIO B/DVI) COMPONENT IN VIDEO AUDIO 2 1 L R AV IN ... Y Y PB PR PB PR B-Y R-Y Cb Cr Pb Pr 19 EXTERNAL EQUIPMENT SETUP RGB(PC) DVD SETUP Component Connection 1. Component ports on the TV Y Y Video output ports Y on the TV. How to connect 1 Connect the video outputs (Y, PB, PR) of the DVD to the COMPONENT IN AUDIO 1 jacks on the...

Owner's Manual (English)
Page 22
.... ■ Select the A V 1 input source on the TV using the INPUT button on the remote control. ■ Refer to the HDMI/DVI IN 1, 2, 3 or 4 (Only 42/50PQ60, 50/60PS60, 50/60PS60C, 50/60PS70, 50/60PS80) jack on the TV. 2 Connect the audio outputs of the DVD to the DVD player's manual ...for operating instructions. How to connect 1 Connect the S-VIDEO output of the DVD to the S -VIDEO input on the...
.... ■ Select the A V 1 input source on the TV using the INPUT button on the remote control. ■ Refer to the HDMI/DVI IN 1, 2, 3 or 4 (Only 42/50PQ60, 50/60PS60, 50/60PS60C, 50/60PS70, 50/60PS80) jack on the TV. 2 Connect the audio outputs of the DVD to the DVD player's manual ...for operating instructions. How to connect 1 Connect the S-VIDEO output of the DVD to the S -VIDEO input on the...

Owner's Manual (English)
Page 23
How to connect 1 Connect the RF antenna out socket of the VCR to the ANTENNA/CABLE IN socket on the VCR. (Refer to the RF antenna in socket of the VCR. 2. How to use ■ Set VCR output switch to 3 or 4 and then tune TV to the same channel number. ■ Insert a video tape into the VCR and press PLAY on the TV. 2 Connect the antenna cable to the VCR owner's manual.) ANTENNA/ CABLE IN 1 ANT OUT S-VIDEO VIDEO L R ANT IN OUTPUT SWITCH Wall Jack 2 Antenna 21 EXTERNAL EQUIPMENT SETUP AV IN 1 VCR SETUP Antenna Connection 1.
How to connect 1 Connect the RF antenna out socket of the VCR to the ANTENNA/CABLE IN socket on the VCR. (Refer to the RF antenna in socket of the VCR. 2. How to use ■ Set VCR output switch to 3 or 4 and then tune TV to the same channel number. ■ Insert a video tape into the VCR and press PLAY on the TV. 2 Connect the antenna cable to the VCR owner's manual.) ANTENNA/ CABLE IN 1 ANT OUT S-VIDEO VIDEO L R ANT IN OUTPUT SWITCH Wall Jack 2 Antenna 21 EXTERNAL EQUIPMENT SETUP AV IN 1 VCR SETUP Antenna Connection 1.

Owner's Manual (English)
Page 24
... IN 1 RGB IN (PC) S-VIDEO VIDEO /MONO AUDIO REMOTE CONTROL IN ANTENN CABLE CAUTION G Do not connect to the S -VIDEO input on the TV. 2. NOTE S-VIDEO VIDEO /MONO AUDIO REMOTE CONTROL IN ANTE CAB G If you connect both Video and S-Video at the same time. How to the VCR owner's manual.) UDIO IN... the INPUT button on the remote control. 1 L R AV IN 1 RGB IN (PC) ■ If connected to the AUDIO input jacks on the TV. 2 Connect the audio outputs of the TV. In the event that you have a mono VCR, connect the audio cable from the VCR to the AUDIO L/MONO jack of the VCR to AV...
... IN 1 RGB IN (PC) S-VIDEO VIDEO /MONO AUDIO REMOTE CONTROL IN ANTENN CABLE CAUTION G Do not connect to the S -VIDEO input on the TV. 2. NOTE S-VIDEO VIDEO /MONO AUDIO REMOTE CONTROL IN ANTE CAB G If you connect both Video and S-Video at the same time. How to the VCR owner's manual.) UDIO IN... the INPUT button on the remote control. 1 L R AV IN 1 RGB IN (PC) ■ If connected to the AUDIO input jacks on the TV. 2 Connect the audio outputs of the TV. In the event that you have a mono VCR, connect the audio cable from the VCR to the AUDIO L/MONO jack of the VCR to AV...

Owner's Manual (English)
Page 25
...Select the A V 2 input source on the TV using 1 the INPUT button on the audio equipment. 3 Set the "TV Speaker option - How to connect 1 Connect one end of the optical cable to the TV's OPTICAL port of DIGITAL AUDIO OUT. 2 Connect the other end of the optical cable to external...MONO AUDIO R HDMI IN 3 EXTERNAL EQUIPMENT SETUP 2. AV IN 2 AUDIO OUT CONNECTION Send the TV's audio to the digital audio input on the remote control. ■ If connected to connect 1 Connect the AUDIO/VIDEO jacks between TV and external equipment. OPTICAL DIGITAL AUDIO AUDIO OUT (RGB/DVI) RGB(PC) RS-...
...Select the A V 2 input source on the TV using 1 the INPUT button on the audio equipment. 3 Set the "TV Speaker option - How to connect 1 Connect one end of the optical cable to the TV's OPTICAL port of DIGITAL AUDIO OUT. 2 Connect the other end of the optical cable to external...MONO AUDIO R HDMI IN 3 EXTERNAL EQUIPMENT SETUP 2. AV IN 2 AUDIO OUT CONNECTION Send the TV's audio to the digital audio input on the remote control. ■ If connected to connect 1 Connect the AUDIO/VIDEO jacks between TV and external equipment. OPTICAL DIGITAL AUDIO AUDIO OUT (RGB/DVI) RGB(PC) RS-...

Owner's Manual (English)
Page 26
How to the USB I N jack, you use the USB function. (G p.50) 24 How to connect 1 Connect the USB device to use ■ After connecting the USB I N jack on the side of TV. 2. USB IN HDMI / DVI IN 3 VIDEO L/MONO AUDIO R EXTERNAL EQUIPMENT SETUP EXTERNAL EQUIPMENT SETUP USB CONNECTION i.e) 1 AV IN 2 1.
How to the USB I N jack, you use the USB function. (G p.50) 24 How to connect 1 Connect the USB device to use ■ After connecting the USB I N jack on the side of TV. 2. USB IN HDMI / DVI IN 3 VIDEO L/MONO AUDIO R EXTERNAL EQUIPMENT SETUP EXTERNAL EQUIPMENT SETUP USB CONNECTION i.e) 1 AV IN 2 1.

Owner's Manual (English)
Page 27
...■ Turn on the PC and the TV. ■ Select the HDMI1, 2, 3 or 4 (Only 42/50PQ60, 50/60PS60, 50/60PS60C, 50/60PS70, 50/60PS80) input source on the TV using the INPUT button on the TV. 1 REMOTE CONTROL IN S-VID 2 AV IN 1 2. How to connect 1 Connect the DVI output of the PC to the... RGB IN (P C) jack on the TV. 2 Connect the PC audio output to the AUDIO...
...■ Turn on the PC and the TV. ■ Select the HDMI1, 2, 3 or 4 (Only 42/50PQ60, 50/60PS60, 50/60PS60C, 50/60PS70, 50/60PS80) input source on the TV using the INPUT button on the TV. 1 REMOTE CONTROL IN S-VID 2 AV IN 1 2. How to connect 1 Connect the DVI output of the PC to the... RGB IN (P C) jack on the TV. 2 Connect the PC audio output to the AUDIO...
Owner's Manual (English)
Page 32
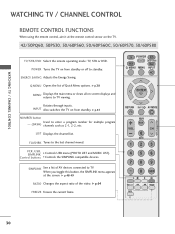
... or clears all on from standby. INPUT Also switches the TV on the TV. 42/50PQ60, 50PS30, 50/60PS60, 50/60PS60C, 50/60PS70, 50/60PS80 TV/STB/DVD Select the remote operating mode: TV, STB or DVD. ENERGY SAVING Adjusts the Energy Saving. SIMPLINK See a list of AV devices connected to standby. G p.48-49 RATIO Changes the aspect ratio...
... or clears all on from standby. INPUT Also switches the TV on the TV. 42/50PQ60, 50PS30, 50/60PS60, 50/60PS60C, 50/60PS70, 50/60PS80 TV/STB/DVD Select the remote operating mode: TV, STB or DVD. ENERGY SAVING Adjusts the Energy Saving. SIMPLINK See a list of AV devices connected to standby. G p.48-49 RATIO Changes the aspect ratio...
Owner's Manual (English)
Page 34
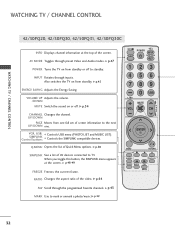
... on or off to TV. G p.34 CHANNEL Changes the channel. G p.38 SIMPLINK See a list of Quick Menu options. INPUT Rotates through preset Video and Audio modes. G p.45 ENERGY SAVING Adjusts the Energy Saving. SIMPLINK Control buttons Controls the SIMPLINK compatible devices. Q.MENU Opens the list of AV devices connected to standby. G p.48...
... on or off to TV. G p.34 CHANNEL Changes the channel. G p.38 SIMPLINK See a list of Quick Menu options. INPUT Rotates through preset Video and Audio modes. G p.45 ENERGY SAVING Adjusts the Energy Saving. SIMPLINK Control buttons Controls the SIMPLINK compatible devices. Q.MENU Opens the list of AV devices connected to standby. G p.48...


