

Owner's Manual (English)
Page 1
...NO : SAC33575901(0905-REV06) www.lgusa.com / www.lg.cwaw/ww.lgwuws.alg.comm/ ewrwciwa.l.lgco.cma The model and serial number of the TV. PLASMA TV OWNER'S MANUAL 42PQ20 50PQ20 42PQ30 50PQ30 42PQ31 50PQ31 42PQ60 50PQ60 50PS30 50PS60 60PS60 42PQ30C 50PQ30C 50PS60C 60PS60C 50PS70 60PS70 50PS80 60PS80 Please... read this is located on the back and one side of the TV is the setting in the ...
...NO : SAC33575901(0905-REV06) www.lgusa.com / www.lg.cwaw/ww.lgwuws.alg.comm/ ewrwciwa.l.lgco.cma The model and serial number of the TV. PLASMA TV OWNER'S MANUAL 42PQ20 50PQ20 42PQ30 50PQ30 42PQ31 50PQ31 42PQ60 50PQ60 50PS30 50PS60 60PS60 42PQ30C 50PQ30C 50PS60C 60PS60C 50PS70 60PS70 50PS80 60PS80 Please... read this is located on the back and one side of the TV is the setting in the ...
Owner's Manual (English)
Page 4
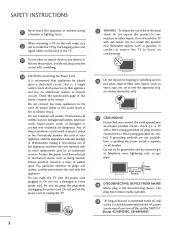
... connecting it to telephone wires, lightening rods, or gas pipes. Do not use of this owner's manual to be connected to a three-prong grounded AC outlet). Do not touch the TV with the power cord plugged in electric shock or fire. Do not try to ground the unit by the hanging power.... 16 Do not expose to dripping or splashing and do not drop onto the screen with an exact replacement part by SWITCH" (Except 42/50PQ30C, 50/60PS60C) Any of fire or electrical shock, do grasp the plug when unplugging the power cord. Do not install this unit is connected to the...
... connecting it to telephone wires, lightening rods, or gas pipes. Do not use of this owner's manual to be connected to a three-prong grounded AC outlet). Do not touch the TV with the power cord plugged in electric shock or fire. Do not try to ground the unit by the hanging power.... 16 Do not expose to dripping or splashing and do not drop onto the screen with an exact replacement part by SWITCH" (Except 42/50PQ30C, 50/60PS60C) Any of fire or electrical shock, do grasp the plug when unplugging the power cord. Do not install this unit is connected to the...

Owner's Manual (English)
Page 6
Add / Delete Channel (Manual Tuning 40 - User Mode 70 Picture Improvement Technology 71 Expert Picture Control 72 Picture Reset 74 Image Sticking Minimization (ISM) Method 75 Demo Mode 76 4 CONTENTS WARNING / CAUTION A SAFETY INSTRUCTIONS 1 FEATURE OF THIS TV 6 PREPARATION Accessories 7 Front Panel Information 8 Back ... Favorite Channel List 43 Brief Information 44 Input List 45 Input Label 46 AV Mode 47 SIMPLINK 48 USB Entry Modes 50 Photo List 51 Music List 55 Movie List 58 DivX Registration Code 62 Deactivation 63 PICTURE CONTROL Picture Size (Aspect Ratio...
Add / Delete Channel (Manual Tuning 40 - User Mode 70 Picture Improvement Technology 71 Expert Picture Control 72 Picture Reset 74 Image Sticking Minimization (ISM) Method 75 Demo Mode 76 4 CONTENTS WARNING / CAUTION A SAFETY INSTRUCTIONS 1 FEATURE OF THIS TV 6 PREPARATION Accessories 7 Front Panel Information 8 Back ... Favorite Channel List 43 Brief Information 44 Input List 45 Input Label 46 AV Mode 47 SIMPLINK 48 USB Entry Modes 50 Photo List 51 Music List 55 Movie List 58 DivX Registration Code 62 Deactivation 63 PICTURE CONTROL Picture Size (Aspect Ratio...

Owner's Manual (English)
Page 7
Auto Clock Setup 90 Manual Clock Setup 91 Auto On/Off Time Setting 92 Sleep Timer Setting 93 PARENTAL CONTROL / RATINGS Set Password & Lock System 94 Channel Blocking 97 Movie & TV Rating 98 Downloadable Rating 103 External Input Blocking 104 Key lock 105 APPENDIX Troubleshooting 106 Maintenance...Product Specifications 109 Programming The Remote Control 110 IR Codes 113 External Control Through RS-232C 115 5 User Mode 80 Balance 81 TV Speakers On/Off Setup 82 Audio Reset 83 Stereo/SAP Broadcasts Setup 84 Audio Language 85 On-Screen Menus Language Selection 86 Caption...
Auto Clock Setup 90 Manual Clock Setup 91 Auto On/Off Time Setting 92 Sleep Timer Setting 93 PARENTAL CONTROL / RATINGS Set Password & Lock System 94 Channel Blocking 97 Movie & TV Rating 98 Downloadable Rating 103 External Input Blocking 104 Key lock 105 APPENDIX Troubleshooting 106 Maintenance...Product Specifications 109 Programming The Remote Control 110 IR Codes 113 External Control Through RS-232C 115 5 User Mode 80 Balance 81 TV Speakers On/Off Setup 82 Audio Reset 83 Stereo/SAP Broadcasts Setup 84 Audio Language 85 On-Screen Menus Language Selection 86 Caption...

Owner's Manual (English)
Page 9
... (Not included with ferrite cores to the power plug, the better it is missing, please contact the dealer where you purchased the TV. The accessories included may cause (Not included with all models) Ferrite core can be used to P.12) * Wipe spots on... MUTE FLASHBK FREEZE CH P A G ENTER E MENU Q.MENU FREEZE RATIO RETURN 1.5V 1.5V FAV MARK Owner's Manual CD Manual Remote Control, Batteries Power Cord (Except 60PS60, 60PS60C, 60PS70, 60PS80) (Only 60PS60, 60PS60C, 50/60PS70, 50/60PS80) or Protection Cover (Refer to P.11) x 4 Bolts for stand assembly (Refer to P.11) x 2...
... (Not included with ferrite cores to the power plug, the better it is missing, please contact the dealer where you purchased the TV. The accessories included may cause (Not included with all models) Ferrite core can be used to P.12) * Wipe spots on... MUTE FLASHBK FREEZE CH P A G ENTER E MENU Q.MENU FREEZE RATIO RETURN 1.5V 1.5V FAV MARK Owner's Manual CD Manual Remote Control, Batteries Power Cord (Except 60PS60, 60PS60C, 60PS70, 60PS80) (Only 60PS60, 60PS60C, 50/60PS70, 50/60PS80) or Protection Cover (Refer to P.11) x 4 Bolts for stand assembly (Refer to P.11) x 2...
Owner's Manual (English)
Page 15
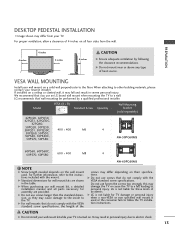
... length of accidents. G When purchasing our wall mount kit, a detailed installation manual and all four sides from your wall mount on a solid wall perpendicular to the...screw specifications. G Do not use screws that you use an LG brand wall mount when mounting the TV to a wall. LG is not liable for wall mount kits are provided. G Do...sold separately) 42PQ20, 42PQ30, 42PQ31, 42PQ30C, 42PQ60, 50PQ20, 50PQ30, 50PQ31, 50PQ30C, 400 * 400 M6 50PQ60, 50PS30, 50PS60, 50PS60C, 50PS70, 50PS80 4 AW-50PG60MS 60PS60, 60PS60C, 60PS70, 60PS80 600 * 400 M8 4 AW-60PG60MS ! Do not...
... length of accidents. G When purchasing our wall mount kit, a detailed installation manual and all four sides from your wall mount on a solid wall perpendicular to the...screw specifications. G Do not use screws that you use an LG brand wall mount when mounting the TV to a wall. LG is not liable for wall mount kits are provided. G Do...sold separately) 42PQ20, 42PQ30, 42PQ31, 42PQ30C, 42PQ60, 50PQ20, 50PQ30, 50PQ31, 50PQ30C, 400 * 400 M6 50PQ60, 50PS30, 50PS60, 50PS60C, 50PS70, 50PS80 4 AW-50PG60MS 60PS60, 60PS60C, 60PS70, 60PS80 600 * 400 M8 4 AW-60PG60MS ! Do not...

Owner's Manual (English)
Page 16
.... SWIVEL STAND (This feature is safer to the holes in a forward direction, potentially causing injury or damaging the product. Caution: Please make sure that the TV be attached to a wall so it cannot fall over (when not using a wall mount). ■ Image shown may differ from the... on the wall to tie the rope so it cannot be pulled in the product. Match the height of the TV. G To use the TV safely, make sure that you can adjust the TV manually to the left or right direction by 20 degrees to the wall. It is not available for all models...
.... SWIVEL STAND (This feature is safer to the holes in a forward direction, potentially causing injury or damaging the product. Caution: Please make sure that the TV be attached to a wall so it cannot fall over (when not using a wall mount). ■ Image shown may differ from the... on the wall to tie the rope so it cannot be pulled in the product. Match the height of the TV. G To use the TV safely, make sure that you can adjust the TV manually to the left or right direction by 20 degrees to the wall. It is not available for all models...

Owner's Manual (English)
Page 18
...TV. How to connect IN VI) 1 Connect the video outputs (Y, PB, PR) of the digital set -top box. REMOTE CONTROL IN S-VIDEO VIDEO /MONO AUDIO AN CA 2. How to use ■ Turn on the digital set-top box. (Refer to the owner's manual... SETUP ■ To prevent the equipment damage, never plug in any power cords until you do receive digital signals from your TV. Match the jack colors (Y = green, PB = blue, and PR = red). COMPONENT IN VIDEO AUDIO 2 1 L...43 67.50 59.94 60.00 59.94 60.00 59.94 60.00 59.94 60.00 24.00 30.00 59.94 60.00 16 HD RECEIVER SETUP This TV can ...
...TV. How to connect IN VI) 1 Connect the video outputs (Y, PB, PR) of the digital set -top box. REMOTE CONTROL IN S-VIDEO VIDEO /MONO AUDIO AN CA 2. How to use ■ Turn on the digital set-top box. (Refer to the owner's manual... SETUP ■ To prevent the equipment damage, never plug in any power cords until you do receive digital signals from your TV. Match the jack colors (Y = green, PB = blue, and PR = red). COMPONENT IN VIDEO AUDIO 2 1 L...43 67.50 59.94 60.00 59.94 60.00 59.94 60.00 59.94 60.00 24.00 30.00 59.94 60.00 16 HD RECEIVER SETUP This TV can ...

Owner's Manual (English)
Page 19
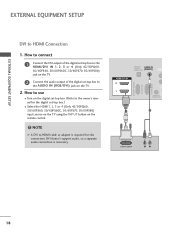
...manual for the digital set -top box to use the latest cables that support HDMI version 1.3. NOTE G Check HDMI cable over version 1.3. How to connect 1 Connect the digital set -top box.) ■ Select the HDMI1, 2, 3 or 4 (Only 42/50PQ60, 50/60PS60, 50/60PS60C, 50/60PS70, 50/60PS80) input source on the TV... using the INPUT button on the TV. 2 No separate audio connection is necessary. OPTICAL DIGITAL AUDIO AUDIO OUT (RGB/DVI) HDMI/DVI IN...
...manual for the digital set -top box to use the latest cables that support HDMI version 1.3. NOTE G Check HDMI cable over version 1.3. How to connect 1 Connect the digital set -top box.) ■ Select the HDMI1, 2, 3 or 4 (Only 42/50PQ60, 50/60PS60, 50/60PS60C, 50/60PS70, 50/60PS80) input source on the TV... using the INPUT button on the TV. 2 No separate audio connection is necessary. OPTICAL DIGITAL AUDIO AUDIO OUT (RGB/DVI) HDMI/DVI IN...
Owner's Manual (English)
Page 20
...232C IN (CONTROL & SERVICE) EXTERNAL EQUIPMENT SETUP EXTERNAL EQUIPMENT SETUP DVI to the HDMI/DVI IN 1, 2, 3 or 4 (Only 42/50PQ60, 50/60PS60, 50/60PS60C, 50/60PS70, 50/60PS80) jack on the TV. 2 Connect the audio output of the digital set -top box.) ■ Select the HDMI1, 2, 3 or 4 (Only 42/50PQ60..., 50/60PS60, 50/60PS60C, 50/60PS70, 50/60PS80) input source on the TV using the INPUT button on the TV. 2. How to use ■ Turn on the digital set-top box. (Refer to the owner's manual for this connection. DVI doesn't support audio, so a ...
...232C IN (CONTROL & SERVICE) EXTERNAL EQUIPMENT SETUP EXTERNAL EQUIPMENT SETUP DVI to the HDMI/DVI IN 1, 2, 3 or 4 (Only 42/50PQ60, 50/60PS60, 50/60PS60C, 50/60PS70, 50/60PS80) jack on the TV. 2 Connect the audio output of the digital set -top box.) ■ Select the HDMI1, 2, 3 or 4 (Only 42/50PQ60..., 50/60PS60, 50/60PS60C, 50/60PS70, 50/60PS80) input source on the TV using the INPUT button on the TV. 2. How to use ■ Turn on the digital set-top box. (Refer to the owner's manual for this connection. DVI doesn't support audio, so a ...

Owner's Manual (English)
Page 21
... to connect 1 Connect the video outputs (Y, PB, PR) of the DVD to the component input ports as shown below. Component ports on the TV Y Y Video output ports Y on the TV. 2. DIO B/DVI) COMPONENT IN VIDEO AUDIO 2 1 L R AV IN 1 REMOTE CONTROL IN S-VIDEO VIDEO /MONO AUDIO 1 2 Y PB PR L R Component Input ports To get...) DVD SETUP Component Connection 1. Match the jack colors (Y = green, PB = blue, and PR = red). 2 Connect the audio outputs of the DVD to the DVD player's manual for operating instructions.
... to connect 1 Connect the video outputs (Y, PB, PR) of the DVD to the component input ports as shown below. Component ports on the TV Y Y Video output ports Y on the TV. 2. DIO B/DVI) COMPONENT IN VIDEO AUDIO 2 1 L R AV IN 1 REMOTE CONTROL IN S-VIDEO VIDEO /MONO AUDIO 1 2 Y PB PR L R Component Input ports To get...) DVD SETUP Component Connection 1. Match the jack colors (Y = green, PB = blue, and PR = red). 2 Connect the audio outputs of the DVD to the DVD player's manual for operating instructions.

Owner's Manual (English)
Page 22
How to connect 1 Connect the HDMI output of the DVD to the DVD player's manual for operating instructions. EXTERNAL EQUIPMENT SETUP EXTERNAL EQUIPMENT SETUP S-Video Connection 1. HDMI Connection 1. HDMI supports both audio and video. 2. RGB(PC) S-VIDEO AUDIO L R 1 2 ... IN (CONTROL & SERVICE) HDMI/DVI IN 2 1 1 HDMI-DVD OUTPUT 20 How to use ■ Select the HDMI1, 2, 3 or 4 (Only 42/50PQ60, 50/60PS60, 50/60PS60C, 50/60PS70, 50/60PS80) input source on the TV using the INPUT button on the remote control. ■ Refer to the HDMI/DVI IN 1, 2, 3 or 4 (Only 42/50PQ60...
How to connect 1 Connect the HDMI output of the DVD to the DVD player's manual for operating instructions. EXTERNAL EQUIPMENT SETUP EXTERNAL EQUIPMENT SETUP S-Video Connection 1. HDMI Connection 1. HDMI supports both audio and video. 2. RGB(PC) S-VIDEO AUDIO L R 1 2 ... IN (CONTROL & SERVICE) HDMI/DVI IN 2 1 1 HDMI-DVD OUTPUT 20 How to use ■ Select the HDMI1, 2, 3 or 4 (Only 42/50PQ60, 50/60PS60, 50/60PS60C, 50/60PS70, 50/60PS80) input source on the TV using the INPUT button on the remote control. ■ Refer to the HDMI/DVI IN 1, 2, 3 or 4 (Only 42/50PQ60...

Owner's Manual (English)
Page 23
How to use ■ Set VCR output switch to 3 or 4 and then tune TV to the same channel number. ■ Insert a video tape into the VCR and press PLAY on the TV. 2 Connect the antenna cable to the VCR owner's manual.) ANTENNA/ CABLE IN 1 ANT OUT S-VIDEO VIDEO L R ANT IN OUTPUT SWITCH Wall Jack 2 Antenna 21 EXTERNAL EQUIPMENT SETUP AV IN 1 VCR SETUP Antenna Connection 1. How to connect 1 Connect the RF antenna out socket of the VCR to the ANTENNA/CABLE IN socket on the VCR. (Refer to the RF antenna in socket of the VCR. 2.
How to use ■ Set VCR output switch to 3 or 4 and then tune TV to the same channel number. ■ Insert a video tape into the VCR and press PLAY on the TV. 2 Connect the antenna cable to the VCR owner's manual.) ANTENNA/ CABLE IN 1 ANT OUT S-VIDEO VIDEO L R ANT IN OUTPUT SWITCH Wall Jack 2 Antenna 21 EXTERNAL EQUIPMENT SETUP AV IN 1 VCR SETUP Antenna Connection 1. How to connect 1 Connect the RF antenna out socket of the VCR to the ANTENNA/CABLE IN socket on the VCR. (Refer to the RF antenna in socket of the VCR. 2.

Owner's Manual (English)
Page 24
... ■ Insert a video tape into the VCR and press PLAY on the VCR. (Refer to the VCR owner's manual.) UDIO IN GB/DVI) COMPONENT IN VIDEO AUDIO 2 ■ Select the A V 1 input source on the TV using the INPUT button on the remote control. 1 L R AV IN 1 RGB IN (PC) ■ If connected to... the VCR owner's manual.) ■ Select the A V 1 input source on the TV using the INPUT button on the TV. ! How to use ■ Insert a video tape into the VCR and press PLAY on the VCR. (Refer to AV...
... ■ Insert a video tape into the VCR and press PLAY on the VCR. (Refer to the VCR owner's manual.) UDIO IN GB/DVI) COMPONENT IN VIDEO AUDIO 2 ■ Select the A V 1 input source on the TV using the INPUT button on the remote control. 1 L R AV IN 1 RGB IN (PC) ■ If connected to... the VCR owner's manual.) ■ Select the A V 1 input source on the TV using the INPUT button on the TV. ! How to use ■ Insert a video tape into the VCR and press PLAY on the VCR. (Refer to AV...

Owner's Manual (English)
Page 25
...1 C ! NOTE 2 G When connecting with ACP (Audio Copy Protection) function may damage your vision. How to connect 1 Connect one end of the optical cable to the TV's OPTICAL port of DIGITAL AUDIO OUT. 2 Connect the other end of the optical cable to connect 1 Connect the AUDIO/VIDEO jacks between... Right = red) Camcorder Video Game Set VIDEO L R USB IN VIDEO L/MONO AUDIO R HDMI IN 3 EXTERNAL EQUIPMENT SETUP 2. See the external audio equipment instruction manual for operation. G Audio with external audio equipment, such as amplifiers or speakers, you can turn the...
...1 C ! NOTE 2 G When connecting with ACP (Audio Copy Protection) function may damage your vision. How to connect 1 Connect one end of the optical cable to the TV's OPTICAL port of DIGITAL AUDIO OUT. 2 Connect the other end of the optical cable to connect 1 Connect the AUDIO/VIDEO jacks between... Right = red) Camcorder Video Game Set VIDEO L R USB IN VIDEO L/MONO AUDIO R HDMI IN 3 EXTERNAL EQUIPMENT SETUP 2. See the external audio equipment instruction manual for operation. G Audio with external audio equipment, such as amplifiers or speakers, you can turn the...
Owner's Manual (English)
Page 29
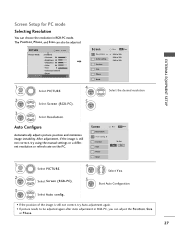
...768 1360 x 768 1 MENU 2 ENTER Select PICTURE. Select Screen (RGB-PC). After adjustment, if the image is still not correct, try using the manual settings or a different resolution or refresh rate on the PC. To Set Yes No 1 MENU 2 ENTER 3 ENTER Select PICTURE. The Position, Phase, ...you can also be adjusted again after Auto adjustment in RGB-PC mode. PICTURE Move Enter E Picture Mode : Standard • Contrast 90 • Brightness 50 • Sharpness 60 • Color 60 • Tint 0R G • Advanced Control • Reset Screen (RGB-PC) Screen Resolution G Auto ...
...768 1360 x 768 1 MENU 2 ENTER Select PICTURE. Select Screen (RGB-PC). After adjustment, if the image is still not correct, try using the manual settings or a different resolution or refresh rate on the PC. To Set Yes No 1 MENU 2 ENTER 3 ENTER Select PICTURE. The Position, Phase, ...you can also be adjusted again after Auto adjustment in RGB-PC mode. PICTURE Move Enter E Picture Mode : Standard • Contrast 90 • Brightness 50 • Sharpness 60 • Color 60 • Tint 0R G • Advanced Control • Reset Screen (RGB-PC) Screen Resolution G Auto ...
Owner's Manual (English)
Page 30
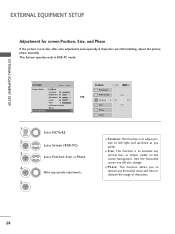
... not clear after auto adjustment and especially if characters are still trembling, adjust the picture phase manually. D F G E 1 MENU 2 ENTER 3 ENTER 4 ENTER 5 ENTER Select PICTURE. PICTURE Move Enter E Picture Mode : Standard • Contrast 90 • Brightness 50 • Sharpness 60 • Color 60 • Tint 0R G • Advanced Control • Reset Screen (RGB...
... not clear after auto adjustment and especially if characters are still trembling, adjust the picture phase manually. D F G E 1 MENU 2 ENTER 3 ENTER 4 ENTER 5 ENTER Select PICTURE. PICTURE Move Enter E Picture Mode : Standard • Contrast 90 • Brightness 50 • Sharpness 60 • Color 60 • Tint 0R G • Advanced Control • Reset Screen (RGB...
Owner's Manual (English)
Page 37
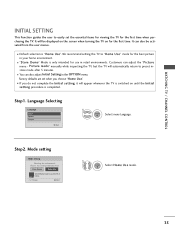
...Store Demo Home Use Select [Home Use] to use in retail environments. Picture mode" manually while inspecting the TV, but the TV will appear whenever the TV is switched on for the first time when purchasing the TV. Step1. Choose the setting mode you do not complete the Initial setting, it will.... ■ You can also adjust Initial Setting in your home environment. ■ "Store Demo" Mode is only intended for use this TV at home. WATCHING TV / CHANNEL CONTROL INITIAL SETTING This Function guides the user to easily set when you choose "Home Use". ■ If you want. Language...
...Store Demo Home Use Select [Home Use] to use in retail environments. Picture mode" manually while inspecting the TV, but the TV will appear whenever the TV is switched on for the first time when purchasing the TV. Step1. Choose the setting mode you do not complete the Initial setting, it will.... ■ You can also adjust Initial Setting in your home environment. ■ "Store Demo" Mode is only intended for use this TV at home. WATCHING TV / CHANNEL CONTROL INITIAL SETTING This Function guides the user to easily set when you choose "Home Use". ■ If you want. Language...
Owner's Manual (English)
Page 38
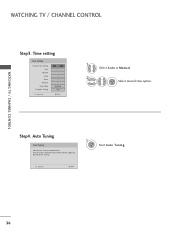
Previous Next 1 ENTER Start Auto Tuning. 36 The previous channel information will be updated during Auto Tuning. WATCHING TV / CHANNEL CONTROL WATCHING TV / CHANNEL CONTROL Step3. Step4. Time setting Time Setting Current Time Setting Year Month Date Hour Minute Time Zone Daylight Saving F Auto G 2007 11 15 5 PM 52 Eastern Off Previous Next 1 Select A ut o or Manual. 2 ENTER Select desired time option. Auto Tuning Auto Tuning Check your antenna connection.
Previous Next 1 ENTER Start Auto Tuning. 36 The previous channel information will be updated during Auto Tuning. WATCHING TV / CHANNEL CONTROL WATCHING TV / CHANNEL CONTROL Step3. Step4. Time setting Time Setting Current Time Setting Year Month Date Hour Minute Time Zone Daylight Saving F Auto G 2007 11 15 5 PM 52 Eastern Off Previous Next 1 Select A ut o or Manual. 2 ENTER Select desired time option. Auto Tuning Auto Tuning Check your antenna connection.
Owner's Manual (English)
Page 39
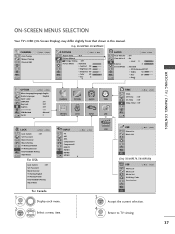
... CONTROL 37 Return to TV viewing. Select a menu item. 3 ENTER 4 MENU Accept the current selection. Only 50/60PS60, 50/60PS60C CHANNEL Auto Tuning Manual Tuning Channel Edit Move Enter PICTURE Move Aspect Ratio : 16:9 Picture Wizard Energy Saving : Off Picture Mode : Standard • Contrast 90 • Brightness 50 • Sharpness 60 • Color 60 R •...
... CONTROL 37 Return to TV viewing. Select a menu item. 3 ENTER 4 MENU Accept the current selection. Only 50/60PS60, 50/60PS60C CHANNEL Auto Tuning Manual Tuning Channel Edit Move Enter PICTURE Move Aspect Ratio : 16:9 Picture Wizard Energy Saving : Off Picture Mode : Standard • Contrast 90 • Brightness 50 • Sharpness 60 • Color 60 R •...

