
Owners Manual
Page 2
... different from LG Electronics, Unauthorized modification could void the user's authority to operate the equipment, CAUTION: Do not attempt to modify this product \ WARNING/CAUTmON TO REDUCE THE RISK OF FIRE AND ELECTRIC SHOCK, DO NOT EXPOSE THIS PRODUCT TO RAIN OR MOISTURE, 2 Plasma TV Consult the... dealer or an experienced radio/TV technician for help, o Any changes or modifications not expressly approved by the party responsibme for a Class B digital device...
... different from LG Electronics, Unauthorized modification could void the user's authority to operate the equipment, CAUTION: Do not attempt to modify this product \ WARNING/CAUTmON TO REDUCE THE RISK OF FIRE AND ELECTRIC SHOCK, DO NOT EXPOSE THIS PRODUCT TO RAIN OR MOISTURE, 2 Plasma TV Consult the... dealer or an experienced radio/TV technician for help, o Any changes or modifications not expressly approved by the party responsibme for a Class B digital device...

Owners Manual
Page 4
... instructions. 5. Do not defeat the safety purpose of the obsolete out_et. 10. If the provided p_ug does not fit into your safety. PORTABLE CART WARNING J 4 Plasma TV
... instructions. 5. Do not defeat the safety purpose of the obsolete out_et. 10. If the provided p_ug does not fit into your safety. PORTABLE CART WARNING J 4 Plasma TV
Owners Manual
Page 8
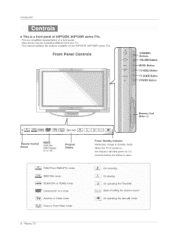
...HDMI1/DVI or HDMI2 mgde Component1 or 2 mode Antenna or Cable moae [_ Video or Front Video mode 8 Plasma TV m Power Standby Indicator Illuminates orange in standby mode, When the TV is turned on, the indicator will blink green for 3-4 seconds before the picture is a simplified representation of... a front panel, Here shown may be somewhat different from your TV, - This is seen, On recording On playing State of 50PY2DR, 60PY2DR series TVs. - Introduction ÷ This is a front panel of setting me reserve recora [_ On operating the ...
...HDMI1/DVI or HDMI2 mgde Component1 or 2 mode Antenna or Cable moae [_ Video or Front Video mode 8 Plasma TV m Power Standby Indicator Illuminates orange in standby mode, When the TV is turned on, the indicator will blink green for 3-4 seconds before the picture is a simplified representation of... a front panel, Here shown may be somewhat different from your TV, - This is seen, On recording On playing State of 50PY2DR, 60PY2DR series TVs. - Introduction ÷ This is a front panel of setting me reserve recora [_ On operating the ...
Owners Manual
Page 10
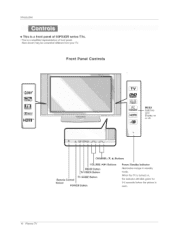
Here shown may be somewhat different from your TV. Front Panel: Controls qeT¢ iiii _I611AL [TM iNDEX -- CHANNEL (_f, A) Buttons VOLUME (4,m) Buttons MENU Button TV/VIDEO Button Remote Sensor Contro_ TV GUIDE Button POWER Button Power Standby mndicstor Illuminates orange in standby mode. Switches LED Disolav on , the indicator will blink green for 3-4 seconds before the picture is turned on ot off. Introduction ÷ This is a simplified representation of 50PX4DR series TVs. - This is a front panel of front panel. When the TV is seen. 10 Plasma TV
Here shown may be somewhat different from your TV. Front Panel: Controls qeT¢ iiii _I611AL [TM iNDEX -- CHANNEL (_f, A) Buttons VOLUME (4,m) Buttons MENU Button TV/VIDEO Button Remote Sensor Contro_ TV GUIDE Button POWER Button Power Standby mndicstor Illuminates orange in standby mode. Switches LED Disolav on , the indicator will blink green for 3-4 seconds before the picture is turned on ot off. Introduction ÷ This is a simplified representation of 50PX4DR series TVs. - This is a front panel of front panel. When the TV is seen. 10 Plasma TV

Owners Manual
Page 14
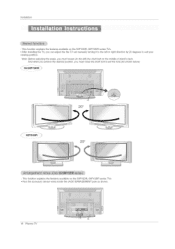
...joining it to be somewhat different from your plasma display. Install the wall brackets on a desk top, insert the 2 eye-botts and tighten them securely in the upper holes as shown. Check to a wall by using the TV/Wall brackets. - Here shown may be sure... Cable 75£_ Round Cable 2-Wall brackets(50") 2-eye-bolts(50") G-LINK Cable 6-RING SPACER (Only 60PY2DR series ) 6- bolts (Only 60PY2DR series ) 2-Wail brackets(60") 2-TV brackets(60") - /nstaflation l Ensure that the following accessories are tightened securely. 14 Plasma TV Match the height of the eye-bolts and ...
...joining it to be somewhat different from your plasma display. Install the wall brackets on a desk top, insert the 2 eye-botts and tighten them securely in the upper holes as shown. Check to a wall by using the TV/Wall brackets. - Here shown may be sure... Cable 75£_ Round Cable 2-Wall brackets(50") 2-eye-bolts(50") G-LINK Cable 6-RING SPACER (Only 60PY2DR series ) 6- bolts (Only 60PY2DR series ) 2-Wail brackets(60") 2-TV brackets(60") - /nstaflation l Ensure that the following accessories are tightened securely. 14 Plasma TV Match the height of the eye-bolts and ...

Owners Manual
Page 16
... installation instruc- tions are available from your TV, GROUNDING Ensure that you connect the earth ground wire to be mounted horizontally, - fnstaflat/on The TV can be installed in the optional Desktop Stand Installation, i ..... 16 Plasma TV This manual explains the features available on a... desktop etc, The TV is designed to prevent possible electric shock, if grounding ...
... installation instruc- tions are available from your TV, GROUNDING Ensure that you connect the earth ground wire to be mounted horizontally, - fnstaflat/on The TV can be installed in the optional Desktop Stand Installation, i ..... 16 Plasma TV This manual explains the features available on a... desktop etc, The TV is designed to prevent possible electric shock, if grounding ...
Owners Manual
Page 18
...Plasma TV installation - After installing the TV, you must loosen (to the left or right direction by 20 degrees to the left ) the shaft bolt on the middle of stand's back. And when you acheve the desired position, you can adiust the the TV set the hole.(As shown below) (. 50/60PY2DR :'!) --. ........ -- { 50PX4DR... i- - This function explains the features available on the 50PY2DR, 60PY2DR series TVs. This function explains the features available on...
...Plasma TV installation - After installing the TV, you must loosen (to the left or right direction by 20 degrees to the left ) the shaft bolt on the middle of stand's back. And when you acheve the desired position, you can adiust the the TV set the hole.(As shown below) (. 50/60PY2DR :'!) --. ........ -- { 50PX4DR... i- - This function explains the features available on the 50PY2DR, 60PY2DR series TVs. This function explains the features available on...

Owners Manual
Page 20
... Jack Turn clockwise to A/V iNPUT, select Video input SOUrCe) ,_ DS-oVindoeto coant ntheect staombeothtimVei.deo and VCR Rear 20 Plasma TV RF Coaxial Wire (75 ohm) Bronze Wire To improve the picture quality in the figure. Connect the audio and video cables from VCR to the... VCR owner's manual.) 3. When connecting the TV to the TV input jacks, as shown in a poor signal area, please purchase a signal amplifier and install properly. If the 4:3 picture format is improved; Insert a video...
... Jack Turn clockwise to A/V iNPUT, select Video input SOUrCe) ,_ DS-oVindoeto coant ntheect staombeothtimVei.deo and VCR Rear 20 Plasma TV RF Coaxial Wire (75 ohm) Bronze Wire To improve the picture quality in the figure. Connect the audio and video cables from VCR to the... VCR owner's manual.) 3. When connecting the TV to the TV input jacks, as shown in a poor signal area, please purchase a signal amplifier and install properly. If the 4:3 picture format is improved; Insert a video...

Owners Manual
Page 22
...panel. These 3 types of Motorola, Scientific Atlanta, SCM etc.. Use TV/WDEO on the digital set -top box.) 2. Signal 480i 480p 720p 1080i Component 1/2 RGB-DTV, HDMI1/DVI,HDMI2 Yes No Yes Yes Yes Yes Yes Yes 22 Plasma TV If the pairing information about this may cause damage to the CableCARD%... - This TV can be used for the digital set -top box. (Refer to the figure as this...
...panel. These 3 types of Motorola, Scientific Atlanta, SCM etc.. Use TV/WDEO on the digital set -top box.) 2. Signal 480i 480p 720p 1080i Component 1/2 RGB-DTV, HDMI1/DVI,HDMI2 Yes No Yes Yes Yes Yes Yes Yes 22 Plasma TV If the pairing information about this may cause damage to the CableCARD%... - This TV can be used for the digital set -top box. (Refer to the figure as this...

Owners Manual
Page 26
... automatically set to How To Connect 1, Connect the source device to HDMtl/DVl port of this TV with a HDMI-to-DVI cable(not supplied with this TV with this purpose, 26 Plasma TV This TV supports HDCP(High-bandwidth lution, Digital Contents Protection) Protocol for DVl INPUT, 4, If the source... set the output resolution appropriately, To get the best picture quality, adjust the output resolution of the source device to 1280x720p, - This TV can receive the High-Definition Multimedia Interface(HDMI) or the Digital Visual Interface(DVI), - If the source device has an HDMI output, ...
... automatically set to How To Connect 1, Connect the source device to HDMtl/DVl port of this TV with a HDMI-to-DVI cable(not supplied with this TV with this purpose, 26 Plasma TV This TV supports HDCP(High-bandwidth lution, Digital Contents Protection) Protocol for DVl INPUT, 4, If the source... set the output resolution appropriately, To get the best picture quality, adjust the output resolution of the source device to 1280x720p, - This TV can receive the High-Definition Multimedia Interface(HDMI) or the Digital Visual Interface(DVI), - If the source device has an HDMI output, ...

Owners Manual
Page 28
...800 @ 72.18Hz - 800 x 800 @ 78Hz - 800 x 800 @ 88.06Hz -1024 x 788 @ 80Hz(preferred -1024 x 788 @ 70.08Hz -1024 x 768 @ 78.02Hz format) 28 Plasma TV Turn on the display by pressing the POWER button on the ISM Method menu. - There may be noise associated with HDMI1/DW Input, output PC...Screen. Notes: - When Soume Devices connected with the resolution, vertical pattern, contrast or brightness in HDMI1/DVI Source Devices. Source Devices or contact your TV SET. The fixed image may not work if a HDMI1 to DV/Cable is clear. If not, refer to use . - lnstatiation How to the...
...800 @ 72.18Hz - 800 x 800 @ 78Hz - 800 x 800 @ 88.06Hz -1024 x 788 @ 80Hz(preferred -1024 x 788 @ 70.08Hz -1024 x 768 @ 78.02Hz format) 28 Plasma TV Turn on the display by pressing the POWER button on the ISM Method menu. - There may be noise associated with HDMI1/DW Input, output PC...Screen. Notes: - When Soume Devices connected with the resolution, vertical pattern, contrast or brightness in HDMI1/DVI Source Devices. Source Devices or contact your TV SET. The fixed image may not work if a HDMI1 to DV/Cable is clear. If not, refer to use . - lnstatiation How to the...
Owners Manual
Page 32
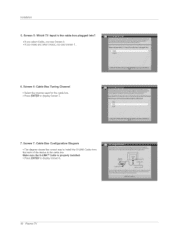
Screen 5: Which TV input is property installed. Screen 6: Cabme Box Tuning Channel Select the channel used for the cable box= • Press ENTER to display Screen 8= 32 Plasma TV Screen 7: Cabme Box Configuration Diagram The diagram shows the correct way to install the G-LINK Cable from the back of the device to the cable box= Make sure the G_UNK TM Cable is the cabme box pmugged into? , If you select Cable, you see Screen 6= If you make any other choice, you see Screen 7 = 6. /nstaflation 5. Press ENTER to display Screen 7= 7.
Screen 5: Which TV input is property installed. Screen 6: Cabme Box Tuning Channel Select the channel used for the cable box= • Press ENTER to display Screen 8= 32 Plasma TV Screen 7: Cabme Box Configuration Diagram The diagram shows the correct way to install the G-LINK Cable from the back of the device to the cable box= Make sure the G_UNK TM Cable is the cabme box pmugged into? , If you select Cable, you see Screen 6= If you make any other choice, you see Screen 7 = 6. /nstaflation 5. Press ENTER to display Screen 7= 7.
Owners Manual
Page 34
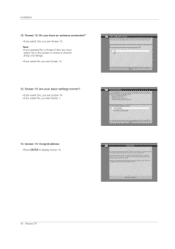
/nstaflation 12. Screen 14: Congratulations ,Press ENTER to receive a channel fineup and listings. •If you select No, you see Screen 13. Screen 13: Are your basic settings correct? •If you select Yes, you see Screen 14= •If you select No, you see Screen 13. 13. No_e: .If you selected No in Screen 3 then you must select Yes in this screen to display Screen 15, 34 Plasma TV Screen 12: Do you have an antenna connected? •If you select Yes, you see Screen 1= 14.
/nstaflation 12. Screen 14: Congratulations ,Press ENTER to receive a channel fineup and listings. •If you select No, you see Screen 13. Screen 13: Are your basic settings correct? •If you select Yes, you see Screen 14= •If you select No, you see Screen 13. 13. No_e: .If you selected No in Screen 3 then you must select Yes in this screen to display Screen 15, 34 Plasma TV Screen 12: Do you have an antenna connected? •If you select Yes, you see Screen 1= 14.
Owners Manual
Page 36
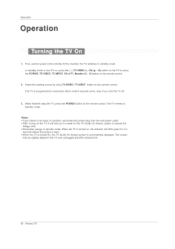
...TV on, press the 0!I,TV/VmDEO ®, OR (_. / _) button on the TV or press the POWER, TV/VIDEO, TV INPUT, OH (A/T), Number (0 _ 9) button on the remote control. When the TV is automatically displayed. The TV reverts to standby mode. When finished using TV/VmDEO, TV iNPUT button on the TV, it was unplugged and then powered On. 36 Plasma TV... Operation 1. At this moment, the TV switches to ...
...TV on, press the 0!I,TV/VmDEO ®, OR (_. / _) button on the TV or press the POWER, TV/VIDEO, TV INPUT, OH (A/T), Number (0 _ 9) button on the remote control. When the TV is automatically displayed. The TV reverts to standby mode. When finished using TV/VmDEO, TV iNPUT button on the TV, it was unplugged and then powered On. 36 Plasma TV... Operation 1. At this moment, the TV switches to ...
Owners Manual
Page 38
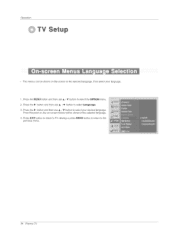
Operation TV l The menus can be shown in the selected language. First select your desired language. Press the MENU button and then use & / _' button to select the OPTION menu. 2. Press the _ button and then use A / _" button to select your language. 1. Press the _" button and then use A / T button to the previous menu. 38 Plasma TV From this point on, the on-screen menus will be shown on the screen in the selected language. 4. Press EXmTbutton to return to TV viewing or press MENU button to return to select Language. 3.
Operation TV l The menus can be shown in the selected language. First select your desired language. Press the MENU button and then use & / _' button to select the OPTION menu. 2. Press the _ button and then use A / _" button to select your language. 1. Press the _" button and then use A / T button to the previous menu. 38 Plasma TV From this point on, the on-screen menus will be shown on the screen in the selected language. 4. Press EXmTbutton to return to TV viewing or press MENU button to return to select Language. 3.

Owners Manual
Page 40
...it. Use A / T / _ / _ button to select a channel and then use _, / T button to the Favorite List. 5. Instead, use A / _" button to the previous menu. 40 Plasma TV Press the MENU button and then use the cable box's Channel Edit if available, - Create two different types of channel lists in memory: "Custom list...from the Custom List are received to the small window at the top-left corner of the signal being received. 4. Press EXmTbutton to return to TV viewing or press MENU button to return to select the $_,_ menu. 2. A custom list can add or delete the channel to see a ...
...it. Use A / T / _ / _ button to select a channel and then use _, / T button to the Favorite List. 5. Instead, use A / _" button to the previous menu. 40 Plasma TV Press the MENU button and then use the cable box's Channel Edit if available, - Create two different types of channel lists in memory: "Custom list...from the Custom List are received to the small window at the top-left corner of the signal being received. 4. Press EXmTbutton to return to TV viewing or press MENU button to return to select the $_,_ menu. 2. A custom list can add or delete the channel to see a ...

Owners Manual
Page 42
...or press MENU button to return to select the VI:_ menu. 2. Operation EZ Picture adiusts the TV for optimum picture quality at 1. Press the MENU button and then use _ / _ button to the previous menu. 42 Plasma TV Press the _ button and then use A / _ button to select either Coo:L Medium or ...Warm. 4. Press EXIT button to return to TV viewing or press MENU button to return to their original factory preset values, 1. Use ...
...or press MENU button to return to select the VI:_ menu. 2. Operation EZ Picture adiusts the TV for optimum picture quality at 1. Press the MENU button and then use _ / _ button to the previous menu. 42 Plasma TV Press the _ button and then use A / _ button to select either Coo:L Medium or ...Warm. 4. Press EXIT button to return to TV viewing or press MENU button to return to their original factory preset values, 1. Use ...
Owners Manual
Page 44
... appropriate adiustments. 4. Press the MENU button and then use A / _ button to select the AUDIO menu. 2. Press EXIT button to return to TV viewing or press MENU button to return to the previous menu. is incorporated under license from SRS Labs, Inc. - TruSurround XT technology is a trademark...without needing to select the desired sound option (Balance, Treb|e, or Bass). 3. Press EXmTbutton to return to TV viewing or press MENU button to return to the previous menu. 44 Plasma TV Press the _ button and then use A / T button to add extra speakers or equipment. Operation -...
... appropriate adiustments. 4. Press the MENU button and then use A / _ button to select the AUDIO menu. 2. Press EXIT button to return to TV viewing or press MENU button to return to the previous menu. is incorporated under license from SRS Labs, Inc. - TruSurround XT technology is a trademark...without needing to select the desired sound option (Balance, Treb|e, or Bass). 3. Press EXmTbutton to return to TV viewing or press MENU button to return to the previous menu. 44 Plasma TV Press the _ button and then use A / T button to add extra speakers or equipment. Operation -...
Owners Manual
Page 48
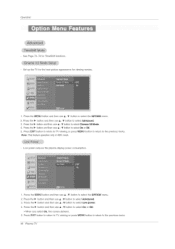
... OPTION menu. 2. Press the _ button and then use _ / T button to select O_ or Off. 5. Press EXmTbutton to return to TV viewing or press MENU button to return to the previous menu. 48 Plasma TV Press the _ button and then use A / T button to select Clne_ 3_2_l_¢de. 4. Press the _ button and then use...
... OPTION menu. 2. Press the _ button and then use _ / T button to select O_ or Off. 5. Press EXmTbutton to return to TV viewing or press MENU button to return to the previous menu. 48 Plasma TV Press the _ button and then use A / T button to select Clne_ 3_2_l_¢de. 4. Press the _ button and then use...
Owners Manual
Page 50
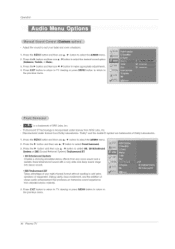
... image. (4:3 _ 4:3, 16:9 _ 16:9) , ¢:3 Choose 4:3 when you want the picture to specify how the picture is displayed on your TV with a 16:9 aspect ratio, you want to select the desired picture format. Zoom 2 Choose Zoom 2 when you want to adjust the picture horizontally,...menu. If you are viewing a picture with a 16:9 ratio picturo format. You can 't use 4:3 or 16:9 aspect ratio. - SO Plasma TV H_riz_naspectrati_isn_tavai_ab_ef_rC_m__nent1`2(48__/72_p/1_8_i)/RGB-DTV(48__/72__/1_8_i)/HDM_1/Dv_-DTv (720p/1080i)/DTV(720p/1080i), HDMI2-DTV(720p/1080i) input source. - ble...
... image. (4:3 _ 4:3, 16:9 _ 16:9) , ¢:3 Choose 4:3 when you want the picture to specify how the picture is displayed on your TV with a 16:9 aspect ratio, you want to select the desired picture format. Zoom 2 Choose Zoom 2 when you want to adjust the picture horizontally,...menu. If you are viewing a picture with a 16:9 ratio picturo format. You can 't use 4:3 or 16:9 aspect ratio. - SO Plasma TV H_riz_naspectrati_isn_tavai_ab_ef_rC_m__nent1`2(48__/72_p/1_8_i)/RGB-DTV(48__/72__/1_8_i)/HDM_1/Dv_-DTv (720p/1080i)/DTV(720p/1080i), HDMI2-DTV(720p/1080i) input source. - ble...


