

Specification
Page 2
... View (Flashback) • Quick Setup Guide • Parental Control w/V-Chip • Key Lock • Closed Caption • SIMPLINK™ (HDMI CEC) • Language 3 (English/Spanish/French) LGusa.com LG Electronics U.S.A., Inc. 1000 Sylvan Avenue Englewood Cliffs, NJ 07632 Customer Service and Technical Support: (800) 243-0000 CONVENIENCE FEATURES Auto Tuning/Programming • Channel Add/Delete • Favorite Channel Programming • Auto/Manual Clock • On/Off Timer • Sleep Timer • Auto...
... View (Flashback) • Quick Setup Guide • Parental Control w/V-Chip • Key Lock • Closed Caption • SIMPLINK™ (HDMI CEC) • Language 3 (English/Spanish/French) LGusa.com LG Electronics U.S.A., Inc. 1000 Sylvan Avenue Englewood Cliffs, NJ 07632 Customer Service and Technical Support: (800) 243-0000 CONVENIENCE FEATURES Auto Tuning/Programming • Channel Add/Delete • Favorite Channel Programming • Auto/Manual Clock • On/Off Timer • Sleep Timer • Auto...

User Manual
Page 3
...TO USE A USB DEVICE 42/50PJ3**, 42/50PJ6**, 50/60PK5**......... Picture Mode-User option 66 Picture Improvement Technology 67 Expert Picture Control 68 Picture Reset 71 Image Sticking Minimization(ISM) Method........72 Demo Mode 73 Mode Setting 74 I A-1 EXTERNAL EQUIPMENT SETUP Antenna Connection 1 Connecting with a Component cable 2 Connecting with an HDMI cable 3 Connecting with an HDMI to DVI cable 4 Usb setup 4 Connecting with a RCA cable 5 Connecting with a RF Cable 5 Connecting with a D-sub 15 pin cable 6 Digital audio out SETUP 7 Supported Display Resolution 8 Screen...
...TO USE A USB DEVICE 42/50PJ3**, 42/50PJ6**, 50/60PK5**......... Picture Mode-User option 66 Picture Improvement Technology 67 Expert Picture Control 68 Picture Reset 71 Image Sticking Minimization(ISM) Method........72 Demo Mode 73 Mode Setting 74 I A-1 EXTERNAL EQUIPMENT SETUP Antenna Connection 1 Connecting with a Component cable 2 Connecting with an HDMI cable 3 Connecting with an HDMI to DVI cable 4 Usb setup 4 Connecting with a RCA cable 5 Connecting with a RF Cable 5 Connecting with a D-sub 15 pin cable 6 Digital audio out SETUP 7 Supported Display Resolution 8 Screen...
User Manual
Page 8
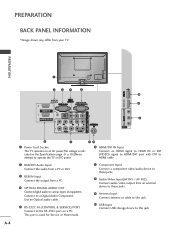
... Service or Hotel mode. This port is indicated on the Specifications page. (G p.102)Never attempt to operate the TV on a PC. 3 PREPARATION BACK PANEL INFORMATION I Image shown may differ from your TV. Connect to the RS-232C port on DC power. 6 HDMI/DVI IN Input Connect an HDMI signal to HDMI IN or DVI (VIDEO) signal to HDMI/DVI port with DVI to HDMI cable. 2 RGB/DVI Audio Input Connect the audio from a PC or DVI. 3 RGB IN Input Connect the output from an external...
... Service or Hotel mode. This port is indicated on the Specifications page. (G p.102)Never attempt to operate the TV on a PC. 3 PREPARATION BACK PANEL INFORMATION I Image shown may differ from your TV. Connect to the RS-232C port on DC power. 6 HDMI/DVI IN Input Connect an HDMI signal to HDMI IN or DVI (VIDEO) signal to HDMI/DVI port with DVI to HDMI cable. 2 RGB/DVI Audio Input Connect the audio from a PC or DVI. 3 RGB IN Input Connect the output from an external...

User Manual
Page 11
... cm A B 10 cm Model 42/50PJ3** 42/50PJ6** 50PK5** 60PK5** VESA (A * B) Standard Screw Quantity 400 * 400 M6 4 400 * 400 M6 4 400 * 400 M6 4 600 * 400 M8 4 WALL MOUNT: HORIZONTAL INSTALLATION A We recommend the use a special wall mount, if you purchase a wall mounting bracket which may cause TV to the instructions included with the mount. A LG recommends that you connect the earth wire to a wall. If grounding methods...
... cm A B 10 cm Model 42/50PJ3** 42/50PJ6** 50PK5** 60PK5** VESA (A * B) Standard Screw Quantity 400 * 400 M6 4 400 * 400 M6 4 400 * 400 M6 4 600 * 400 M8 4 WALL MOUNT: HORIZONTAL INSTALLATION A We recommend the use a special wall mount, if you purchase a wall mounting bracket which may cause TV to the instructions included with the mount. A LG recommends that you connect the earth wire to a wall. If grounding methods...
User Manual
Page 12
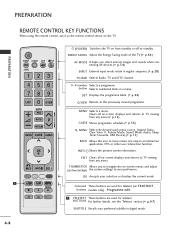
... you select and set images and sounds when connecting AV devices.(G p.34) INPUT External input mode rotate in an interactive application, EPG or other user interaction function. A-8 LIST Displays the programme table. (G p.26) Q.VIEW Returns to move return one step in regular sequence.(G p.28) TV/RAD Selects Radio, TV and DTV channel. 0~9 number Selects a programme. Coloured These buttons are used for teletext (on -screen menus and adjust (Up/Down...
... you select and set images and sounds when connecting AV devices.(G p.34) INPUT External input mode rotate in an interactive application, EPG or other user interaction function. A-8 LIST Displays the programme table. (G p.26) Q.VIEW Returns to move return one step in regular sequence.(G p.28) TV/RAD Selects Radio, TV and DTV channel. 0~9 number Selects a programme. Coloured These buttons are used for teletext (on -screen menus and adjust (Up/Down...
User Manual
Page 16
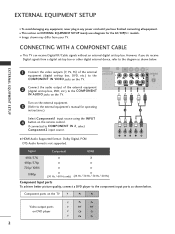
... IN 1 Connect the video outputs (Y, PB, PR) of the external equipment (digital set-top box, DVD, etc.) to the COMPONENT IN VIDEO jacks on the TV. 2 Connect the audio output of the external equipment (digital set -top box. Turn on the external equipment. 3 (Refer to the COMPONENT IN AUDIO jacks on EXTERNAL EQUIPMENT SETUP mainly uses diagrams for operating instructions.) Select Component1 input source using the INPUT 4 button on DVD player Y PB PR Y B-Y R-Y Y Cb Cr Y Pb Pr 2 COMPONENT IN Signal Component HDMI 480i...
... IN 1 Connect the video outputs (Y, PB, PR) of the external equipment (digital set-top box, DVD, etc.) to the COMPONENT IN VIDEO jacks on the TV. 2 Connect the audio output of the external equipment (digital set -top box. Turn on the external equipment. 3 (Refer to the COMPONENT IN AUDIO jacks on EXTERNAL EQUIPMENT SETUP mainly uses diagrams for operating instructions.) Select Component1 input source using the INPUT 4 button on DVD player Y PB PR Y B-Y R-Y Y Cb Cr Y Pb Pr 2 COMPONENT IN Signal Component HDMI 480i...

User Manual
Page 17
... or no screen display can receive video and audio signals simultaneously w2hen using the INPUT button on the remote control. COMPONENT IN EXTERNAL EQUIPMENT SETUP CONNECTING WITH AN HDMI CABLE 1 Connect the HDMI output of the external equipment (digital set the output resolution appropriately. G If the DVD does not support Auto HDMI, you must set -top box, DVD, etc.) to HDMI/DVI IN 1, HDMI IN 2 or HDMI IN 3 jack on the external equipment. 2 (Refer to the external equipment's manual for operating instructions.) 3 Select HDMI1, HDMI2 or HDMI3 input source using an HDMI cable...
... or no screen display can receive video and audio signals simultaneously w2hen using the INPUT button on the remote control. COMPONENT IN EXTERNAL EQUIPMENT SETUP CONNECTING WITH AN HDMI CABLE 1 Connect the HDMI output of the external equipment (digital set the output resolution appropriately. G If the DVD does not support Auto HDMI, you must set -top box, DVD, etc.) to HDMI/DVI IN 1, HDMI IN 2 or HDMI IN 3 jack on the external equipment. 2 (Refer to the external equipment's manual for operating instructions.) 3 Select HDMI1, HDMI2 or HDMI3 input source using an HDMI cable...

User Manual
Page 18
.... VIDEO L/MONO-AUDIO-R or DVI-PC OUTPUT AUDIO COMPONENT IN 2 USB SETUP 1 Connect the USB device to the USB IN jack on the remote control. EXTERNAL EQUIPMENT SETUP EXTERNAL EQUIPMENT SETUP COMPONENT IN COMPONENT IN AV IN 1 CONNECTING WITH AN HDMI TO DVI CABLE 1 Connect the digital set-top box or the DVI output of the PC to HDMI/DVI IN 1 jack on the TV. 2 Connect the audio output of the digital set -top box or the PC manual for operating instructions.) 1 2 4 Select HDMI1 input source using the INPUT button on...
.... VIDEO L/MONO-AUDIO-R or DVI-PC OUTPUT AUDIO COMPONENT IN 2 USB SETUP 1 Connect the USB device to the USB IN jack on the remote control. EXTERNAL EQUIPMENT SETUP EXTERNAL EQUIPMENT SETUP COMPONENT IN COMPONENT IN AV IN 1 CONNECTING WITH AN HDMI TO DVI CABLE 1 Connect the digital set-top box or the DVI output of the PC to HDMI/DVI IN 1 jack on the TV. 2 Connect the audio output of the digital set -top box or the PC manual for operating instructions.) 1 2 4 Select HDMI1 input source using the INPUT button on...

User Manual
Page 19
... VCR. (Refer to the VCR owner's manual.) Or, Operate the corresponding external equipment. (Refer to AV IN 1 input, select A V 1 input source. ! EXTERNAL EQUIPMENT SETUP VIDEO L/MONO AUDIO R HDMI IN 3 CONNECTING WITH A RCA CABLE 1 Connect the AUDIO/VIDEO jacks between the TV and VCR for viewing. Match the jack colours (Video = yellow, Audio Left = white, and Audio Right = red) 2 Insert a video tape into the VCR and press PLAY on the remote control. ANT OUT S-VIDEO VIDEO L R 1 ANT IN OUTPUT SWITCH 2 Wall Jack Antenna 5
... VCR. (Refer to the VCR owner's manual.) Or, Operate the corresponding external equipment. (Refer to AV IN 1 input, select A V 1 input source. ! EXTERNAL EQUIPMENT SETUP VIDEO L/MONO AUDIO R HDMI IN 3 CONNECTING WITH A RCA CABLE 1 Connect the AUDIO/VIDEO jacks between the TV and VCR for viewing. Match the jack colours (Video = yellow, Audio Left = white, and Audio Right = red) 2 Insert a video tape into the VCR and press PLAY on the remote control. ANT OUT S-VIDEO VIDEO L R 1 ANT IN OUTPUT SWITCH 2 Wall Jack Antenna 5
User Manual
Page 20
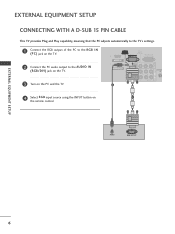
COMPONENT IN AV IN 1 EXTERNAL EQUIPMENT SETUP EXTERNAL EQUIPMENT SETUP CONNECTING WITH A D-SUB 15 PIN CABLE This TV provides Plug and Play capability, meaning that the PC adjusts automatically to the TV's settings. 1 Connect the RGB output of the PC to the RGB IN (PC) jack on the TV. 2 2 Connect the PC audio output to the AUDIO IN (RGB/DVI) jack on the TV. 1 VIDEO L/MONO-AUDIO-R 2 3 Turn on the PC and the TV 1 2 4 Select R G B input source using the INPUT button on 1 the remote control. AUDIO RGB OUTPUT 6
COMPONENT IN AV IN 1 EXTERNAL EQUIPMENT SETUP EXTERNAL EQUIPMENT SETUP CONNECTING WITH A D-SUB 15 PIN CABLE This TV provides Plug and Play capability, meaning that the PC adjusts automatically to the TV's settings. 1 Connect the RGB output of the PC to the RGB IN (PC) jack on the TV. 2 2 Connect the PC audio output to the AUDIO IN (RGB/DVI) jack on the TV. 1 VIDEO L/MONO-AUDIO-R 2 3 Turn on the PC and the TV 1 2 4 Select R G B input source using the INPUT button on 1 the remote control. AUDIO RGB OUTPUT 6

User Manual
Page 21
... TV Digital Audio (Optical) Output port. 2 Connect the other end of the optical cable to enjoy digital broadcasting through 5.1-channel speakers, connect the OPTICAL DIGITAL AUDIO OUT terminal on the audio equipment. 3 Set the "TV Speaker option - Off " in the AUDIO menu.(Gp.80). Refer to external audio equipment via the Digital Audio Output (Optical) port. Looking at the laser beam may damage your vision. ! COMPONENT IN AV IN 1 EXTERNAL EQUIPMENT SETUP DIGITAL AUDIO OUT SETUP Sending the TV's audio signal to the external audio equipment instruction manual...
... TV Digital Audio (Optical) Output port. 2 Connect the other end of the optical cable to enjoy digital broadcasting through 5.1-channel speakers, connect the OPTICAL DIGITAL AUDIO OUT terminal on the audio equipment. 3 Set the "TV Speaker option - Off " in the AUDIO menu.(Gp.80). Refer to external audio equipment via the Digital Audio Output (Optical) port. Looking at the laser beam may damage your vision. ! COMPONENT IN AV IN 1 EXTERNAL EQUIPMENT SETUP DIGITAL AUDIO OUT SETUP Sending the TV's audio signal to the external audio equipment instruction manual...
User Manual
Page 23
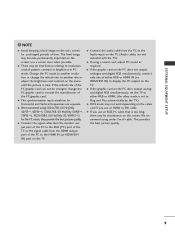
... 50PJ3**, 50PJ6**), 1920x1080, 60 Hz(Only 50/60PK5**) for Horizontal and Vertical frequencies are not included with the TV). G We recommend using a sound card, adjust PC sound as required. NOTE G Avoid keeping a fixed image on the set to Plug and Play automatically by the TV.) G DOS mode may become permanently imprinted on the video card if you use a screen saver when possible. G Connect the audio cable from the HDMI output port of time.
... 50PJ3**, 50PJ6**), 1920x1080, 60 Hz(Only 50/60PK5**) for Horizontal and Vertical frequencies are not included with the TV). G We recommend using a sound card, adjust PC sound as required. NOTE G Avoid keeping a fixed image on the set to Plug and Play automatically by the TV.) G DOS mode may become permanently imprinted on the video card if you use a screen saver when possible. G Connect the audio cable from the HDMI output port of time.

User Manual
Page 28
... standby mode. 2 In standby mode to use its features. 1 Firstly, connect the power cord correctly. INITIALIZING SETUP 1 If the OSD (On Screen Display) is the TV's default mode. or AV Mode button. 14 PROGRAMME SELECTION 1 Press the P number. You can adjust the Mode Setting, Country, Time Zone(Only Australia), Auto Tuning. If a user modifies image quality data, "Store Demo" mode initializes the product to the image quality set by pressing the MUTE, + , - or NUMBER buttons to adjust the volume. Note: a. The mode (Home Use, Store Demo...
... standby mode. 2 In standby mode to use its features. 1 Firstly, connect the power cord correctly. INITIALIZING SETUP 1 If the OSD (On Screen Display) is the TV's default mode. or AV Mode button. 14 PROGRAMME SELECTION 1 Press the P number. You can adjust the Mode Setting, Country, Time Zone(Only Australia), Auto Tuning. If a user modifies image quality data, "Store Demo" mode initializes the product to the image quality set by pressing the MUTE, + , - or NUMBER buttons to adjust the volume. Note: a. The mode (Home Use, Store Demo...
User Manual
Page 50
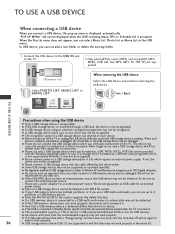
... VIDEO L/MONO AUDIO R HDMI IN 3 TO USE A USB DEVICE Precautions when using an automatic recognition programme may not be recognized. G A USB storage device using the USB device G Only a USB storage device is 1TB or less for a USB external hard disk and 32GB or less for an external power source. G A USB storage device which requires an external power supply. G Please do not guarantee an USB cable for USB memory. The device may not work , turn...
... VIDEO L/MONO AUDIO R HDMI IN 3 TO USE A USB DEVICE Precautions when using an automatic recognition programme may not be recognized. G A USB storage device using the USB device G Only a USB storage device is 1TB or less for a USB external hard disk and 32GB or less for an external power source. G A USB storage device which requires an external power supply. G Please do not guarantee an USB cable for USB memory. The device may not work , turn...
User Manual
Page 62
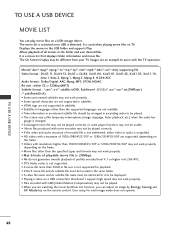
.... • Time information in an external subtitle file should be arranged in file size is outputted. • HD videos with the TV operation. TO USE A USB DEVICE TO USE A USB DEVICE MOVIE LIST You can adjust an image by Movie List function, you are supported, depending on the frame. • Videos with resolutions higher than 1920X1080@25/30P or 1280x720@50/60P may not work properly depending...
.... • Time information in an external subtitle file should be arranged in file size is outputted. • HD videos with the TV operation. TO USE A USB DEVICE TO USE A USB DEVICE MOVIE LIST You can adjust an image by Movie List function, you are supported, depending on the frame. • Videos with resolutions higher than 1920X1080@25/30P or 1280x720@50/60P may not work properly depending...
User Manual
Page 77
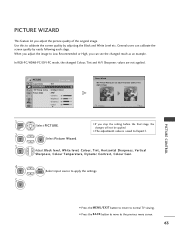
... mode, the changed result as an example. PICTURE WIZARD This feature let you stop the setting before the final stage, the changes will not be applied • The adjustment value is saved to Expert1. Adjust Black level, White level, Colour, Tint, Horizontal Sharpness, Vertical Sharpness, Colour Temperature, Dynamic Contrast, Colour Gain. General users can calibrate the screen quality by adjusting the Black and White Level etc. Use...
... mode, the changed result as an example. PICTURE WIZARD This feature let you stop the setting before the final stage, the changes will not be applied • The adjustment value is saved to Expert1. Adjust Black level, White level, Colour, Tint, Horizontal Sharpness, Vertical Sharpness, Colour Temperature, Dynamic Contrast, Colour Gain. General users can calibrate the screen quality by adjusting the Black and White Level etc. Use...
User Manual
Page 87
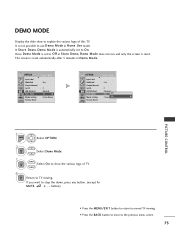
... DDeemmooMModoede Mode Setting Factory Reset E Move OK : On : 1 : Normal : OOnn : Store Demo OPTION Input Label SIMPLINK Simple Manual Set ID ISM Method DDeemmooMModoede Mode Setting Factory Reset E Move OK : On : 1 : Normal : OOnn Off : Store DeOOmnno PICTURE CONTROL 1 MENU 2 OK 3 OK Select OPTION. button) • Press the MENU/EXIT button to return to normal TV viewing. • Press the BACK button to move to O f f in Store Demo, Demo Mode does not run and only the screen is automatically set...
... DDeemmooMModoede Mode Setting Factory Reset E Move OK : On : 1 : Normal : OOnn : Store Demo OPTION Input Label SIMPLINK Simple Manual Set ID ISM Method DDeemmooMModoede Mode Setting Factory Reset E Move OK : On : 1 : Normal : OOnn Off : Store DeOOmnno PICTURE CONTROL 1 MENU 2 OK 3 OK Select OPTION. button) • Press the MENU/EXIT button to return to normal TV viewing. • Press the BACK button to move to O f f in Store Demo, Demo Mode does not run and only the screen is automatically set...
User Manual
Page 103
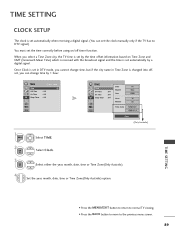
... Hour Minute Time Zone 01 Mar. 2008 16 09 NSW/ACT GMT+11.0 Close (Only Australia) 1 MENU 2 OK 3 OK Select TI M E. TIME SETTING CLOCK SETUP The clock is set automatically when receiving a digital signal. (You can change time, but if the city name in Time Zone is changed into offset, you select a Time Zone city, the TV time is set by the time offset information based on /off timer function.
... Hour Minute Time Zone 01 Mar. 2008 16 09 NSW/ACT GMT+11.0 Close (Only Australia) 1 MENU 2 OK 3 OK Select TI M E. TIME SETTING CLOCK SETUP The clock is set automatically when receiving a digital signal. (You can change time, but if the city name in Time Zone is changed into offset, you select a Time Zone city, the TV time is set by the time offset information based on /off timer function.

User Manual
Page 113
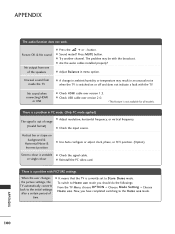
... image is no screen display can result. The video function does not work A Check to another channel. Please contact your antenna direction and/or location. Please use the latest cables that support at the TV. to +, - The problem may be with correct polarity (+ to -). A Check for local interference such as an electrical appliance or power tool. The remote control does not work . A Install new batteries. Has the Power supply...
... image is no screen display can result. The video function does not work A Check to another channel. Please contact your antenna direction and/or location. Please use the latest cables that support at the TV. to +, - The problem may be with correct polarity (+ to -). A Check for local interference such as an electrical appliance or power tool. The remote control does not work . A Install new batteries. Has the Power supply...
User Manual
Page 114
... PC mode. (Only PC mode applied) The signal is out of the speakers A Press the + or - or single colour A Reinstall the PC video card. There is a problem in menu option. A Try another channel. A Are the audio cables installed properly? A Check USB cable over version 1.3. A Check the input source. APPENDIX 100 A Sound muted? Unusual sound from one of range (Invalid format) A Adjust resolution, horizontal frequency, or vertical frequency. No sound when connecting HDMI or USB A Check HDMI cable over...
... PC mode. (Only PC mode applied) The signal is out of the speakers A Press the + or - or single colour A Reinstall the PC video card. There is a problem in menu option. A Try another channel. A Are the audio cables installed properly? A Check USB cable over version 1.3. A Check the input source. APPENDIX 100 A Sound muted? Unusual sound from one of range (Invalid format) A Adjust resolution, horizontal frequency, or vertical frequency. No sound when connecting HDMI or USB A Check HDMI cable over...


