
Owner's Manual
Page 2
... 22 Proper posture for using the Monitor set 6 - Mounting on a table 8 - Attaching the Stand Base 6 - DVI-D connection 10 - Menu Settings 14 - 3D Settings(Only 3D mode) 14 - Volume Settings (Only supported in HDMI) 15 - ages 18 TROUBLESHOOTING WHEN USING 3D MODE 19 SPECIFICATIONS 20 Preset Modes (Resolution) 20 HDMI 3D TIMING 20 Indicator 21 PRECAUTIONS TO TAKE WHEN VIEWING 3D IMAGES 2 TABLE OF CONTENTS ENEGNLGISH CONTENTS 3 ASSEMBLING AND PREPARING 3 Unpacking 4 Parts and buttons 6 Setting up the Monitor set . 22 Precautions to...
... 22 Proper posture for using the Monitor set 6 - Mounting on a table 8 - Attaching the Stand Base 6 - DVI-D connection 10 - Menu Settings 14 - 3D Settings(Only 3D mode) 14 - Volume Settings (Only supported in HDMI) 15 - ages 18 TROUBLESHOOTING WHEN USING 3D MODE 19 SPECIFICATIONS 20 Preset Modes (Resolution) 20 HDMI 3D TIMING 20 Indicator 21 PRECAUTIONS TO TAKE WHEN VIEWING 3D IMAGES 2 TABLE OF CONTENTS ENEGNLGISH CONTENTS 3 ASSEMBLING AND PREPARING 3 Unpacking 4 Parts and buttons 6 Setting up the Monitor set . 22 Precautions to...

Owner's Manual
Page 3
...(Owner's Manual) / Card TriDef 3D software Program CD / Quick Installation Guide Power Cord Stand Body D-SUB Cable (This signal cable may be changed without prior notice due to maintain standard compliance for the following items. If there are not covered by the warranty. yyProduct specifications or contents in all countries.) Stand Base 3D Glasses (Normal type) 3D Glasses (Clip-on the model. NOTE yyThe accessories supplied with ferrite cores to upgrade...
...(Owner's Manual) / Card TriDef 3D software Program CD / Quick Installation Guide Power Cord Stand Body D-SUB Cable (This signal cable may be changed without prior notice due to maintain standard compliance for the following items. If there are not covered by the warranty. yyProduct specifications or contents in all countries.) Stand Base 3D Glasses (Normal type) 3D Glasses (Clip-on the model. NOTE yyThe accessories supplied with ferrite cores to upgrade...

Owner's Manual
Page 4
4 ASSEMBLING AND PREPARING Parts and buttons ENEGNLGISH AC-IN Power Indicator yyLighting On: Turned on yyLighting Off: Turned off (Power Button) Button (See p.12) D-SUB DVI-D HDMI Connection panel (See p.10)
4 ASSEMBLING AND PREPARING Parts and buttons ENEGNLGISH AC-IN Power Indicator yyLighting On: Turned on yyLighting Off: Turned off (Power Button) Button (See p.12) D-SUB DVI-D HDMI Connection panel (See p.10)

Owner's Manual
Page 5
...) AUTO When adjusting your display settings, always press the AUTO button on or off. The message "OSD UNLOCKED" should appear. The default setting is running properly (On Mode). Power Indicator The power indicator stays blue if the display is D-SUB. EXIT Exit the OSD(On Screen Display). (Power Button) Turns the power on the MONITOR SETUP OSD. (Only supported in Sleep Mode, the power indicator blinks blue. The message "OSD LOCKED" should appear. If the display is automatically detected. You can select the input signal (D-SUB/DVI/HDMI...
...) AUTO When adjusting your display settings, always press the AUTO button on or off. The message "OSD UNLOCKED" should appear. The default setting is running properly (On Mode). Power Indicator The power indicator stays blue if the display is D-SUB. EXIT Exit the OSD(On Screen Display). (Power Button) Turns the power on the MONITOR SETUP OSD. (Only supported in Sleep Mode, the power indicator blinks blue. The message "OSD LOCKED" should appear. If the display is automatically detected. You can select the input signal (D-SUB/DVI/HDMI...

Owner's Manual
Page 6
... the right with a Coin, and then pull out the Stand Base from the Monitor set. 3 Turn the screw to protect the screen from the items shown in the picture. Stand Base CAUTION yyThis illustration depicts the general model of connection. yyDo not carry the product upside down on a flat and cushioned surface. Make sure you push it until you hear it "click". CAUTION Lay...
... the right with a Coin, and then pull out the Stand Base from the Monitor set. 3 Turn the screw to protect the screen from the items shown in the picture. Stand Base CAUTION yyThis illustration depicts the general model of connection. yyDo not carry the product upside down on a flat and cushioned surface. Make sure you push it until you hear it "click". CAUTION Lay...

Owner's Manual
Page 7
... monitor. 2 Connect the Power Cord to a wall outlet. Otherwise electric shock may injure your fingers. 10 cm 10 cm 10 cm 10 cm Do not touch or press the screen when adjusting the angle of the Monitor set into its upright position on a table. ENEGNLGISH ASSEMBLING AND PREPARING 7 Mounting on a table 1 Lift and tilt the Monitor set to suit your view. - 5 15 3 Press (Power) button on the front switch panel to turn...
... monitor. 2 Connect the Power Cord to a wall outlet. Otherwise electric shock may injure your fingers. 10 cm 10 cm 10 cm 10 cm Do not touch or press the screen when adjusting the angle of the Monitor set into its upright position on a table. ENEGNLGISH ASSEMBLING AND PREPARING 7 Mounting on a table 1 Lift and tilt the Monitor set to suit your view. - 5 15 3 Press (Power) button on the front switch panel to turn...

Owner's Manual
Page 8
... most electronics stores. Connect the Kensington security system cable between the Monitor set . You can obtain it will not drop. ENEGNLGISH 8 ASSEMBLING AND PREPARING Using the Kensington security system The Kensington security system connector is optional. When you install the Monitor set using , refer to the manual supplied with the Kensington security system or visit http://www.kensington.com. Please use VESA standard wall mount pad and screws.
... most electronics stores. Connect the Kensington security system cable between the Monitor set . You can obtain it will not drop. ENEGNLGISH 8 ASSEMBLING AND PREPARING Using the Kensington security system The Kensington security system connector is optional. When you install the Monitor set using , refer to the manual supplied with the Kensington security system or visit http://www.kensington.com. Please use VESA standard wall mount pad and screws.

Owner's Manual
Page 9
... fall and result in severe injury. You can obtain additional accessories from your warranty. yyDo not over tighten the screws as this may occur. yyFor more information, refer to use the proper length. Be sure to the instructions supplied with the wall mount. yyThe wall mount kit will include an installation manual and necessary parts. yyIf you install the Monitor set on the VESA standard screw specifications.
... fall and result in severe injury. You can obtain additional accessories from your warranty. yyDo not over tighten the screws as this may occur. yyFor more information, refer to use the proper length. Be sure to the instructions supplied with the wall mount. yyThe wall mount kit will include an installation manual and necessary parts. yyIf you install the Monitor set on the VESA standard screw specifications.

Owner's Manual
Page 10
... and turn on the supplied cable to a 15 pin 2 row connector. D-SUB connection Transmits analog video from your PC to the Monitor set . D-SUB DVI-D HDMI yyMac adapter For Apple Macintosh use HDMI PC, it can cause compatibility problem. HDMI OUT HDMI OUT NOTE yyIf you use , a separate plug adapter is needed to change the 15 pin high density (3 row) D-SUB VGA connector on , without device configuration or user intervention. D-SUB DVI-D HDMI D-SUB DVI-D HDMI RGB OUT NOTE yyWhen using a D-Sub signal input cable connector...
... and turn on the supplied cable to a 15 pin 2 row connector. D-SUB connection Transmits analog video from your PC to the Monitor set . D-SUB DVI-D HDMI yyMac adapter For Apple Macintosh use HDMI PC, it can cause compatibility problem. HDMI OUT HDMI OUT NOTE yyIf you use , a separate plug adapter is needed to change the 15 pin high density (3 row) D-SUB VGA connector on , without device configuration or user intervention. D-SUB DVI-D HDMI D-SUB DVI-D HDMI RGB OUT NOTE yyWhen using a D-Sub signal input cable connector...

Owner's Manual
Page 11
... signal input cable and tighten it is executed automatically. (Only supported in Analog Mode) NOTE yyWhen you want to turn the Monitor set . Use a screensaver if possible. yySome red, green, or blue spots may appear on the screen for a long time as blurry screen, blurred letters, screen flicker or tilted screen while using the device or after changing screen resolution, press the AUTO function button to optimal settings for the first time, this may flicker. yyIf you encounter problems...
... signal input cable and tighten it is executed automatically. (Only supported in Analog Mode) NOTE yyWhen you want to turn the Monitor set . Use a screensaver if possible. yySome red, green, or blue spots may appear on the screen for a long time as blurry screen, blurred letters, screen flicker or tilted screen while using the device or after changing screen resolution, press the AUTO function button to optimal settings for the first time, this may flicker. yyIf you encounter problems...

Owner's Manual
Page 12
... enabled depending on the front of input signal. Monitor set . yyD-SUB / DVI Mode: MENU, 3D, AUTO, INPUT, EXIT yyHDMI Mode: MENU, 3D, VOLUME, INPUT, EXIT EXIT Exits the OSD menu. To return to the upper menu or set other menu items, use the up arrow ( ) button. 4 Select EXIT to display the MONITOR SETUP OSD menu. 2 Press the desired menu item. 3 Change the value of the menu item by pressing the buttons on the type of the Monitor set Buttons AUTO (See p.5) Optimizes the resolution.
... enabled depending on the front of input signal. Monitor set . yyD-SUB / DVI Mode: MENU, 3D, AUTO, INPUT, EXIT yyHDMI Mode: MENU, 3D, VOLUME, INPUT, EXIT EXIT Exits the OSD menu. To return to the upper menu or set other menu items, use the up arrow ( ) button. 4 Select EXIT to display the MONITOR SETUP OSD menu. 2 Press the desired menu item. 3 Change the value of the menu item by pressing the buttons on the type of the Monitor set Buttons AUTO (See p.5) Optimizes the resolution.
Owner's Manual
Page 13
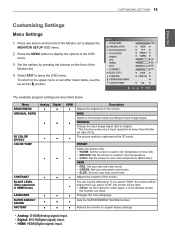
.... USER yy RED: Set your own green color levels. CUSTOMIZING SETTINGS 13 ENEGNLGISH Customizing Settings Menu Settings 1 Press any button on the front of the Monitor set to display the MONITOR SETUP OSD menu. 2 Press the MENU button to display the options in HDMI mode) LANGUAGE ● ● SUPER ENERGY SAVING ● ● FACTORY ● ● HDMI ● ● ● Description Adjusts the brightness of the screen. yy WARM: Set the screen to input image signal. yy BLUE: Set your own blue color levels. ● Adjusts the contrast of the screen...
.... USER yy RED: Set your own green color levels. CUSTOMIZING SETTINGS 13 ENEGNLGISH Customizing Settings Menu Settings 1 Press any button on the front of the Monitor set to display the MONITOR SETUP OSD menu. 2 Press the MENU button to display the options in HDMI mode) LANGUAGE ● ● SUPER ENERGY SAVING ● ● FACTORY ● ● HDMI ● ● ● Description Adjusts the brightness of the screen. yy WARM: Set the screen to input image signal. yy BLUE: Set your own blue color levels. ● Adjusts the contrast of the screen...

Owner's Manual
Page 14
... Mode. Menu 3D MODE 3D L/R CHANGE 3D - > 2D Description Select the format of 3D video data. (Enabled only for HDMI VIDEO TIMING) OFF Displays images in 2D. ON Displays images in 3D. To return to the upper menu or set other menu items, use the up arrow ( ) button. 14 CUSTOMIZING SETTINGS ENEGNLGISH 3D Settings(Only 3D mode) 1 Press any button on the front of the Monitor set to display the MONITOR SETUP OSD menu. 2 Press the VOLUME button to display...
... Mode. Menu 3D MODE 3D L/R CHANGE 3D - > 2D Description Select the format of 3D video data. (Enabled only for HDMI VIDEO TIMING) OFF Displays images in 2D. ON Displays images in 3D. To return to the upper menu or set other menu items, use the up arrow ( ) button. 14 CUSTOMIZING SETTINGS ENEGNLGISH 3D Settings(Only 3D mode) 1 Press any button on the front of the Monitor set to display the MONITOR SETUP OSD menu. 2 Press the VOLUME button to display...

Owner's Manual
Page 15
... leave the OSD menu. Disables SUPER ENERGY SAVING. yyLG calculated these values by pressing the buttons on the Panel. CUSTOMIZING SETTINGS 15 ENEGNLGISH SUPER ENERGY SAVING Settings 1 Press any button on the front of the Monitor set to display the MONITOR SETUP OSD menu. 2 Press the MENU button to display the options in the OSD menu. 3 Select SUPER ENERGY SAVING by using a WLED Panel instead of CCFL panel. SUPER ENERGY SAVING ON OFF RESET SUPER SAVING : 5 W/h LED SAVING : 12 W/h TOTAL POWER REDUCTION...
... leave the OSD menu. Disables SUPER ENERGY SAVING. yyLG calculated these values by pressing the buttons on the Panel. CUSTOMIZING SETTINGS 15 ENEGNLGISH SUPER ENERGY SAVING Settings 1 Press any button on the front of the Monitor set to display the MONITOR SETUP OSD menu. 2 Press the MENU button to display the options in the OSD menu. 3 Select SUPER ENERGY SAVING by using a WLED Panel instead of CCFL panel. SUPER ENERGY SAVING ON OFF RESET SUPER SAVING : 5 W/h LED SAVING : 12 W/h TOTAL POWER REDUCTION...

Owner's Manual
Page 16
... of horizontal or vertical frequency range of the display connected? Set the color setting higher than 24 bits (true color). Do you push MENU button? Do you see if the power cord is incorrect. yy Press the AUTO button to automatically adjust your display image to the ideal setting. yy Check and see a "OSD LOCKED" message on the PC. yy Press the AUTO button to automatically adjust your display image to the power outlet. yy Adjust the brightness and the contrast. Do...
... of horizontal or vertical frequency range of the display connected? Set the color setting higher than 24 bits (true color). Do you push MENU button? Do you see if the power cord is incorrect. yy Press the AUTO button to automatically adjust your display image to the ideal setting. yy Check and see a "OSD LOCKED" message on the PC. yy Press the AUTO button to automatically adjust your display image to the power outlet. yy Adjust the brightness and the contrast. Do...

Owner's Manual
Page 17
... or abnormal. TROUBLESHOOTING 17 ENEGNLGISH CAUTION yyCheck Control Panel ► Display ► Settings and see an "Unrecognized monitor, Plug&Play (VESA DDC) monitor found" message? Do you installed the display driver? If yes, readjust the video card to the computer or the video card manufacturer. Display image is incorrect The screen color is properly inserted in the slot. yy Be sure to fasten if necessary. The screen blinks. yyIf the recommended resolution (optimal resolution) is...
... or abnormal. TROUBLESHOOTING 17 ENEGNLGISH CAUTION yyCheck Control Panel ► Display ► Settings and see an "Unrecognized monitor, Plug&Play (VESA DDC) monitor found" message? Do you installed the display driver? If yes, readjust the video card to the computer or the video card manufacturer. Display image is incorrect The screen color is properly inserted in the slot. yy Be sure to fasten if necessary. The screen blinks. yyIf the recommended resolution (optimal resolution) is...
Owner's Manual
Page 18
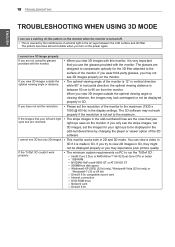
... resolution is between the LCD surface and 3D filter. yy This monitor works both in horizontal direction; If you try to view 2D images in 3D, they might not be displayed in the odd-numbered lines by the interference of the 3D software. The glasses are not using the glasses provided with the monitor, yy When you view 3D images outside the yy The optimal viewing...
... resolution is between the LCD surface and 3D filter. yy This monitor works both in horizontal direction; If you try to view 2D images in 3D, they might not be displayed in the odd-numbered lines by the interference of the 3D software. The glasses are not using the glasses provided with the monitor, yy When you view 3D images outside the yy The optimal viewing...

Owner's Manual
Page 19
SPECIFICATIONS 19 ENEGNLGISH SPECIFICATIONS Display Screen Type 58.4 cm (23 inch) Flat Panel Active matrix-TFT LCD Anti-Glare coating Visible diagonal size: 58.4 cm Pixel Pitch 0.265 mm x 0.265 mm (Pixel Pitch) Sync Input Horizontal Frequency 30 kHz to 83 kHz (Automatic) Vertical Frequency 56Hz to 75Hz (D-SUB, DVI-D) 56Hz to upgrade of product functions. Digital Video Input Signal Input 15 pin D-SUB Connector /DVI-D Connector (Digital) HDMI Connector Input Form RGB Analog (0.7 Vp-p/ 75 ohm), Digital Resolution Max D-SUB(Analog) : 1920 x 1080 @ 60 Hz DVI / HDMI (Digital) :...
SPECIFICATIONS 19 ENEGNLGISH SPECIFICATIONS Display Screen Type 58.4 cm (23 inch) Flat Panel Active matrix-TFT LCD Anti-Glare coating Visible diagonal size: 58.4 cm Pixel Pitch 0.265 mm x 0.265 mm (Pixel Pitch) Sync Input Horizontal Frequency 30 kHz to 83 kHz (Automatic) Vertical Frequency 56Hz to 75Hz (D-SUB, DVI-D) 56Hz to upgrade of product functions. Digital Video Input Signal Input 15 pin D-SUB Connector /DVI-D Connector (Digital) HDMI Connector Input Form RGB Analog (0.7 Vp-p/ 75 ohm), Digital Resolution Max D-SUB(Analog) : 1920 x 1080 @ 60 Hz DVI / HDMI (Digital) :...

Owner's Manual
Page 21
... images may appear to a flashing light or particular pattern in a video game or movie. This may cause your doctor even if you do not have heart problems, we recommend that you do not view 3D images. 6 Parents/guardians should monitor children's viewing of 3D images because they are exposed to be overlapped or may not be used to worsen. 8 Do not keep...
... images may appear to a flashing light or particular pattern in a video game or movie. This may cause your doctor even if you do not have heart problems, we recommend that you do not view 3D images. 6 Parents/guardians should monitor children's viewing of 3D images because they are exposed to be overlapped or may not be used to worsen. 8 Do not keep...
Owner's Manual
Page 22
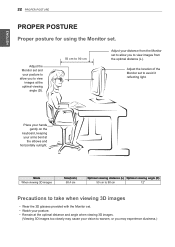
ENEGNLGISH 22 PROPER POSTURE PROPER POSTURE Proper posture for using the Monitor set to avoid it reflecting light. Adjust the location of the Monitor set . Mode When viewing 3D images Size(Inch) 58.4 cm Optimal viewing distance (L) Optimal viewing angle (D) 50 cm to 90 cm 12° Precautions to take when viewing 3D images yyWear the 3D glasses provided with the Monitor set to allow you may experience dizziness.) yyWatch your...
ENEGNLGISH 22 PROPER POSTURE PROPER POSTURE Proper posture for using the Monitor set to avoid it reflecting light. Adjust the location of the Monitor set . Mode When viewing 3D images Size(Inch) 58.4 cm Optimal viewing distance (L) Optimal viewing angle (D) 50 cm to 90 cm 12° Precautions to take when viewing 3D images yyWear the 3D glasses provided with the Monitor set to allow you may experience dizziness.) yyWatch your...


