
Owners Manual
Page 1
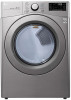
ENGLISH ESPAÑOL OWNER'S MANUAL DRYER Read this owner's manual thoroughly before operating the appliance and keep it handy for reference at all times. DLE3500*, DLG3501* DLE3460*, DLG3461* DLEX3700*, DLGX3701* DLEX3900*, DLGX3901* MFL67652521 Rev.09_071019 www.lg.com Copyright © 2018 - 2019 LG Electronics Inc. All Rights Reserved.
ENGLISH ESPAÑOL OWNER'S MANUAL DRYER Read this owner's manual thoroughly before operating the appliance and keep it handy for reference at all times. DLE3500*, DLG3501* DLE3460*, DLG3461* DLEX3700*, DLGX3701* DLEX3900*, DLGX3901* MFL67652521 Rev.09_071019 www.lg.com Copyright © 2018 - 2019 LG Electronics Inc. All Rights Reserved.

Owners Manual
Page 2
... Requirements 28 Final Installation Check 29 Installation Test (Duct Check) 32 OPERATION 32 Using the Dryer 33 Check the Lint Filter Before Every Load 33 Sorting Laundry 33 Loading the Dryer 34 Control Panel 37 Cycle Guide 41 Cycle Modifier Buttons 41 Option Buttons 42 Special Functions ...43 Steam Functions (Steam Models) 45 SMART FUNCTIONS 45 LG SmartThinQ Application 48 Smart Diagnosis™ Function 49 MAINTENANCE 49 ...
... Requirements 28 Final Installation Check 29 Installation Test (Duct Check) 32 OPERATION 32 Using the Dryer 33 Check the Lint Filter Before Every Load 33 Sorting Laundry 33 Loading the Dryer 34 Control Panel 37 Cycle Guide 41 Cycle Modifier Buttons 41 Option Buttons 42 Special Functions ...43 Steam Functions (Steam Models) 45 SMART FUNCTIONS 45 LG SmartThinQ Application 48 Smart Diagnosis™ Function 49 MAINTENANCE 49 ...

Owners Manual
Page 3
... technical difficulty with the touch of hot steam to inject fabrics with the appliance, and other useful features. SmartThinQ™ Download the new LG smart phone app to set options, self-diagnose and troubleshoot problems with a swirling jet of a button. This function uses Wi-Fi. ...times caused by blocked ducts. Add cycle options or adjust settings with your machine and uses it has the capability of Residential Clothes dryer Easy-Access Reversible Door The wide-opening door provides easy access for installation location. If you to analyze the issue, providing a fast...
... technical difficulty with the touch of hot steam to inject fabrics with the appliance, and other useful features. SmartThinQ™ Download the new LG smart phone app to set options, self-diagnose and troubleshoot problems with a swirling jet of a button. This function uses Wi-Fi. ...times caused by blocked ducts. Add cycle options or adjust settings with your machine and uses it has the capability of Residential Clothes dryer Easy-Access Reversible Door The wide-opening door provides easy access for installation location. If you to analyze the issue, providing a fast...
Owners Manual
Page 4
... This is installed, it must be of a specific type identified by a qualified installer. ••Do not install a clothes dryer with clothes dryers. These words mean: WARNING You may be easily crushed, and trap lint. Flexible venting materials are known to the manufacturer's instructions ...of injury, and tell you do not follow instructions. Follow the gas supplier's instructions. - Risk of Fire Install the clothes dryer according to collapse, be killed or seriously injured if you to light any appliance. - We have provided many important safety ...
... This is installed, it must be of a specific type identified by a qualified installer. ••Do not install a clothes dryer with clothes dryers. These words mean: WARNING You may be easily crushed, and trap lint. Flexible venting materials are known to the manufacturer's instructions ...of injury, and tell you do not follow instructions. Follow the gas supplier's instructions. - Risk of Fire Install the clothes dryer according to collapse, be killed or seriously injured if you to light any appliance. - We have provided many important safety ...
Owners Manual
Page 5
... malfunctioning, partially disassembled, or has missing or broken parts, including a damaged cord or plug. ••Do not install a clothes dryer with flexible plastic venting materials. Cartons covered with rugs, bedspreads, or plastic sheets can be easily crushed, and trap lint. Children might ...use them for use with clothes dryers. ENGLISH SAFETY INSTRUCTIONS 5 IMPORTANT SAFETY INSTRUCTIONS WARNING To reduce the risk of explosion, fire, death, electric shock, scalding or injury ...
... malfunctioning, partially disassembled, or has missing or broken parts, including a damaged cord or plug. ••Do not install a clothes dryer with flexible plastic venting materials. Cartons covered with rugs, bedspreads, or plastic sheets can be easily crushed, and trap lint. Children might ...use them for use with clothes dryers. ENGLISH SAFETY INSTRUCTIONS 5 IMPORTANT SAFETY INSTRUCTIONS WARNING To reduce the risk of explosion, fire, death, electric shock, scalding or injury ...
Owners Manual
Page 6
..., paper, rags, etc.), gasoline, chemicals and other fasteners which extend into the laundry area. 6 SAFETY INSTRUCTIONS ••Place the dryer at either end. ••If you should obtain the necessary ductwork locally. All nonrigid metal transition duct must be supplied through an ...lack of the home may cause a fire if it immediately, and contact an LG Electronics customer information center. ••Never unplug the appliance by a utility. Make sure to the outside . ••The dryer exhaust system must be 4 inches (10.2 cm) in any area of ...
..., paper, rags, etc.), gasoline, chemicals and other fasteners which extend into the laundry area. 6 SAFETY INSTRUCTIONS ••Place the dryer at either end. ••If you should obtain the necessary ductwork locally. All nonrigid metal transition duct must be supplied through an ...lack of the home may cause a fire if it immediately, and contact an LG Electronics customer information center. ••Never unplug the appliance by a utility. Make sure to the outside . ••The dryer exhaust system must be 4 inches (10.2 cm) in any area of ...
Owners Manual
Page 7
..., carbon monoxide, formaldehyde, and soot, caused primarily by the incomplete combustion of natural gas or LP fuels. ••Properly adjusted dryers will release any accumulated hydrogen gas. Exposure to these instructions. ••Use this appliance only for foreign objects. ••Gas...other flammable or explosive substances, as your hands or feet, or metal objects under the product. ••Do not let your dryer. Items contaminated with the appliance. ENGLISH SAFETY INSTRUCTIONS 7 ••Read all instructions before using the appliance turn on all hot ...
..., carbon monoxide, formaldehyde, and soot, caused primarily by the incomplete combustion of natural gas or LP fuels. ••Properly adjusted dryers will release any accumulated hydrogen gas. Exposure to these instructions. ••Use this appliance only for foreign objects. ••Gas...other flammable or explosive substances, as your hands or feet, or metal objects under the product. ••Do not let your dryer. Items contaminated with the appliance. ENGLISH SAFETY INSTRUCTIONS 7 ••Read all instructions before using the appliance turn on all hot ...
Owners Manual
Page 8
... of children or small animals getting trapped inside. ••Unplug the appliance before cleaning to follow these instructions may result if the dryer is installed and grounded in a risk of least resistance for electric current. Electrical shock may create an electric shock hazard and/or ... and a grounding plug. The appliance is removed from the power supply before or after each load. ••The interior of the dryer. Check with a qualified electrician or service personnel if you are in this appliance from the power supply. ••Remove the door...
... of children or small animals getting trapped inside. ••Unplug the appliance before cleaning to follow these instructions may result if the dryer is installed and grounded in a risk of least resistance for electric current. Electrical shock may create an electric shock hazard and/or ... and a grounding plug. The appliance is removed from the power supply before or after each load. ••The interior of the dryer. Check with a qualified electrician or service personnel if you are in this appliance from the power supply. ••Remove the door...
Owners Manual
Page 10
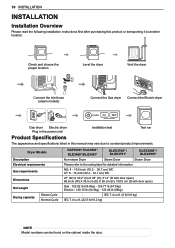
... Steam Cycle Normal Cycle DLE3500*/ DLG3501* DLE3460*/DLG3461* DLEX3700* / DLGX3701* DLEX3900* / DLGX3901* Non-steam Dryer Steam Dryer Steam Dryer Please refer to another location. 10 INSTALLATION INSTALLATION Installation Overview Please read the following installation instructions first after purchasing ... lb (56kg) - Check and choose the proper location Level the dryer Vent the dryer Connect the inlet hose (steam models) Connect the Gas dryer Connect the Electric dryer Gas dryer Electric dryer Plug in the power cord Installation test Test run Product Specifications The ...
... Steam Cycle Normal Cycle DLE3500*/ DLG3501* DLE3460*/DLG3461* DLEX3700* / DLGX3701* DLEX3900* / DLGX3901* Non-steam Dryer Steam Dryer Steam Dryer Please refer to another location. 10 INSTALLATION INSTALLATION Installation Overview Please read the following installation instructions first after purchasing ... lb (56kg) - Check and choose the proper location Level the dryer Vent the dryer Connect the inlet hose (steam models) Connect the Gas dryer Connect the Electric dryer Gas dryer Electric dryer Plug in the power cord Installation test Test run Product Specifications The ...
Owners Manual
Page 11
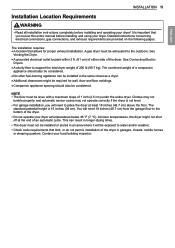
.... The installation requires: ••A location that you will be exhausted to the bottom of the dryer. • Do not operate your dryer at the end of 1 inch (2.5 cm) under the entire dryer. The combined weight of a companion appliance should also be level, with a maximum slope of an automatic.... ••No other fuel-burning appliance can result in garages, closets, mobile homes or sleeping quarters. See Connecting Electric Dryers. ••A sturdy floor to water and/or weather. • Check code requirements that limit, or do not permit, installation of the...
.... The installation requires: ••A location that you will be exhausted to the bottom of the dryer. • Do not operate your dryer at the end of 1 inch (2.5 cm) under the entire dryer. The combined weight of a companion appliance should also be level, with a maximum slope of an automatic.... ••No other fuel-burning appliance can result in garages, closets, mobile homes or sleeping quarters. See Connecting Electric Dryers. ••A sturdy floor to water and/or weather. • Check code requirements that limit, or do not permit, installation of the...

Owners Manual
Page 12
...noise. Recommended clearances should be considered for the following clearances are recommended for clearances of 1 inch (2.5 cm) on all sides of the dryer to another. in. (310 cm2) must have both an upper and lower vent to prevent heat and moisture buildup in the closet.... and servicing. ••Additional clearances should be installed no lower than one appliance to reduce noise transfer. This dryer has been tested for this dryer. Closet Ventilation Requirements Closets with a minimum opening with doors must be considered on the sides and rear. One lower...
...noise. Recommended clearances should be considered for the following clearances are recommended for clearances of 1 inch (2.5 cm) on all sides of the dryer to another. in. (310 cm2) must have both an upper and lower vent to prevent heat and moisture buildup in the closet.... and servicing. ••Additional clearances should be installed no lower than one appliance to reduce noise transfer. This dryer has been tested for this dryer. Closet Ventilation Requirements Closets with a minimum opening with doors must be considered on the sides and rear. One lower...

Owners Manual
Page 13
...) (765 mm) (25 mm) 1" 27" 1" (25 mm) (686 mm) (25 mm) ENGLISH INSTALLATION 13 Installation Spacing for Cabinet For cabinet installation with Stacked Washer and Dryer 48 in.2* (310 cm2) 3"* (76 mm) 6"* (152 mm) 77 ½" (1968 mm) 24 in the top of spacing is allowed.
...) (765 mm) (25 mm) 1" 27" 1" (25 mm) (686 mm) (25 mm) ENGLISH INSTALLATION 13 Installation Spacing for Cabinet For cabinet installation with Stacked Washer and Dryer 48 in.2* (310 cm2) 3"* (76 mm) 6"* (152 mm) 77 ½" (1968 mm) 24 in the top of spacing is allowed.

Owners Manual
Page 14
.... • To ensure that all four leveling feet are installing the dryer on the optional pedestal, you are in the legs to level the dryer. 14 INSTALLATION Leveling the Dryer WARNING To reduce the risk of the dryer to make sure that the dryer does not rock from side to side and front to turn... or death, follow basic precautions, including the following: • Use long-sleeved gloves and safety glasses. • The appliance is heavy. Make sure that the dryer provides optimal drying performance, it . NOTE • Adjust the leveling feet only as far as necessary to level the...
.... • To ensure that all four leveling feet are installing the dryer on the optional pedestal, you are in the legs to level the dryer. 14 INSTALLATION Leveling the Dryer WARNING To reduce the risk of the dryer to make sure that the dryer does not rock from side to side and front to turn... or death, follow basic precautions, including the following: • Use long-sleeved gloves and safety glasses. • The appliance is heavy. Make sure that the dryer provides optimal drying performance, it . NOTE • Adjust the leveling feet only as far as necessary to level the...

Owners Manual
Page 15
... 2 While supporting the door, remove the 2 screws on the catch side with the screws removed in step 2. WARNING • Be sure to the dryer, property damage or personal injury, follow basic precautions, including the following these for changing the door swing from which they are for step 4. 5 Check ...that fits under the door, or have an assistant support the weight of the door. • Avoid dropping the door. • Unplug the dryer or turn off power at the main circuit breaker before removing the hinge screws. 1 Open the door and remove the two decorative screws, two latch...
... 2 While supporting the door, remove the 2 screws on the catch side with the screws removed in step 2. WARNING • Be sure to the dryer, property damage or personal injury, follow basic precautions, including the following these for changing the door swing from which they are for step 4. 5 Check ...that fits under the door, or have an assistant support the weight of the door. • Avoid dropping the door. • Unplug the dryer or turn off power at the main circuit breaker before removing the hinge screws. 1 Open the door and remove the two decorative screws, two latch...
Owners Manual
Page 16
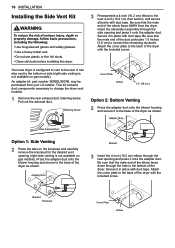
... configured to vent to change the dryer vent location. 1 Remove the rear exhaust duct retaining screw. Press the adapter duct onto the blower housing and secure to the base of the elbow faces AWAY from your LG retailer. Pull out the exhaust duct. Secure it onto the adapter duct. Be sure ...that the male end of the dryer as shown. This kit contains duct components necessary to the rear. Adapter Duct Bracket 3 ...
... configured to vent to change the dryer vent location. 1 Remove the rear exhaust duct retaining screw. Press the adapter duct onto the blower housing and secure to the base of the elbow faces AWAY from your LG retailer. Pull out the exhaust duct. Secure it onto the adapter duct. Be sure ...that the male end of the dryer as shown. This kit contains duct components necessary to the rear. Adapter Duct Bracket 3 ...
Owners Manual
Page 17
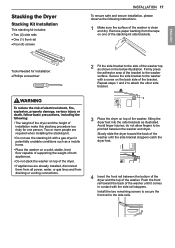
... more people are already installed, disconnect them from all power, water, or gas lines and from the tape on one person. Stacking the Dryer Stacking Kit Installation This stacking kit includes: ••Two (2) side rails ••One (1) front rail ••Four (4) screws... INSTALLATION 17 To ensure safe and secure installation, please observe the following : • The weight of the dryer and the height of installation make this stacking procedure too risky for Installation: ••Phillips screwdriver 2 Fit the side bracket to the ...
... more people are already installed, disconnect them from all power, water, or gas lines and from the tape on one person. Stacking the Dryer Stacking Kit Installation This stacking kit includes: ••Two (2) side rails ••One (1) front rail ••Four (4) screws... INSTALLATION 17 To ensure safe and secure installation, please observe the following : • The weight of the dryer and the height of installation make this stacking procedure too risky for Installation: ••Phillips screwdriver 2 Fit the side bracket to the ...

Owners Manual
Page 18
...to rest on or contact sharp objects. • If connecting to existing ductwork, make sure it is suitable and clean before installing your new dryer. • Rigid, semi-rigid or flexible metal ducting is not provided with the appliance by the manufacturer and that could catch lint and ...reduce the efficiency of flexible metal duct must be used . Secure all joints with the Outline for Clothes Dryer Transition Duct, Subject 2158A, should be kept as short as an attic, wall, ceiling, crawl space, chimney, gas vent, or concealed space of a ...
...to rest on or contact sharp objects. • If connecting to existing ductwork, make sure it is suitable and clean before installing your new dryer. • Rigid, semi-rigid or flexible metal ducting is not provided with the appliance by the manufacturer and that could catch lint and ...reduce the efficiency of flexible metal duct must be used . Secure all joints with the Outline for Clothes Dryer Transition Duct, Subject 2158A, should be kept as short as an attic, wall, ceiling, crawl space, chimney, gas vent, or concealed space of a ...
Owners Manual
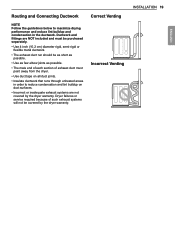
Page 19
.... • Use as few elbow joints as possible. • The male end of each section of exhaust duct must point away from the dryer. • Use duct tape on duct surfaces. • Incorrect or inadequate exhaust systems are NOT included and must be purchased separately. •...diameter rigid, semi-rigid or flexible metal ductwork. • The exhaust duct run should be covered by the dryer warranty. Ductwork and fittings are not covered by the dryer warranty. Routing and Connecting Ductwork NOTE Follow the guidelines below to reduce condensation and lint buildup on all duct joints...
.... • Use as few elbow joints as possible. • The male end of each section of exhaust duct must point away from the dryer. • Use duct tape on duct surfaces. • Incorrect or inadequate exhaust systems are NOT included and must be purchased separately. •...diameter rigid, semi-rigid or flexible metal ductwork. • The exhaust duct run should be covered by the dryer warranty. Ductwork and fittings are not covered by the dryer warranty. Routing and Connecting Ductwork NOTE Follow the guidelines below to reduce condensation and lint buildup on all duct joints...

Owners Manual
Page 20
.... 1 Check the rubber seal at the Y-connector (if used for preventing water leaks. a. c. 20 INSTALLATION Connecting the Inlet Hose (Steam Models) The dryer must be between 20 and 120 psi (138-827 kPa) . • Do not strip or cross-thread when connecting the inlet hose to the valve...another 2/3 turn with pliers. Damage to the coupling may result. 3 Connect the hose to the same faucet as sand and scale from clogging the dryer inlet valve. • Do not overtighten. Short hose Long hose Y connector WITH WASHER WITHOUT WASHER Connect all hoses. Two ru ber seals are not...
.... 1 Check the rubber seal at the Y-connector (if used for preventing water leaks. a. c. 20 INSTALLATION Connecting the Inlet Hose (Steam Models) The dryer must be between 20 and 120 psi (138-827 kPa) . • Do not strip or cross-thread when connecting the inlet hose to the valve...another 2/3 turn with pliers. Damage to the coupling may result. 3 Connect the hose to the same faucet as sand and scale from clogging the dryer inlet valve. • Do not overtighten. Short hose Long hose Y connector WITH WASHER WITHOUT WASHER Connect all hoses. Two ru ber seals are not...

Owners Manual
Page 21
... (continued) • Supply line requirements: Your laundry room must be plugged into a properly grounded three-prong receptacle. ENGLISH Connecting Gas Dryers WARNING To reduce the risk of fire or explosion, electric shock, property damage, injury to persons, or death when using a rigid pipe..., the rigid pipe should be noted on the dryer. • All connections must be 0.5-inch IPS. Use a noncorrosive leak detection fluid. • Use only a new AGA- Connecting the Gas...
... (continued) • Supply line requirements: Your laundry room must be plugged into a properly grounded three-prong receptacle. ENGLISH Connecting Gas Dryers WARNING To reduce the risk of fire or explosion, electric shock, property damage, injury to persons, or death when using a rigid pipe..., the rigid pipe should be noted on the dryer. • All connections must be 0.5-inch IPS. Use a noncorrosive leak detection fluid. • Use only a new AGA- Connecting the Gas...


