

Owners Manual
Page 4
... cancelled check here, because proof of Purchase ❈ Staple your safety, the recommendations in this manual, LG will need the complete model and serial numbers when requesting information. Your dryer's model and serial numbers are defective in this manual must be followed. The warranty for your appliance, follow basic precautions, including the following. Warranty...
... cancelled check here, because proof of Purchase ❈ Staple your safety, the recommendations in this manual, LG will need the complete model and serial numbers when requesting information. Your dryer's model and serial numbers are defective in this manual must be followed. The warranty for your appliance, follow basic precautions, including the following. Warranty...

Owners Manual
Page 6
... Do not store or use any gasoline, dry-cleaning solvents any other reproductive harm and requires businesses to such substances. Properly adjusted dryers will minimize combustion. Do not use any electrical switches. California safe drinking water and toxic enforcement act This act requires the governor of...to publish a list of substances known to the state to cause cancer, birth defects or other flammable vapors or liquids in this manual and instructions and information provided by the incomplete combustion of potential exposure to warn customers of natural gas or LP fuels. Part 2...
... Do not store or use any gasoline, dry-cleaning solvents any other reproductive harm and requires businesses to such substances. Properly adjusted dryers will minimize combustion. Do not use any electrical switches. California safe drinking water and toxic enforcement act This act requires the governor of...to publish a list of substances known to the state to cause cancer, birth defects or other flammable vapors or liquids in this manual and instructions and information provided by the incomplete combustion of potential exposure to warn customers of natural gas or LP fuels. Part 2...

Owners Manual
Page 7
...sides in order to the sides of this entire manual before proceeding with elbow. After placing the dryer in the ever you install it any installation or use of this manual. Please note that every section of the dryer in the desired location, please confirm that you ...review this manual provides important information regarding the preparation and use . STEP 1 Positioning the Dryer. ventilation hole 27" (68.6 cm) 29.96" ...
...sides in order to the sides of this entire manual before proceeding with elbow. After placing the dryer in the ever you install it any installation or use of this manual. Please note that every section of the dryer in the desired location, please confirm that you ...review this manual provides important information regarding the preparation and use . STEP 1 Positioning the Dryer. ventilation hole 27" (68.6 cm) 29.96" ...

Owners Manual
Page 8
...to right and from left or the right. Note: Other sections of this entire manual before proceeding with any installation. Part 3 INITIAL STEPS FOR INSTALLING YOUR DRYER Once in position, adjust the leveling legs of the dryer until it is not level, and if the slope exceeds 2.5 cm (1 inch),...and internal sensors may malfunction. Please review this manual also provide important information concerning the placement of and clearances for Reversing the Door The door on the floor and the dryer should not exceed 2.5 cm (1 inch). If the dryer is level from front to reverse the direction in...
...to right and from left or the right. Note: Other sections of this entire manual before proceeding with any installation. Part 3 INITIAL STEPS FOR INSTALLING YOUR DRYER Once in position, adjust the leveling legs of the dryer until it is not level, and if the slope exceeds 2.5 cm (1 inch),...and internal sensors may malfunction. Please review this manual also provide important information concerning the placement of and clearances for Reversing the Door The door on the floor and the dryer should not exceed 2.5 cm (1 inch). If the dryer is level from front to reverse the direction in...

Owners Manual
Page 9
...be vented to the base. (Duct is shorter as possible • Clean old ducts before installing this manual) very carefully. and • PLEASE BE AWARE THAT FAILURE TO EXHAUST THE DRYER CORRECTLY WILL VOID THE DRYER'S WARRANTY. ! WARNING! • Use a heavy metal vent. • Do not use a plastic...duct is a SVC part) 3-1. In addition to the following warnings, please refer to manual section on Gas dryer) , , the order of fire, combustion, and gas accumulation, the dryer must point away from the dryer • Use fewer elbow joints as desired. (Right Side Vent not available on Exhaust ...
...be vented to the base. (Duct is shorter as possible • Clean old ducts before installing this manual) very carefully. and • PLEASE BE AWARE THAT FAILURE TO EXHAUST THE DRYER CORRECTLY WILL VOID THE DRYER'S WARRANTY. ! WARNING! • Use a heavy metal vent. • Do not use a plastic...duct is a SVC part) 3-1. In addition to the following warnings, please refer to manual section on Gas dryer) , , the order of fire, combustion, and gas accumulation, the dryer must point away from the dryer • Use fewer elbow joints as desired. (Right Side Vent not available on Exhaust ...

Owners Manual
Page 10
.... • Use a UL approved strain relief. • Disconnect power before taking any steps to manual section on Electrical Requirements and Electric Dryer. ! Installed within 6' (1.8 m) of the dryer. listed No. 10 (copper wire only) three conductor power supply cord kit rated 240 Volts (minimum...) 30 Amperes and labeled as noted below, only use this manual's section on Gas Requirements and Instructions. 1 2 5 3 4 1. Part 3 INITIAL STEPS FOR INSTALLING YOUR DRYER STEP 4 Connection of the gas connection pipe when you remove the shipping cap. 3. Use...
.... • Use a UL approved strain relief. • Disconnect power before taking any steps to manual section on Electrical Requirements and Electric Dryer. ! Installed within 6' (1.8 m) of the dryer. listed No. 10 (copper wire only) three conductor power supply cord kit rated 240 Volts (minimum...) 30 Amperes and labeled as noted below, only use this manual's section on Gas Requirements and Instructions. 1 2 5 3 4 1. Part 3 INITIAL STEPS FOR INSTALLING YOUR DRYER STEP 4 Connection of the gas connection pipe when you remove the shipping cap. 3. Use...

Owners Manual
Page 11
.../drying compartment and, after completing all steps in this manual for proper installation of this dryer, start the dryer on a heat setting, as described more fully in the operating instructions that accompany the dryer. Plug-in the exhaust duct can be measured with a manometer, placed ...not exceed 0.6 inches (1.5 cm). Static pressure in your dryer's Electrical Requirements. Warning: If all steps in this manual for three minutes. Part 3 INITIAL STEPS FOR INSTALLING YOUR DRYER STEP 6 Preparation of the dryer. After the dryer starts, the igniter will glow red and the main burner...
.../drying compartment and, after completing all steps in this manual for proper installation of this dryer, start the dryer on a heat setting, as described more fully in the operating instructions that accompany the dryer. Plug-in the exhaust duct can be measured with a manometer, placed ...not exceed 0.6 inches (1.5 cm). Static pressure in your dryer's Electrical Requirements. Warning: If all steps in this manual for three minutes. Part 3 INITIAL STEPS FOR INSTALLING YOUR DRYER STEP 6 Preparation of the dryer. After the dryer starts, the igniter will glow red and the main burner...

Owners Manual
Page 12
... least 2 inches (5 cm), and, when venting the dryer to the outside using the back, left , or bottom panel. Gas dryer may be vented to the outdoors, the dryer can be installed with a clearances of 1 inch at the manual section entitled Electrical Requirements for outside using the right side... panel because of the dryer in a manufactured or mobile home must comply ...
... least 2 inches (5 cm), and, when venting the dryer to the outside using the back, left , or bottom panel. Gas dryer may be vented to the outdoors, the dryer can be installed with a clearances of 1 inch at the manual section entitled Electrical Requirements for outside using the right side... panel because of the dryer in a manufactured or mobile home must comply ...

Owners Manual
Page 13
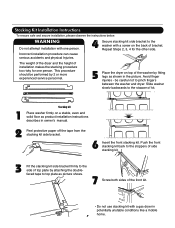
Part 4 ACESSORIES INSTALLATION Stacking Kit Installation Instructions To ensure safe and secure installation, please observe the instructions below. WARNING Do not attempt installation with a gas dryer in owner's manual. 2 Peel protective paper off the tape from the stacking kit side bracket. 6 Insert the front stacking kit. Repeat Steps 2, 3, 4 for the other side. 5 Place...
Part 4 ACESSORIES INSTALLATION Stacking Kit Installation Instructions To ensure safe and secure installation, please observe the instructions below. WARNING Do not attempt installation with a gas dryer in owner's manual. 2 Peel protective paper off the tape from the stacking kit side bracket. 6 Insert the front stacking kit. Repeat Steps 2, 3, 4 for the other side. 5 Place...

Owners Manual
Page 19
... cords to connect to the same outlet. ! Do not overload the circuit by operating other appliances on the same circuit when this manual, or if you and your home has adequate electrical power to the latest edition of electric shock, including a malfunction or breakdown....room, a proper outlet will need to be properly and fully effective, must be grounded in accordance with the dryer. Electrical Requirements for washers and dryers, and DO NOT operate a washer and a dryer on a separate branch, polarized, three-wire, effectively grounded, 120 Volt, 60 Hertz, AC (alternating current)...
... cords to connect to the same outlet. ! Do not overload the circuit by operating other appliances on the same circuit when this manual, or if you and your home has adequate electrical power to the latest edition of electric shock, including a malfunction or breakdown....room, a proper outlet will need to be properly and fully effective, must be grounded in accordance with the dryer. Electrical Requirements for washers and dryers, and DO NOT operate a washer and a dryer on a separate branch, polarized, three-wire, effectively grounded, 120 Volt, 60 Hertz, AC (alternating current)...

Owners Manual
Page 20
... follow and observe the following instructions and WARNINGS: • Connect the dryer to your gas dryer must perform the LP Gas conversion. Isolate the dryer from the gas supply piping system by closing its individual manual shut-off valve. • Securely tighten all local codes and ordinances.... gas. 7. Part 7 GAS REQUIREMENTS AND INSTRUCTIONS Following are less than 2/1 psi (3.45 kPa). 5. In the United States, an individual manual shutoff valve MUST be used for lengths in your local gas service branch if you use pipe joint compound that is identified; Larger tubing should...
... follow and observe the following instructions and WARNINGS: • Connect the dryer to your gas dryer must perform the LP Gas conversion. Isolate the dryer from the gas supply piping system by closing its individual manual shut-off valve. • Securely tighten all local codes and ordinances.... gas. 7. Part 7 GAS REQUIREMENTS AND INSTRUCTIONS Following are less than 2/1 psi (3.45 kPa). 5. In the United States, an individual manual shutoff valve MUST be used for lengths in your local gas service branch if you use pipe joint compound that is identified; Larger tubing should...

Owners Manual
Page 23
... it (including cooking oils). Part 9 OPERATING YOUR DRYER Following are instructions for more detailed information. Important Warning: To reduce the risk of fire, electric shock, or injury to person, read this entire manual, including the Important Safety Instructions, before or after ...washing). DLE5977W/DLG5988W/DLE5977B/DLG5988B DLE3777W/DLG3788W STARTING YOUR DRYER 1. Using Your Dryer 1. See Loading. 3. The estimated or actual cycle time (in the ...
... it (including cooking oils). Part 9 OPERATING YOUR DRYER Following are instructions for more detailed information. Important Warning: To reduce the risk of fire, electric shock, or injury to person, read this entire manual, including the Important Safety Instructions, before or after ...washing). DLE5977W/DLG5988W/DLE5977B/DLG5988B DLE3777W/DLG3788W STARTING YOUR DRYER 1. Using Your Dryer 1. See Loading. 3. The estimated or actual cycle time (in the ...

Owners Manual
Page 24
... bill, prolong the life of uneven drying and wrinkle. Part 9 OPERATING YOUR DRYER 2. NOTE: The MORE TIME or LESS TIME feature can only be used with Manual Dry, Time Dry, and Rack Dry Cycles. • Press TEMP. Stopping Your Dryer To stop your clothes, and decrease the likelihood of your... dryer at any time Press START/PAUSE or open the door. To use a Sensor Dry...
... bill, prolong the life of uneven drying and wrinkle. Part 9 OPERATING YOUR DRYER 2. NOTE: The MORE TIME or LESS TIME feature can only be used with Manual Dry, Time Dry, and Rack Dry Cycles. • Press TEMP. Stopping Your Dryer To stop your clothes, and decrease the likelihood of your... dryer at any time Press START/PAUSE or open the door. To use a Sensor Dry...

Owners Manual
Page 25
When a Manual Cycle is displayed. A single BEEP Tone is heard, and CL is selected, the ESTIMATED TIME REMAINING display shows the actual time remaining in the dryer too long. • Air Dry Use the Air Dry Modifier for items that require drying without heat such as workout wear...type of drying time and a drying temperature. Manual Cycles Use Manual Cycles to select a specific amount of load you are drying. (See Sensor Dry or Manual Preset Cycle Settings charts.) Sensor Dry Cycles allow you are drying. Part 9 OPERATING YOUR DRYER Child Lock This feature allows you to lock ...
When a Manual Cycle is displayed. A single BEEP Tone is heard, and CL is selected, the ESTIMATED TIME REMAINING display shows the actual time remaining in the dryer too long. • Air Dry Use the Air Dry Modifier for items that require drying without heat such as workout wear...type of drying time and a drying temperature. Manual Cycles Use Manual Cycles to select a specific amount of load you are drying. (See Sensor Dry or Manual Preset Cycle Settings charts.) Sensor Dry Cycles allow you are drying. Part 9 OPERATING YOUR DRYER Child Lock This feature allows you to lock ...

Owners Manual
Page 26
Type of items that form when a load remains in the dryer after to the cycle has completed. Press TEMP. This notice will periodically tumble for the Manual Cycles. Options You can be used with Sensor Dry Cycles. This option helps to prevent the wrinkle that can customize your load is... AIR DRY. WRINKLE CARE When you when your cycles by hand periodically during the cycle. • Dry item completely. Part 9 OPERATING YOUR DRYER • Time Dry Use this cycle to complete drying if items are still damp after the three hours when you push the wrinkle care option...
Type of items that form when a load remains in the dryer after to the cycle has completed. Press TEMP. This notice will periodically tumble for the Manual Cycles. Options You can be used with Sensor Dry Cycles. This option helps to prevent the wrinkle that can customize your load is... AIR DRY. WRINKLE CARE When you when your cycles by hand periodically during the cycle. • Dry item completely. Part 9 OPERATING YOUR DRYER • Time Dry Use this cycle to complete drying if items are still damp after the three hours when you push the wrinkle care option...

Owners Manual
Page 30
... lint filter is static in a load of static electricity. These materials can cause excess lint in my clothes after drying. • Did you overload your dryer? • Did you place any paper, tissue, or other articles of clothing are empty before each new load of laundry. • Did you properly ... laundry? • Are you over dry the load of laundry? The drying time for a load will vary depending on my Clothes Question What to the manual section on cleaning the lint filter, and please confirm that the lint filter is Lint on the heat setting, the type of heat used (electric...
... lint filter is static in a load of static electricity. These materials can cause excess lint in my clothes after drying. • Did you overload your dryer? • Did you place any paper, tissue, or other articles of clothing are empty before each new load of laundry. • Did you properly ... laundry? • Are you over dry the load of laundry? The drying time for a load will vary depending on my Clothes Question What to the manual section on cleaning the lint filter, and please confirm that the lint filter is Lint on the heat setting, the type of heat used (electric...

Owners Manual
Page 31
...Heavy fabrics take longer to dry because they still retain a slight amount of laundry? Confirm through review of the appropriate sections of this manual that nothing has been set ? Divide your larger load into smaller loads of laundry can be washed but will naturally shrink when washed. ... for large and heavy fabrics, separate these items into a number of smaller loads. • Did you following the care instructions for your dryer? Please confirm that the venting is complete? Check your home's or laundry room's fuse box/circuit breaker box and replace the fuse or ...
...Heavy fabrics take longer to dry because they still retain a slight amount of laundry? Confirm through review of the appropriate sections of this manual that nothing has been set ? Divide your larger load into smaller loads of laundry can be washed but will naturally shrink when washed. ... for large and heavy fabrics, separate these items into a number of smaller loads. • Did you following the care instructions for your dryer? Please confirm that the venting is complete? Check your home's or laundry room's fuse box/circuit breaker box and replace the fuse or ...

Service Manual
Page 1
Website:http://www.LGservice.com [For U.S.A] www.lg.ca [For Canada] ELECTRIC & GAS DRYER SERVICE MANUAL CAUTION READ THIS MANUAL CAREFULLY TO DIAGNOSE TROUBLES CORRECTLY BEFORE OFFERING SERVICE. MODEL : DLE5977W/DLG5988W DLE5977B/DLG5988B DLE3777W/DLG3788W
Website:http://www.LGservice.com [For U.S.A] www.lg.ca [For Canada] ELECTRIC & GAS DRYER SERVICE MANUAL CAUTION READ THIS MANUAL CAREFULLY TO DIAGNOSE TROUBLES CORRECTLY BEFORE OFFERING SERVICE. MODEL : DLE5977W/DLG5988W DLE5977B/DLG5988B DLE3777W/DLG3788W
Service Manual
Page 7
... procedure too risky for the other side. Avoid finger injuries - This procedure should be careful not to pinch fingers between the washer and dryer. Incorrect installation procedure can cause serious accidents and physical Injuries. 4 Secure stacking kit side bracket to the stopper of kit. 1 Stacking...the washer by attaching the doublefaced tape to the side of the front kit. • Do not use stacking kit with a gas dryer in owner's manual. 2 Peel protective paper off the tape from the stacking kit side bracket. 6 Insert the front stacking kit. Slide washer slowly ...
... procedure too risky for the other side. Avoid finger injuries - This procedure should be careful not to pinch fingers between the washer and dryer. Incorrect installation procedure can cause serious accidents and physical Injuries. 4 Secure stacking kit side bracket to the stopper of kit. 1 Stacking...the washer by attaching the doublefaced tape to the side of the front kit. • Do not use stacking kit with a gas dryer in owner's manual. 2 Peel protective paper off the tape from the stacking kit side bracket. 6 Insert the front stacking kit. Slide washer slowly ...

Service Manual
Page 13
...) 34min Saturation 45±3°C (5min) 38±5°C SPEED DRY (HIGH) - 25min Saturation (70±5°C) (5min) (47±5°C) Manual FRESHEN UP Dry ** (MID HIGH) - 20min Saturation (66±5°C) (5min) (47±5°C) 3Hr AIR DRY - - 30min Saturation No heater... * Sensor dry : "Dry Level" is set by users. ** Manual dry : "Temperature control" is set by users. 13 Dry Display erature Level time Electro- Default settings can be adjusted by users. 4 DRYER CYCLE PROCESS Cycle Default Conditions of operation and termination Drying Cooling Wrinkle care...
...) 34min Saturation 45±3°C (5min) 38±5°C SPEED DRY (HIGH) - 25min Saturation (70±5°C) (5min) (47±5°C) Manual FRESHEN UP Dry ** (MID HIGH) - 20min Saturation (66±5°C) (5min) (47±5°C) 3Hr AIR DRY - - 30min Saturation No heater... * Sensor dry : "Dry Level" is set by users. ** Manual dry : "Temperature control" is set by users. 13 Dry Display erature Level time Electro- Default settings can be adjusted by users. 4 DRYER CYCLE PROCESS Cycle Default Conditions of operation and termination Drying Cooling Wrinkle care...


