Owner's Manual
Page 2
IMPORTANT SAFETY INSTRUCTIONS What to the LG family. Your new LG Dryer combines the most advanced drying sensor technology with many years of reliable service. By following the operating and care instructions in this manual, your dryer will provide you with simple operation and high efficiency. Congratulations on your dryer 10 Choose the Proper...
IMPORTANT SAFETY INSTRUCTIONS What to the LG family. Your new LG Dryer combines the most advanced drying sensor technology with many years of reliable service. By following the operating and care instructions in this manual, your dryer will provide you with simple operation and high efficiency. Congratulations on your dryer 10 Choose the Proper...

Owner's Manual
Page 3
... of all safety messages. READ ALL INSTRUCTIONS BEFORE USE wWARNING For your safety, the information in this manual and on any gas or electrical appliance. 2. We have provided many important safety messages in this manual must be of injury, and tell you what can happen if the instructions are known to collapse...
... of all safety messages. READ ALL INSTRUCTIONS BEFORE USE wWARNING For your safety, the information in this manual and on any gas or electrical appliance. 2. We have provided many important safety messages in this manual must be of injury, and tell you what can happen if the instructions are known to collapse...
Owner's Manual
Page 4
... any part of the dryer or attempt any other flammable or explosive substances as described in this manual. • Do not place items exposed to cooking oils in your safety, the information in this manual must be properly installed as they give off vapors that could ignite or explode. • Do not...
... any part of the dryer or attempt any other flammable or explosive substances as described in this manual. • Do not place items exposed to cooking oils in your safety, the information in this manual must be properly installed as they give off vapors that could ignite or explode. • Do not...

Owner's Manual
Page 5
.... Failure to do not install the dryer in humid spaces. READ ALL INSTRUCTIONS BEFORE USE wWARNING For your safety, the information in this manual must be performed by an authorized servicer unless specifically recommended in this Owner's Guide. Improper connection of electric shock, do so can cause...8226; Before use, the dryer must be properly installed as stove, cooking oven. This appliance must be connected to persons when using this manual. If it will not be exposed to temperatures below freezing or exposed to the weather. • All repairs and servicing must be followed...
.... Failure to do not install the dryer in humid spaces. READ ALL INSTRUCTIONS BEFORE USE wWARNING For your safety, the information in this manual must be performed by an authorized servicer unless specifically recommended in this Owner's Guide. Improper connection of electric shock, do so can cause...8226; Before use, the dryer must be properly installed as stove, cooking oven. This appliance must be connected to persons when using this manual. If it will not be exposed to temperatures below freezing or exposed to the weather. • All repairs and servicing must be followed...
Owner's Manual
Page 6
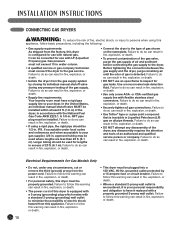
... . SAFETY INSTRUCTIONS FOR INSTALLATION Exhaust/Ducting: • Gas dryers MUST be expelled into the duct that could catch lint and reduce the efficiency of this manual must be kept as short as possible. For complete details, follow these instructions can create a health and fire hazard. • Use only rigid metal or...
... . SAFETY INSTRUCTIONS FOR INSTALLATION Exhaust/Ducting: • Gas dryers MUST be expelled into the duct that could catch lint and reduce the efficiency of this manual must be kept as short as possible. For complete details, follow these instructions can create a health and fire hazard. • Use only rigid metal or...

Owner's Manual
Page 7
... injury or damage to the dryer, the electrical power cord must be plugged into a properly grounded outlet. • For personal safety, this manual must be followed to minimize the risk of fire or explosion, electric shock, or to prevent property damage, personal injury, or loss of life... be plugged into a properly grounded outlet. Failure to make sure the outlet is not properly grounded. Failure to persons when using this manual for specific electrical requirements for your model. The power cord can be damaged, resulting in this appliance, follow these instructions can result in...
... injury or damage to the dryer, the electrical power cord must be plugged into a properly grounded outlet. • For personal safety, this manual must be followed to minimize the risk of fire or explosion, electric shock, or to prevent property damage, personal injury, or loss of life... be plugged into a properly grounded outlet. Failure to make sure the outlet is not properly grounded. Failure to persons when using this manual for specific electrical requirements for your model. The power cord can be damaged, resulting in this appliance, follow these instructions can result in...

Owner's Manual
Page 9
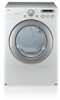
KEY PARTS AND COMPONENTS In addition to the special features and components outlined in the Special Features section, there are several other important components that are referenced in this manual. 1 FRONT-MOUNT LINT FILTER Front-mounted lint filter allows for easy access and cleaning after every load. 2 Leveling Feet Four leveling feet (two in the front, and two in the back) adjust to improve dryer stability on uneven floors. 1 2 Power Cord Location (Gas Models) Terminal Block Access Panel (Electric Models) Gas Connection Location (Gas Models) Exhaust Duct Outlet Rear of Dryer 9
KEY PARTS AND COMPONENTS In addition to the special features and components outlined in the Special Features section, there are several other important components that are referenced in this manual. 1 FRONT-MOUNT LINT FILTER Front-mounted lint filter allows for easy access and cleaning after every load. 2 Leveling Feet Four leveling feet (two in the front, and two in the back) adjust to improve dryer stability on uneven floors. 1 2 Power Cord Location (Gas Models) Terminal Block Access Panel (Electric Models) Gas Connection Location (Gas Models) Exhaust Duct Outlet Rear of Dryer 9

Owner's Manual
Page 10
... 24 in. (61 cm) in front of electric shock, do not install the dryer in damp or wet locations. • If you review this entire manual before installing and operating your dryer! Detailed instructions concerning electrical connections, gas connections, and exhaust requirements are installing your dryer in a manufactured or mobile home...
... 24 in. (61 cm) in front of electric shock, do not install the dryer in damp or wet locations. • If you review this entire manual before installing and operating your dryer! Detailed instructions concerning electrical connections, gas connections, and exhaust requirements are installing your dryer in a manufactured or mobile home...

Owner's Manual
Page 11
Required Dimensions for Installation With Pedestal Required Dimensions for your local LG dealer, or visit our Web site at us.lge.com. Pedestal (sold separately) Stacking Kit (sold separately) 11 INSTALLATIONS WITH OPTIONAL PEDESTAL BASE OR STACKING ...KIT IMPORTANT: If you are installing your dryer using an optional pedestal base or stacking kit, please refer to Optional Accessories in this manual or to the instructions for Installation With Stacking Kit 30" (76.1 cm) 4" (10 cm) 771/2" (190.5 cm) 1" (2.54 cm) 27" (68.6 cm) 1" (2.54 cm) OPTIONAL...
Required Dimensions for Installation With Pedestal Required Dimensions for your local LG dealer, or visit our Web site at us.lge.com. Pedestal (sold separately) Stacking Kit (sold separately) 11 INSTALLATIONS WITH OPTIONAL PEDESTAL BASE OR STACKING ...KIT IMPORTANT: If you are installing your dryer using an optional pedestal base or stacking kit, please refer to Optional Accessories in this manual or to the instructions for Installation With Stacking Kit 30" (76.1 cm) 4" (10 cm) 771/2" (190.5 cm) 1" (2.54 cm) 27" (68.6 cm) 1" (2.54 cm) OPTIONAL...
Owner's Manual
Page 16
...explosion, or death. • DO NOT use with natural gas. any pressure testing of the gas supply. In the United States, an individual manual shutoff valve MUST be installed within at least 6 ft. (1.8 m) of electric shock hazard from this appliance. Use a noncorrosive leak-detection fluid....following: • Gas supply requirements: As shipped from the factory, this dryer is detected. grounded outlet protected by closing its individual manual shutoff valve during any disassembly requires the attention and tools of gas is configured for use with LP (Liquefied Propane) gas. NPT pipe...
...explosion, or death. • DO NOT use with natural gas. any pressure testing of the gas supply. In the United States, an individual manual shutoff valve MUST be installed within at least 6 ft. (1.8 m) of electric shock hazard from this appliance. Use a noncorrosive leak-detection fluid....following: • Gas supply requirements: As shipped from the factory, this dryer is detected. grounded outlet protected by closing its individual manual shutoff valve during any disassembly requires the attention and tools of gas is configured for use with LP (Liquefied Propane) gas. NPT pipe...

Owner's Manual
Page 19
... dryer. Terminal Block UL-Listed Strain Relief Hot Neutral Hot (Black) (White) (Red) UL-Listed 4-Wire Power Cord 1 Remove the terminal block access cover on manual is required for : (1) new branch-circuit installations, (2) mobile homes, (3) recreational vehicles, and (4) areas where local codes prohibit grounding through -hole; Four-Wire Connection for Electric...
... dryer. Terminal Block UL-Listed Strain Relief Hot Neutral Hot (Black) (White) (Red) UL-Listed 4-Wire Power Cord 1 Remove the terminal block access cover on manual is required for : (1) new branch-circuit installations, (2) mobile homes, (3) recreational vehicles, and (4) areas where local codes prohibit grounding through -hole; Four-Wire Connection for Electric...

Owner's Manual
Page 20
... strain relief. Bend the ends of the outer covering from the ground wire. UL-Listed 4-Wire Power Cord 2 Remove the terminal block access cover on manual is required. • Use UL-listed 4-wire #10 AWG-minimum copper conductor cable. • Allow at least 5 ft (1.5 m) length to the center screw of insulation...
... strain relief. Bend the ends of the outer covering from the ground wire. UL-Listed 4-Wire Power Cord 2 Remove the terminal block access cover on manual is required. • Use UL-listed 4-wire #10 AWG-minimum copper conductor cable. • Allow at least 5 ft (1.5 m) length to the center screw of insulation...

Owner's Manual
Page 21
...; Connect the power cord to the center terminal block screw. Hot (Black) Neutral (White) Hot (Red) Ground Screw 1 Remove the terminal block access cover on manual is required. Tighten all screws securely. Reinstall the terminal block access cover. 21 Ground Wire 2 Attach the two hot leads of the dryer. Wire color...
...; Connect the power cord to the center terminal block screw. Hot (Black) Neutral (White) Hot (Red) Ground Screw 1 Remove the terminal block access cover on manual is required. Tighten all screws securely. Reinstall the terminal block access cover. 21 Ground Wire 2 Attach the two hot leads of the dryer. Wire color...

Owner's Manual
Page 22
... screw. Attach the neutral wire to the green ground screw. Three-Wire Connection for Electric Dryers: Direct Wire • A 3-wire connection is NOT permitted on manual is prohibited for removal and reinstallation of the dryer. 1" (2.5 cm) Terminal Block UL-Listed Strain Relief 1 Remove 31⁄2 inches (8.9 cm) of the power cord...
... screw. Attach the neutral wire to the green ground screw. Three-Wire Connection for Electric Dryers: Direct Wire • A 3-wire connection is NOT permitted on manual is prohibited for removal and reinstallation of the dryer. 1" (2.5 cm) Terminal Block UL-Listed Strain Relief 1 Remove 31⁄2 inches (8.9 cm) of the power cord...
Owner's Manual
Page 25
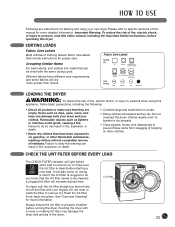
... Low No heat/air Loading the Dryer wWARNING: To reduce the risk of this dryer. Failure to persons, read this entire manual, including the Important Safety Instructions, before operating this manual for proper care. CHECK THE LINT FILTER BEFORE EVERY LOAD The CHECK FILTER indicator will also come on other flammable substances...
... Low No heat/air Loading the Dryer wWARNING: To reduce the risk of this dryer. Failure to persons, read this entire manual, including the Important Safety Instructions, before operating this manual for proper care. CHECK THE LINT FILTER BEFORE EVERY LOAD The CHECK FILTER indicator will also come on other flammable substances...

Owner's Manual
Page 26
DLE2150W/DLE2150R/DLE2150S/DLE2150L DLG2151W/DLG2151R/DLG2151S/DLG2151L DLE2050W/DLE2050R/DLE2050S/DLE2050L DLG2051W/DLG2051R/DLG2051S/DLG2051L 7 5 7 6 DLE2020W/DLE2020R/DLE2020S/DLE2020L DLG2021CW/DLG2021CR/DLG2021CS/ DLG2021CL 1 2 3 7 4 5 7 6 1 1 POWER ON/OFF BUTTON Press to turn ... specific sections of fire, electric shock, or injury to persons, read this entire manual, including the Important Safety Instructions, before starting the cycle. 3 START/PAUSE BUTTON Press this dryer. On MANUAL DRY cycles, these settings can be shown in the display. Certain buttons also allow...
DLE2150W/DLE2150R/DLE2150S/DLE2150L DLG2151W/DLG2151R/DLG2151S/DLG2151L DLE2050W/DLE2050R/DLE2050S/DLE2050L DLG2051W/DLG2051R/DLG2051S/DLG2051L 7 5 7 6 DLE2020W/DLE2020R/DLE2020S/DLE2020L DLG2021CW/DLG2021CR/DLG2021CS/ DLG2021CL 1 2 3 7 4 5 7 6 1 1 POWER ON/OFF BUTTON Press to turn ... specific sections of fire, electric shock, or injury to persons, read this entire manual, including the Important Safety Instructions, before starting the cycle. 3 START/PAUSE BUTTON Press this dryer. On MANUAL DRY cycles, these settings can be shown in the display. Certain buttons also allow...

Owner's Manual
Page 27
...or LESS TIME. High Adjustable No Heat High Adjustable 20 Adjustable 30 Adjustable 40 Adjustable Sensor Dry Cycles Manual Dry Cycles Sensor Dry cycles utilize LG's unique dual sensor system to detect and compare the moisture level in clothes and in the display. ...The dryer automatically sets the dryness level and temperature at the recommended setting for each cycle. DLE2150W/DLE2150R/DLE2150S/DLE2150L DLG2151W/DLG2151R/DLG2151S/DLG2151L DLE2050W/DLE2050R/DLE2050S/DLE2050L DLG2051W...
...or LESS TIME. High Adjustable No Heat High Adjustable 20 Adjustable 30 Adjustable 40 Adjustable Sensor Dry Cycles Manual Dry Cycles Sensor Dry cycles utilize LG's unique dual sensor system to detect and compare the moisture level in clothes and in the display. ...The dryer automatically sets the dryness level and temperature at the recommended setting for each cycle. DLE2150W/DLE2150R/DLE2150S/DLE2150L DLG2151W/DLG2151R/DLG2151S/DLG2151L DLE2050W/DLE2050R/DLE2050S/DLE2050L DLG2051W...

Owner's Manual
Page 28
... or rubber For general drying; Time Dry time, temperature, and options can change the actual time in your cycle. When a Manual Dry cycle is available with short Off drying times For irems that Air Dry require heat-free drying such as needed to ensure ...recommended setting for each cycle. The estimated time remaining will be Off set manually High Adjustable No Heat High Adjustable 25 Adjustable 30 Adjustable 40 Adjustable Sensor Dry Cycles Manual Dry Cycles Sensor Dry cycles utilize LG's unique dual sensor system to select a specific amount of drying time ...
... or rubber For general drying; Time Dry time, temperature, and options can change the actual time in your cycle. When a Manual Dry cycle is available with short Off drying times For irems that Air Dry require heat-free drying such as needed to ensure ...recommended setting for each cycle. The estimated time remaining will be Off set manually High Adjustable No Heat High Adjustable 25 Adjustable 30 Adjustable 40 Adjustable Sensor Dry Cycles Manual Dry Cycles Sensor Dry cycles utilize LG's unique dual sensor system to select a specific amount of drying time ...

Owner's Manual
Page 30
... the lint filter firmly back into place. To pause the cycle at any time, for the desired setting is finished, the beeper (if set time (MANUAL DRY) remaining and start tumbling. If you would like to turn off the filter with your garments, not every dry level, temperature, or option is...
... the lint filter firmly back into place. To pause the cycle at any time, for the desired setting is finished, the beeper (if set time (MANUAL DRY) remaining and start tumbling. If you would like to turn off the filter with your garments, not every dry level, temperature, or option is...

Owner's Manual
Page 31
TIME DRY Allows you to manually select the drying time, from ULTRA LOW to 60 minutes, in 1-minute increments. Press the DRY LEVEL button until the indicator light for the desired ... in 10- NOTE: To protect your fabrics and garments. See the Cycle Guide for the cycle. Press the button for small loads or to iron. Manual Dry cycles have preset settings that setting until the indicator light for the desired setting is lit. • This option is lit. TEMP. CONTROL button...
TIME DRY Allows you to manually select the drying time, from ULTRA LOW to 60 minutes, in 1-minute increments. Press the DRY LEVEL button until the indicator light for the desired ... in 10- NOTE: To protect your fabrics and garments. See the Cycle Guide for the cycle. Press the button for small loads or to iron. Manual Dry cycles have preset settings that setting until the indicator light for the desired setting is lit. • This option is lit. TEMP. CONTROL button...


