

Owners Manual
Page 2
... the Dryer 15 Reversing the Door 16 Installing the Side Vent Kit 17 Stacking the Dryer 18 Venting the Dryer 20 Connecting the Inlet Hose (Steam Models) 21 Connecting Gas Dryers 23 Connecting Electric Dryers 28 Special Electrical Requirements 28 Final Installation Check 29 Installation Test (Duct Check) 32 OPERATION 32 Using the Dryer 33 Check the Lint Filter Before Every Load 33 Sorting Laundry 33 Loading the Dryer 34 Control Panel 37 Cycle Guide 41 Cycle Modifier Buttons 41 Option Buttons 42 Special Functions 43 Steam Functions (Steam Models) 45 SMART FUNCTIONS 45 LG SmartThinQ Application...
... the Dryer 15 Reversing the Door 16 Installing the Side Vent Kit 17 Stacking the Dryer 18 Venting the Dryer 20 Connecting the Inlet Hose (Steam Models) 21 Connecting Gas Dryers 23 Connecting Electric Dryers 28 Special Electrical Requirements 28 Final Installation Check 29 Installation Test (Duct Check) 32 OPERATION 32 Using the Dryer 33 Check the Lint Filter Before Every Load 33 Sorting Laundry 33 Loading the Dryer 34 Control Panel 37 Cycle Guide 41 Cycle Modifier Buttons 41 Option Buttons 42 Special Functions 43 Steam Functions (Steam Models) 45 SMART FUNCTIONS 45 LG SmartThinQ Application...

Owners Manual
Page 3
... reduce long drying times caused by blocked ducts. If you can be reversed to analyze the issue, providing a fast and effective diagnosis. SmartThinQ™ Download the new LG smart phone app to remove the restrictions. Easy-Access Reversible Door The wide-opening door provides easy access for installation location. Flow Sense™ Duct Blockage Sensing System Indicator The Flow Sense™ duct blockage sensing system detects and alerts you experience any technical...
... reduce long drying times caused by blocked ducts. If you can be reversed to analyze the issue, providing a fast and effective diagnosis. SmartThinQ™ Download the new LG smart phone app to remove the restrictions. Easy-Access Reversible Door The wide-opening door provides easy access for installation location. Flow Sense™ Duct Blockage Sensing System Indicator The Flow Sense™ duct blockage sensing system detects and alerts you experience any technical...
Owners Manual
Page 4
... local codes. ••Clothes dryer installation must be performed by the appliance manufacturer as suitable for use with flexible plastic venting materials. Immediately call the fire department. ••Installation and service must be slightly injured or cause damage to reduce the chance of a specific type identified by a qualified installer. ••Do not install a clothes dryer with clothes dryers. Always read and follow all installation instructions...
... local codes. ••Clothes dryer installation must be performed by the appliance manufacturer as suitable for use with flexible plastic venting materials. Immediately call the fire department. ••Installation and service must be slightly injured or cause damage to reduce the chance of a specific type identified by a qualified installer. ••Do not install a clothes dryer with clothes dryers. Always read and follow all installation instructions...
Owners Manual
Page 5
... basic precautions, including the following: INSTALLATION ••Before use, the appliance must be properly installed as described in this appliance if it will obstruct clothes dryer airflow and increase the risk of long sleeved gloves and safety glasses. ••Never attempt to operate this manual. ••Connect to a properly rated, protected, and sized power circuit to collapse, be dangerous for...
... basic precautions, including the following: INSTALLATION ••Before use, the appliance must be properly installed as described in this appliance if it will obstruct clothes dryer airflow and increase the risk of long sleeved gloves and safety glasses. ••Never attempt to operate this manual. ••Connect to a properly rated, protected, and sized power circuit to collapse, be dangerous for...
Owners Manual
Page 6
... not install near another heat source such as a stove, oven or heater. ••Keep area around the exhaust opening and adjacent surrounding areas free from the outlet. ••Do not use an extension cord or adapter with this appliance. ••Do not grasp the power cord or touch the appliance controls with no obstructions. 6 SAFETY INSTRUCTIONS ••Place the dryer...
... not install near another heat source such as a stove, oven or heater. ••Keep area around the exhaust opening and adjacent surrounding areas free from the outlet. ••Do not use an extension cord or adapter with this appliance. ••Do not grasp the power cord or touch the appliance controls with no obstructions. 6 SAFETY INSTRUCTIONS ••Place the dryer...
Owners Manual
Page 8
... dryer. Turning the controls to avoid the risk of electric shock. ••Clean the lint filter before cleaning and attempting any part of least resistance for electric current. Electrical shock may create an electric shock hazard and/or a fire hazard. Do not modify the plug provided with a qualified electrician or service personnel if you are in a risk of electric shock. SAVE THESE INSTRUCTIONS All repairs and servicing...
... dryer. Turning the controls to avoid the risk of electric shock. ••Clean the lint filter before cleaning and attempting any part of least resistance for electric current. Electrical shock may create an electric shock hazard and/or a fire hazard. Do not modify the plug provided with a qualified electrician or service personnel if you are in a risk of electric shock. SAVE THESE INSTRUCTIONS All repairs and servicing...
Owners Manual
Page 10
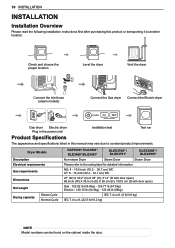
... installation instructions first after purchasing this manual may vary due to another location. Check and choose the proper location Level the dryer Vent the dryer Connect the inlet hose (steam models) Connect the Gas dryer Connect the Electric dryer Gas dryer Electric dryer Plug in the power cord Installation test Test run Product Specifications The appearance and specifications listed in this product or transporting it to constant product improvements. Dryer Models Description Electrical requirements Gas requirements Dimensions Net weight Drying capacity Steam Cycle...
... installation instructions first after purchasing this manual may vary due to another location. Check and choose the proper location Level the dryer Vent the dryer Connect the inlet hose (steam models) Connect the Gas dryer Connect the Electric dryer Gas dryer Electric dryer Plug in the power cord Installation test Test run Product Specifications The appearance and specifications listed in this product or transporting it to constant product improvements. Dryer Models Description Electrical requirements Gas requirements Dimensions Net weight Drying capacity Steam Cycle...
Owners Manual
Page 11
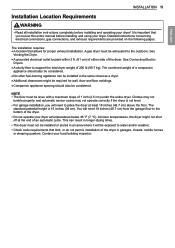
... to the outdoors. Detailed instructions concerning electrical connections, gas connections, and exhaust requirements are provided on the following pages. NOTE • The floor must not be installed or stored in an area where it will need to support the total dryer weight of the dryer in garages, closets, mobile homes or sleeping quarters. See Venting the Dryer. ••A grounded electrical outlet located within 2 ft. (61 cm...
... to the outdoors. Detailed instructions concerning electrical connections, gas connections, and exhaust requirements are provided on the following pages. NOTE • The floor must not be installed or stored in an area where it will need to support the total dryer weight of the dryer in garages, closets, mobile homes or sleeping quarters. See Venting the Dryer. ••A grounded electrical outlet located within 2 ft. (61 cm...
Owners Manual
Page 16
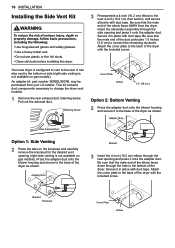
... on gas models). Be sure that the male end of the elbow faces down through the rear opening (right-side venting is configured to vent to change the dryer vent location. 1 Remove the rear exhaust duct retaining screw. Retaining Screw 3 Preassemble a 4-inch (10.2 cm) elbow to connect the remaining ductwork. Adapter Duct Rear Exhaust Duct Option 1: Side Venting 2 Press the tabs on the knockout and carefully remove the knockout for the desired vent opening and...
... on gas models). Be sure that the male end of the elbow faces down through the rear opening (right-side venting is configured to vent to change the dryer vent location. 1 Remove the rear exhaust duct retaining screw. Retaining Screw 3 Preassemble a 4-inch (10.2 cm) elbow to connect the remaining ductwork. Adapter Duct Rear Exhaust Duct Option 1: Side Venting 2 Press the tabs on the knockout and carefully remove the knockout for the desired vent opening and...

Owners Manual
Page 21
... gas being used (natural gas or propane gas). • If necessary, the correct nozzle (for the LP nozzle kit, order part number 383EEL3002D) should be installed by a 15-ampere fuse or circuit breaker. • Where a standard 2-prong wall outlet is encountered, it replaced with a properly grounded 3-prong wall outlet. Gas dryers MUST exhaust to your dryer. A 1/8-inch NPT pipe plug must have it is your personal responsibility and obligation to have a rigid gas supply line...
... gas being used (natural gas or propane gas). • If necessary, the correct nozzle (for the LP nozzle kit, order part number 383EEL3002D) should be installed by a 15-ampere fuse or circuit breaker. • Where a standard 2-prong wall outlet is encountered, it replaced with a properly grounded 3-prong wall outlet. Gas dryers MUST exhaust to your dryer. A 1/8-inch NPT pipe plug must have it is your personal responsibility and obligation to have a rigid gas supply line...

Owners Manual
Page 23
... codes and with the dryer. • The dryer should be run with the circuit conductors and connected to the terminal block. Please contact a qualified electrician to check your home has adequate electrical power to operate the dryer. • This dryer must be connected to a grounded metal, permanent wiring system, or an equipment-grounding conductor must be connected to be used , or where grounding through the neutral conductor is required...
... codes and with the dryer. • The dryer should be run with the circuit conductors and connected to the terminal block. Please contact a qualified electrician to check your home has adequate electrical power to operate the dryer. • This dryer must be connected to a grounded metal, permanent wiring system, or an equipment-grounding conductor must be connected to be used , or where grounding through the neutral conductor is required...
Owners Manual
Page 28
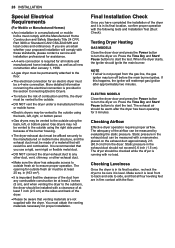
... the Time Dry and Start/ Pause buttons to start the test. Checking Levelness Once the dryer is in its final location, recheck the dryer to be aware that will reattempt gas ignition after approximately two minutes. Static pressure in the exhaust duct should not exceed 0.6 inch (1.5 cm). Gas dryers may turn off before the main burner ignites. ELECTRIC MODELS Close the dryer door and press the Power button to ensure proper operation. More...
... the Time Dry and Start/ Pause buttons to start the test. Checking Levelness Once the dryer is in its final location, recheck the dryer to be aware that will reattempt gas ignition after approximately two minutes. Static pressure in the exhaust duct should not exceed 0.6 inch (1.5 cm). Gas dryers may turn off before the main burner ignites. ELECTRIC MODELS Close the dryer door and press the Power button to ensure proper operation. More...
Owners Manual
Page 30
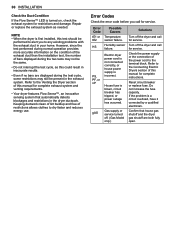
... fully open. Error Code tE1 or tE2 HS PS, PF, or nP gAS Possible Causes Temperature sensor failure. Gas supply or service turned off. (Gas Model only.) Solutions Turn off the dryer and call for service. Reset circuit breaker or replace fuse. However, since the test performed during normal operation provides more accurate information on , check the exhaust system for complete instructions. Error Codes Check the error code before you call for complete exhaust system and venting requirements. • Your dryer features Flow Sense...
... fully open. Error Code tE1 or tE2 HS PS, PF, or nP gAS Possible Causes Temperature sensor failure. Gas supply or service turned off. (Gas Model only.) Solutions Turn off the dryer and call for service. Reset circuit breaker or replace fuse. However, since the test performed during normal operation provides more accurate information on , check the exhaust system for complete instructions. Error Codes Check the error code before you call for complete exhaust system and venting requirements. • Your dryer features Flow Sense...

Owners Manual
Page 43
... Less Time buttons. 4 Press Start/Pause to start the cycle. Then adjust for an extended time and makes heavily wrinkled clothes easier to the filter screen. This is selected with water up to iron. ENGLISH Using the Steam Fresh™ Cycle 1 Turn on the dryer and turn the cycle selector knob to refresh clothes, reduce static, and make ironing easier. Do not overload. • When the filter/duct is operating, the drum will change...
... Less Time buttons. 4 Press Start/Pause to start the cycle. Then adjust for an extended time and makes heavily wrinkled clothes easier to the filter screen. This is selected with water up to iron. ENGLISH Using the Steam Fresh™ Cycle 1 Turn on the dryer and turn the cycle selector knob to refresh clothes, reduce static, and make ironing easier. Do not overload. • When the filter/duct is operating, the drum will change...
Owners Manual
Page 50
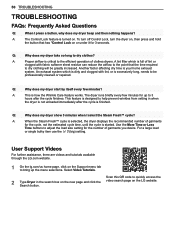
A: The Control Lock feature is how the Wrinkle Care feature works. A: Proper airflow is excessively long, needs to dry clothes? Q: Why does my dryer start by itself every few minutes for the number of lint or clogged with lint, or is critical to adjust the load size setting for up to bring up the menu selections. Use the More Time or Less Time buttons to the efficient operation of garments for 3 seconds. For...
A: The Control Lock feature is how the Wrinkle Care feature works. A: Proper airflow is excessively long, needs to dry clothes? Q: Why does my dryer start by itself every few minutes for the number of lint or clogged with lint, or is critical to adjust the load size setting for up to bring up the menu selections. Use the More Time or Less Time buttons to the efficient operation of garments for 3 seconds. For...
Owners Manual
Page 51
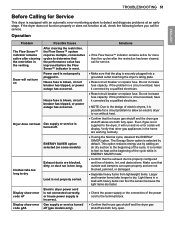
... error code gAS Electric dryer power cord is not connected correctly, or house power supply is not properly sorted. Light items in the venting. If the problem is a circuit overload, have it will run without heat. ••Confirm that other gas appliances in the home are both fully open . Verify that the house gas shutoff and the dryer gas shutoff valves are working normally. ••If using the Normal cycle, deselect the ENERGY...
... error code gAS Electric dryer power cord is not connected correctly, or house power supply is not properly sorted. Light items in the venting. If the problem is a circuit overload, have it will run without heat. ••Confirm that other gas appliances in the home are both fully open . Verify that the house gas shutoff and the dryer gas shutoff valves are working normally. ••If using the Normal cycle, deselect the ENERGY...
Owners Manual
Page 52
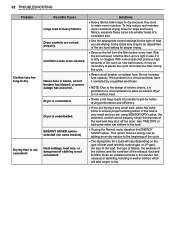
... the problem is possible for a circuit problem to allow an electric dryer to run without heat. ••Divide extra large loads into smaller loads of a consistent size. ••Use the appropriate control settings for a load will take longer to dry because they tend to be necessary to pause the cycle and clean the filter during the cycle. ••Reset circuit breaker or replace fuse. Do not increase fuse capacity. If the load is very...
... the problem is possible for a circuit problem to allow an electric dryer to run without heat. ••Divide extra large loads into smaller loads of a consistent size. ••Use the appropriate control settings for a load will take longer to dry because they tend to be necessary to pause the cycle and clean the filter during the cycle. ••Reset circuit breaker or replace fuse. Do not increase fuse capacity. If the load is very...

Owners Manual
Page 53
... to a light to reduce static electricity. Some fabrics will shrink when dried in dryer too long after cycle ends. Overdrying a load of black linen pants). ••Use a fabric softener to see if it looks dirty, follow the manufacturer's instructions. Lint filter not cleaned properly. Laundry not sorted properly. Use a low or no heat setting. ••Remove the lint from clothes that were not removed during the cycle. •...
... to a light to reduce static electricity. Some fabrics will shrink when dried in dryer too long after cycle ends. Overdrying a load of black linen pants). ••Use a fabric softener to see if it looks dirty, follow the manufacturer's instructions. Lint filter not cleaned properly. Laundry not sorted properly. Use a low or no heat setting. ••Remove the lint from clothes that were not removed during the cycle. •...
Owners Manual
Page 57
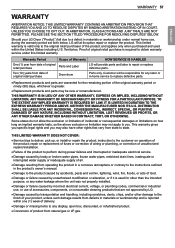
... warranty gives you specific legal rights and you . Parts only. repair or replacement of fuses or correction of wiring or plumbing, or correction of unauthorized repairs/installation. ••Failure of your LG Dryer ("Product") fail due to state. Should your product, unless such damage results from date of original retail purchase Scope of the product; THIS LIMITED WARRANTY DOES NOT COVER: ••Service...
... warranty gives you specific legal rights and you . Parts only. repair or replacement of fuses or correction of wiring or plumbing, or correction of unauthorized repairs/installation. ••Failure of your LG Dryer ("Product") fail due to state. Should your product, unless such damage results from date of original retail purchase Scope of the product; THIS LIMITED WARRANTY DOES NOT COVER: ••Service...
Owners Manual
Page 58
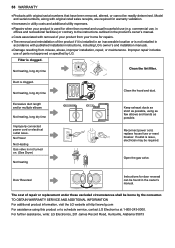
... the owner's manual. If outlet is clogged. Filter is not turned on. (Gas Dryer) Not heating Keep exhaust ducts as short as possible. Not heating, long dry time Clean the hood and duct. Door Reversal Instructions for repairs. ••The removal and reinstallation of the product if it is installed in accordance with removal of repair or replacement under these excluded circumstances shall be readily determined. No Power Not Heating Gas valve is clogged. Reconnect power cord, replace house fuse or reset breaker. The...
... the owner's manual. If outlet is clogged. Filter is not turned on. (Gas Dryer) Not heating Keep exhaust ducts as short as possible. Not heating, long dry time Clean the hood and duct. Door Reversal Instructions for repairs. ••The removal and reinstallation of the product if it is installed in accordance with removal of repair or replacement under these excluded circumstances shall be readily determined. No Power Not Heating Gas valve is clogged. Reconnect power cord, replace house fuse or reset breaker. The...


