
Owners Manual
Page 3
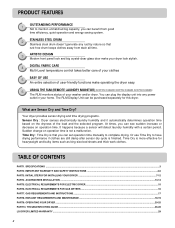
... from good time efficiency, quiet operation and energy saving system. 2 STAINLESS STEEL DRUM Stainless steel drum doesn't generate any power outlet in your washer and/or dryer. What are still damp after sensor dry cycle is more effective for this dryer. At times, you can set operation time manually to complete drying. Sudden change on the dryness of your home. TABLE OF CONTENTS PART1. IMPORTANT WARRANTY AND SAFETY INSTRUCTIONS ...4-6 PART3. GAS REQUIREMENTS AND INSTRUCTIONS ...17...
... from good time efficiency, quiet operation and energy saving system. 2 STAINLESS STEEL DRUM Stainless steel drum doesn't generate any power outlet in your washer and/or dryer. What are still damp after sensor dry cycle is more effective for this dryer. At times, you can set operation time manually to complete drying. Sudden change on the dryness of your home. TABLE OF CONTENTS PART1. IMPORTANT WARRANTY AND SAFETY INSTRUCTIONS ...4-6 PART3. GAS REQUIREMENTS AND INSTRUCTIONS ...17...
Owners Manual
Page 6
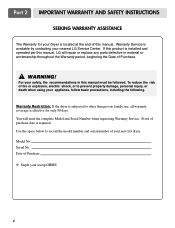
... manual, LG will need the complete Model and Serial Number when requesting Warranty Service. Serial No. WARNING! You will repair or replace any parts defective in this manual must be followed. Use the space below to other than private family use, all warranty coverage is located at the end of your receipt HERE. 4 Model No. Date of purchase date is installed and operated per this manual. Warranty Service is available by contacting your Dryer...
... manual, LG will need the complete Model and Serial Number when requesting Warranty Service. Serial No. WARNING! You will repair or replace any parts defective in this manual must be followed. Use the space below to other than private family use, all warranty coverage is located at the end of your receipt HERE. 4 Model No. Date of purchase date is installed and operated per this manual. Warranty Service is available by contacting your Dryer...
Owners Manual
Page 7
... the appliance. 5 Part 2 IMPORTANT WARRANTY AND SAFETY INSTRUCTIONS IMPORTANT SAFETY INSTRUCTIONS ! This appliance is equipped with all instructions before or after each load. 11) Keep area around the exhaust opening and adjacent surrounding areas free from service or discarded, remove the door to the drying compartment. 5) Do not reach into an appropriate outlet that have a proper outlet installed by the manufacturer of least resistance for electric current.
... the appliance. 5 Part 2 IMPORTANT WARRANTY AND SAFETY INSTRUCTIONS IMPORTANT SAFETY INSTRUCTIONS ! This appliance is equipped with all instructions before or after each load. 11) Keep area around the exhaust opening and adjacent surrounding areas free from service or discarded, remove the door to the drying compartment. 5) Do not reach into an appropriate outlet that have a proper outlet installed by the manufacturer of least resistance for electric current.
Owners Manual
Page 12
... solid copper wire. • Use a UL approved strain relief. • Disconnect power before taking any problem with . Use Design AGA Certified Connector. 2. 1/8" NPT Pipe Plug (for the type of gas available in fire or electrical shock. Installed within 6' (1.8 m) of Gas Supply (Gas dryer only). If needed in this elevation because A.G.A certifies this manual's section entitled Gas Requirements and Instructions. 10 STEP 5 Electrical Plug Connections Following are required to install or use and where local codes do...
... solid copper wire. • Use a UL approved strain relief. • Disconnect power before taking any problem with . Use Design AGA Certified Connector. 2. 1/8" NPT Pipe Plug (for the type of gas available in fire or electrical shock. Installed within 6' (1.8 m) of Gas Supply (Gas dryer only). If needed in this elevation because A.G.A certifies this manual's section entitled Gas Requirements and Instructions. 10 STEP 5 Electrical Plug Connections Following are required to install or use and where local codes do...
Owners Manual
Page 13
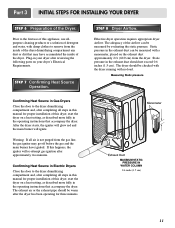
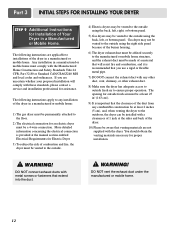
... dryer. Effective dryer operation requires appropriate dryer airflow. Prior to the dryer drum/drying compartment and, after approximately two minutes. STEP 8 Dryer Airflow. Confirming Heat Source in your dryer's Electrical Requirements. STEP 7 Confirming Heat Source Operation. The dryer should not exceed 0.6 inches (1.5 cm). Part 3 INITIAL STEPS FOR INSTALLING YOUR DRYER STEP 6 Preparation of the dryer drum/drying compartment any dust or dirt that accompany the dryer. Plug-in Gas Dryers Close the door to the first use allpurpose cleaning...
... dryer. Effective dryer operation requires appropriate dryer airflow. Prior to the dryer drum/drying compartment and, after approximately two minutes. STEP 8 Dryer Airflow. Confirming Heat Source in your dryer's Electrical Requirements. STEP 7 Confirming Heat Source Operation. The dryer should not exceed 0.6 inches (1.5 cm). Part 3 INITIAL STEPS FOR INSTALLING YOUR DRYER STEP 6 Preparation of the dryer drum/drying compartment any dust or dirt that accompany the dryer. Plug-in Gas Dryers Close the door to the first use allpurpose cleaning...
Owners Manual
Page 14
... NOT connect the exhaust duct with the dryer. Gas dryer may not be vented to the outside fresh air must be at the manual section entitled Electrical Requirements for Electric Dryer 3) To reduce the risk of combustion and fire, the dryer must be at least 2 inches (5 cm), and, when venting the dryer to ensure proper operation. The opening for outside using the back, left , right, or bottom panel. 5) Gas dryers may be vented to...
... NOT connect the exhaust duct with the dryer. Gas dryer may not be vented to the outside fresh air must be at the manual section entitled Electrical Requirements for Electric Dryer 3) To reduce the risk of combustion and fire, the dryer must be at least 2 inches (5 cm), and, when venting the dryer to ensure proper operation. The opening for outside using the back, left , right, or bottom panel. 5) Gas dryers may be vented to...
Owners Manual
Page 17
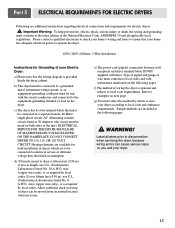
... be run with dryer. Heating elements are available for field installation in dryers which to local code and ordinance requirements. e) The power cord (pigtail) connection between wall receptacle and dryer terminal block IS NOT supplied with the circuit conductors and connected to a grounded metal, permanent wiring system; f) The method of wiring the dryer is optional and subject to dryer is provided Inside the dryer cabinet. Part 5 ELECTRICAL REQUIREMENTS FOR ELECTRIC DRYERS Following are additional instructions regarding electrical connections and requirements...
... be run with dryer. Heating elements are available for field installation in dryers which to local code and ordinance requirements. e) The power cord (pigtail) connection between wall receptacle and dryer terminal block IS NOT supplied with the circuit conductors and connected to a grounded metal, permanent wiring system; f) The method of wiring the dryer is optional and subject to dryer is provided Inside the dryer cabinet. Part 5 ELECTRICAL REQUIREMENTS FOR ELECTRIC DRYERS Following are additional instructions regarding electrical connections and requirements...
Owners Manual
Page 18
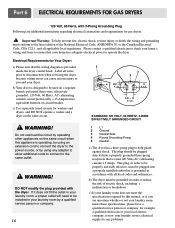
... instructions regarding electrical connections and requirements for any adapter to allow additional cords to connect to ensure that the wiring diagram is rated 120 Volts AC (alternating current) 15 Amps. WARNING! The plug should be grounded in your home's wiring and fuses to the same outlet. ! c) If your laundry room's electrical supply for gas dryers. ! Do not overload the circuit by operating other appliances on the same circuit. ! Part 6 ELECTRICAL REQUIREMENTS FOR GAS DRYERS...
... instructions regarding electrical connections and requirements for any adapter to allow additional cords to connect to ensure that the wiring diagram is rated 120 Volts AC (alternating current) 15 Amps. WARNING! The plug should be grounded in your home's wiring and fuses to the same outlet. ! c) If your laundry room's electrical supply for gas dryers. ! Do not overload the circuit by operating other appliances on the same circuit. ! Part 6 ELECTRICAL REQUIREMENTS FOR GAS DRYERS...
Owners Manual
Page 19
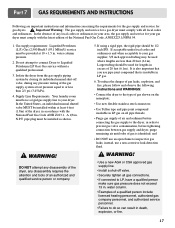
... connect Dryer to LP, have a rigid gas supply line to or less than 20 feet (6.1m). Important Warning: The gas supply and service for a gas dryer must be provided at test pressure equal to your gas dryer must be installed as shown. ! Larger tubing should be used where lengths are important instructions and information concerning the requirements for the gas supply and service for gas leaks; Gas supply requirements: Liquefied Petroleum (L.P.) Gas...
... connect Dryer to LP, have a rigid gas supply line to or less than 20 feet (6.1m). Important Warning: The gas supply and service for a gas dryer must be provided at test pressure equal to your gas dryer must be installed as shown. ! Larger tubing should be used where lengths are important instructions and information concerning the requirements for the gas supply and service for gas leaks; Gas supply requirements: Liquefied Petroleum (L.P.) Gas...
Owners Manual
Page 20
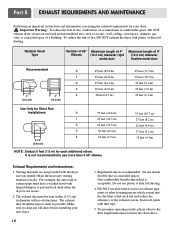
.... Weather Hood Type Number of 90° Maximum length of 4" Elbows (10.2 cm) diameter rigid metal duct Maximum length of a building. Venting materials are important instructions and information concerning the exhaust requirements for each additional elbow. Important Warning: To reduce the risk of fire, combustion, or accumulation of combustible gases, DO NOT exhaust dryer air into the duct that could catch lint and reduce...
.... Weather Hood Type Number of 90° Maximum length of 4" Elbows (10.2 cm) diameter rigid metal duct Maximum length of a building. Venting materials are important instructions and information concerning the exhaust requirements for each additional elbow. Important Warning: To reduce the risk of fire, combustion, or accumulation of combustible gases, DO NOT exhaust dryer air into the duct that could catch lint and reduce...

Owners Manual
Page 21
... hot or warm water. Ordinarily, the dryer drum will need no care. Wipe the exterior of the control panel. 9. The screen is firmly secured before starting a new load, because a clogged lint filter may damage the finish of the dryer as new towels. 5. d) After the residue has been removed, rinse screen with a clean towel, firmly replace the lint screen in and that the wiring diagram is clean before drying each load. e) After drying the lint screen with hot water. Disconnect the dryer's electric power...
... hot or warm water. Ordinarily, the dryer drum will need no care. Wipe the exterior of the control panel. 9. The screen is firmly secured before starting a new load, because a clogged lint filter may damage the finish of the dryer as new towels. 5. d) After the residue has been removed, rinse screen with a clean towel, firmly replace the lint screen in and that the wiring diagram is clean before drying each load. e) After drying the lint screen with hot water. Disconnect the dryer's electric power...
Owners Manual
Page 24
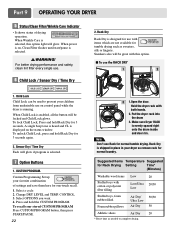
... Air Dry/ Ultra Low Air Dry Athletic shoes Air Dry * Reset time as sweaters, silk or lingerie. For better drying performance and safety, clean lint filter every single use on , Clean Filter flashes until start/pause is selected. 7 Option Buttons 1. To unlock Child Lock, press and hold the CUSTOM PROGRAM. CUSTOM PROGRAM. Change DRY LEVEL and TEMP. Part 9 OPERATING YOUR DRYER 5 Status/Clean Filter/Wrinkle Care Indicator • It shows status of settings and save them here for 3 seconds, A single beep...
... Air Dry/ Ultra Low Air Dry Athletic shoes Air Dry * Reset time as sweaters, silk or lingerie. For better drying performance and safety, clean lint filter every single use on , Clean Filter flashes until start/pause is selected. 7 Option Buttons 1. To unlock Child Lock, press and hold the CUSTOM PROGRAM. CUSTOM PROGRAM. Change DRY LEVEL and TEMP. Part 9 OPERATING YOUR DRYER 5 Status/Clean Filter/Wrinkle Care Indicator • It shows status of settings and save them here for 3 seconds, A single beep...

Owners Manual
Page 27
... use and check it before restarting the dryer. ! Run the fingers across the filter Vacuum the lint filter Wash the lint screen in cases. Dry thoroughly and replace. 25 CONTROL until the desired drying time is interrupted for more details, see Options. • Press START/PAUSE. Press START/PAUSE. Improper wire connection or related wiring error will damage sealing of following ways in warm, soapy water. Not cleaning or emptying the filter will shut...
... use and check it before restarting the dryer. ! Run the fingers across the filter Vacuum the lint filter Wash the lint screen in cases. Dry thoroughly and replace. 25 CONTROL until the desired drying time is interrupted for more details, see Options. • Press START/PAUSE. Press START/PAUSE. Improper wire connection or related wiring error will damage sealing of following ways in warm, soapy water. Not cleaning or emptying the filter will shut...

Owners Manual
Page 28
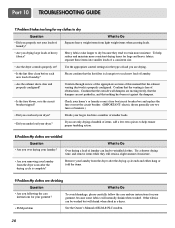
... gas shutoff and the dryer gas shutoff are both fully open. 3.Problem:There are actually stains that the dryer's plug is the circuit breaker tripped? Check your home's or laundry room's fuse box / circuit breaker box and replace the fuse or reset the circuit breaker. (IMPORTANT: electric dryers generally use two fuses or breakers.) 2.Problem:My Dryer Doesn 't Heat Question What to Do • Did you may not need to call for service. 1.Problem:My Dryer Won 't Start Question What to dry only clean...
... gas shutoff and the dryer gas shutoff are both fully open. 3.Problem:There are actually stains that the dryer's plug is the circuit breaker tripped? Check your home's or laundry room's fuse box / circuit breaker box and replace the fuse or reset the circuit breaker. (IMPORTANT: electric dryers generally use two fuses or breakers.) 2.Problem:My Dryer Doesn 't Heat Question What to Do • Did you may not need to call for service. 1.Problem:My Dryer Won 't Start Question What to dry only clean...

Owners Manual
Page 29
... Do • Did you drying synthetic, permanent press and blends? Part 10 TROUBLESHOOTING GUIDE 4.Problem:There is Lint on the heat setting, the type of heat used (electric, natural or LP gas), the size of the load, the type of fabrics, the wetness of the clothes and the condition of the exhaust ducts and lint filer. 27 Please refer to reduce static electricity. • Did you over dry the load of laundry. • Did...
... Do • Did you drying synthetic, permanent press and blends? Part 10 TROUBLESHOOTING GUIDE 4.Problem:There is Lint on the heat setting, the type of heat used (electric, natural or LP gas), the size of the load, the type of fabrics, the wetness of the clothes and the condition of the exhaust ducts and lint filer. 27 Please refer to reduce static electricity. • Did you over dry the load of laundry. • Did...
Owners Manual
Page 30
... has been set ? What to Do Over drying a load of heavy fabrics? To help ensure proper tumbling action. 8.Problem:My clothes are not pushed in a dryer. • PLM problem See the Owner's Manual of laundry? Check your home's or laundry room's fuse box/circuit breaker box and replace the fuse or reset the circuit breaker. (IMPORTANT: electric dryers generally use instructions for your dryer? To avoid shrinkage, please carefully follow the care and use two fuses or breakers.) •...
... has been set ? What to Do Over drying a load of heavy fabrics? To help ensure proper tumbling action. 8.Problem:My clothes are not pushed in a dryer. • PLM problem See the Owner's Manual of laundry? Check your home's or laundry room's fuse box/circuit breaker box and replace the fuse or reset the circuit breaker. (IMPORTANT: electric dryers generally use instructions for your dryer? To avoid shrinkage, please carefully follow the care and use two fuses or breakers.) •...

Service Manual
Page 4
... CONTROL PANEL & PLATE ASSEMBLY 36 12-2. OUT ...17 8. DIAGNOSTIC TEST ...19 9-1. TEST 4 MOISTURE SENSOR 23 9-5. EXPLODED VIEW ...36 12-1. INSTALLATION INSTRUCTIONS 6 4. COMPONENT TESTING INFORMATION 13 6. TEST 6 HEATER SWITCH TEST - CHANGE GAS SETTING (NATURAL GAS, PROPANE GAS 27 11. TEST 2 THERMISTOR TEST --- DRUM & MOTOR ASSEMBLY : ELECTRIC TYPE 38 12-3-2. REPLACEMENT PARTS LIST 3 DISASSEMBLY INSTRUCTIONS 29 12. MEASURE WITH POWER OFF 21 9-3. CABINET & DOOR ASSEMBLY 37 12-3-1. ELECTRIC TYPE 25 9-7. SPECIFICATIONS ...4 2. TEST 7 GAS VALVE TEST...
... CONTROL PANEL & PLATE ASSEMBLY 36 12-2. OUT ...17 8. DIAGNOSTIC TEST ...19 9-1. TEST 4 MOISTURE SENSOR 23 9-5. EXPLODED VIEW ...36 12-1. INSTALLATION INSTRUCTIONS 6 4. COMPONENT TESTING INFORMATION 13 6. TEST 6 HEATER SWITCH TEST - CHANGE GAS SETTING (NATURAL GAS, PROPANE GAS 27 11. TEST 2 THERMISTOR TEST --- DRUM & MOTOR ASSEMBLY : ELECTRIC TYPE 38 12-3-2. REPLACEMENT PARTS LIST 3 DISASSEMBLY INSTRUCTIONS 29 12. MEASURE WITH POWER OFF 21 9-3. CABINET & DOOR ASSEMBLY 37 12-3-1. ELECTRIC TYPE 25 9-7. SPECIFICATIONS ...4 2. TEST 7 GAS VALVE TEST...

Service Manual
Page 19
8 WIRING DIAGRAM ELECTRIC DRYER WIRING DIAGRAM GAS DRYER WIRING DIAGRAM 18
8 WIRING DIAGRAM ELECTRIC DRYER WIRING DIAGRAM GAS DRYER WIRING DIAGRAM 18

Service Manual
Page 23
... Outlet Thermostat attached to Motor Bracket operate Level by drum belt? " (Brown wire)? YES Is resistance below 3Ω between Idler Switch terminals? " (Yellow wire) and "BL2- YES NO Is resistance below 3Ω between Connector "BL2- No fan will work. NO YES • Check Motor.(Refer to 'Motor Diagram & Check') • Check if Control Connector is closed . No Heater will function; NO Is resistance below 1Ω between terminals of Power cord with earth line.) Trouble Symptom Drum...
... Outlet Thermostat attached to Motor Bracket operate Level by drum belt? " (Brown wire)? YES Is resistance below 3Ω between Idler Switch terminals? " (Yellow wire) and "BL2- YES NO Is resistance below 3Ω between Connector "BL2- No fan will work. NO YES • Check Motor.(Refer to 'Motor Diagram & Check') • Check if Control Connector is closed . No Heater will function; NO Is resistance below 1Ω between terminals of Power cord with earth line.) Trouble Symptom Drum...

Service Manual
Page 24
... Dry 10% ~ Dried clothes 205 ~ 240 Over 4.0V Completely-dried clothes 23 Test 4 Moisture sensor Caution Before measuring resistance, be sure to turn Power off, and do voltage discharge. (When discharging, contact the metal plug of Power cord with earth line.) Trouble Symptom Degree of dryness does not match with metal to 6pin connector's Pin (BLUE wire) and Pin (ORANGE wire) to Electro load: 1. NO YES • Check Electro Load...
... Dry 10% ~ Dried clothes 205 ~ 240 Over 4.0V Completely-dried clothes 23 Test 4 Moisture sensor Caution Before measuring resistance, be sure to turn Power off, and do voltage discharge. (When discharging, contact the metal plug of Power cord with earth line.) Trouble Symptom Degree of dryness does not match with metal to 6pin connector's Pin (BLUE wire) and Pin (ORANGE wire) to Electro load: 1. NO YES • Check Electro Load...


