

Owners Manual
Page 5
... .. 16 17 17 18 18 19 19 20 Front LED (Light Emitting Diode) Display ..... 20 Video Menu Options EZ Picture 21 Manual Picture Control (User Option) ........ 21 XD Function 21 Color Temperature Control 22 Video Preset 22 Audio Menu Options Audio Language 23 EZ... SoundRite / EZ Sound 23 Manual Sound Control (User Option) ........ 23 Stereo/SAP Broadcasts Setup 24 Front Surround 24 TV Speakers On/Off Setup 24 Time Menu Options...
... .. 16 17 17 18 18 19 19 20 Front LED (Light Emitting Diode) Display ..... 20 Video Menu Options EZ Picture 21 Manual Picture Control (User Option) ........ 21 XD Function 21 Color Temperature Control 22 Video Preset 22 Audio Menu Options Audio Language 23 EZ... SoundRite / EZ Sound 23 Manual Sound Control (User Option) ........ 23 Stereo/SAP Broadcasts Setup 24 Front Surround 24 TV Speakers On/Off Setup 24 Time Menu Options...

Owners Manual
Page 6
Dims when the TV is a simplified representation of front panel. Here shown may be somewhat different from your TV. - i 4 ENTER Button -MENU Button -- This manual explains the features available on . TVNIDEO ButtonON/OFF Button- I EN_R;;;;;;;; This is switched on the DU-42LZ30 TV. i L r CHANNEL (_r A) Buttons-- "_ Remote Control Sensor Power Standby Indicator Illuminates brightly when the TV is in standby mode. iiiiiiiiiiiiiiiiiiiiiiiiiiiiiiiiiiiiiiiiiiiiil;! i O_;tO;_ : i!iiiiiiiiiiiiiiiiiiiiiiil ............ Introduction - VOLUME (_,1_) Buttons--
Dims when the TV is a simplified representation of front panel. Here shown may be somewhat different from your TV. - i 4 ENTER Button -MENU Button -- This manual explains the features available on . TVNIDEO ButtonON/OFF Button- I EN_R;;;;;;;; This is switched on the DU-42LZ30 TV. i L r CHANNEL (_r A) Buttons-- "_ Remote Control Sensor Power Standby Indicator Illuminates brightly when the TV is in standby mode. iiiiiiiiiiiiiiiiiiiiiiiiiiiiiiiiiiiiiiiiiiiiil;! i O_;tO;_ : i!iiiiiiiiiiiiiiiiiiiiiiil ............ Introduction - VOLUME (_,1_) Buttons--
Owners Manual
Page 9
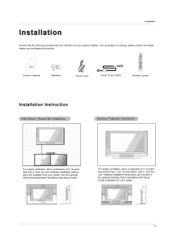
... plasma display. Detailed installation instructions are available from your dealer. If an accessory is missing, please contact the dealer where you purchased the product. / , / Owner's Manual Batteries Power Cord D-sub 15 pin Cable Remote Control Insta IIat io n Inst ruc t io n For proper ventilation, allow a clearance of 4" on the bottom, and...
... plasma display. Detailed installation instructions are available from your dealer. If an accessory is missing, please contact the dealer where you purchased the product. / , / Owner's Manual Batteries Power Cord D-sub 15 pin Cable Remote Control Insta IIat io n Inst ruc t io n For proper ventilation, allow a clearance of 4" on the bottom, and...

Owners Manual
Page 10
This manual explains the features available on the TV stand. 10 Install wires as necessary. c. d. Reinstall the cover. Align the holes on the rear A/V cover and insert. b. e. Position the A/V cover with the two tuberance on the TV back panel with the TV back panel. Thread, then pull the wires through the hole on the DU-42LZ30 TVs. * The connection panel is hidden behind the A/V cover. a. Close cover. - Installation Ins ta IIat io n Inst ruct ion - Remove the cover.
This manual explains the features available on the TV stand. 10 Install wires as necessary. c. d. Reinstall the cover. Align the holes on the rear A/V cover and insert. b. e. Position the A/V cover with the two tuberance on the TV back panel with the TV back panel. Thread, then pull the wires through the hole on the DU-42LZ30 TVs. * The connection panel is hidden behind the A/V cover. a. Close cover. - Installation Ins ta IIat io n Inst ruct ion - Remove the cover.

Owners Manual
Page 12
Connection Option 2 1. compared to connecting a regular VCR to the VCR owner's manual.) 3. Insert a video tape into the VCR and press PLAY on cable box. 3. The TV cannot display TV programming unless a TV tuner device or cable TV ...
Connection Option 2 1. compared to connecting a regular VCR to the VCR owner's manual.) 3. Insert a video tape into the VCR and press PLAY on cable box. 3. The TV cannot display TV programming unless a TV tuner device or cable TV ...

Owners Manual
Page 13
... VonideDoVDoutpplauyt erports 13 Select the input source with using the TV/VIDEO button on the TV, as shown in the figure. See the Operating Manual of the second TV or monitor for Monitor out. Operate the corresponding external equipment. Connect the second TV or monitor to the DVD player...'s manual for Component 2 input source. • Digital Audio operation has priority if Digital Audio and AUDIO L/R are connected at the same time....
... VonideDoVDoutpplauyt erports 13 Select the input source with using the TV/VIDEO button on the TV, as shown in the figure. See the Operating Manual of the second TV or monitor for Monitor out. Operate the corresponding external equipment. Connect the second TV or monitor to the DVD player...'s manual for Component 2 input source. • Digital Audio operation has priority if Digital Audio and AUDIO L/R are connected at the same time....

Owners Manual
Page 14
... set -top box connector. Use TVNIDEO or COMP/RGB/DVl on the audio equipment. 3. your set -top box. (Refer to the owner's manual for video connections, depending on your vision. 14 Installation This TV can receive Digital Over-the-air/Cable signals without an external digital set -top.... However, if you do receive Digital signals from a digital set -top box. Set the" TV Speaker option - See the external audio equipment instruction manual for DTV (480p,720p,1080i) mode. Off" in the AUDIO menu. or Signal 480i 4803 72013 1080i Component 1/2 RGB-DTV, DVI-DTV Yes No...
... set -top box connector. Use TVNIDEO or COMP/RGB/DVl on the audio equipment. 3. your set -top box. (Refer to the owner's manual for video connections, depending on your vision. 14 Installation This TV can receive Digital Over-the-air/Cable signals without an external digital set -top.... However, if you do receive Digital signals from a digital set -top box. Set the" TV Speaker option - See the external audio equipment instruction manual for DTV (480p,720p,1080i) mode. Off" in the AUDIO menu. or Signal 480i 4803 72013 1080i Component 1/2 RGB-DTV, DVI-DTV Yes No...
Owners Manual
Page 16
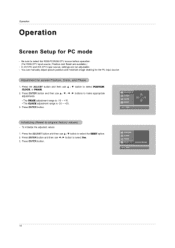
... POSITION, CLOCK, or PHASE. 2. Press the ADJUST button and then use A / • / "41/ IP- Operation peration Screen Setup for the PC input source. 1. You can manually adjust picture position and minimize image shaking for PC Be sure to select the RESET option. 2. Press ENTER button and then use A /• button to...
... POSITION, CLOCK, or PHASE. 2. Press the ADJUST button and then use A / • / "41/ IP- Operation peration Screen Setup for the PC input source. 1. You can manually adjust picture position and minimize image shaking for PC Be sure to select the RESET option. 2. Press ENTER button and then use A /• button to...

Owners Manual
Page 21
... Time, Movie, Video Game, and Sports settings are not adjustable. 1. Press the I =- When adjusting Video menu options (contrast, brightness, color, sharpness, tint, and color temperature) manually, EZ Picture automatically changes to suit your own settings), Day Light, Normal, Night Time, Movie, Video Game, and Sports. • You can also use the...
... Time, Movie, Video Game, and Sports settings are not adjustable. 1. Press the I =- When adjusting Video menu options (contrast, brightness, color, sharpness, tint, and color temperature) manually, EZ Picture automatically changes to suit your own settings), Day Light, Normal, Night Time, Movie, Video Game, and Sports. • You can also use the...

Owners Manual
Page 23
... on the program content. - button and then use A / • button to TV viewing. Press the IP- When adjusting sound options (treble, bass, and front surround) manually, EZ Sound automatically switches Off. - Scans for good sound quality at the factory and are watching a commercial or a regular TV program. 1. Press EXIT button to...
... on the program content. - button and then use A / • button to TV viewing. Press the IP- When adjusting sound options (treble, bass, and front surround) manually, EZ Sound automatically switches Off. - Scans for good sound quality at the factory and are watching a commercial or a regular TV program. 1. Press EXIT button to...

Owners Manual
Page 25
... signal. The TV must be in standby mode for the current time provided by the auto clock function. 1. Set the clock manually, if the current time is wrong, reset the clock manually. 1. Press the I =- Press the I_ button and then use • / • button to select either the year, date,.... 6. If you do not press any button within 2 hours after the TV turns on . 7. button and then use • / • button to select Manual Clock. 3. button and then use • / • button to select On. 4. Press EXIT button to return to TV viewing or press MENU button to return...
... signal. The TV must be in standby mode for the current time provided by the auto clock function. 1. Set the clock manually, if the current time is wrong, reset the clock manually. 1. Press the I =- Press the I_ button and then use • / • button to select either the year, date,.... 6. If you do not press any button within 2 hours after the TV turns on . 7. button and then use • / • button to select Manual Clock. 3. button and then use • / • button to select On. 4. Press EXIT button to return to TV viewing or press MENU button to return...


