

Owners Manual
Page 5
...Option / Cinema Mode Setup ........ 29 Demo (Review 29 Split Zoom 29 Lock Menu Options Parental Lock Setup 31 PIP (Picture-in remote control. see pages 11 - 15. 3 Install batteries in -Picture)/Twin Picture Watching PIP/POP/Twin Picture 32 Selecting an Input ...for Twin Picture..33 POP (Picture-out-of-Picture: Channel Scan) ...33 External Control Device Setup 34-38 IR Codes 39-40 Programming the Remote Programming Codes Troubleshooting Checklist Maintenance 41 42-43 44 45 Product Specifications 46 Troubleshooting Checklist 47 S et u p a n d• C ...
...Option / Cinema Mode Setup ........ 29 Demo (Review 29 Split Zoom 29 Lock Menu Options Parental Lock Setup 31 PIP (Picture-in remote control. see pages 11 - 15. 3 Install batteries in -Picture)/Twin Picture Watching PIP/POP/Twin Picture 32 Selecting an Input ...for Twin Picture..33 POP (Picture-out-of-Picture: Channel Scan) ...33 External Control Device Setup 34-38 IR Codes 39-40 Programming the Remote Programming Codes Troubleshooting Checklist Maintenance 41 42-43 44 45 Product Specifications 46 Troubleshooting Checklist 47 S et u p a n d• C ...

Owners Manual
Page 6
Here shown may be somewhat different from your TV. - iiiiiiiiiiiiiiiiiiiiiiiiiiiiiiiiiiiiiiiiiiiiil;! VOLUME (_,1_) Buttons-- i O_;tO;_ : i!iiiiiiiiiiiiiiiiiiiiiiil ............ This manual explains the features available on . i L r CHANNEL (_r A) Buttons-- Dims when the TV is switched on the DU-42LZ30 TV. TVNIDEO ButtonON/OFF Button- "_ Remote Control Sensor Power Standby Indicator Illuminates brightly when the TV is a simplified representation of front panel. i 4 ENTER Button -MENU Button -- I EN_R;;;;;;;; Introduction - This is in standby mode.
Here shown may be somewhat different from your TV. - iiiiiiiiiiiiiiiiiiiiiiiiiiiiiiiiiiiiiiiiiiiiil;! VOLUME (_,1_) Buttons-- i O_;tO;_ : i!iiiiiiiiiiiiiiiiiiiiiiil ............ This manual explains the features available on . i L r CHANNEL (_r A) Buttons-- Dims when the TV is switched on the DU-42LZ30 TV. TVNIDEO ButtonON/OFF Button- "_ Remote Control Sensor Power Standby Indicator Illuminates brightly when the TV is a simplified representation of front panel. i 4 ENTER Button -MENU Button -- I EN_R;;;;;;;; Introduction - This is in standby mode.

Owners Manual
Page 8
...• Install two 1.5V AA batteries. VIDEO Adjusts the factory preset picture according to scroll the Surf channel list. Replace cover. LIGHT \ \ Illuminates the remote control buttons. \ \ TVNIDEO \ Selects: DTV, Analog, Video1-2, \ Component 1-2, RGB-DTV (or RGB-PC), DVI-DTV (or DVI-PC) input sources.... FREEZE Freezes the currently-viewed picture. MODE Selects the remote operating mode: TV, VCR, DVD, CABLE, HDSTB or AUDIO. TIMER Lets you to navigate the on or off automatically. PIP Switches between PIP,...
...• Install two 1.5V AA batteries. VIDEO Adjusts the factory preset picture according to scroll the Surf channel list. Replace cover. LIGHT \ \ Illuminates the remote control buttons. \ \ TVNIDEO \ Selects: DTV, Analog, Video1-2, \ Component 1-2, RGB-DTV (or RGB-PC), DVI-DTV (or DVI-PC) input sources.... FREEZE Freezes the currently-viewed picture. MODE Selects the remote operating mode: TV, VCR, DVD, CABLE, HDSTB or AUDIO. TIMER Lets you to navigate the on or off automatically. PIP Switches between PIP,...
Owners Manual
Page 9
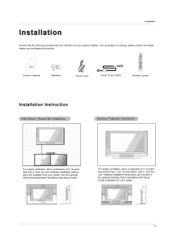
... the wall. If an accessory is missing, please contact the dealer where you purchased the product. / , / Owner's Manual Batteries Power Cord D-sub 15 pin Cable Remote Control Insta IIat io n Inst ruc t io n For proper ventilation, allow a clearance of 4" on each side and the top, 2.36" on each side and 2" from...
... the wall. If an accessory is missing, please contact the dealer where you purchased the product. / , / Owner's Manual Batteries Power Cord D-sub 15 pin Cable Remote Control Insta IIat io n Inst ruc t io n For proper ventilation, allow a clearance of 4" on each side and the top, 2.36" on each side and 2" from...

Owners Manual
Page 12
..., you can watch cable TV programming. For further information regarding cable TV service, contact your desired channel with using the TVNIDEO button on the remote control. (If connected to the same selected output channel on cable box. 2. If the 4:3 picture format is connected to the Video input....the jack colors (Video = yellow, Audio Left = white, and Audio Right = red). Select 3 or 4 with using the TV/VlDEO button on the remote control. (If connected to A/V INPUT 1, select Video 1 input source) Do not connect to the VCR owner's manual.) 3. Select the input source with ...
..., you can watch cable TV programming. For further information regarding cable TV service, contact your desired channel with using the TVNIDEO button on the remote control. (If connected to the same selected output channel on cable box. 2. If the 4:3 picture format is connected to the Video input....the jack colors (Video = yellow, Audio Left = white, and Audio Right = red). Select 3 or 4 with using the TV/VlDEO button on the remote control. (If connected to A/V INPUT 1, select Video 1 input source) Do not connect to the VCR owner's manual.) 3. Select the input source with ...

Owners Manual
Page 13
...second TV or monitor to connect 1. Connect the DVD video outputs (Y, PB, PR) to the COMPONENT (Y, PB, PR) INPUT jacks on the remote control. (If connected to hook up a second TV or monitor. How to the AUDIO INPUT jacks on the TV and connect the DVD audio ...to S-VIDEO, select the Video 1 or Video 2 external input source.) 3. Operate the corresponding external equipment. How to the AUDIO INPUT jacks on the remote control to select Component 1 or Component 2. (If connected to the DVD player's manual for Component 2 input source. • Digital Audio operation has priority...
...second TV or monitor to connect 1. Connect the DVD video outputs (Y, PB, PR) to the COMPONENT (Y, PB, PR) INPUT jacks on the remote control. (If connected to hook up a second TV or monitor. How to the AUDIO INPUT jacks on the TV and connect the DVD audio ...to S-VIDEO, select the Video 1 or Video 2 external input source.) 3. Operate the corresponding external equipment. How to the AUDIO INPUT jacks on the remote control to select Component 1 or Component 2. (If connected to the DVD player's manual for Component 2 input source. • Digital Audio operation has priority...

Owners Manual
Page 14
.../Cable signals without an external digital set -top box or other end of an optical cable to the owner's manual for operation. Turn on the remote control to external audio equipment (stereo system) via the Digital Audio Output Optical port. Connect the other digital external device, refer to page 23. Set...
.../Cable signals without an external digital set -top box or other end of an optical cable to the owner's manual for operation. Turn on the remote control to external audio equipment (stereo system) via the Digital Audio Output Optical port. Connect the other digital external device, refer to page 23. Set...

Owners Manual
Page 15
... DVI-PC input source in PC mode. If noise is clear. The fixed image may not work if you use 1. manently imprinted on the TV's remote control. 3. Use the Orbiter screen saver when possible. • The synchronization input form for a long period of SETUP menu. (Refer to another rate or adjust...
... DVI-PC input source in PC mode. If noise is clear. The fixed image may not work if you use 1. manently imprinted on the TV's remote control. 3. Use the Orbiter screen saver when possible. • The synchronization input form for a long period of SETUP menu. (Refer to another rate or adjust...
Owners Manual
Page 17
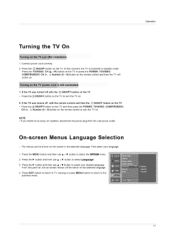
... selected language. 4. Operation 17 First select your desired language. Turning the TV On 1. At this point on, the on-screen menus will switch on the remote control and then the TV will be shown in the selected language. Menus Language Selection - Press the MENU button and then use A / • button to... return to TV viewing or press MENU button to return to turn the TV on the TV. If the TV was turned off with the remote control and then the (_) ON/OFF button on the TV • Press the OON/OFF button on the TV and then press the POWER, TV...
... selected language. 4. Operation 17 First select your desired language. Turning the TV On 1. At this point on, the on-screen menus will switch on the remote control and then the TV will be shown in the selected language. Menus Language Selection - Press the MENU button and then use A / • button to... return to TV viewing or press MENU button to return to turn the TV on the TV. If the TV was turned off with the remote control and then the (_) ON/OFF button on the TV • Press the OON/OFF button on the TV and then press the POWER, TV...

Owners Manual
Page 18
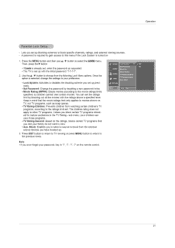
Press the I_ button and then use A / • button to select the S£TUP menu. 2. Use the SURF button on the remote control when a channel is currently added or deleted by toggling each channel on or off with ENTER button. Press the MENU button and then use A / &#...
Press the I_ button and then use A / • button to select the S£TUP menu. 2. Use the SURF button on the remote control when a channel is currently added or deleted by toggling each channel on or off with ENTER button. Press the MENU button and then use A / &#...

Owners Manual
Page 24
... Laboratories. 1. "Dolby" and the double-D symbol are trademarks of SRS Labs, Inc. button and then use A i • button to select your desired MTS mode in remote fringe areas during stereo/SAP broadcasting. 1. Press the I =- Press the I =- if the station transmits an additional sound signal as well as the original one. Use...
... Laboratories. 1. "Dolby" and the double-D symbol are trademarks of SRS Labs, Inc. button and then use A i • button to select your desired MTS mode in remote fringe areas during stereo/SAP broadcasting. 1. Press the I =- Press the I =- if the station transmits an additional sound signal as well as the original one. Use...
Owners Manual
Page 31
... up blocking schemes to this menu if the Lock System is turned on 1. You can view those programs. • TV Rating-General: Based on the remote control. 31 ously. • Set Password: Change the password by blocking out all the movies with the initial password "7-7-7-7". 2. sub menu, your preference. • Lock...
... up blocking schemes to this menu if the Lock System is turned on 1. You can view those programs. • TV Rating-General: Based on the remote control. 31 ously. • Set Password: Change the password by blocking out all the movies with the initial password "7-7-7-7". 2. sub menu, your preference. • Lock...
Owners Manual
Page 35
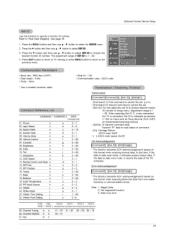
... A / • button to adjust SET ID to choose desired monitor ID number in Setup menu. Screen Mute 05. Brightness 09. Color k g 0 ~ 64 k h 0 ~ 64 k i 0 ~ 64 10. Remote Control Lock Mode k 14. Bass k q 0~ 3 k r 0 ~ 64 k s 0 ~ 64 18. Orbiter j 22. Transmit 'FF' data to select SET ID. 3. Contrast 08. PIP Position 16. Orbiter Time Setting...
... A / • button to adjust SET ID to choose desired monitor ID number in Setup menu. Screen Mute 05. Brightness 09. Color k g 0 ~ 64 k h 0 ~ 64 k i 0 ~ 64 10. Remote Control Lock Mode k 14. Bass k q 0~ 3 k r 0 ~ 64 k s 0 ~ 64 18. Orbiter j 22. Transmit 'FF' data to select SET ID. 3. Contrast 08. PIP Position 16. Orbiter Time Setting...
Owners Manual
Page 36
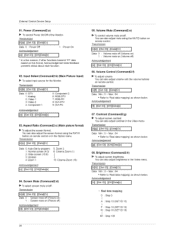
... ][Set ID][ ][OK][Data][x] J 06. Transmission I[k][e][ ][Set ID][ ][Data][Cr] J Data 0 : Volume mute off (Volume on) 1 : Volume mute on remote control. Transmission [[k][g][ ][Set ID][ ][Data][Cr] J Data Min:0~Max:64 • Refer to 'Real data mapping' as shown below. You can also adjust brightness Transmission...I 03. You can also adjust the screen format using the MUTE button on remote control or in the Video menu. You can also adjust mute using the RATIO button on remote control. Brightness (Command2:h) I_ To adjust screen brightness. You can also adjust...
... ][Set ID][ ][OK][Data][x] J 06. Transmission I[k][e][ ][Set ID][ ][Data][Cr] J Data 0 : Volume mute off (Volume on) 1 : Volume mute on remote control. Transmission [[k][g][ ][Set ID][ ][Data][Cr] J Data Min:0~Max:64 • Refer to 'Real data mapping' as shown below. You can also adjust brightness Transmission...I 03. You can also adjust the screen format using the MUTE button on remote control or in the Video menu. You can also adjust mute using the RATIO button on remote control. Brightness (Command2:h) I_ To adjust screen brightness. You can also adjust...
Owners Manual
Page 37
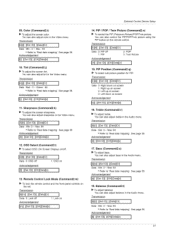
Color (Command2:i) I_ To adjust the screen color. See page 36. Remote Control Lock Mode (Command2:m) I_ To lock the remote control and the front panel controls on screen Acknowledgement [[q][ ][Set ID][ ][OK][Data][x] I ][ ][Set ID][ ][Data][Cr] ...Cr] Data 0: Lock off 1: PIP Acknowledgement I 2: POP 3: Twin Picture I [k][n][ ][Set ID][ ][Data][Cr] Data 0: PIP off Acknowledgement ] 1: Lock on the remote control. Acknowledgement [[r][ ][Set ID][ ][OK][Data][x] ] 17. See page 36. Bass (Command2:s) I_ To adjust bass. Acknowledgement I[j][ ][Set ID][ ][OK][Data][x] I 10...
Color (Command2:i) I_ To adjust the screen color. See page 36. Remote Control Lock Mode (Command2:m) I_ To lock the remote control and the front panel controls on screen Acknowledgement [[q][ ][Set ID][ ][OK][Data][x] I ][ ][Set ID][ ][Data][Cr] ...Cr] Data 0: Lock off 1: PIP Acknowledgement I 2: POP 3: Twin Picture I [k][n][ ][Set ID][ ][Data][Cr] Data 0: PIP off Acknowledgement ] 1: Lock on the remote control. Acknowledgement [[r][ ][Set ID][ ][OK][Data][x] ] 17. See page 36. Bass (Command2:s) I_ To adjust bass. Acknowledgement I[j][ ][Set ID][ ][OK][Data][x] I 10...

Owners Manual
Page 38
... 12. * To change the channel between ATSC air and ATSC cable, change the antenna setting with RS-232C. 38 Key (Command: m c) I_ To send IR remote key code Transmission [[m][o][ ][Set IU][ ][Data][ ][Cr] Data Key code: Refer to command the IR Code 0x08 and 0xC4 with EZ Scan. You can also...
... 12. * To change the channel between ATSC air and ATSC cable, change the antenna setting with RS-232C. 38 Key (Command: m c) I_ To send IR remote key code Transmission [[m][o][ ][Set IU][ ][Data][ ][Cr] Data Key code: Refer to command the IR Code 0x08 and 0xC4 with EZ Scan. You can also...
Owners Manual
Page 39
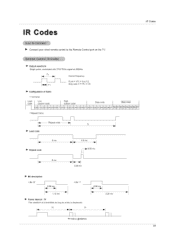
Tf Tf __[--] I_1 Tf=108ms @455KHz IRCodes 39 I_ Connect your wired remote control to the Remote Control port on the TV. I_ Output waveform Single pulse, modulated with 37.917KHz signal at 455KHz Tc __T--]__I--I__ Carrier frequency FCAR = 1/Tc = ...
Tf Tf __[--] I_1 Tf=108ms @455KHz IRCodes 39 I_ Connect your wired remote control to the Remote Control port on the TV. I_ Output waveform Single pulse, modulated with 37.917KHz signal at 455KHz Tc __T--]__I--I__ Carrier frequency FCAR = 1/Tc = ...
Owners Manual
Page 41
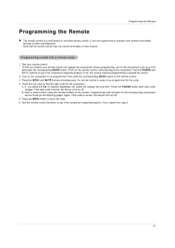
... A. Press the MENU button to be programmed for the component. Press the MENU and MUTE buttons simultaneously, the remote control is a multi-brand or universal remote control. B. Turn on the component to store the code. 6. Press the POWER button after each code change ...one at the component. ProgrammthineRgemote Programming the Remote I_ The remote control is ready to see if the component responds properly. Programming code numbers for the corresponding component can operate the component ...
... A. Press the MENU button to be programmed for the component. Press the MENU and MUTE buttons simultaneously, the remote control is a multi-brand or universal remote control. B. Turn on the component to store the code. 6. Press the POWER button after each code change ...one at the component. ProgrammthineRgemote Programming the Remote I_ The remote control is ready to see if the component responds properly. Programming code numbers for the corresponding component can operate the component ...
Owners Manual
Page 44
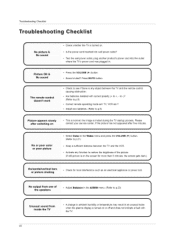
TroubleshoCothinegcklist Tro u b Ie s ho ot in . to -)? (Refer to p.8) • Correct remote operating mode set: TV, VCR etc.? %, • Install new batteries. (Refer to p.8) f Picture appears slowly after five minutes. • Select...+, - f Picture OK & No sound • Press the VOLUME (1_) button. ii _ _i _i / II_iI!ii_!i_i_ii_i_il"i caustoisnege,oftbhsetr,rseauncoty,bojnebCcethtwecetkheeTnVantdheremoctoentro, The remote control doesn't work • Are batteries installed with correct polarity (+ to restore the brightness of the picture. (If still picture is on or off and...
TroubleshoCothinegcklist Tro u b Ie s ho ot in . to -)? (Refer to p.8) • Correct remote operating mode set: TV, VCR etc.? %, • Install new batteries. (Refer to p.8) f Picture appears slowly after five minutes. • Select...+, - f Picture OK & No sound • Press the VOLUME (1_) button. ii _ _i _i / II_iI!ii_!i_i_ii_i_il"i caustoisnege,oftbhsetr,rseauncoty,bojnebCcethtwecetkheeTnVantdheremoctoentro, The remote control doesn't work • Are batteries installed with correct polarity (+ to restore the brightness of the picture. (If still picture is on or off and...

Owners Manual
Page 47
Check batteries in ? Check antenna connectings. CHECK THESE THINGS Is power cord plugged in remote control. Try another channel (station trouble). Check for local interference. Is television turned on ? Program channel using EZ Scan. 47 Adjust the picture control. Adjust the antenna. Cannot tune desired channel. Troubleshooting Checkl ilist• TroubleshoCothinegcklist SYMPTOMS No power No 3icture or sound Poor picture but good sound Poor reception Lines in picture Ghosts (multiple images) Remote control does not work.
Check batteries in ? Check antenna connectings. CHECK THESE THINGS Is power cord plugged in remote control. Try another channel (station trouble). Check for local interference. Is television turned on ? Program channel using EZ Scan. 47 Adjust the picture control. Adjust the antenna. Cannot tune desired channel. Troubleshooting Checkl ilist• TroubleshoCothinegcklist SYMPTOMS No power No 3icture or sound Poor picture but good sound Poor reception Lines in picture Ghosts (multiple images) Remote control does not work.


