
Owners Manual
Page 2
... Voltages inside . Call your dealer if the display is turned off. There are dangerous. Do not throw any way, please contact the manufacturer or the nearest authorized repair service provider for replacement. On Safety Use only the power cord supplied with your dealer. Use only a stand recommended by the supplier. Keep children from the AC power source even if the unit is not operating...
... Voltages inside . Call your dealer if the display is turned off. There are dangerous. Do not throw any way, please contact the manufacturer or the nearest authorized repair service provider for replacement. On Safety Use only the power cord supplied with your dealer. Use only a stand recommended by the supplier. Keep children from the AC power source even if the unit is not operating...

Owners Manual
Page 3
... power cord, and do not place the display where the power cord is provided. Displays are blocked, built-up heat can cause electric shock or fire. Contact an authorized the service ...use a screen saver on the screen. Cover the openings with ventilation openings in enclosure unless proper ventilation is subject to the screen and cause image burn-in a fire hazard. However, this product. Do not shock or scratch the front and sides of the fixed-resolution LCD panel. Otherwise, it with metallic objects. However, this display near water such as Red, Green or Blue...
... power cord, and do not place the display where the power cord is provided. Displays are blocked, built-up heat can cause electric shock or fire. Contact an authorized the service ...use a screen saver on the screen. Cover the openings with ventilation openings in enclosure unless proper ventilation is subject to the screen and cause image burn-in a fire hazard. However, this product. Do not shock or scratch the front and sides of the fixed-resolution LCD panel. Otherwise, it with metallic objects. However, this display near water such as Red, Green or Blue...

Owners Manual
Page 6
.... Connecting the Display Before setting up or move the product, Do Not hold the Stand Body or plastic cover of the stand. It will damage the panel. (Please hold or touch the front part of LCD panel. Stop Pin Stand Body Stand Base WARNING The tape and locking pin may be removed from those monitors equipped with a standing base when the base is pulled up. Assemble the Stand Base into the Stand Body. Connecting the stand base...
.... Connecting the Display Before setting up or move the product, Do Not hold the Stand Body or plastic cover of the stand. It will damage the panel. (Please hold or touch the front part of LCD panel. Stop Pin Stand Body Stand Base WARNING The tape and locking pin may be removed from those monitors equipped with a standing base when the base is pulled up. Assemble the Stand Base into the Stand Body. Connecting the stand base...

Owners Manual
Page 7
... turn the screw clockwise to the female part of the cable you desire to disintegrate the monitor from the items shown in various ways for maximum comfort. Your monitor may fall and get damaged or injure your display After installation, adjust the angle as shown below. 1. IMPORTANT This illustration depicts the general model of the panel in the picture. Positioning your foot. Connecting the Display 3. Use...
... turn the screw clockwise to the female part of the cable you desire to disintegrate the monitor from the items shown in various ways for maximum comfort. Your monitor may fall and get damaged or injure your display After installation, adjust the angle as shown below. 1. IMPORTANT This illustration depicts the general model of the panel in the picture. Positioning your foot. Connecting the Display 3. Use...

Owners Manual
Page 8
... the monitor and the stand base. WARNING You do not need to adjust its height. When adjusting the angle of the screen, do not put your finger(s). When adjusting the height of the screen, do not put your finger(s). Connecting the Display Height Range : maximum 4.33 inches (110.0 mm) 110.0 mm * Please be sure to remove the Locking pin to maintain an ergonomic and comfortable viewing position, the forward tilt angle...
... the monitor and the stand base. WARNING You do not need to adjust its height. When adjusting the angle of the screen, do not put your finger(s). When adjusting the height of the screen, do not put your finger(s). Connecting the Display Height Range : maximum 4.33 inches (110.0 mm) 110.0 mm * Please be sure to remove the Locking pin to maintain an ergonomic and comfortable viewing position, the forward tilt angle...

Owners Manual
Page 10
... monitor, ensure that the power to turn the power on , the 'Self Image Setting Function' is needed to change the 15 pin high density (3 row) D-sub VGA connector on the supplied cable to model. This rear view represents a general model; Wall-outlet type When using the device or after changing screen resolution, press the AUTO function button to optimal settings for Macintosh Mac adapter : For Apple Macintosh use, a separate plug adapter is executed automatically. (Only Analog Mode) Power Button NOTE ' Self Image Setting Function'? A Connect DVI-D(Digital signal) Cable B Connect...
... monitor, ensure that the power to turn the power on , the 'Self Image Setting Function' is needed to change the 15 pin high density (3 row) D-sub VGA connector on the supplied cable to model. This rear view represents a general model; Wall-outlet type When using the device or after changing screen resolution, press the AUTO function button to optimal settings for Macintosh Mac adapter : For Apple Macintosh use, a separate plug adapter is executed automatically. (Only Analog Mode) Power Button NOTE ' Self Image Setting Function'? A Connect DVI-D(Digital signal) Cable B Connect...

Owners Manual
Page 12
... INPUT Button (SOURCE Hot key) When two input signals are connected, you can select the input signal (D-SUB/DVI) you want. The best display mode is automatically detected. AUTO Button AUTO IMAGE ADJUSTMENT When adjusting your display settings, always press the AUTO button before entering the On Screen Display(OSD). (Only Analog Mode) This will automatically adjust your display image to enter F-ENGINE, ORIGINAL RATIO(Only E2210P),PHOTO EFFECT menus. Control Panel Functions MODE Button Use this button to page 18. The power indicator stays white if the display...
... INPUT Button (SOURCE Hot key) When two input signals are connected, you can select the input signal (D-SUB/DVI) you want. The best display mode is automatically detected. AUTO Button AUTO IMAGE ADJUSTMENT When adjusting your display settings, always press the AUTO button before entering the On Screen Display(OSD). (Only Analog Mode) This will automatically adjust your display image to enter F-ENGINE, ORIGINAL RATIO(Only E2210P),PHOTO EFFECT menus. Control Panel Functions MODE Button Use this button to page 18. The power indicator stays white if the display...

Owners Manual
Page 13
... MONITOR SETUP AUTO MENU MODE AUTO INPUT EXIT MENU PICTURE BRIGHTNESS CONTRAST SHARPNESS 100 70 5 EXIT 1 Press the discretionary Button, then the main menu of the OSD appears. 2 To access a control, use of the controls. Button to select other sub-menu items. 4 Press the EXIT Button to exit from the OSD. 12 The following section is an outline of the available adjustments and selections you with the On Screen Display Control system. To make using the OSD. On Screen Display (OSD) Control Adjustment Screen Adjustment Making adjustments...
... MONITOR SETUP AUTO MENU MODE AUTO INPUT EXIT MENU PICTURE BRIGHTNESS CONTRAST SHARPNESS 100 70 5 EXIT 1 Press the discretionary Button, then the main menu of the OSD appears. 2 To access a control, use of the controls. Button to select other sub-menu items. 4 Press the EXIT Button to exit from the OSD. 12 The following section is an outline of the available adjustments and selections you with the On Screen Display Control system. To make using the OSD. On Screen Display (OSD) Control Adjustment Screen Adjustment Making adjustments...

Owners Manual
Page 14
...(Analog signal) input DVI-D : DVI-D(Digital signal) input Main menu PICTURE Sub-menu BRIGHTNESS CONTRAST SHARPNESS Supported input Description DSUB DVI-D To adjust the brightness, contrast and sharpness of the screen COLOR DISPLAY COLOR TEMP (PRESET / USER) GAMMA HORIZONTAL VERTICAL CLOCK PHASE DSUB DVI-D To customize the color of the screen DSUB DSUB To adjust the position of the screen To improve the clarity and stability of the screen OTHERS LANGUAGE POWER INDICATOR WHITE BALANCE FACTORY RESET DSUB DVI-D DSUB DSUB DVI-D To customize the screen status for a user's operating...
...(Analog signal) input DVI-D : DVI-D(Digital signal) input Main menu PICTURE Sub-menu BRIGHTNESS CONTRAST SHARPNESS Supported input Description DSUB DVI-D To adjust the brightness, contrast and sharpness of the screen COLOR DISPLAY COLOR TEMP (PRESET / USER) GAMMA HORIZONTAL VERTICAL CLOCK PHASE DSUB DVI-D To customize the color of the screen DSUB DSUB To adjust the position of the screen To improve the clarity and stability of the screen OTHERS LANGUAGE POWER INDICATOR WHITE BALANCE FACTORY RESET DSUB DVI-D DSUB DSUB DVI-D To customize the screen status for a user's operating...

Owners Manual
Page 16
... green color levels. GREEN Set your own red color levels. GAMMA Set your own blue color levels. BLUE Set your own gamma value. : 0 / 1 / 2 On the monitor, high gamma values display whitish images and low gamma values display blackish images. 15 Exit : Exit : Decrease : Increase : Select another sub-menu : Restart to select sub-menu COLOR TEMP PRESET Exit : Exit : Decrease : Increase USER : Select another sub-menu : Restart to select sub-menu Select the screen color...
... green color levels. GREEN Set your own red color levels. GAMMA Set your own blue color levels. BLUE Set your own gamma value. : 0 / 1 / 2 On the monitor, high gamma values display whitish images and low gamma values display blackish images. 15 Exit : Exit : Decrease : Increase : Select another sub-menu : Restart to select sub-menu COLOR TEMP PRESET Exit : Exit : Decrease : Increase USER : Select another sub-menu : Restart to select sub-menu Select the screen color...

Owners Manual
Page 18
... the video card in the screen. If necessary, execute the WHITE BALANCE function again. On Screen Display(OSD) Selection and Adjustment Main menu Sub menu Description LANGUAGE POWER INDICATOR Exit : Exit : Decrease : Increase WHITE BALANCE : Select another sub-menu : Restart to select sub-menu FACTORY RESET To choose the language in which the control names are present in order to provide the optimal image. Use this does not improve the screen image, restore the factory default settings.
... the video card in the screen. If necessary, execute the WHITE BALANCE function again. On Screen Display(OSD) Selection and Adjustment Main menu Sub menu Description LANGUAGE POWER INDICATOR Exit : Exit : Decrease : Increase WHITE BALANCE : Select another sub-menu : Restart to select sub-menu FACTORY RESET To choose the language in which the control names are present in order to provide the optimal image. Use this does not improve the screen image, restore the factory default settings.

Owners Manual
Page 21
On Screen Display(OSD) Selection and Adjustment (Only E2210P) Main menu Sub menu Description WIDE Switch to full screen mode according to original. * This function works only if input resolution is lower than monitor ratio (16:10). Exit : Exit , : Move : Select another sub-menu 20 ORIGINAL Change the input image signal ratio to input image signal.
On Screen Display(OSD) Selection and Adjustment (Only E2210P) Main menu Sub menu Description WIDE Switch to full screen mode according to original. * This function works only if input resolution is lower than monitor ratio (16:10). Exit : Exit , : Move : Select another sub-menu 20 ORIGINAL Change the input image signal ratio to input image signal.

Owners Manual
Page 24
... current control settings, so that they cannot be inadvertently changed. frequency range of horizontal or vertical the screen? G Do you push MENU button? • You can unlock the OSD controls at any key on PC (video card) is connected display connected? G Do you see a "CHECK SIGNAL CABLE" message on ? No image appears G Is the power cord of this manual and configure your display is in power saving mode, try again. Do you see if the power cord is out of the display. Troubleshooting Check...
... current control settings, so that they cannot be inadvertently changed. frequency range of horizontal or vertical the screen? G Do you push MENU button? • You can unlock the OSD controls at any key on PC (video card) is connected display connected? G Do you see a "CHECK SIGNAL CABLE" message on ? No image appears G Is the power cord of this manual and configure your display is in power saving mode, try again. Do you see if the power cord is out of the display. Troubleshooting Check...

Owners Manual
Page 25
... setting. IMPORTANT Check Control Panel --> Display --> Settings and see if the frequency or the resolution were changed. If the recommended resolution (optimal resolution) is incorrect. • Press the AUTO button to automatically adjust your display image to the ideal setting. In this case, please ask to the recommend resolution. If yes, readjust the video card to the computer or the video card manufacturer. 24 If the results are unsatisfactory, decrease the horizontal bars using the H position...
... setting. IMPORTANT Check Control Panel --> Display --> Settings and see if the frequency or the resolution were changed. If the recommended resolution (optimal resolution) is incorrect. • Press the AUTO button to automatically adjust your display image to the ideal setting. In this case, please ask to the recommend resolution. If yes, readjust the video card to the computer or the video card manufacturer. 24 If the results are unsatisfactory, decrease the horizontal bars using the H position...

Owners Manual
Page 26
... "Unrecognized monitor, Plug&Play (VESA DDC) monitor found" message? Do you installed the display driver? • Be sure to fasten if necessary. • Make sure the video card is properly inserted in the slot. • Set the color setting higher than 24 bits (true color) at Control Panel - Troubleshooting Display image is incorrect G The screen color is mono or abnormal. • Check if the signal cable is properly connected and use a screwdriver to install the display driver from our...
... "Unrecognized monitor, Plug&Play (VESA DDC) monitor found" message? Do you installed the display driver? • Be sure to fasten if necessary. • Make sure the video card is properly inserted in the slot. • Set the color setting higher than 24 bits (true color) at Control Panel - Troubleshooting Display image is incorrect G The screen color is mono or abnormal. • Check if the signal cable is properly connected and use a screwdriver to install the display driver from our...

Owners Manual
Page 27
... (Automatic) Separate Sync. Digital Video Input Signal Input Input Form 15 pin D-Sub Connector DVI-D Connector (Digital) RGB Analog (0.7 Vp-p/ 75 ohm), Digital Resolution Max Recommend VESA 1280 x 1024 @75 Hz VESA 1280 x 1024 @60 Hz Plug&Play DDC 2B(Digital),DDC2AB(Anlaog) Power Consumption On Mode Sleep Mode Off Mode : 25 W(Typ.) ≤ 0.2 W ≤ 0.15 W Dimensions & Weight With Stand Without Stand Width 40.89 cm ( 16.10 inch) Width 40.89 cm ( 16.10 inch) Height 37.08...
... (Automatic) Separate Sync. Digital Video Input Signal Input Input Form 15 pin D-Sub Connector DVI-D Connector (Digital) RGB Analog (0.7 Vp-p/ 75 ohm), Digital Resolution Max Recommend VESA 1280 x 1024 @75 Hz VESA 1280 x 1024 @60 Hz Plug&Play DDC 2B(Digital),DDC2AB(Anlaog) Power Consumption On Mode Sleep Mode Off Mode : 25 W(Typ.) ≤ 0.2 W ≤ 0.15 W Dimensions & Weight With Stand Without Stand Width 40.89 cm ( 16.10 inch) Width 40.89 cm ( 16.10 inch) Height 37.08...

Owners Manual
Page 28
... (Automatic) Separate Sync. Digital 15 pin D-Sub Connector DVI-D Connector (Digital) RGB Analog (0.7 Vp-p/ 75 ohm), Digital Resolution Plug&Play Max Recommend VESA 1680 x 1050 @60 Hz VESA 1680 x 1050 @60 Hz DDC 2B(Digital),DDC2AB(Anlaog) Power Consumption Dimensions & Weight On Mode Sleep Mode Off Mode : 28 W(Typ.) ≤ 0.2 W ≤ 0.15 W With Stand Without Stand Width 50.64 cm ( 19.94 inch) Width 50.64 cm ( 19.94 inch) Height 36.89 cm...
... (Automatic) Separate Sync. Digital 15 pin D-Sub Connector DVI-D Connector (Digital) RGB Analog (0.7 Vp-p/ 75 ohm), Digital Resolution Plug&Play Max Recommend VESA 1680 x 1050 @60 Hz VESA 1680 x 1050 @60 Hz DDC 2B(Digital),DDC2AB(Anlaog) Power Consumption Dimensions & Weight On Mode Sleep Mode Off Mode : 28 W(Typ.) ≤ 0.2 W ≤ 0.15 W With Stand Without Stand Width 50.64 cm ( 19.94 inch) Width 50.64 cm ( 19.94 inch) Height 36.89 cm...
Owners Manual
Page 29
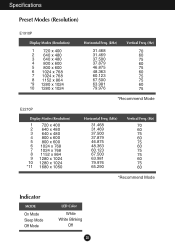
... 75 60 75 75 60 75 *Recommend Mode Horizontal Freq. (kHz) 31.468 31.469 37.500 37.879 46.875 48.363 60.123 67.500 63.981 79.976 65.290 Vertical Freq. (Hz) 70 60 75 60 75 60 75 75 60 75 60 *Recommend Mode Indicator MODE On Mode Sleep Mode Off Mode LED Color White White Blinking Off 28
... 75 60 75 75 60 75 *Recommend Mode Horizontal Freq. (kHz) 31.468 31.469 37.500 37.879 46.875 48.363 60.123 67.500 63.981 79.976 65.290 Vertical Freq. (Hz) 70 60 75 60 75 60 75 75 60 75 60 *Recommend Mode Indicator MODE On Mode Sleep Mode Off Mode LED Color White White Blinking Off 28

Owners Manual
Page 31
... is stand-type or wall mount type and is purchased. Kensington Security Slot Connected to the installation guide for more details, which is provided when Wall mount plate is connectable with respect to screw mounting interface dimensions and mounting screw specifications Please use VESA standard wall mount pad and screws. 30 Wall Mount Pad Thickness : 2.6 mm - Screw : 4.0 mm x Pitch 0.7 mm x Length 10 mm * 787.4 mm and above (31.0 inch) - Please refer to a locking cable that...
... is stand-type or wall mount type and is purchased. Kensington Security Slot Connected to the installation guide for more details, which is provided when Wall mount plate is connectable with respect to screw mounting interface dimensions and mounting screw specifications Please use VESA standard wall mount pad and screws. 30 Wall Mount Pad Thickness : 2.6 mm - Screw : 4.0 mm x Pitch 0.7 mm x Length 10 mm * 787.4 mm and above (31.0 inch) - Please refer to a locking cable that...

Owners Manual
Page 32
Record it below should you ever need service. A.,Inc. has determined that this product meets the ENERGY STAR guidelines for furture reference. Keep the OWNER'S MANUAL(CD) in an accessible place for energy efficiency. The model and serial number of the SET is a set of the SET. Make sure to read the Safety Precautions before using the product. MODEL SERIAL ENERGY STAR is located on the back or one side of power-saving guidelines issued by the U.S.Environmental Protection Agency(EPA). S. As an ENERGY STAR Partner LGE U.
Record it below should you ever need service. A.,Inc. has determined that this product meets the ENERGY STAR guidelines for furture reference. Keep the OWNER'S MANUAL(CD) in an accessible place for energy efficiency. The model and serial number of the SET is a set of the SET. Make sure to read the Safety Precautions before using the product. MODEL SERIAL ENERGY STAR is located on the back or one side of power-saving guidelines issued by the U.S.Environmental Protection Agency(EPA). S. As an ENERGY STAR Partner LGE U.


