User Guide
Page 5
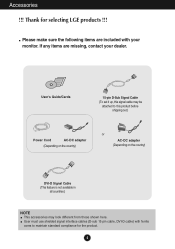
... not available in all countries.) NOTE This accessories may look different from those shown here. Please make sure the following items are missing, contact your monitor.
... not available in all countries.) NOTE This accessories may look different from those shown here. Please make sure the following items are missing, contact your monitor.

User Guide
Page 6
... the items shown in the picture. The product may differ from the stand base, use a coin to turn the screw clockwise to the monitor, the computer system, and other attached devices is turned off. 1. Important This illustration depicts the general model of the stand base and turn the... screw counterclockwise. Once assembled take the monitor up the monitor, ensure that the power to tighten. 3. Do not carry the product upside down holding only the stand base. Place the...
... the items shown in the picture. The product may differ from the stand base, use a coin to turn the screw clockwise to the monitor, the computer system, and other attached devices is turned off. 1. Important This illustration depicts the general model of the stand base and turn the... screw counterclockwise. Once assembled take the monitor up the monitor, ensure that the power to tighten. 3. Do not carry the product upside down holding only the stand base. Place the...

User Guide
Page 7
... in between the head of the panel in order to maintain an ergonomic and comfortable viewing position, the forward tilt angle of the monitor. Tilt Range : -5˚ to the monitor, the computer system, and other attached devices is turned off. ERGONOMIC It is recommended that the power to 15˚ Do not... touch or press the screen when adjusting the angle of the monitor should not exceed 5 degrees. 6 You can hurt your display -After installation, adjust the angle as shown below. 1. Positioning your finger(s).
... in between the head of the panel in order to maintain an ergonomic and comfortable viewing position, the forward tilt angle of the monitor. Tilt Range : -5˚ to the monitor, the computer system, and other attached devices is turned off. ERGONOMIC It is recommended that the power to 15˚ Do not... touch or press the screen when adjusting the angle of the monitor should not exceed 5 degrees. 6 You can hurt your display -After installation, adjust the angle as shown below. 1. Positioning your finger(s).

User Guide
Page 8
... blurred letters, screen flicker or tilted screen while using a D-Sub signal input cable connector for individual input signals. 'AUTO' Function? When monitor power is turned on, the 'Self Image Setting Function' is turned off. 2. A Connect DVI-D(Digital signal) Cable B Connect D-sub...row connector. This function provides the user with the PC 1. Connecting the Display E1940T/E2040T/E2240T/E2340T Connecting with optimal display settings.When the user connects the monitor for the first time, this function automatically adjusts the display to optimal settings for Macintosh Varies...
... blurred letters, screen flicker or tilted screen while using a D-Sub signal input cable connector for individual input signals. 'AUTO' Function? When monitor power is turned on, the 'Self Image Setting Function' is turned off. 2. A Connect DVI-D(Digital signal) Cable B Connect D-sub...row connector. This function provides the user with the PC 1. Connecting the Display E1940T/E2040T/E2240T/E2340T Connecting with optimal display settings.When the user connects the monitor for the first time, this function automatically adjusts the display to optimal settings for Macintosh Varies...

User Guide
Page 9
...a general model; Mac adapter : For Apple Macintosh use, a separate plug adapter is turned off. 2. Before setting up the monitor, ensure that the power to the monitor, the computer system, and other attached devices is needed to change the 15 pin high density (3 row) D-sub VGA connector ...input cable connector for individual input signals. 'AUTO' Function? A Connect D-sub(Analog signal) Cable NOTE This is executed automatically. When monitor power is turned on . Connecting the Display E1940S/E2040S/E2240S/E2340S Connecting with optimal display settings.When the user connects the...
...a general model; Mac adapter : For Apple Macintosh use, a separate plug adapter is turned off. 2. Before setting up the monitor, ensure that the power to the monitor, the computer system, and other attached devices is needed to change the 15 pin high density (3 row) D-sub VGA connector ...input cable connector for individual input signals. 'AUTO' Function? A Connect D-sub(Analog signal) Cable NOTE This is executed automatically. When monitor power is turned on . Connecting the Display E1940S/E2040S/E2240S/E2340S Connecting with optimal display settings.When the user connects the...

User Guide
Page 17
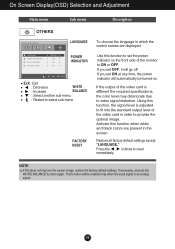
Listed below are the icons, icon names, and icon descriptions of the all items shown on the monitor may differ from the manual. 16 On Screen Display(OSD) Selection and Adjustment You were introduced to select sub-menu Button Tip NOTE OSD (On Screen Display) menu languages on the Menu. Menu Name Icons Submenus Exit Adjust (Decrease/Increase) Select another sub-menu Restart to the procedure of the OSD appears. E1940T/E2040T/E2240T/E2340T E1940S/E2040S/E2240S/E2340S Press the MENU Button, then the main menu of selecting and adjusting an item using the OSD system.
Listed below are the icons, icon names, and icon descriptions of the all items shown on the monitor may differ from the manual. 16 On Screen Display(OSD) Selection and Adjustment You were introduced to select sub-menu Button Tip NOTE OSD (On Screen Display) menu languages on the Menu. Menu Name Icons Submenus Exit Adjust (Decrease/Increase) Select another sub-menu Restart to the procedure of the OSD appears. E1940T/E2040T/E2240T/E2340T E1940S/E2040S/E2240S/E2340S Press the MENU Button, then the main menu of selecting and adjusting an item using the OSD system.

User Guide
Page 18
...: Slightly bluish white. Set your own green color levels. CONTRAST To adjust the contrast of the screen. GREEN Set your own gamma value. : 0 / 1 / 2 On the monitor, high gamma values display whitish images and low gamma values display blackish images. 17
...: Slightly bluish white. Set your own green color levels. CONTRAST To adjust the contrast of the screen. GREEN Set your own gamma value. : 0 / 1 / 2 On the monitor, high gamma values display whitish images and low gamma values display blackish images. 17
User Guide
Page 20
... is adjusted to video signal distortion. This function will go off. If you set OFF, it will be turned on the front side of the monitor to reset immediately.
... is adjusted to video signal distortion. This function will go off. If you set OFF, it will be turned on the front side of the monitor to reset immediately.

User Guide
Page 21
E1940T/E2040T/E2240T/E2340T E1940S/E2040S/E2240S/E2340S Press the MODE Button, then the main menu of selecting and adjusting an item using the OSD system. Menu Name Icons Submenus Exit Move Select another sub-menu Restart to the procedure of the OSD appears. On Screen Display(OSD) Selection and Adjustment You were introduced to select sub-menu Button Tip NOTE OSD (On Screen Display) menu languages on the Menu. Listed below are the icons, icon names, and icon descriptions of the all items shown on the monitor may differ from the manual. 20
E1940T/E2040T/E2240T/E2340T E1940S/E2040S/E2240S/E2340S Press the MODE Button, then the main menu of selecting and adjusting an item using the OSD system. Menu Name Icons Submenus Exit Move Select another sub-menu Restart to the procedure of the OSD appears. On Screen Display(OSD) Selection and Adjustment You were introduced to select sub-menu Button Tip NOTE OSD (On Screen Display) menu languages on the Menu. Listed below are the icons, icon names, and icon descriptions of the all items shown on the monitor may differ from the manual. 20

User Guide
Page 23
On Screen Display(OSD) Selection and Adjustment Main menu Sub menu Description WIDE Switch to full screen mode according to select sub-menu 22 Exit : Exit , : Move : Restart to input image signal. ORIGINAL Change the input image signal ratio to original. * This function works only if input resolution is lower than monitor ratio (16:9).
On Screen Display(OSD) Selection and Adjustment Main menu Sub menu Description WIDE Switch to full screen mode according to select sub-menu 22 Exit : Exit , : Move : Restart to input image signal. ORIGINAL Change the input image signal ratio to original. * This function works only if input resolution is lower than monitor ratio (16:9).

User Guide
Page 27
Or, you can also download the driver from the display driver CD (or diskette) that comes with your display. G Have you see an "Unrecognized monitor, Plug&Play (VESA DDC) monitor found" message? Do you installed the display driver? • Be sure to install the display driver from our web site: http://www.lge...
Or, you can also download the driver from the display driver CD (or diskette) that comes with your display. G Have you see an "Unrecognized monitor, Plug&Play (VESA DDC) monitor found" message? Do you installed the display driver? • Be sure to install the display driver from our web site: http://www.lge...


