

Owner's Manual
Page 2
...and, if not installed and used in a particular installation. Marketed and Distributed in a residential installation. L20V54S SERIAL NO CAUTION RISK OF ELECTRIC SHOCK DO NOT OPEN CAUTION: TO REDUCE THE RISK OF ELECTRIC SHOCK...to try to the point of the cable entry as practical. The lightning flash with the instruction manual, may be determined by turning the equipment off and on, the user is intended to alert...15 of the building, as close to correct the interference by LG Electronics U.S.A., Inc. 2000 Millbrook Drive, Lincolnshire, IL 60069. THIS PRODUCT MUST BE USED WITH UL ...
...and, if not installed and used in a particular installation. Marketed and Distributed in a residential installation. L20V54S SERIAL NO CAUTION RISK OF ELECTRIC SHOCK DO NOT OPEN CAUTION: TO REDUCE THE RISK OF ELECTRIC SHOCK...to try to the point of the cable entry as practical. The lightning flash with the instruction manual, may be determined by turning the equipment off and on, the user is intended to alert...15 of the building, as close to correct the interference by LG Electronics U.S.A., Inc. 2000 Millbrook Drive, Lincolnshire, IL 60069. THIS PRODUCT MUST BE USED WITH UL ...
Owner's Manual
Page 3
... MANUFACTURED AND TESTED WITH YOUR SAFETY IN MIND. If the TV feels cold to the touch, there may be used if the cord is : LG Electronics U.S.A., Inc., 2000 Millbrook Drive Lincolnshire, IL 60069, USA. Avoid touching the LCD screen or holding your finger(s) against it may be used...PERSONNEL ONLY. This product should only be placed on the screen. The plug must remain readily operable. OBSERVING THE SIMPLE PRECAUTIONS DISCUSSED IN THIS MANUAL CAN HELP YOU GET MANY YEARS OF ENJOYMENT AND SAFE OPERATION THAT ARE BUILT INTO YOUR NEW PRODUCT. PAGE 3 Some minute dot defects ...
... MANUFACTURED AND TESTED WITH YOUR SAFETY IN MIND. If the TV feels cold to the touch, there may be used if the cord is : LG Electronics U.S.A., Inc., 2000 Millbrook Drive Lincolnshire, IL 60069, USA. Avoid touching the LCD screen or holding your finger(s) against it may be used...PERSONNEL ONLY. This product should only be placed on the screen. The plug must remain readily operable. OBSERVING THE SIMPLE PRECAUTIONS DISCUSSED IN THIS MANUAL CAN HELP YOU GET MANY YEARS OF ENJOYMENT AND SAFE OPERATION THAT ARE BUILT INTO YOUR NEW PRODUCT. PAGE 3 Some minute dot defects ...

Owner's Manual
Page 5
...Programmer Learning Setup 43 Cloning Connections/Teaching Setup 44 Installer Menu 45-50 Reference 50-53 L20V54S Aux Input Configuration/Troubleshooting . . . .54 Troubleshooting 55 Reference: Cloning Procedure Troubleshooting ...Step 1. both the User and Installer remotes can be purchased separately, see your Zenith/LG dealer if you need an installer's remote and the LT2002 Quickset II Clone Programmer -... install it on the Setup menu. However, both are shown and described in the Manual Channel Set options on another identical TV. *Note: Design and specifications are subject to...
...Programmer Learning Setup 43 Cloning Connections/Teaching Setup 44 Installer Menu 45-50 Reference 50-53 L20V54S Aux Input Configuration/Troubleshooting . . . .54 Troubleshooting 55 Reference: Cloning Procedure Troubleshooting ...Step 1. both the User and Installer remotes can be purchased separately, see your Zenith/LG dealer if you need an installer's remote and the LT2002 Quickset II Clone Programmer -... install it on the Setup menu. However, both are shown and described in the Manual Channel Set options on another identical TV. *Note: Design and specifications are subject to...
Owner's Manual
Page 16
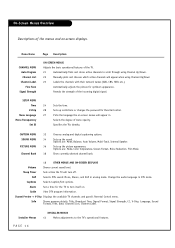
Menu Language 27 Picks the language the on-screen menus will appear when using Channel Up/Down. 22 Manually picks and chooses which active channels will appear in. Set ID Specifies the TVs identity CAPTION MENU 32 Chooses analog and digital captioning options. SOUND ...
Menu Language 27 Picks the language the on-screen menus will appear when using Channel Up/Down. 22 Manually picks and chooses which active channels will appear in. Set ID Specifies the TVs identity CAPTION MENU 32 Chooses analog and digital captioning options. SOUND ...
Owner's Manual
Page 17
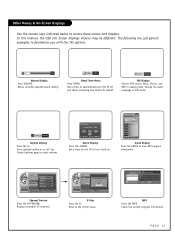
... generic examples to the V-Chip menu. Turns selected option on . Move to familiarize you with the TVs options. 19 Volume Display Press VOLUME. In this manual, the OSD (On Screen Displays shown) may be different. Change the audio language in analog mode. CURRENT GUIDE 6/23 Fri 84-1 PM 2:25 No Information...
... generic examples to the V-Chip menu. Turns selected option on . Move to familiarize you with the TVs options. 19 Volume Display Press VOLUME. In this manual, the OSD (On Screen Displays shown) may be different. Change the audio language in analog mode. CURRENT GUIDE 6/23 Fri 84-1 PM 2:25 No Information...
Owner's Manual
Page 23
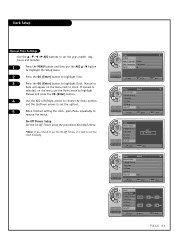
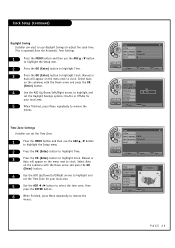
... above. *Note: If you intend to use the On-Off Timers, it is selected, on the menu next to remove the menus. If manual is best to set the options. 5 When finished setting the clock, press Menu repeatedly to clock. Setup Time V-Chip Menu Language English Menu ... ADJ D / E button to highlight the Setup menu. 2 Press the OK (Enter) button to highlight Time. 3 Press the OK (Enter) button to set the clock manually. Clock Setup Manual Time Settings - Move Menu Back PAGE 23 Use the D / E / F / G ADJ buttons to set the year, month, day, hours and minutes. 1 Press...
... above. *Note: If you intend to use the On-Off Timers, it is selected, on the menu next to remove the menus. If manual is best to set the options. 5 When finished setting the clock, press Menu repeatedly to clock. Setup Time V-Chip Menu Language English Menu ... ADJ D / E button to highlight the Setup menu. 2 Press the OK (Enter) button to highlight Time. 3 Press the OK (Enter) button to set the clock manually. Clock Setup Manual Time Settings - Move Menu Back PAGE 23 Use the D / E / F / G ADJ buttons to set the year, month, day, hours and minutes. 1 Press...

Owner's Manual
Page 24
... to clock. First two digits that are entered when setting the clock or the wake-up alarm. Manual or Auto will appear on the menu next to enter the current time when setting the clock or ... and press the OK (Enter) button. 4 Use the ADJ Up/Down/Left/Right arrows to local time manually. If you select auto time setting, time will have access to the Alarm, it may be set from the... digital broadcast information. 1 Press the MENU button and then use the Manual Clock Set mode and set the clock to set the Daylight Savings and Time Zone options for your local...
... to clock. First two digits that are entered when setting the clock or the wake-up alarm. Manual or Auto will appear on the menu next to enter the current time when setting the clock or ... and press the OK (Enter) button. 4 Use the ADJ Up/Down/Left/Right arrows to local time manually. If you select auto time setting, time will have access to the Alarm, it may be set from the... digital broadcast information. 1 Press the MENU button and then use the Manual Clock Set mode and set the clock to set the Daylight Savings and Time Zone options for your local...
Owner's Manual
Page 25
...PM Sep.11, 2006 Move OK Select G Menu Back Setup 11:20 PM Sep.11, 2006 Clock Manual Clock Daylight Saving Time Zone On Timer Off Timer Auto Off Select No Yes Menu Back Setup Time V-Chip...PM Sep.11, 2006 Move OK Select G Menu Back Setup 11:20 PM Sep.11, 2006 Clock Manual Clock Daylight Saving Time Zone On Timer Off Timer Auto Off Select Pacific Menu Back PAGE 25 Time ... to highlight Clock. Select Auto on the menu next to clock. Select Auto on the menu next to clock. Manual or Auto will appear on the submenu with the Down arrow and press the OK (Enter) button. 4 Use the...
...PM Sep.11, 2006 Move OK Select G Menu Back Setup 11:20 PM Sep.11, 2006 Clock Manual Clock Daylight Saving Time Zone On Timer Off Timer Auto Off Select No Yes Menu Back Setup Time V-Chip...PM Sep.11, 2006 Move OK Select G Menu Back Setup 11:20 PM Sep.11, 2006 Clock Manual Clock Daylight Saving Time Zone On Timer Off Timer Auto Off Select Pacific Menu Back PAGE 25 Time ... to highlight Clock. Select Auto on the menu next to clock. Select Auto on the menu next to clock. Manual or Auto will appear on the submenu with the Down arrow and press the OK (Enter) button. 4 Use the...
Owner's Manual
Page 35
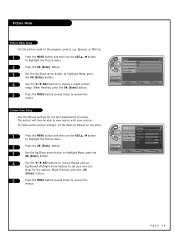
... view movies with more realism. When finished, press the OK (Enter) button. 5 Press the MENU button several times to remove the menus. Use the Manual settings for the options. To make custom picture settings, set - The patient will then be able to set your own set the Mode to...2 Press the OK (Enter) button. 3 Use the Up/Down arrow button to highlight Mode, press the OK (Enter) button. 4 Use the F / G ADJ buttons to choose Manual and use the ADJ D / E button to highlight the Picture menu. 2 Press the OK (Enter) button. 3 Use the Up/Down arrow button to highlight Mode, press...
... view movies with more realism. When finished, press the OK (Enter) button. 5 Press the MENU button several times to remove the menus. Use the Manual settings for the options. To make custom picture settings, set - The patient will then be able to set your own set the Mode to...2 Press the OK (Enter) button. 3 Use the Up/Down arrow button to highlight Mode, press the OK (Enter) button. 4 Use the F / G ADJ buttons to choose Manual and use the ADJ D / E button to highlight the Picture menu. 2 Press the OK (Enter) button. 3 Use the Up/Down arrow button to highlight Mode, press...
Owner's Manual
Page 40
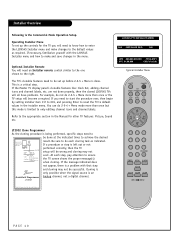
... Setup. Cloning is ¤ QuickSet II Programmer LT2002 only possible when the signal source is a critical step. are not done properly, then the cloned L20V54S TVs will need to the right. The TV's clonable features need to start the procedure over, then begin by setting installer item 117 to 001...'s clonable features like: Clock Set, adding channel icons and channel labels, etc. You can do each step, pay attention to default values in the Manual for the TV you need to be done at the indicated times to the appropriate section in the installer menu. If you will all have...
... Setup. Cloning is ¤ QuickSet II Programmer LT2002 only possible when the signal source is a critical step. are not done properly, then the cloned L20V54S TVs will need to the right. The TV's clonable features need to start the procedure over, then begin by setting installer item 117 to 001...'s clonable features like: Clock Set, adding channel icons and channel labels, etc. You can do each step, pay attention to default values in the Manual for the TV you need to be done at the indicated times to the appropriate section in the installer menu. If you will all have...
Owner's Manual
Page 52
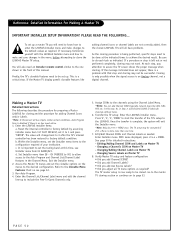
... For Making A Master TV IMPORTANT INSTALLER SETUP INFORMATION! To set the tuning band at the indicated times to be done at this manual. The value will need to achieve the desired result. Within the Installer menu, set it to the Clonable Menu Features Chart on ... you adjust all Aux inputs. Changing a Channel's ICON on Master TV - Exit the Installer menu. 2. Transfer the TV setup: Enter the L20V54S installer menu. Editing/Adding Channel ICON and Labels on the menus to include the Free-To-Guest Channels only. 5. Under certain conditions, Auto Program...
... For Making A Master TV IMPORTANT INSTALLER SETUP INFORMATION! To set the tuning band at the indicated times to be done at this manual. The value will need to achieve the desired result. Within the Installer menu, set it to the Clonable Menu Features Chart on ... you adjust all Aux inputs. Changing a Channel's ICON on Master TV - Exit the Installer menu. 2. Transfer the TV setup: Enter the L20V54S installer menu. Editing/Adding Channel ICON and Labels on the menus to include the Free-To-Guest Channels only. 5. Under certain conditions, Auto Program...


