

Owner's Manual
Page 5
...LG dealer if you need an installer's remote and the LT2002 Quickset II Clone Programmer - The installer remote has Menu, Select, and Adjust Keys. Customize the TV's Features Setup Menu Clock Setup 23-25 Menu Language 26 V-Chip 27-30 Caption Menu 31-32 Sound Menu 33-34 Picture Menu... Setup 41 Cloning Connections/Learning Setup 42 Cloning Programmer Learning Setup 43 Cloning Connections/Teaching Setup 44 Installer Menu 45-50 Reference 50-53 L20V54S Aux Input Configuration/Troubleshooting . . . .54 Troubleshooting 55 Reference: Cloning Procedure Troubleshooting 56 Troubleshooting Flow...
...LG dealer if you need an installer's remote and the LT2002 Quickset II Clone Programmer - The installer remote has Menu, Select, and Adjust Keys. Customize the TV's Features Setup Menu Clock Setup 23-25 Menu Language 26 V-Chip 27-30 Caption Menu 31-32 Sound Menu 33-34 Picture Menu... Setup 41 Cloning Connections/Learning Setup 42 Cloning Programmer Learning Setup 43 Cloning Connections/Teaching Setup 44 Installer Menu 45-50 Reference 50-53 L20V54S Aux Input Configuration/Troubleshooting . . . .54 Troubleshooting 55 Reference: Cloning Procedure Troubleshooting 56 Troubleshooting Flow...

Owner's Manual
Page 6
...the front panel? See page 5, Table of features available on the stand following the instructions supplied with the TV.) Yes___ No___ End-User Menu Access Will the end-user have access to Operation The LCD TV/Monitor must for the LCD TV/Monitor, TV stand or mount. ...• Determine mounting and installation requirements. See page 14. Review TV Setup Options in the Installer's Menu Section The Installer's menu includes a number of Contents, for Cloning Overview • Set up Installer's remote control, see page 19. • Do a Channel Search...
...the front panel? See page 5, Table of features available on the stand following the instructions supplied with the TV.) Yes___ No___ End-User Menu Access Will the end-user have access to Operation The LCD TV/Monitor must for the LCD TV/Monitor, TV stand or mount. ...• Determine mounting and installation requirements. See page 14. Review TV Setup Options in the Installer's Menu Section The Installer's menu includes a number of Contents, for Cloning Overview • Set up Installer's remote control, see page 19. • Do a Channel Search...
Owner's Manual
Page 13
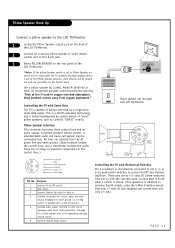
... of the LCD TV/Monitor. 2 Connect an accessory pillow speaker or wired remote control unit to this 6-pin jack. 3 Select PILLOW SPEAKER on the Sound menu. Impedance to previous Zenith models using the 5-Wire Interface except that only +7 volts DC was supplied and current draw was only 2.5 mA.) PAGE 13 Use...
... of the LCD TV/Monitor. 2 Connect an accessory pillow speaker or wired remote control unit to this 6-pin jack. 3 Select PILLOW SPEAKER on the Sound menu. Impedance to previous Zenith models using the 5-Wire Interface except that only +7 volts DC was supplied and current draw was only 2.5 mA.) PAGE 13 Use...
Owner's Manual
Page 15
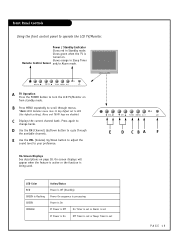
... to scroll through the available channels. D Use the CH (Channel) Up/Down button to 000 (the default setting), Menu and TV/AV keys are disabled. Front Panel Controls Using the front control panel to change banks. C Displays the current channel bank. E Use the VOL (... set or Alarm is set If Power is On Off Timer is set or Sleep Timer is set to cycle through menus. *Note: With Installer menu item 11 Key Defeat set PAGE 15 Power / Standby Indicator Glows red in Sleep Timer Remote Control Sensor and/or Alarm mode. Glows orange in...
... to scroll through the available channels. D Use the CH (Channel) Up/Down button to 000 (the default setting), Menu and TV/AV keys are disabled. Front Panel Controls Using the front control panel to change banks. C Displays the current channel bank. E Use the VOL (... set or Alarm is set If Power is On Off Timer is set or Sleep Timer is set to cycle through menus. *Note: With Installer menu item 11 Key Defeat set PAGE 15 Power / Standby Indicator Glows red in Sleep Timer Remote Control Sensor and/or Alarm mode. Glows orange in...
Owner's Manual
Page 16
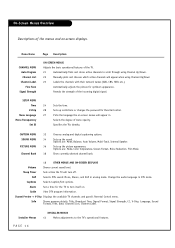
...Channel List Channel Label Fine Tune Signal Strength ON-SCREEN MENUS Adjusts the basic operational features of the menus and on-screen displays. SETUP MENU Time 24 Sets the time. V-Chip 28 Sets up restrictions or changes the password for optimum appearance. Options are : Mode, Color ...18 OTHER MENUS AND ON-SCREEN DISPLAYS Volume Shows current sound level. Automatically adjusts the picture for Parental Control. Reveals the strength of menu opacity. Sleep Timer Sets a time the TV will appear when using Channel Up/Down. 22 Manually picks and chooses which active channels ...
...Channel List Channel Label Fine Tune Signal Strength ON-SCREEN MENUS Adjusts the basic operational features of the menus and on-screen displays. SETUP MENU Time 24 Sets the time. V-Chip 28 Sets up restrictions or changes the password for optimum appearance. Options are : Mode, Color ...18 OTHER MENUS AND ON-SCREEN DISPLAYS Volume Shows current sound level. Automatically adjusts the picture for Parental Control. Reveals the strength of menu opacity. Sleep Timer Sets a time the TV will appear when using Channel Up/Down. 22 Manually picks and chooses which active channels ...
Owner's Manual
Page 17
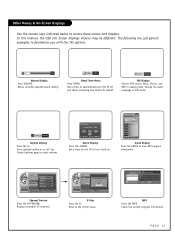
...Screen Displays Use the remote keys indicated below to select options. Shows currently selected sound setting. 12 9 3 TIMER Off 6 Sleep Timer Menu Press TIMER. Off Adjust Min. See Closed Captions page to access these menus and displays. OK Exit Alarm Display Press the ALARM. In ...Move Hr. CURRENT GUIDE 6/23 Fri 84-1 PM 2:25 No Information No Information Guide Display Press the GUIDE to the V-Chip menu. Setup Time V-Chip Menu Language Menu Transparency Set ID 0 ~ 9 Number Enter your PIN. ---CC EXIT V-Chip Press the CC. Move to view DTV program ...
...Screen Displays Use the remote keys indicated below to select options. Shows currently selected sound setting. 12 9 3 TIMER Off 6 Sleep Timer Menu Press TIMER. Off Adjust Min. See Closed Captions page to access these menus and displays. OK Exit Alarm Display Press the ALARM. In ...Move Hr. CURRENT GUIDE 6/23 Fri 84-1 PM 2:25 No Information No Information Guide Display Press the GUIDE to the V-Chip menu. Setup Time V-Chip Menu Language Menu Transparency Set ID 0 ~ 9 Number Enter your PIN. ---CC EXIT V-Chip Press the CC. Move to view DTV program ...
Owner's Manual
Page 18
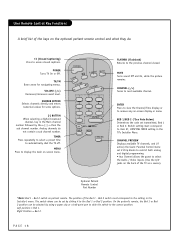
...On the patient's remote, the Bed 1 or Bed 2 position can be selected by the-> [-] -> then the sub channel number. Left position = Bed 1. MENU Press to remove any on the optional patient remote control and what they do not contain a sub channel number. Analog channels do . FLASHBK (Flashback) Returns... shut the TV off. Optional Patient Remote Control Part Number *Note: Bed 1 - Bed 2 switch must correspond to the setting in the Installer's menu. The switch above can be set by sliding it to the Bed 1 or Bed 2 position. POWER Turns TV On or Off. VOLUME (-/+) Decreases...
...On the patient's remote, the Bed 1 or Bed 2 position can be selected by the-> [-] -> then the sub channel number. Left position = Bed 1. MENU Press to remove any on the optional patient remote control and what they do not contain a sub channel number. Analog channels do . FLASHBK (Flashback) Returns... shut the TV off. Optional Patient Remote Control Part Number *Note: Bed 1 - Bed 2 switch must correspond to the setting in the Installer's menu. The switch above can be set by sliding it to the Bed 1 or Bed 2 position. POWER Turns TV On or Off. VOLUME (-/+) Decreases...
Owner's Manual
Page 19
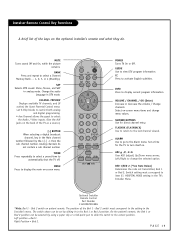
...Control Part Number 3140OSKZ003AR6 *Note: Bed 1 - Left position = Bed 1. PAGE 19 ADJ D / E, F / G User ADJ (adjust) Up/Down menu arrows, Left/Right to the Alarm menu. On the patient's remote, the Bed 1 or Bed 2 position can be selected by sliding it to item 27, HOSPITAL MODE setting in... jacks on the optional installer's remote and what they do not contain a sub channel number. Bed 2 switch on -screen menu. Select on . ALARM Use to go to change menu values. BED 1/BED 2 (*See Note Below) Determines the code set V-Chip blocks to restrict both analog and digital programming. ...
...Control Part Number 3140OSKZ003AR6 *Note: Bed 1 - Left position = Bed 1. PAGE 19 ADJ D / E, F / G User ADJ (adjust) Up/Down menu arrows, Left/Right to the Alarm menu. On the patient's remote, the Bed 1 or Bed 2 position can be selected by sliding it to item 27, HOSPITAL MODE setting in... jacks on the optional installer's remote and what they do not contain a sub channel number. Bed 2 switch on -screen menu. Select on . ALARM Use to go to change menu values. BED 1/BED 2 (*See Note Below) Determines the code set V-Chip blocks to restrict both analog and digital programming. ...
Owner's Manual
Page 20
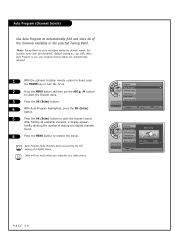
.... Channel Antenna Auto Program Channel Label Channel List Fine Tune Signal Strength Move OK Select G Menu Back Channel Antenna Auto Program Channel Label Channel List Fine Tune Signal Strength Menu Back Searching ... ANALOG34 added 30 PAGE 20 Auto Program (Channel Search) Use Auto Program to... the number of the channels available in hand, press the POWER key to turn the TV on. 2 Press the MENU button and then use the ADJ D / E button to select the Channel menu. 3 Press the OK (Enter) button. 4 With Auto Program highlighted, press the OK (Enter) button. 5 ...
.... Channel Antenna Auto Program Channel Label Channel List Fine Tune Signal Strength Move OK Select G Menu Back Channel Antenna Auto Program Channel Label Channel List Fine Tune Signal Strength Menu Back Searching ... ANALOG34 added 30 PAGE 20 Auto Program (Channel Search) Use Auto Program to... the number of the channels available in hand, press the POWER key to turn the TV on. 2 Press the MENU button and then use the ADJ D / E button to select the Channel menu. 3 Press the OK (Enter) button. 4 With Auto Program highlighted, press the OK (Enter) button. 5 ...
Owner's Manual
Page 21
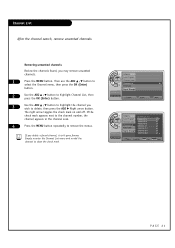
...re-add the channel to remove the menus. Channel Antenna Auto Program Channel Label Channel List Fine Tune Signal Strength Move OK Select G Menu Back Channel Antenna Channel List (1/1) Add Auto Program ANALOG 14 Channel Label Channel List Fine Tune ANALOG 15 ANALOG 16 DIGITAL 7-1 DIGITAL 11...-1 Signal Strength DIGITAL 84-1 DIGITAL 88-1 Move Add/Del OK View Menu Back PAGE 21 The right arrow toggles the check mark on and off. Removing unwanted channels Review the channels found channel, it isn't gone ...
...re-add the channel to remove the menus. Channel Antenna Auto Program Channel Label Channel List Fine Tune Signal Strength Move OK Select G Menu Back Channel Antenna Channel List (1/1) Add Auto Program ANALOG 14 Channel Label Channel List Fine Tune ANALOG 15 ANALOG 16 DIGITAL 7-1 DIGITAL 11...-1 Signal Strength DIGITAL 84-1 DIGITAL 88-1 Move Add/Del OK View Menu Back PAGE 21 The right arrow toggles the check mark on and off. Removing unwanted channels Review the channels found channel, it isn't gone ...

Owner's Manual
Page 22
...option highlighted, use the ADJ D / E button to existing channels, then re-run Auto Program, the labels will all be deleted. Move OK Select G Menu Back PAGE 22 Press the OK (Enter) button. 2 Use the ADJ D / E button to scroll through the available channel labels, such as, A&E, ... Strength --. -- ---- Channel Labels Setup Channel Labels help the user identify the channel or network being viewed. Operating the Channel Label Menu 1 Press the MENU button and then use the ADJ Left/Right arrow to highlight Channel Labels, then press the OK (Enter) button. Channel Labels Setup...
...option highlighted, use the ADJ D / E button to existing channels, then re-run Auto Program, the labels will all be deleted. Move OK Select G Menu Back PAGE 22 Press the OK (Enter) button. 2 Use the ADJ D / E button to scroll through the available channel labels, such as, A&E, ... Strength --. -- ---- Channel Labels Setup Channel Labels help the user identify the channel or network being viewed. Operating the Channel Label Menu 1 Press the MENU button and then use the ADJ Left/Right arrow to highlight Channel Labels, then press the OK (Enter) button. Channel Labels Setup...
Owner's Manual
Page 23
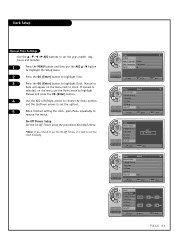
... using the procedures described above. *Note: If you intend to use the On-Off Timers, it is selected, on the menu next to set the options. 5 When finished setting the clock, press Menu repeatedly to highlight Clock. Use the D / E / F / G ADJ buttons to set the year, month, day,... to remove the menus. Clock Setup Manual Time Settings - Move Menu Back PAGE 23 If manual is best to clock. Setup Time V-Chip Menu Language English Menu Transparency Transparent Set ID 96 Move OK Select G Menu Back Setup Clock Manual Clock Daylight Saving Time Zone On Timer Off...
... using the procedures described above. *Note: If you intend to use the On-Off Timers, it is selected, on the menu next to set the options. 5 When finished setting the clock, press Menu repeatedly to highlight Clock. Use the D / E / F / G ADJ buttons to set the year, month, day,... to remove the menus. Clock Setup Manual Time Settings - Move Menu Back PAGE 23 If manual is best to clock. Setup Time V-Chip Menu Language English Menu Transparency Transparent Set ID 96 Move OK Select G Menu Back Setup Clock Manual Clock Daylight Saving Time Zone On Timer Off...

Owner's Manual
Page 24
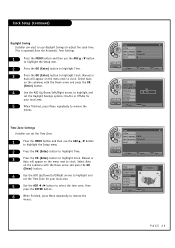
... Settings - Manual or Auto will appear on at the expected time. Caution: Some digital channels may be set from the digital broadcast information. 1 Press the MENU button and then use the Manual Clock Set mode and set the Daylight Savings and Time Zone options for your local area. If the end... user will be best to use the ADJ D / E button to highlight the Setup menu. 2 Press the OK (Enter) button to highlight Time. 3 Press the OK (Enter) button to local time manually. If you select auto time setting, time will...
... Settings - Manual or Auto will appear on at the expected time. Caution: Some digital channels may be set from the digital broadcast information. 1 Press the MENU button and then use the Manual Clock Set mode and set the Daylight Savings and Time Zone options for your local area. If the end... user will be best to use the ADJ D / E button to highlight the Setup menu. 2 Press the OK (Enter) button to highlight Time. 3 Press the OK (Enter) button to local time manually. If you select auto time setting, time will...
Owner's Manual
Page 25
... Setup 11:20 PM Sep.11, 2006 Clock Manual Clock Daylight Saving Time Zone On Timer Off Timer Auto Off Select Pacific Menu Back PAGE 25 Manual or Auto will appear on the submenu with the Down arrow and press the OK (Enter) button. 4 Use the ADJ Up/... the OK (Enter) button to highlight Time. 3 Press the OK (Enter) button to clock. This is operated from the Automatic Time Settings. 1 Press the MENU button and then use the ADJ D / E button to highlight the Setup men. 2 Press the OK (Enter) button to highlight Time. 3 Press the OK (Enter) button ...
... Setup 11:20 PM Sep.11, 2006 Clock Manual Clock Daylight Saving Time Zone On Timer Off Timer Auto Off Select Pacific Menu Back PAGE 25 Manual or Auto will appear on the submenu with the Down arrow and press the OK (Enter) button. 4 Use the ADJ Up/... the OK (Enter) button to highlight Time. 3 Press the OK (Enter) button to clock. This is operated from the Automatic Time Settings. 1 Press the MENU button and then use the ADJ D / E button to highlight the Setup men. 2 Press the OK (Enter) button to highlight Time. 3 Press the OK (Enter) button ...
Owner's Manual
Page 26
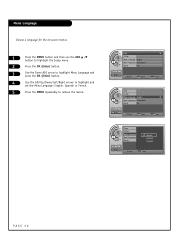
...(Enter) button. 4 Use the ADJ Up/Down/Left/Right arrows to highlight and set the Menu Language: English, Spanish or French. 5 Press the MENU repeatedly to remove the menus. Setup Time V-Chip Menu Language English Menu Transparency Transparent Set ID 96 11:20 PM Sep.11, 2006 Move OK Select... G Menu Back Setup Time V-Chip Menu Language English Menu Transparency Transparent Set ID 96 11:20 PM Sep.11, 2006 Move OK Select G Menu Back Setup Time V-Chip Menu Language Menu Transparency Set ID English Español Français 11...
...(Enter) button. 4 Use the ADJ Up/Down/Left/Right arrows to highlight and set the Menu Language: English, Spanish or French. 5 Press the MENU repeatedly to remove the menus. Setup Time V-Chip Menu Language English Menu Transparency Transparent Set ID 96 11:20 PM Sep.11, 2006 Move OK Select... G Menu Back Setup Time V-Chip Menu Language English Menu Transparency Transparent Set ID 96 11:20 PM Sep.11, 2006 Move OK Select G Menu Back Setup Time V-Chip Menu Language Menu Transparency Set ID English Español Français 11...
Owner's Manual
Page 27
...set , enter a 4-digit password (0~9) using the num- V-Chip Entering a PIN (Password) -This option sets up with the default password "0-0-0-0". 5 Press the MENU button several times to highlight V-Chip and press the OK (Enter) button. 4 If a password has been entered, key it in '7', '7', '7', '7' on ... expires. If you ever forget your PIN. ---- Setup Time V-Chip Menu Language English Menu Transparency Transparent Set ID 96 11:20 PM Sep.11, 2006 Move OK Select G Menu Back Setup Time V-Chip Menu Language Menu Transparency Set ID 11:20 PM Sep.11, 2006 0 ~ 9 Number...
...set , enter a 4-digit password (0~9) using the num- V-Chip Entering a PIN (Password) -This option sets up with the default password "0-0-0-0". 5 Press the MENU button several times to highlight V-Chip and press the OK (Enter) button. 4 If a password has been entered, key it in '7', '7', '7', '7' on ... expires. If you ever forget your PIN. ---- Setup Time V-Chip Menu Language English Menu Transparency Transparent Set ID 96 11:20 PM Sep.11, 2006 Move OK Select G Menu Back Setup Time V-Chip Menu Language Menu Transparency Set ID 11:20 PM Sep.11, 2006 0 ~ 9 Number...
Owner's Manual
Page 28
...elements in this program are specifically designed for a very young audience, including children from ages two - French Rating Move OK Select G Menu Back Setup 11:20 PM Sep.11, 2006 Changing PIN On/Off TVPG Rating MPAA Rating Can. D Dialog...sexual innuendo. TV (FCC...) Content Sub-Categories: V Violence. Setup Time V-Chip Menu Language English Menu Transparency Transparent Set ID 96 11:20 PM Sep.11, 2006 Move OK Select G Menu Back Setup Time V-Chip Menu Language Menu Transparency Set ID 11:20 PM Sep.11, 2006 0 ~ 9 Number Enter your...
...elements in this program are specifically designed for a very young audience, including children from ages two - French Rating Move OK Select G Menu Back Setup 11:20 PM Sep.11, 2006 Changing PIN On/Off TVPG Rating MPAA Rating Can. D Dialog...sexual innuendo. TV (FCC...) Content Sub-Categories: V Violence. Setup Time V-Chip Menu Language English Menu Transparency Transparent Set ID 96 11:20 PM Sep.11, 2006 Move OK Select G Menu Back Setup Time V-Chip Menu Language Menu Transparency Set ID 11:20 PM Sep.11, 2006 0 ~ 9 Number Enter your...

Owner's Manual
Page 29
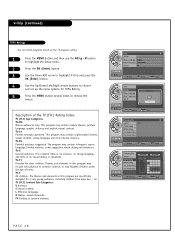
...an adult. R Restricted. No restrictions. NC-17 Not classified. French Rating Move Allow All Block All G PG PG13 R NC17 X NR OK Select Menu Back PAGE 29 Description of the MPAA and TV (FCC) Rating Codes: The MPAA Rating System (Movies) G General Audience. English Rating Can. PG ...Chip and press the OK (Enter) button. 4 Use the Up/Down/Left/Right arrows buttons to choose and set up the menu options for MPAA Rating. 5 Press the MENU button several times to remove the menus. X Adults only. • MPAA ratings: The selected rating will also be locked....
...an adult. R Restricted. No restrictions. NC-17 Not classified. French Rating Move Allow All Block All G PG PG13 R NC17 X NR OK Select Menu Back PAGE 29 Description of the MPAA and TV (FCC) Rating Codes: The MPAA Rating System (Movies) G General Audience. English Rating Can. PG ...Chip and press the OK (Enter) button. 4 Use the Up/Down/Left/Right arrows buttons to choose and set up the menu options for MPAA Rating. 5 Press the MENU button several times to remove the menus. X Adults only. • MPAA ratings: The selected rating will also be locked....
Owner's Manual
Page 30
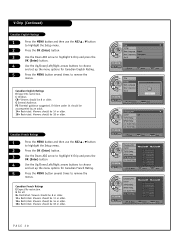
.... Canadian French Ratings E Expect No restriction. G For all 8+ Restricted. Viewers should be 18 or older. Viewers should be 8 or older. 13+ Restricted. Menu Back Setup 11:20 PM Sep.11, 2006 Changing PIN On/Off Off TVPG Rating MPAA Rating Can. French Rating Move Allow All E C C8+ G PG... 14+ 18+ OK Select Block All Menu Back Setup 11:20 PM Sep.11, 2006 Changing PIN On/Off TVPG Rating MPAA Rating Can. PG Parental guidance suggested. French Rating Move Allow...
.... Canadian French Ratings E Expect No restriction. G For all 8+ Restricted. Viewers should be 18 or older. Viewers should be 8 or older. 13+ Restricted. Menu Back Setup 11:20 PM Sep.11, 2006 Changing PIN On/Off Off TVPG Rating MPAA Rating Can. French Rating Move Allow All E C C8+ G PG... 14+ 18+ OK Select Block All Menu Back Setup 11:20 PM Sep.11, 2006 Changing PIN On/Off TVPG Rating MPAA Rating Can. PG Parental guidance suggested. French Rating Move Allow...

Owner's Manual
Page 31
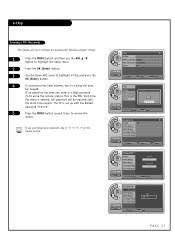
... Caption 11:20 PM Sep.11, 2006 On/Off Analog Mode Digital Mode Digital Font Option CC1 CC2 CC3 CC4 TEXT1 TEXT2 TEXT3 TEXT4 Select Menu Back Mini glossary CAPTIONS TEXT The term for the words that scroll across the bottom of the program provided for the hearing impaired. usually messages...the words that appear in a large black frame and almost cover the entire screen; usually the audio portion of the TV screen; PAGE 31 Caption Menu Turn Captions On/Off *Note: Pressing CC on the remote to select a captions option will display on the screen whether the signal is from an...
... Caption 11:20 PM Sep.11, 2006 On/Off Analog Mode Digital Mode Digital Font Option CC1 CC2 CC3 CC4 TEXT1 TEXT2 TEXT3 TEXT4 Select Menu Back Mini glossary CAPTIONS TEXT The term for the words that scroll across the bottom of the program provided for the hearing impaired. usually messages...the words that appear in a large black frame and almost cover the entire screen; usually the audio portion of the TV screen; PAGE 31 Caption Menu Turn Captions On/Off *Note: Pressing CC on the remote to select a captions option will display on the screen whether the signal is from an...


